Using 'Unified Push' and 'ntfy' for Push Notifications
What is Unified Push?
UnifiedPush is a set of specifications and tools that lets the user choose how push notifications* are delivered. All in a free and open source way.
Unified Push website
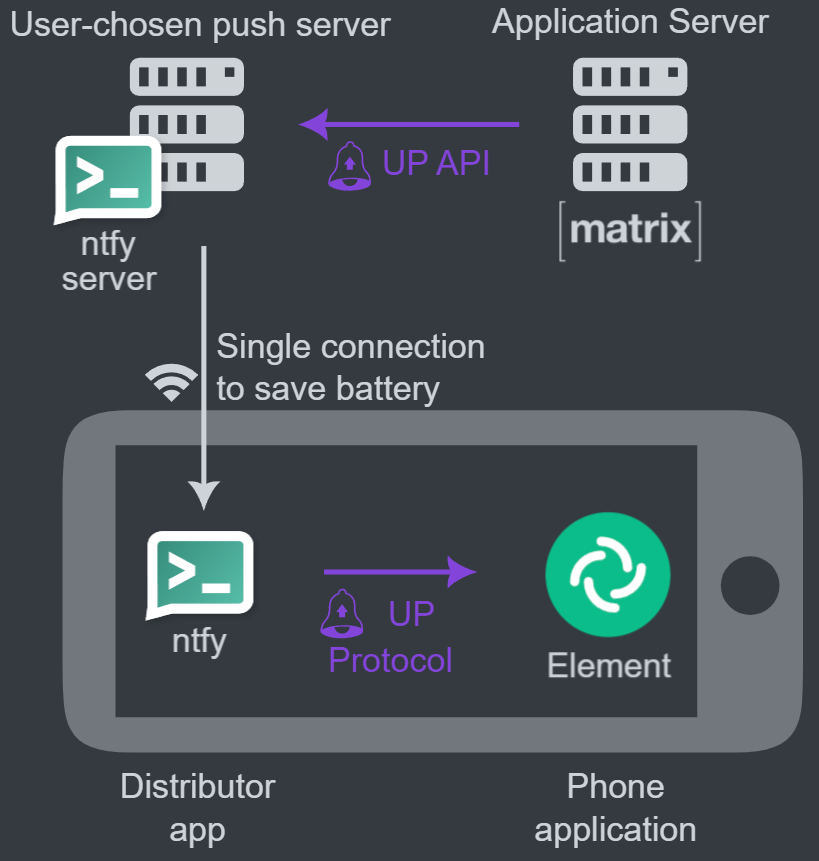
The Unified Push website features multiple diagrams detailing the overall process worth viewing - for this setup, per the static version above, we will be utilising the Unified Push specification to have notifications recieved on a Matrix homeserver, sent to a Unified Push compatible push gateway (ntfy) which are relayed to a Unified Push Distributor application (ntfy) installed on a users' device. This distributor application recieves and relays these notifications to applications installed on your device.
What is ntfy?
ntfy (pronounce: notify) is a simple HTTP-based pub-sub notification service. It allows you to send notifications to your phone or desktop via scripts from any computer, entirely without signup, cost or setup. It's also open source if you want to run your own.
ntfy website
ntfy comes in two forms, the server and the application. The ntfy server is your push gateway, recieving notifications from your homeserver bound for client devices, it communicates with the ntfy application. The ntfy application is your distributor application, this application is used to subscribe to topics of interest, and specifically for this use-case, subscribing to Unified Push notifications to relay to the Element Android application.
Overview of the process / setup
You will need to setup an ntfy server, with a specified domain name and associated certificates, which can access and is accessible by, your Matrix homeserver and end-users' mobile devices. You should also ensure your Certificate Authority (CA) certificate is added to this servers' trust store.
Each end-user will need the ntfy distributor application installed on their devices alongside the Element Android application. This application will require the ntfy server address to be changed from the default to your ntfy servers' domain name. Each device should also ensure they too have the required Certicate Authority (CA) certificate added to the device's trust store.
Once these essentials are in-place, a user need only open the Element Android application and login to their homeserver. On first login, the application will see the installed ntfy application, and prompt the user for which notification service they wish to use. Once ntfy is selected, a topic is subscribed to within the ntfy application and the push gateway (the ntfy server) is registered as a 'pusher' for the logged in user on the home server.
Getting Started
Setting up the ntfy server
The ntfy docs are the best place to start as they are updated with each new release. For the ntfy server, the Self-Hosting Installation section will cover everything you need to get the server binaries installed on your system. Then the subsequent Configuration section will cover fine-tuning your desired configuration, i.e. Disabling the built-in web application, which isn't used for this use case.
Pre-Installation
The server will need access to the ntfy, for internet connect devices you can directly follow the step in Installation below. For Airgapped systems, please source the required binaries linked to from the Linux Binaries section of the Installation section. Ensure the binary is made available to the airgapped server.
Configure your DNS appropriately such as that a sub-domain is setup for the server, i.e. ntfy.example.com and is accessible from your homeserver and end-user devices. If required, set the correct DNS settings on the ntfy server, you can verify DNS is resolving correctly by testing your newly setup ntfy domain, i.e. ping ntfy.example.com.
Generate the required certificates for the sub-domain from your Certificate Authority (CA) and ensure the .key & .crt is made available to the server (if not using a proxy).
The Certificate Authority (CA) certificate should also be made available to the server and installed to it's trust store. The process for this is dependant on your system, for Ubuntu, the Ubuntu Server Docs - Installing a root CA certificate in the trust store are a good choice.
Ensure the domain certificate / key files are located in a suitable location accessible by the user running the ntfy binary, and note their location to be added to the ntfy configuration file later, i.e. /home/example/ntfy/ntfy.example.com.key & /home/example/ntfy/ntfy.example.com.crt.
Ensure the ntfy server firewall allows port 80 and 443, the process for this is dependant on your system & firewall, for Ubuntu using the built-in firewall, the Ubuntu Server Docs - Security - Firewall cover the required steps.
❗As above, following the official ntfy documentation is best here, as it is updated with each new release. This guide will focus on steps taken outside the basic install step. For configuration, please check the config sample is up-to-date and adapt as required for your specific environment / setup.
Installation
There are two main choices for installation for Linux systems, manual installation of the Linux binaries or installation via a package / repository - follow the appropriate steps for your system.
Server Configuration
Once installed you can configure the server by config file, command line or using environment variables. For this guide we will make use of the config file, typically located /etc/ntfy/server.yml.
The official documentation covers all configuration options, including if the server is behind a proxy, setting up access control etc. A basic configuration utilising HTTPS and Certificates on the server, is included below. (This example also disables the web client setup by default)
Note: for access control, please follow the Unified Push guidance on ensuring Synapse has anonymous write access to the topic used for push messages. See the Unified Push Example under the Access Control section and the linked Access Control Example from the Unified Push website.
base-url: "http://ntfy.example.com"
listen-http: ":80"
listen-https: ":443"
key-file: "/home/example/ntfy/ntfy.example.com.key"
cert-file: "/home/example/ntfy/ntfy.example.com.crt"
cache-file: "/var/cache/ntfy/cache.db"
attachment-cache-dir: "/var/cache/ntfy/attachments"
web-root: disable
Modify the config as required, correcting the base-url, key-file / cert-file locations and cache-file / attachment-cache-dir if desired.
Before running the server, please ensure the /var/cache/ntfy directory (or wherever you have specified as the cache-file location exists), if not simply sudo mkdir /var/cache/ntfywill prevent any errors on first-run.
A full list of Config Options is available, once configured as desired, run the server so it is ready to recieve notifications from your homeserver.
Verification
These tests can be performed to ensure the server is correctly setup and accessible from all devices involved:
Tests run from the ntfy server
First perform a basic connection test to the ntfy domain name, i.e. ping https://ntfy.example.com, this will confirm DNS resolves correctly on the ntfy server itself. Then do the same but to your homeserver, i.e. ping https://synapse.example.com, as well as a test mobile device connected to the same Wi-Fi network as your end-users, i.e. ping 10.0.0.76 (The IP address of the mobile device).
Next to confirm the server is correctly hosting a push gateway that your homeserver can make use of, confirm https://ntfy.example.com/_matrix/push/v1/notify outputs {"unifiedpush":{"gateway":"matrix"}}.
Using the above URL, you can also verify that the ntfy server trusts the ntfy.example.com certificate and so the Certificate Authority is trusted.
To locally test the ntfy server can recieve messages, follow the steps from the Sending messages section of the ntfy documentation. The ntfy logs should confirm the message has been recieved, but you could also, if not disabled, use the web app provided by the server.
Tests run from the homeserver
First perform a basic connection test to the ntfy domain name, i.e. ping https://ntfy.example.com, this will confirm DNS resolves correctly to the ntfy server.
Next to confirm the homeserver is able to access the push gateway by confirming https://ntfy.example.com/_matrix/push/v1/notify outputs {"unifiedpush":{"gateway":"matrix"}}. You should also confirm that the ntfy.example.com certificate is trusted, adding it's Certificate Authority (CA) certificate to the servers' trust store. For On-Premise setups, please refer to the On-Premise Documentaion for guidance on certification setup.
You could also test the ntfy server can recieve messages, by following the steps from the Sending messages section of the ntfy documentation. The ntfy logs should confirm the message has been recieved, but you could also, if not disabled, access the web app provided by the server.
Tests run from a test mobile device
First perform a basic connection test to the ntfy domain name, for a mobile device it's easiest to visit https://ntfy.example.com/_matrix/push/v1/notify from your web browser, this will confirm DNS resolves correctly to the ntfy server and the push gateway is available too.
Setting up a mobile device
First ensure the Certificate Authority (CA) certificate that signed the ntfy server domain certificate is added to the devices trust store. You can do this on Android by following these steps:
- Open your phone's Settings app, search 'CA Certificate'
- Tap 'CA certificate' to be taken to the 'Install a certificate' screen, then tap 'CA certificate'
- Tap 'Install anyway' and enter your device PIN / Password
- Locate where you saved the certificate and tap the file, i.e.
ca.pem
For the end-user mobile device they will need both the Element Android application, and the ntfy distributor application.
Once both are installed, open the ntfy application, click the 3-dot menu from the top right, and press 'Settings'. Under the 'General' section, find 'Defualt server' and press to modify. Replace with your ntfy server domain name, i.e. https://ntfy.example.com. You may also notice a warning prompt banner across the top of the main application screen, follow it's steps to ensure the application is being optimised for battery as this may prevent a reliable notification experience.
Open the Element application and complete the sign-in flow, once logged in, you will be presented with a prompt 'Choose how to receive notifications', then select 'ntfy'.
Verification
These tests can be performed to ensure the mobile device is correctly setup and recieves notifications correctly:
First open the ntfy application and subscribe to a test topic by clicking the '+' icon at the bottom right, then entering an example topic name, i.e. test.
Follow the steps from the Sending messages section of the ntfy documentation sending a message to the test topic (or whichever topic name you specified above). The phone should recieve a notification that the topic has recieved the message. This will confirm the ntfy applications connection to the ntfy server and its ability to successfully recieve messages.
Next confirm the presence of an entry within your 'Subscribed Topics' of the ntfy application generated by the Element application. It will have a topic name starting ntfy.example.com/up, and below will confirm it was added by the im.vector.app / im.vector.app.debug and the protocol, Unified Push.
Ensure on the mobile device, the Element application is not in the foreground. From another device, use a Matrix client to send a message to the account logged into the mobile device. The phone should recieve a notification that they have recieved the message. This will confirm successful registration of the ntfy server as the push gateway for the logged in user.
Result
You should now have setup the Unified Push infrastructure so you can recieve push notifications from the Element application via your own self-hosted servers.