Single Node Installations
HowInstalling toa UseStandalone the InstallerServer
Overview
Our Element Enterprise Single Node Installerinstaller can handle the installation of environments in which only one server is available. Our single nodeThis environment consists of a single server with a microk8s runningdeployment thatin which we deploy our Element EnterpriseServer OperatorSuite to, resulting in a fully functioning Synapseversion serverof withour Element Web.platform.
To get started with a single nodestandalone installation, there are several things that need
to be considered and this guide will work through them:
- Operating System
- Postgresql Database
- TURN Server
- SSL Certificates
- Extra configuration items
Once these areas have been covered, you’ll be ableready to install ayour singlestandalone node
environment!server!
Operating System
To get started, we have tested on Ubuntu 20.04 and Red Hat Enterprise Linux 8.57
and suggest that you start
there as well. For x86_64, you can grab an Ubuntu iso here:
https://releases.ubuntu.com/20.04.3/ubuntu-20.04.3-live-server-amd64.iso
or you can get Red Hat Enterprise Linux 8 with a Developer Subscription
https://developers.redhat.com/content-gateway/file/rhel-8.6-7-x86_64-dvd.iso
Note that future references in this document to EL reference Enterprise
Linux.
Ubuntu Specific Directions
Make sure to select docker as a package option. Do set up ssh.
Once you log in, please run:
sudo apt-get update
sudo apt-get upgrade
sudo apt-get install python3-signedjson pwgen -y
The installer requires that you run it as a non-root user who has sudo
permissions. Please make sure that you have a user who can use sudo. If
you wanted to make a user called element-demo that can use sudo, the
following commands (run as root) would
achieve that:
useradd element-demo
gpasswd -a element-demo sudo
EL Specific directions
Make sure to select "Container Management" in the "Additional Software" section.
Once you log in, please run:
sudo yum update -y
sudo yum install podman-docker python-pip python3-devel make gcc -y
sudo yum install https://dl.fedoraproject.org/pub/epel/epel-release-latest-8.noarch.rpm -y
sudo update-alternatives --config python3
Add the following lines to /etc/security/limits.conf:
*              soft    nofile  100000
*              hard    nofile  100000
Then, run:
sudo yum install make gcc python3-devel pwgen -y
pip3 install signedjson --user
sudo update-alternatives --config python3
The installer requires that you run it as a non-root user who has sudo
permissions. Please make sure that you have a user who can use sudo. If
you wanted to make a user called element-demo that can use sudo, the
following commands (run as root) would
achieve that:
useradd element-demo
gpasswd -a element-demo wheel
SettingMigrating upfrom our older installer
NOTE: If you are running an installation installed with version 2023-02.01 and earlier, you cannot use the ConfigurationGUI Directoryinstaller today. We are working to make a migration path available soon and will update this section once it is available. For older documentation on the installer, please see our archived documentation repository.
YouIf shouldyou have thenot used our installer unpackedbefore, inyou amay directorysafely on your server. We
will refer toignore this as the installer directory. You will also need to create a configuration directory that we will call the config directory. Both the parameters.yml
and secrets.yml file live in the config directory.section.
To create the configuration directory, run the following:
mkdir ~/.element-onpremise-config
Network Specifics
Element Enterprise On-Premise needs to bind and serve content over:
- Port 80 TCP
- Port 443 TCP
microk8s needs to bind and serve content over:
- Port 16443 TCP
- Port 10250 TCP
- Port 10255 TCP
- Port 25000 TCP
- Port 12379 TCP
- Port 10257 TCP
- Port 10259 TCP
- Port 19001 TCP
For more information, see https://microk8s.io/docs/ports.
In a default Ubuntu installation, these ports are allowed through the firewall. You will need to ensure that these ports are passed through your firewall.
For EL,EL youinstances needwith tofirewalld explicitly openenabled, the aboveinstaller will take care of opening these ports andfor enabling masquerading:you.
sudo firewall-cmd --add-service={http,https} --permanent
sudo firewall-cmd --add-port=16443/tcp --add-port=10250/tcp --add-port=10255/tcp --add-port=25000/tcp --add-port=12379/tcp --add-port=10257/tcp --add-port=10259/tcp --add-port=19001/tcp --permanent
sudo firewall-cmd --add-masquerade --permanent
sudo firewall-cmd --reload
Further, you need to make sure that your host is able to access the following hosts on the internet:
- api.snapcraft.io
- *.snapcraftcontent.com
- gitlab.matrix.org
- gitlab-registry.matrix.org
- pypi.org
- docker.io
- *.docker.com
- get.helm.sh
Further,In addition, you will also need to make sure that your host can access your distributions' package repositories. As these hostnames can vary, it is beyond the scope of this documentation to enumerate them.
Network Proxies
We also cover the case where you need to use a proxy to access the internet. Please see this article for more information: Configuring a microk8s Single Node Instance to Use a Network Proxy
Unpacking the Installer
Please make sure that you unpack element-enterprise-installer onto your
single node system. The directory that it unpacks into will be referenced in this
document as the installer directory.
Postgresql Database
The installation requires that you have a postgresql database with a locale of C and UTF8 encoding set up. See https://github.com/matrix-org/synapse/blob/develop/docs/postgres.md#set-up-database for further details.
If you have this already, please make note of the database name, user, and password as you will need these to begin the installation.
If you do not already have a database, then the single node installer will set up PostgreSQL on your behalf.
TURNBeginning Serverthe Installation
ForHead installationsto https://ems.element.io/on-premise/download and download the latest installer. The installer will be called element-enterprise-graphical-installer-YYYY-MM.VERSION-gui.bin. You will take this file and copy it to the machine where you will be installing the Element Server Suite. Once you have this file on the machine in whicha directory accessible to your sudo-enabled user, you desirewill torun:
chmod video+x conferencing./element-enterprise-graphical-installer-YYYY-MM.VERSION-gui.bin
replacing the YYYY-MM.VERSION with the appropriate tag for the installer you downloaded.
Once you have done this, you will run:
./element-enterprise-graphical-installer-YYYY-MM.VERSION-gui.bin
replacing the YYYY-MM.VERSION with the appropriate tag for the installer you downloaded, and this will start a web server with the installer loaded.
You will see a message similar to:
[user@element-demo ~]$ ./element-enterprise-graphical-installer-2023-02.02-gui.bin
Testing network...

Using self-signed certificate with SHA-256 fingerprint:
         F3:76:B3:2E:1B:B3:D2:20:3C:CD:D0:72:A3:5E:EC:4F:BC:3E:F5:71:37:0B:D7:68:36:2E:2C:AA:7A:F2:83:94

To start configuration open:
        https://192.168.122.47:8443 or https://10.1.185.64:8443 or https://127.0.0.1:8443
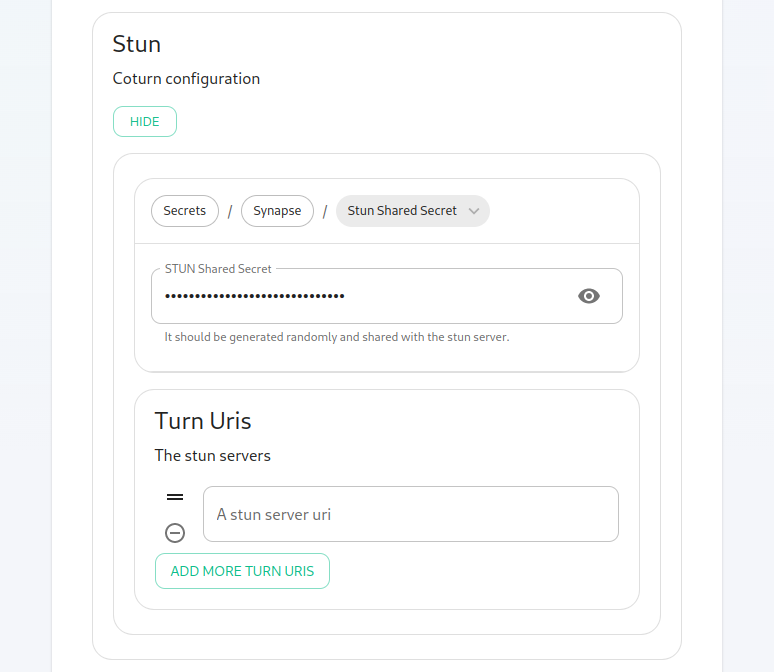
At this point, you will need to haveopen a TURNweb server installedbrowser and available for Elementbrowse to use.
If you do not have an existing TURN server, our installer can configure one forof youthese byIPs. followingYou themay extraneed stepsto inopen Settingport Up Jitsi and TURN With the Installer
If you have an existing TURN server, please create a file called synapse/turn.ymlconfig directory and put the following in it:
turn_uris: [ "turn:turn.matrix.org?transport=udp", "turn:turn.matrix.org?transport=tcp" ]
turn_shared_secret: "n0t4ctuAllymatr1Xd0TorgSshar3d5ecret4obvIousreAsons"
turn_user_lifetime: 86400000
turn_allow_guests: True
based on your TURN server specifics. This will allow the installer to configure synapse to use your TURN server.
A few notes on TURN servers:
The TURN server has to be directly accessible by end-users. Normally this means a public IP, however if all the end-users are going to be on a VPN/private network then they just needfirewall to be able to accessthethisprivateaddressIP of the TURN server.The only reason to have TURN onfrom aprivatedifferentnetwork is if the private network disallows user <-> user traffic and only allows user <-> TURN server traffic. If user <-> user is allowed within the private network then a TURN server isn't needed.
SSL Certificates
For SSL Certificates, you have three options:machine.
Signed PEM encoded certificates from an internet recognized authority.Signed PEM encoded certificates from an internal to your company authority.LetsEncryptSelf-signed certificates
In the case of Signed certificates or LetsEncrypt, your hostnames must be
accessible on the internet.
In the case of self-signed certificates, these are acceptable for a PoC (proof of concept)
environment, but will not be supported in a production environment as the
security risk would be too high. Configuring mobile clients and federation
will not be possible with self-signed certificates.
You will need to configure certificates for the following names:
fqdn.tldelement.fqdn.tldsynapse.fqdn.tlddimension.fqdn.tldhookshot.fqdn.tld
Using our example hosts, this would mean that we need certificates for:
localelement.localsynapse.localdimension.localhookshot.local
Certificates without LetsEncrypt
If you haveare certificatesunable forto allopen port 8443 or you are having difficulty connecting from a different machine, you may want to try ssh port forwarding in which you would run:
ssh <host> -L 8443:127.0.0.1:8443
replacing host with the IP address or hostname of the aforementionedmachine hostthat names,is running the installer. At this point, with ssh connected in this manner, you should be able to use the https://127.0.0.1:8443 link as this will then youforward canthat simplyrequest placeto the PEMinstaller encodedbox .crt
Upon loading this address for the first time, you may be greeted with a message informing you that your connection isn't private such as this:
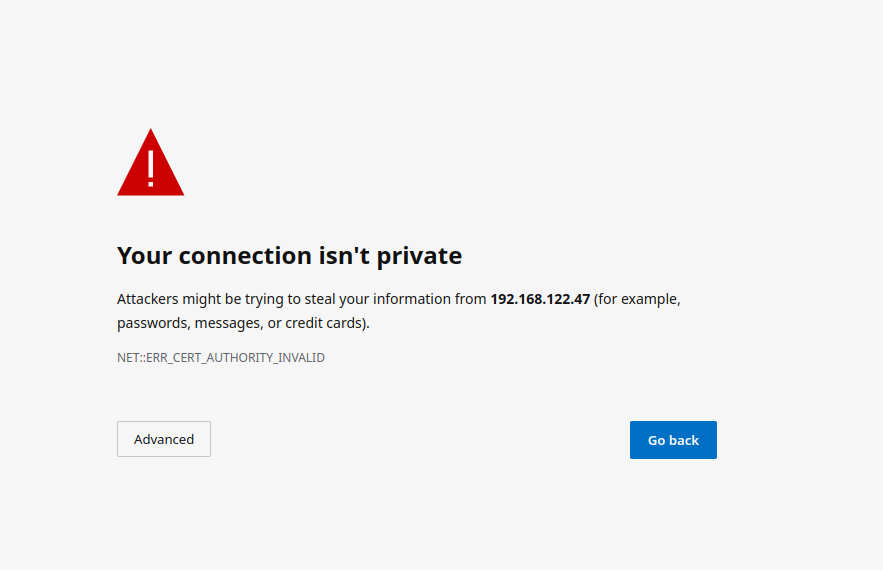
In this case, you'll need to click "Advanced" and .keyfiles"Continue to theorder certsto directory
underview the configurationinstaller. directory. Certificates inAs the certsexact directory must take
the form of fqdn.crt and fqdn.key.
Self-signed certificates with mkcert
For information on using self-signed certificates with mkcert, please see this article: Using Self-Signed Certificates with mkcert
Certificates with LetsEncrypt
Our installer also supports using LetsEncrypt to build certificates for your
hostbutton names and automaticallylinks installcan vary between browsers, it would be hard for us to document them intoall, so you may have slightly different wording depending on your environment.browser.
The yourHosts hostsScreen
The internetvery accessible,first thispage that you come to is the easiesthost method and only requires
an admin email address to provide to LetsEncrypt.screen.
parameters.yml
Now it is time to set parameters.yml. A sample has been provided and to
get started, it is easiest to do: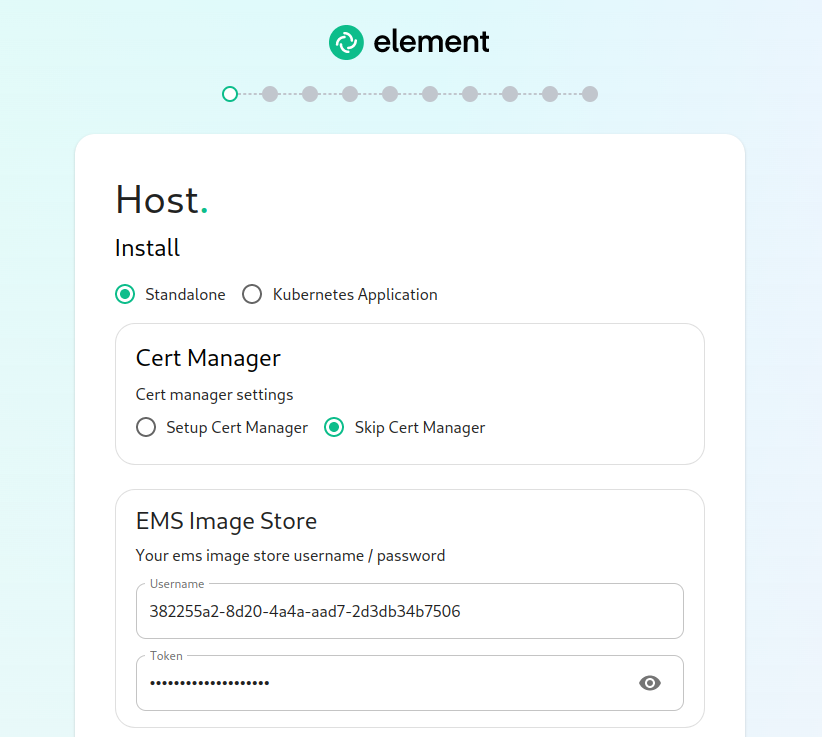
cpUsing the example hostnames of
element.local and synapse.local, we
would set the following parameters first in parameters.yml:
domain_name: local
element_fqdn: element.local
synapse_fqdn: synapse.local
Next, we need to set the variables related to Postgres. If you do not have
an existing Postgres server, do not make any changes. If you have an
existing Postgres server, set the following:
postgres_create_in_cluster: false
postgres_fqdn: `Postgres Server`
postgres_user: `Postgres User`
postgres_db: `Postgres Database for Element`
The next line states:
media_size: "50Gi"
You wllwill want to adjustmake sure that to"Standalone" matchis the size of storage you've allocated for your media. It must be at least 50Gb.
The next section pertains to certmanager.selected. If you are using LetsEncrypt for your own certificates, you will want to make sure that you select "Setup Cert Manager" and enter an email address for LetsEncrypt to associate with your certificates. If you are using custom certifactes or electing to manage SSL certificates yourself, then you will want to select "Skip Cert Manager".
The very next prompt that you come to is for an EMS Image Store Username and Token. These are provided to you by element as access tokens for our enterprise container registries. If you have lost your token, you can always generate a new token at https://ems.element.io/on-premise/subscriptions.
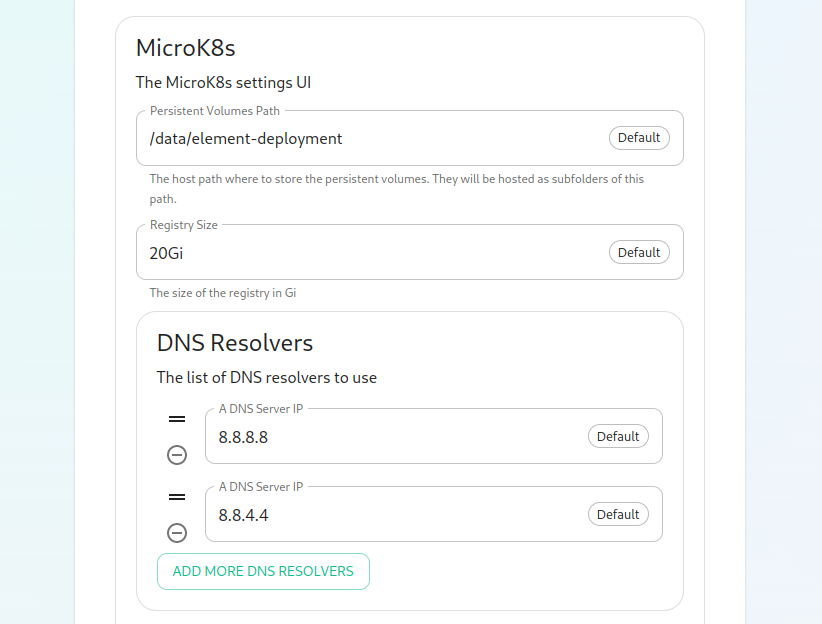
The next option that you have is for microk8s. By default, microk8s will set up persistent volumes in /data/element-deployment and will allow 20GB of space to do this. For most installations, this is fine and can be left alone, but if you'd like to customize those options, you can do that here.
Next, we have DNS resolvers. The default DNS resolvers are Google (8.8.8.8 and 8.8.4.4). If you need to use your company's DNS servers, please change these values appropriately.

Next, we get the option to either have the installer install Postgres in your cluster or to use an external postgresql server. The Postgres in cluster option is only supported for our standalone installation and you should read our storage and backup guidelines for this configuration. At any rate, if you use the in cluster postgres, you will see that the installer defaults to /data/postgres and has generated a random password for your postgresql admin account. You can use the eye to see the password and you can certainly change this to whatever you'd like.
The final options on the hostpage are related to connectivity. For this guide, we are assuming "Connected" and you can leave thesethat itemsbe. bothIf blank,you asare such:doing "Airgapped", you would pick airgapped at this point and then please see the section on airgapped installations.
certmanager_issuer:You certmanager_admin_email:are
The Domains Screen
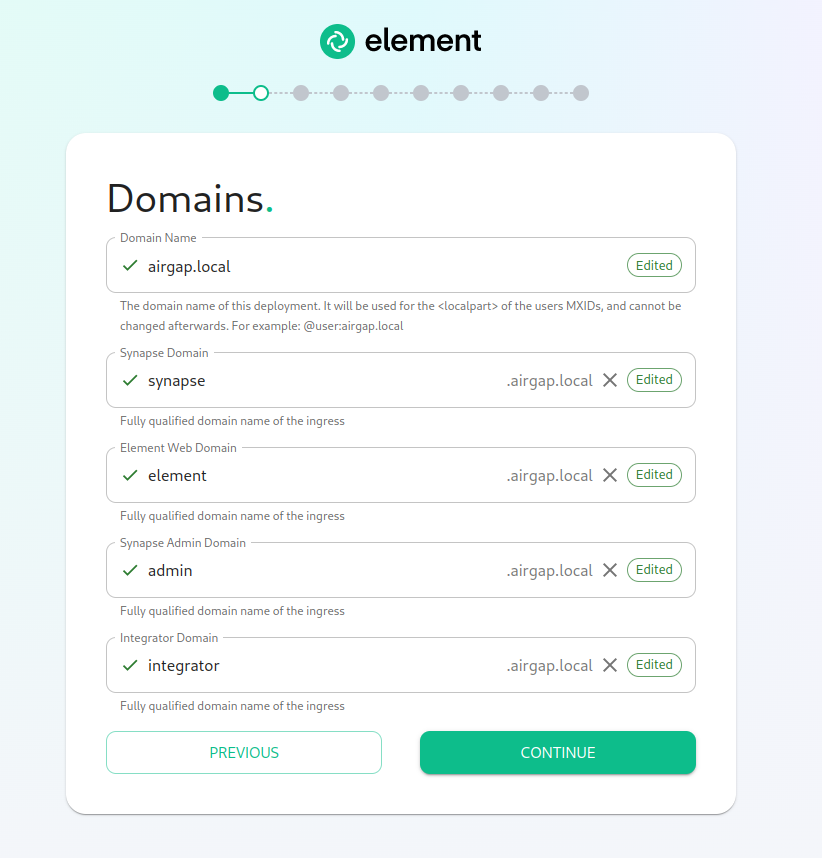
On this page, we get to specify the domains for our installation. In this example, we have a domain name of airgap.local and this would mean our MXIDs would look like @kabbott:airgap.local.
Our domain page has checking to ensure that the host names resolve. Once you get green checks across the board, you can click continue.
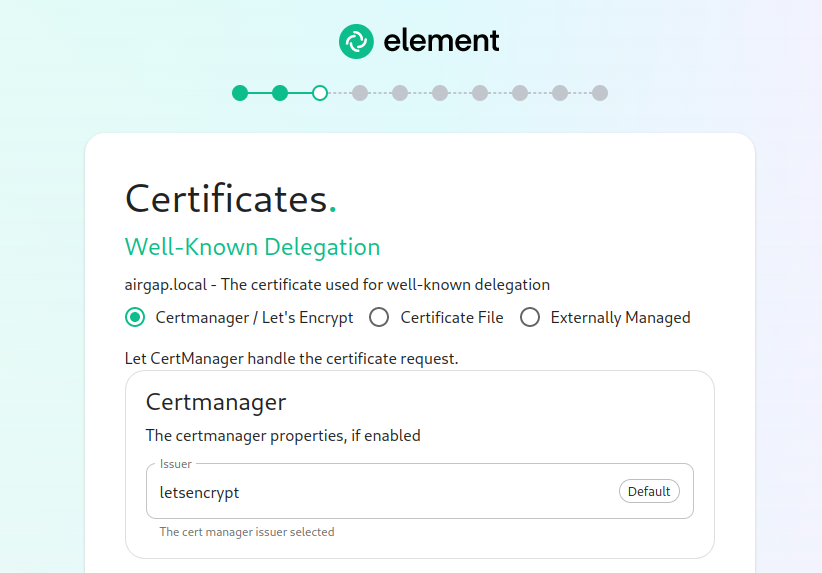
The Certificates Screen
On the Certificates screen, you will provide SSL certificate information for well-known delegation, Synapse, Element Web, Synapse Admin, and Integrator.
If you are using Let's Encrypt, then each of the sections should look like:
If you are using certificate files, then you will see a screen like:
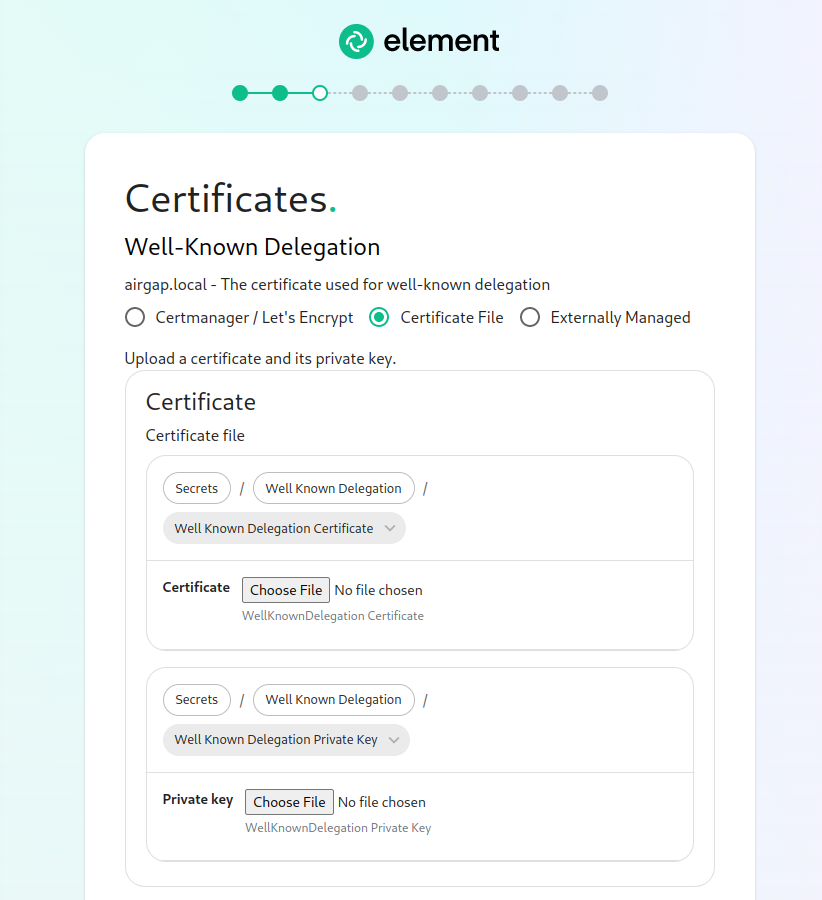
which allows you to upload a .crt and .key file for each host. These files must be in PEM encoding. Our installer does accept wildcard certificates.
Once you have completed the certificate section for each host on the page, you may click continue.
The Database Screen
If you have chosenelected to have the installer configure PostgreSQL for you, then you will not see this screen and can skip this section.
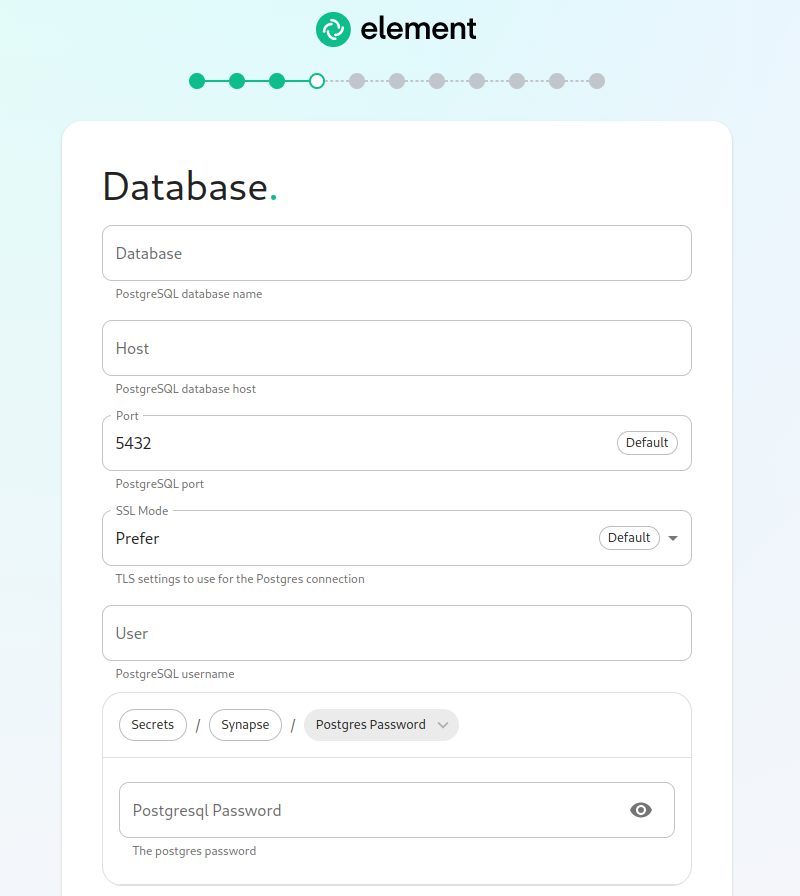
If you are using an external database, then you will see this page, where we provide the option to specify the database name, the database host name, the port to connect to, the SSL mode to use, and finally, the username and password to connect with. Once you have completed this section, you may click continue.
The Media Screen
On this page, you can specify the size of your synapse media volume. Please leave "Create New Volume" checked and specify the size of the volume that you wish to allocate. You must have this space available in /data/element-deployment or whatever you specified back on the hosts screen. If you wish to create a 50G volume, you would need to specify 50Gi for the Volume size.
The Cluster Screen
Most deployments can ignore this, however, if you want to change any microk8s cluster parameters, this is where to do it.
If you are in an environment where you have self-signed certificates, you will want to disable TLS verification, by clicking "Advanced" and then scrolling down and unchecking Verify TLS:
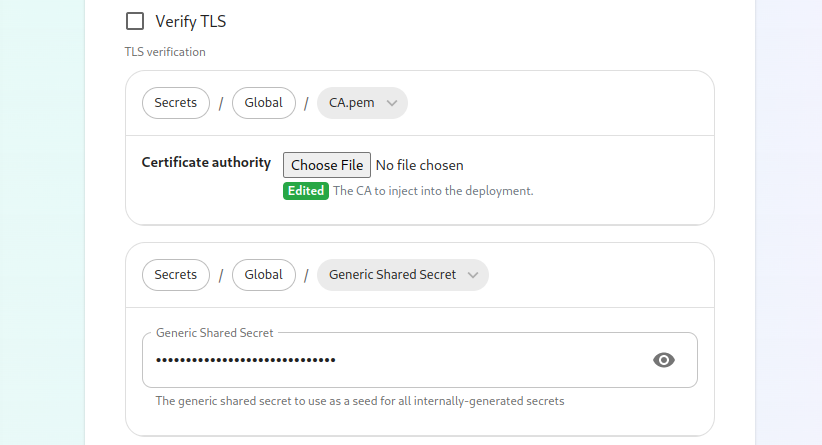
Please bear in mind that disabling TLS verification and using self-signed certificates is not recommended for production deployments.
If your host names are not DNS resolvable, you need to use letsencrypt,host please specify “letsencrypt” for
the certmanager_issuealiases and anthis actualcan emailbe addressset forup whohere. shouldYou managewill thealso certificatesclick for certmanager_admin_email:
certmanager_issuer: 'letsencrypt'
certmanager_admin_email: 'admin@mydomain.com'
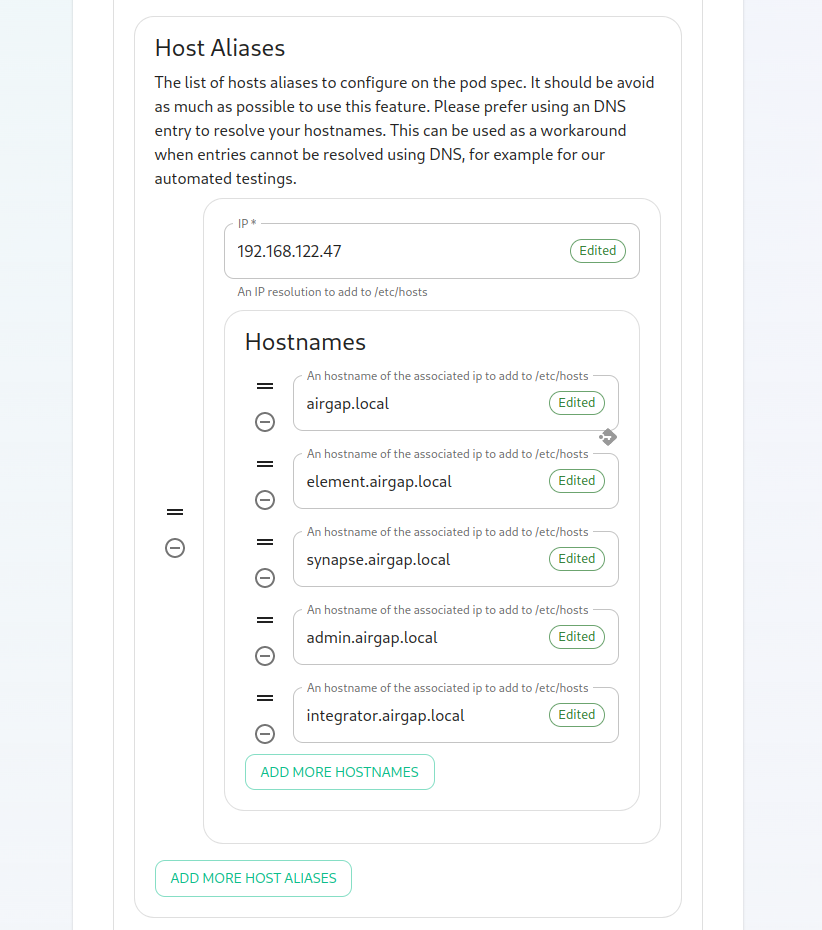
Starting with installer 2022-08.02, we have added two mandatory variables related to telemetry data. These are max_mau_usersstrict_mau_users_limit.scroll You should set max_mau_usersvalue"Host definedAliases" section in your"k8s". contractIn here, you will click "Add Host Aliases" and then you will specify an IP and host names that resolve to that IP as such:
When you are finished with Element.this Ifpage, you setcan click continue.
The Synapse Screen
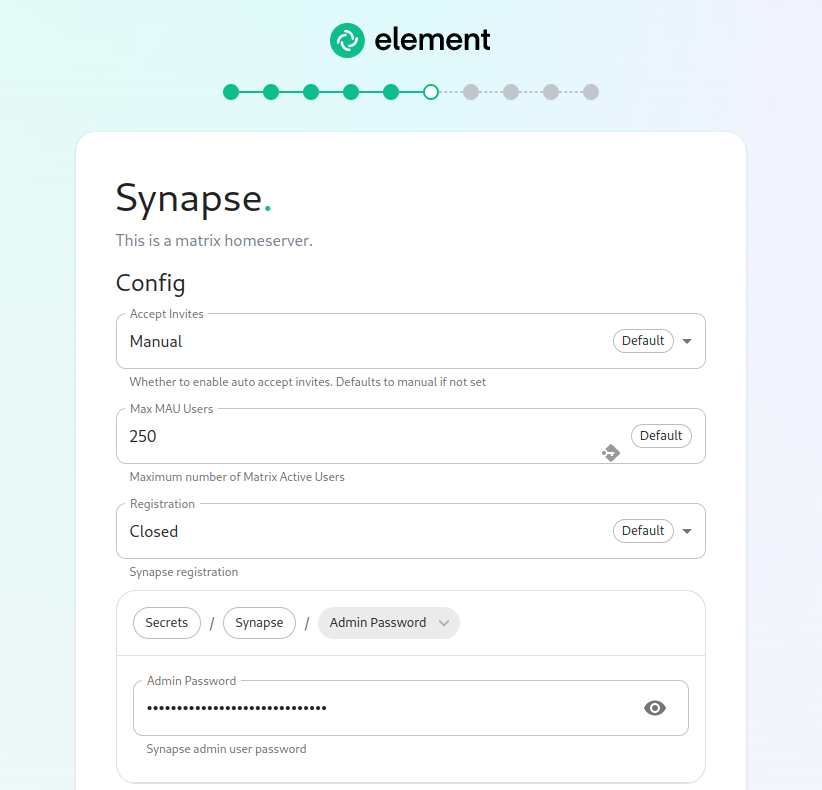
The first setting that you will see is whether you want to auto accept invites. The default of "Manual" will fit most use cases, but you are welcome to change this numbervalue.
The yournext contractualsetting limit, thenis the software will allow you to exceed your contractual limit and Element will bill you appropriately for the overage.
Setting strict_mau_users_limit to true forces synapse to cap themaximum number of monthly active users (MAU) that you have purchased for your server. Your server will not allow you to go past this value. If you set this higher than your purchased MAU and you go over your purchased MAU, you will need to true up with Element to cover the valuecost definedof inthe max_mau_users.unpaid Sayusers.
The next setting concerns registration. A server with open registration on the open internet can become a target, so we default to closed registration.
After this, you will see that the installer has picked an admin password for example,you. you'veYou paid Element for 1,000 monthly active users and don'twill want to exceeduse that,the eye icon to view the password and copy this down as you wouldwill set:use this with the user onprem-admin-donotdelete to log into the admin panel after installation.
max_mau_users: 1000
strict_mau_users_limit: true
Let's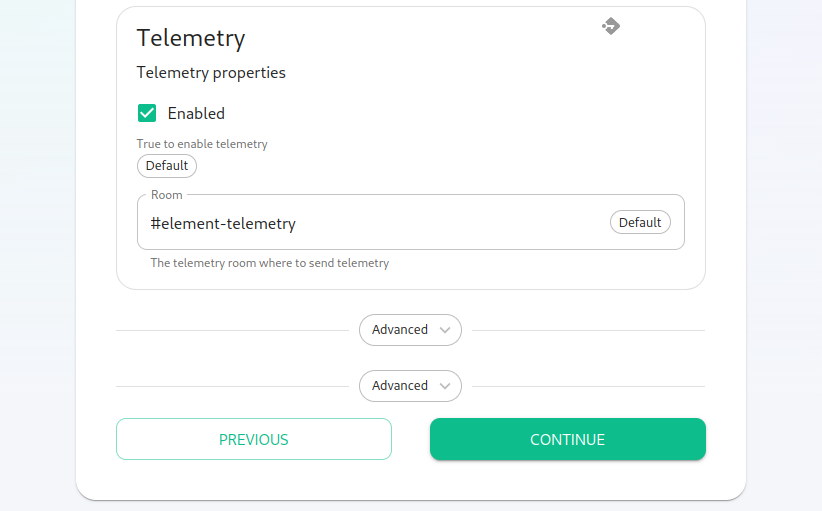
Continuing, we see telemetry. You should leave this enabled as you are required to report MAU to Element. In the event that you paidare Elementinstalling forinto 1,000an monthlyenviroment activewithout users,internet butaccess, didn'tyou mindmay goingdisable overthis providedso that youit didn'tdoes exceednot 2,000continue monthlyto activetry users.talking Into thisElement. scenario,That said, you wouldare set:still required to generate an MAU report at regular intervals and share that with Element.
max_mau_users: 2000
strict_mau_users_limit: true
For more information on the data that Element collects, please see: What Telemetry Data is Collected by Element?
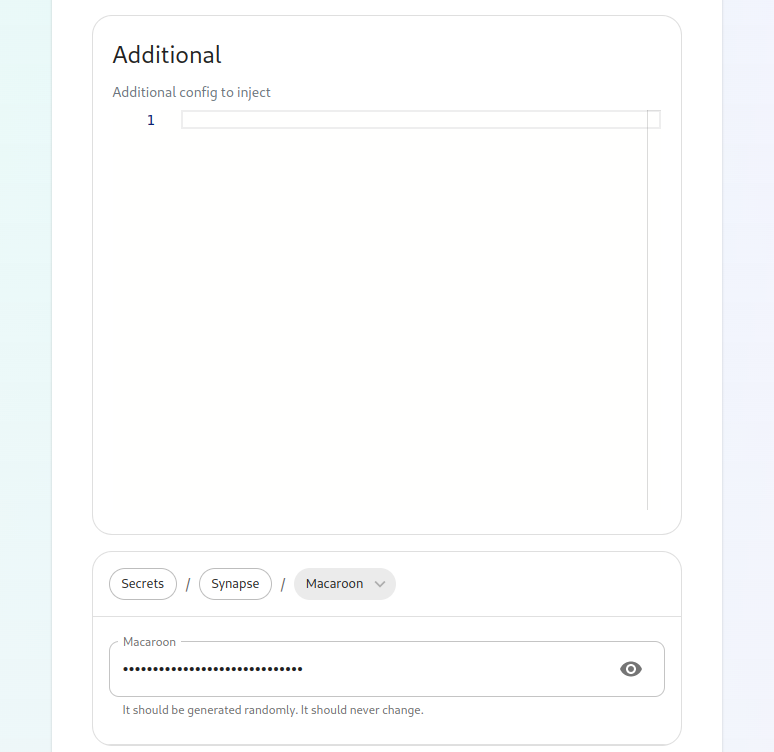
YouNext, willwe also seehave two paths:
media_host_data_path:buttons. "/mnt/data/synapse-media"The #top postgres_data_path:one "/mnt/data/synapse-postgres"is Forsynapse alland installations, media_host_data_path should be uncommented. For installations in whichgives you area lettingtext box to inject additional synapse configs (homeserver.yaml), access to the installer install postgresql for you, please uncomment the postgres_data_path line.
The next lines concern images_dir and local_registry. These are only needed in an air-gapped environment. If you are installing into an air-gapped environment, please see: Using the Single Node Installer in an Air-Gapped Environment
The next item in the configuration is the microk8s DNS resolvers. By default,
the installer will use Google's publicly available DNS servers. If you have
defined your hosts on a
non-publicly available DNS server, then you should use your DNS servers
instead of the publicly available Google DNS servers. Let's assume that
your local dns servers are 192.168.122.253 and 192.168.122.252. To use those
servers, you would need to add this line:
microk8s_dns_resolvers: "192.168.122.253,192.168.122.252"
You will also notice two lines towards the end regarding synapse_registration and tls_managed_externally. In most cases, you can leave these alone, but if you wish to close synapse registration or have your TLS managed externally, you may set them at this time.
Further, if you are not using DNS for hostname mapping, you will need to configure the host_aliases parameter in this file and that is documented in How to Setup Local Host Resolution Without DNS.
secrets.yml
Now we move on to configuring secrets.yml. You will need the following
items here:
A Macaroon keyYour postgres password for the user specified in parameters.ymlA Registration Shared SecretA signing KeyAn EMS Image Store username and token, which will have been provided to you by Element.
To build a secrets.yml with the macaroon key, themacaroon, registration shared secret, theand genericsigning sharedkey. secret,Further, you can add and theconfigure signingmultiple keysynapse alreadyworkers, filledexternal in,appservices, pleaseand runfederation. (inThese topics are presently beyond the installerscope folder):
shthis build_secrets.shinstall mvguide, secrets.ymlbut ~/.element-onpremise-config/we Ifwrite them up in due time. Further, you arealso using your own Postgres server, you will need to uncomment and
fill inhave the postgres_passwd. If you are letting the installer install
Postgres for you, then you will needability to set a randomSTUN password.shared Yousecret can
generate a random password with:
pwgen 32 1
and thenset insertTURN thatURIs valuefor inany theexisting postgres_passwdfield, making sureservers that you uncommentmay have in your environment.
The second advanced button allows you to explicitly set any microk8s cluster settings that you would like just for the line.
Dopods. notMost forget to also set the values for ems_image_store_username and
ems_image_store_token, which will both be provided by Element.
If you have a paid docker hub account, you can specify your username
and password to avoid being throttled in the dockerhub_username and
dockerhub_token fields. This is optional.
Extra Configuration Items
It is possible to configure anything in Synapse's
homeserver.yaml
or Element’s
config.json.
To do so, you need to create json or yaml files in the appropriate
directory under the config directory. These filesusers will be mergedable to ignore this.
You can hit continue to go to the targetnext screen.
The Element Web Screen
Most users will be able to simply click "Continue" here.
The Advanced section allows you to set any custom element web configurations you would like (config.json).
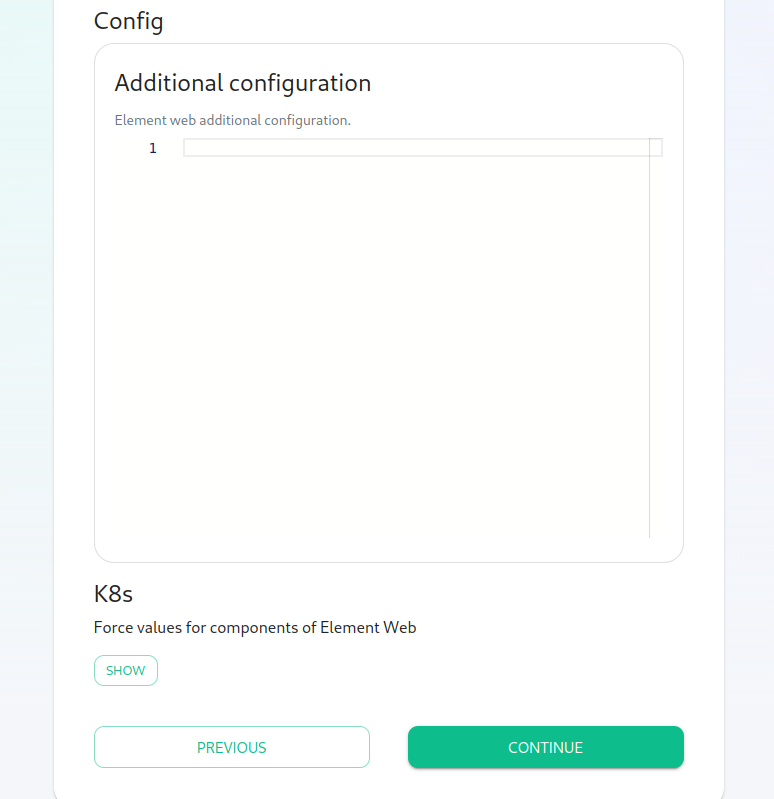
A common custom configuration file.
Samples are available in config-sample under the installer directory.
To configure synapse:
Create a directorysynapseat the root of the config directory :mkdir ~/.element-onpremise-config/synapseCopy the configurations extensions you want to setup fromconfig-sample/synapseto~/.element-onpremise-config/synapse.Edit the values in the file accordingly to your configuration
To configure element:
Create a directoryelementat the root of the installer directory :mkdir ~/.element-onpremise-config/elementCopy the configurations extensions you want to setup fromconfig-sample/elementto~/.element-onpremise-config/element.Edit the values in the file accordingly to your configuration
For specifics onbe configuring permalinks for Element, pleasewhich seewe have documented here: Setting up Permalinks With the Installer
Further, it provides access to the k8s section, allowing you to explicitly set any microk8s cluster settings that you would like just for the element-web pod.
The Enterprise Admin Dashboard
Most users will be able to simply click "Continue" here. The Advanced section allows you to explicitly set any microk8s cluster settings that you would like just for the synapse-admin-ui pod.
The Integrator Screen
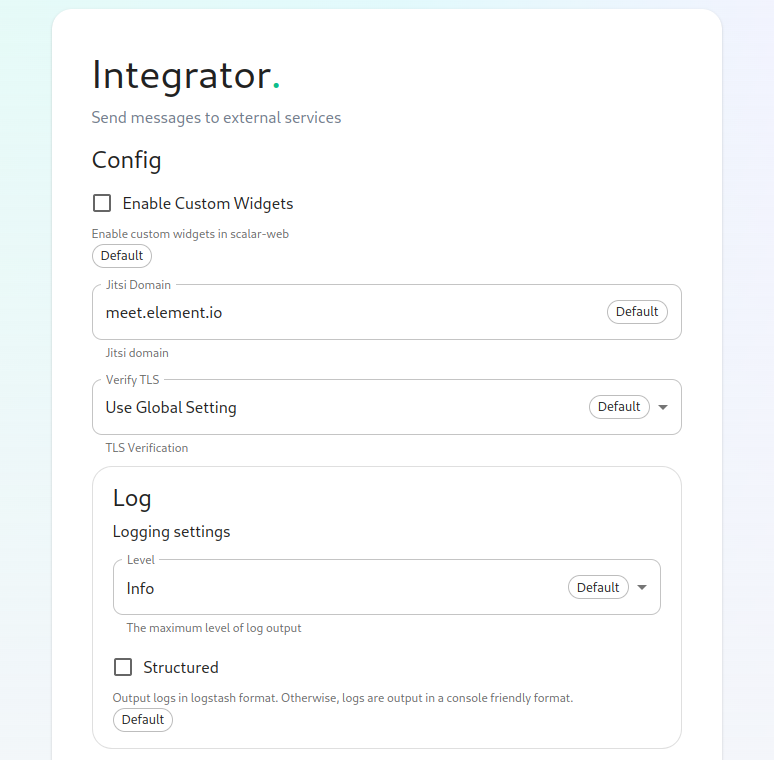
On this page, you can set up Integrator, the integrations manager.
The first option allows you to choose whether users can add custom widgets to their rooms with the integrator or not.
The next option allows you to specify which Jitsi instance the Jitsi widget will create conferences on.
The verify TLS option allows you to set this specifically for Integrator, regardless of what you set on the cluster screen.
The logging section allows you to set the log level and whether the output should be structured or not.
The Advanced section allows you to explicitly set any microk8s cluster settings that you would like just for the integrator pods.
Click "Continue to go to the next screen".
The Integrations Screen
This screen is where you can install any available integrations.
Some of these integrations will have "YAML" next to them. When you see this designation, this integration requires making settings in YAML, much like the old installer. However, with this installer, these YAML files are pre-populated and often only involve a few changes.
If you do not see a "YAML" designation next to the integration then this means that will use regular GUI elements to configure this integration.
Over time, we will do the work required to move the integrations with "YAML" next to them to the new GUI format.
For specifics on configuring well known delegation, please see Setting Up Well Known Delegation
For specifics on setting up Delegated Authentication, please see Setting up Delegated Authentication With the Installer
For specifics on setting up Group Sync, please see Setting up Group Sync with the Installer
For specifics on setting up the Integration Manager, please see Setting Up the Integration Manager With the Installer
For specifics on setting up GitLab, GitHub, and JIRA integrations, please see Setting up GitLab, GitHub, and JIRA Integrations With the Installer
For specifics on setting up Adminbot and Auditbot, please see: Setting up Adminbot and Auditbot
For specifics on setting up the Enterprise Admin Dashboard, please see: Configuring the Enterprise Admin Dashboard
For specifics on setting up Hydrogen, please see: Setting Up Hydrogen
For specifics on pointing your installation at an existing Jitsi instance, please see Setting Up Jitsi and TURN With the Installer
If you do not have an existing TURN server or Jitsi server, our installer can configure these for you by following the extra steps in Setting Up Jitsi and TURN With the Installer
For specifics on configuring the Teams Bridge, please see Setting Up the Teams Bridge
For specifics on configuring the Telegram Bridge, please see Setting Up the Telegram Bridge
For specifics on configuring the IRC Bridge, please see Setting Up the IRC Bridge
For specifics on configuring the XMPP Bridge, please see Setting Up the XMPP Bridge
Installation
Let’s review! Have you considered:
Operating SystemPostgresql DatabaseTURN ServerSSL CertificatesExtra configuration items
Once you have theconfigured above sections taken careall of andthe yourintegrations parameters.yml
The Installation Screen
On the installation screen, you should see a blank console and secrets.ymlfilesstart arebutton:
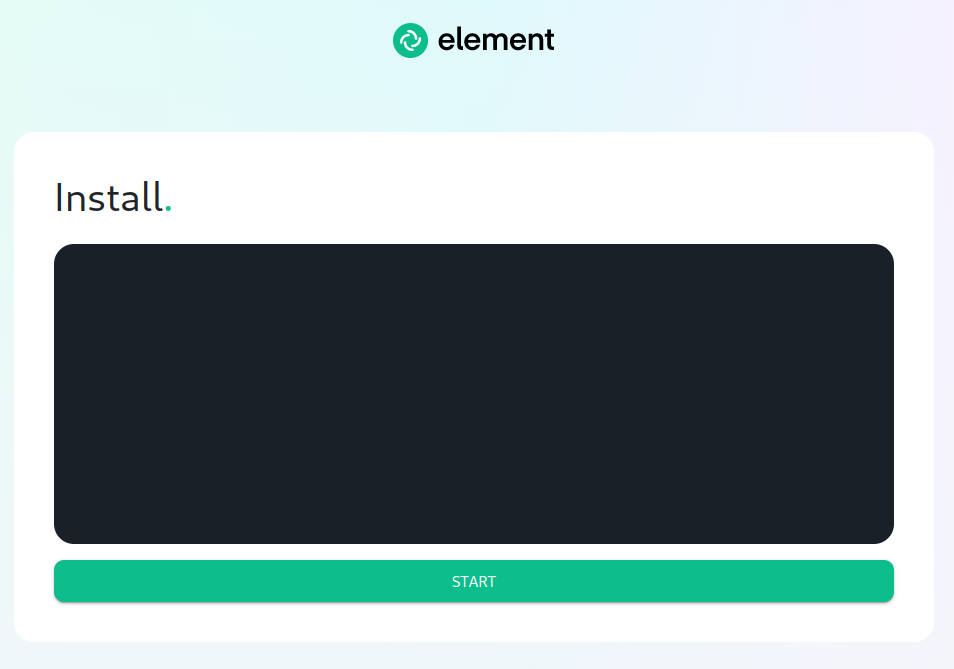
Click Start.
After a moment, you will notice the installer hang. If you go back to the prompt where you are ready to beginrunning the actualinstaller, installation.you will see that you are being asked for the sudo password:
From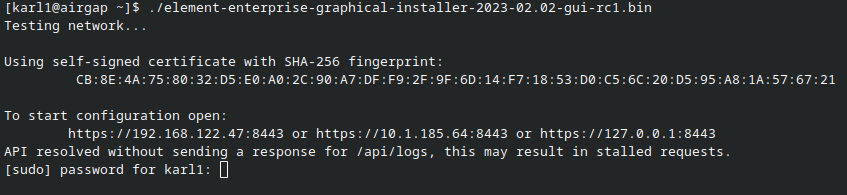
Go ahead and enter the installersudo directory,password run:and (Note:the Youinstallation canwill replacecontinue.
~/.element-onpremise-configOn withthe whateververy first time that you have specified for your config directory.)
bash install.sh ~/.element-onpremise-config
The first run shouldthe go for a little while and then exit, instructinginstaller, you will be prompted to log out and back in.
Pleaseagain to allow Linux group membership changes to be refreshed. This means that you will need to issue a ctrl-C in the terminal running your installer and actually log all the way out andof your Linux session, log back inin, andrestart re-runthe installer, navigate back to the installer fromscreen, theclick installerstart directoryagain, again:and then re-enter your sudo password. You will only have to perform this step once per server.
bashVerifying install.shYour ~/.element-onpremise-config
Once thisthe installation has finished, youit can run:take as much as 15 minutes on a first run for everything to be configured and set up. If you use:
kubectl get pods -n element-onprem
And youYou should getsee similar output to:
NAME                                        READY   STATUS    RESTARTS   AGE
app-element-web-c5bd87777-rqr6s             1/1     Running   1          29m
server-well-known-8c6bd8447-wddtm           1/1     Running   1          29m
postgres-0                                  1/1     Running   1          40m
instance-synapse-main-0                     1/1     Running   2          29m
instance-synapse-haproxy-5b4b55fc9c-hnlmp   1/1     Running   0          20m
AtOnce thisthe time,admin console is up and running:
first-element-deployment-synapse-admin-ui-564cbf5665-dn8nv 1/1 Running 1 (4h4m ago) 3d1h
and synapse:
first-element-deployment-synapse-redis-59548698df-gqkcq      1/1     Running                  1 (4h4m ago)   3d2h
first-element-deployment-synapse-haproxy-7587dfd6f7-gp6wh    1/1     Running                  2 (4h3m ago)   2d23h
first-element-deployment-synapse-appservice-0                1/1     Running                  3 (4h3m ago)   3d
first-element-deployment-synapse-main-0                      1/1     Running                  0              3h19m
then you should also be able to browselog to:in at your admin panel (in our case https://fqdnadmin.airgap.local/) with the onprem-admin-donotdelete user and createthe password that was specified on the "Synapse" screen.
A word about Configuration Files
In the new installer, all configuration files are placed in the directory .element-enterprise-server. This can be found in your user's home directory. In this directory, you will find a testsubdirectory account with Element on your new homeserver. Using our example values,
I am able to go tocalled https://element.local/configandthat registercontains anthe account,actual sign
in and begin testing!configurations.
End-User Documentation
After completing the installation you can share our User Guide to help orient and onboard your users to ElementElement!
Upgrading between installer versions
Installer 2022-08.02
Added two mandatory variables related to telemetry data:
max_mau_users and strict_mau_users_limit
They need to be set (ie: max_mau_users = 1000 and strict_mau_users_limit = true).