Setting up Delegated Authentication with SAML on Microsoft Azure
Before setting up the installer, you have to configure Microsoft Azure Active Directory.
Set up Microsoft Azure Active Directory
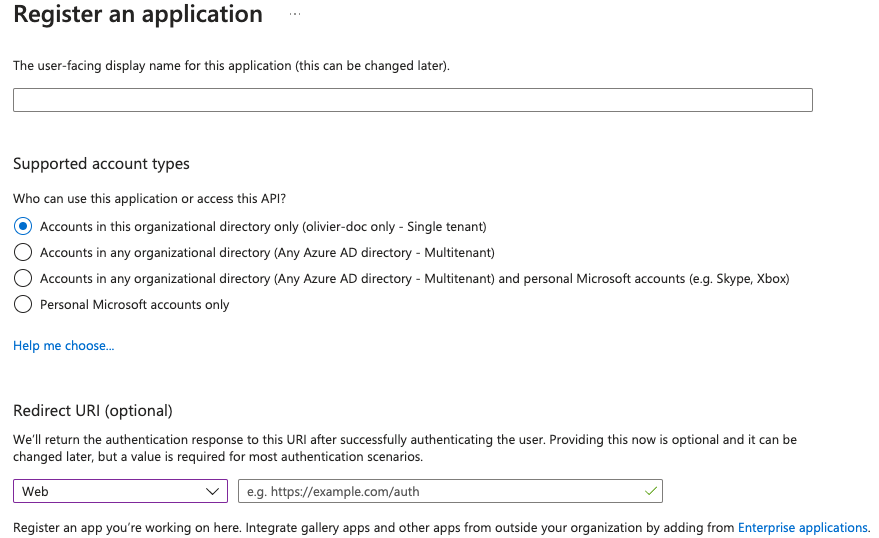
- You need to create an
App registration. - You have to select
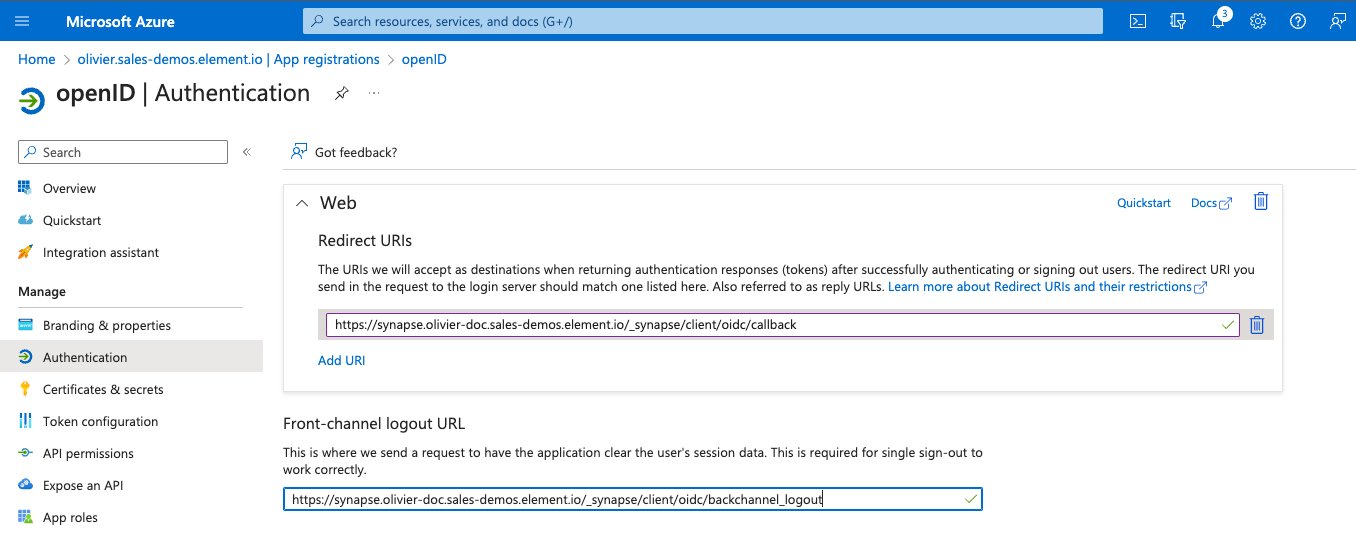
Redirect URI (optional)and set it to https://matrix.your-domain.com/_synapse/client/oidc/callback
For the bridge to be able to operate correctly, navigate to API permissions, add Microsoft Graph APIs, choose Delegated Permissions and add
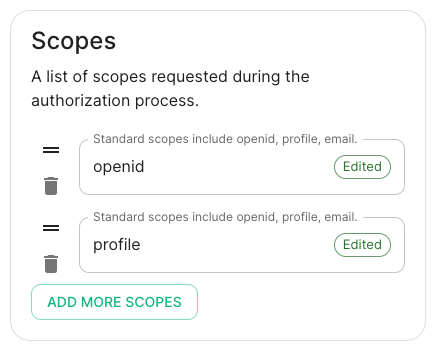
- openid
- profile
Remember to grant the admin consent for those.
To setup the installer, you'll need
- the
Application (client) ID - the
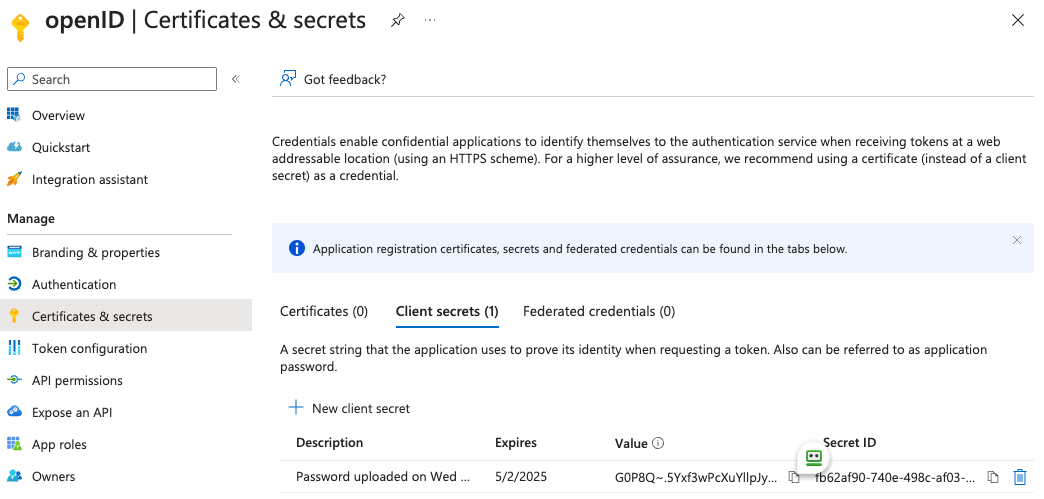
Directory (tenant) ID - a secret generated from
Certificates & secretson the app.
Configure the installer
Add an OIDC provider in the 'Synapse' configuration after enabling Delegated Auth and set the following fields in the installer:
-
Allow Existing Users: if checked, it allows a user logging in via OIDC to match a pre-existing account instead of failing. This could be used if switching from password logins to OIDC. -
Authorization Endpoint: the oauth2 authorization endpoint. Required if provider discovery is disabled.https://login.microsoftonline.com/<Directory (tenant) ID>/oauth2/v2.0/authorize
-
Backchannel Logout Enabled: Synapse supports receiving OpenID Connect Back-Channel Logout notifications. This lets the OpenID Connect Provider notify Synapse when a user logs out, so that Synapse can end that user session. This property has to bet set tohttps://your-domain/_synapse/client/oidc/backchannel_logoutin your identity provider
-
Client Auth Method: auth method to use when exchanging the token. Set it toClient Secret Postor any method supported by your Idp -
Client ID: yourApplication (client) ID -
Discover: enable/disable the use of the OIDC discovery mechanism to discover endpoints -
Idp Brand: an optional brand for this identity provider, allowing clients to style the login flow according to the identity provider in question -
Idp ID: a string identifying your identity provider in your configuration -
Idp Name: A user-facing name for this identity provider, which is used to offer the user a choice of login mechanisms in the Element UI. In the screenshot bellow,Idp Nameis set toAzure AD
-
Issuer: the OIDC issuer. Used to validate tokens and (if discovery is enabled) to discover the provider's endpointshttps://login.microsoftonline.com/<Directory (tenant) ID>/v2.0
-
Token Endpoint: the oauth2 authorization endpoint. Required if provider discovery is disabled. -
Client Secret: your secret value defined under "Certificates and secrets"
- Scopes: add every scope on a different line
- The openid scope is required which translates to the Sign you in permission in the consent UI
- You might also include other scopes in this request for requesting consent.
-
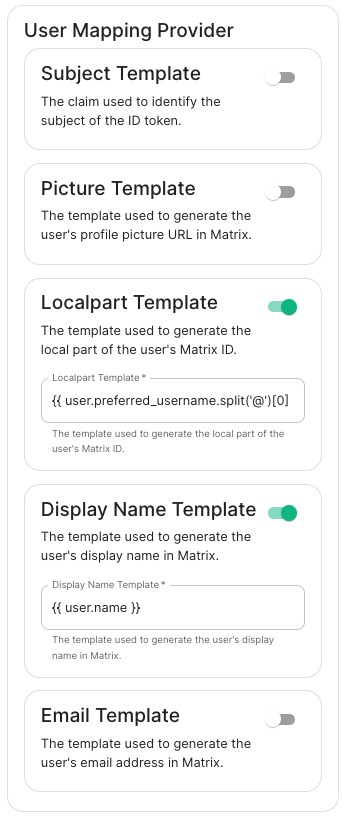
User Mapping Provider: Configuration for how attributes returned from a OIDC provider are mapped onto a matrix user.
-
Localpart Template: Jinja2 template for the localpart of the MXID. Set it to{{ user.preferred_username.split('@')[0] }}for Azure AD -
Display Name Template: Jinja2 template for the display name to set on first login. If unset, no displayname will be set. Set it to{{ user.name }}for Azure AD
Other configurations are documented here.
-

With an account with enough rights, go to : Enterprise Applications Portal
- Click on
New Application - Click on
Create your own applicationon the top left corner - Choose a name for it, and select
Integrate any other application you don't find in the gallery - Click on "Create"
- Select
Set up single sign on - Select
SAML -
EditonBasic SAML Configuration - In
Identifier, add the following URL :https://<synapse fqdn>/_synapse/client/saml2/metadata.xml - Remove the default URL
- In
Reply URL, add the following URL :https://<synapse fqdn>/_synapse/client/saml2/authn_response - Click on
Save -
EditonAttributes & Claims - Remove all defaults additional claims
- Click on
Add new claimto add the following claims. The UID will be used as the MXID, the - value here is mostly a suggestion :
- Name:
uid, Transformation :ExtractMailPrefix, Parameter 1 :user.userprincipalname - Name:
email, Source attribute :user.mail - Name:
displayName, Source attribute :user.displayname - Click on
Save - In
Users and Groups, add groups and users which may have access to element