Setting up Delegated Authentication With the Installer
OnDelegated ElementAuthentication
Enterprise
At present, we support delegating the authentication of users to the following provider interfaces:
DependingLDAP- SAML
- OIDC
- CAS
Note: sampleWe fileare rapidly working to expand and improve this documentation. For now, we are providing screenshots of working configurations, but in the installerfuture, rootwe directorywill frombetter config-sample/synapse/ to ~/.element-onpremise-config/synapse
cp -r config-sample/synapse ~/.element-onpremise-config/synapse
Editexplain thefileoptionsforasthewell.providerIf youaredosettingnotup. You have at least 3 parameters to edit :The IdP metadata urlThe name and description of your synapse server, whichsee your providerwouldlisteddisplaybelow, please file a support ticket or reach out toinformyourtheElementusersrepresentative and we will work towhichgetappyouthey are logging in
Disable the local synapse user databaseconnected andpasswordourworkflowsdocumentationby creating a file~/.element-onpremise-config/synapse/disable-local.ymland putting the following in it:password_config: localdb_enabled: false enabled: falseDisable local user workflows in element by creating a file~/.element-onpremise-config/element/delegatedauth.jsonand putting the following in it:{ "setting_defaults": { "UIFeature.identityServer": false, "UIFeature.passwordReset": false, "UIFeature.registration": false, "UIFeature.deactivate": false, "UIFeature.thirdPartyId": false } }Run the installer to configure SAML provisioning
On the provider
Here we cover Azure ADFS and Keycloak.updated.
Other SAML providers can be configured for use
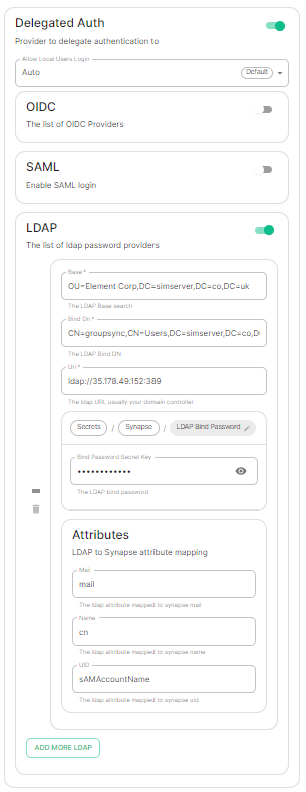
LDAP with ElementWindows Enterprise.AD
Azure
SAML
With
anClick onNew ApplicationClick onCreate your own applicationon the top left cornerChoose a name for it, and selectIntegrate any other application you don't find in the galleryClick on "Create"SelectSet up single sign onSelectSAMLEditonBasic SAML ConfigurationInIdentifier, add the following URL :https://<synapse fqdn>/_synapse/client/saml2/metadata.xmlRemove the default URLInReply URL, add the following URL :https://<synapse fqdn>/_synapse/client/saml2/authn_responseClick onSaveEditonAttributes & ClaimsRemove all defaults additional claimsClick onAdd new claimto add the following claims. The UID will be used as the MXID, the value here is mostly a suggestion :Name:uid, Transformation :ExtractMailPrefix, Parameter 1 :user.userprincipalnameName:email, Source attribute :user.mailName:displayName, Source attribute :user.displayname
Click onSaveInUsers and Groups, add groups and users which may have access to elementConfigure the IdP Metadate URLGo back to the Overview Page for your new Enterprise application.Go to the section SAML Certificates.Copy the App Federation Metadata URLPut this URL into the url: "" field of the saml-azure-adfs.yml.Restart the Installer.

Keycloak
InConfigure>Clients, add a new client. Enterhttps://<synapse fqdn>/_synapse/client/saml2/metadata.xmlas its Client IDInMappers, add the 3 following mappers :Name:uid: User attribute :usernameName:email, User attribute :emailName:displayName, Javascript mapper :user.FirstName + " " + user.lastName