Getting Started with the Enterprise Helm Charts
Introduction
This document will walk you through how to get started with our Element Server Suite Helm Charts. These charts are provided to be used in environments which typically deploy applications by helm charts. If you are unfamiliar with helm charts, we'd highly recommend that you start with our Enterprise Installer.
InstallingGeneral concepts
ESS deployment rely on the Helmfollowing Chart Repositories
The first step iscomponents to startdeploy the workloads on a machine with helm v3 installed and configured with your kubernetes cluster :
- Updater : It reads an ElementDeployment CRD manifest, and
pull downgenerates thetwoassociatedchartsindividual Element CRDs manifests linked together - Operator : It reads the individual Element CRDs manifests to generates the associated kubernetes workloads
- ElementDeployment : This CRD is a simple structure following the pattern :
spec:
  global:
    k8s:
      # Global settings that will be applied by default to all workloads if not forced locally. This is where you will need.be able to configure a default ingress certificate, default number of replicas on the deployments, etc.
    config:
      # Global configuration that can be used by every element component
    secretName: # The global secret name. Required secrets keys can be found in the description of this field using `kubectl explain`. Every config named `<foo>SecretKey` will point to a secret key containing the secret targetted by this secret name.
  components:
    <component name>:
      k8s:
        # Local kubernetes configuration of this component. You can override here the global values to force a certain behaviour for each components.
      config:
        # This component configuration
      secretName: # The component secret name containing secret values. Required secrets keys can be found in the description of this field using `kubectl explain`.  Every config named `<foo>SecretKey` will point to a secret key containing the secret targetted by this secret name.
   <another component>:
     ...
Any change to the ElementDeployment manifest deployed in the namespace will trigger a reconciliation loop. This loop will update the Element manifests read by the Operator. It will again trigger a reconciliation loop in the Operator process, which will update kubernetes workloads accordingly.
If you manually change a workload, it will trigger a reconciliation loop and the Operator will override your change on the workload.
The deployment must be managed only through the ElementDeployment CRD.
Installing the Operator and the Updater helm charts
We advise you to deploy the helm charts in one of the deployments model :
- Cluster-Wide deployment : In this mode, the CRDs Conversion Webhook and the controller managers are deployed in their own namespace, separated from ESS deployments. They are able to manage ESS deployments in any namespace of the cluster The install and the upgrade of the helm chart requires cluster admin permissions.
- Namespace-scoped deployment : In this mode, only the CRDs conversion webhooks require cluster admin permissions. The Controller managers are deployed directly in the namespace of the element deployment. The install and the upgrade of ESS does not require cluster admin permissions if the CRDs do not change.
All-in-one deployment (Requires cert-manager)
When cert-manager is present in the cluster, it is possible to use the all-in-one ess-system helm chart to deploy the operator and the updater.
First, let's add the ess-system repository to helm, replace ems_image_store_username and ems_image_store_token with the values provided to you by Element.
helm repo add ess-system https://registry.element.io/helm/ess-system --username
<ems_image_store_username> --password '<ems_image_store_token>'
Cluster-wide deployment
When deploying ESS-System as a cluster-wide deployment, updating ESS requires ClusterAdmin permissions.
Create the following values file :
emsImageStore:
  username: <username>
  password: <password>

element-operator:
  clusterDeployment: true
  deployCrds: true  # Deploys the CRDs and the Conversion Webhooks
  deployCrdRoles: true  # Deploys roles to give permissions to users to manage specific ESS CRs
  deployManager: true  # Deploys the controller managers

element-updater:
  clusterDeployment: true
  deployCrds: true  # Deploys the CRDs and the Conversion Webhooks
  deployCrdRoles: true  # Deploys roles to give permissions to users to manage specific ESS CRs
  deployManager: true  # Deploys the controller managers
Namespace-scoped deployment
When deploying ESS-System as a namespace-scoped deployment, you have to deploy ess-system in two parts :
- One for the CRDs and the conversion webhooks. This part will be managed with ClusterAdmin permissions. These update less often.
- One for the controller managers. This part will be managed with namespace-scoped permissions.
In this mode, the ElementDeployment CR is deployed in the same namespace as the controller-managers.
Create the following values file to deploy the CRDs and the conversion webhooks :
emsImageStore:
  username: <username>
  password: <password>

element-operator:
  clusterDeployment: true
  deployCrds: true  # Deploys the CRDs and the Conversion Webhooks
  deployCrdRoles: false  # Deploys roles to give permissions to users to manage specific ESS CRs
  deployManager: false  # Deploys the controller managers

element-updater:
  clusterDeployment: true
  deployCrds: true  # Deploys the CRDs and the Conversion Webhooks
  deployCrdRoles: false  # Deploys roles to give permissions to users to manage specific ESS CRs
  deployManager: false  # Deploys the controller managers
Create the following values file to deploy the controller managers in their namespace :
emsImageStore:
  username: <username>
  password: <password>

element-operator:
  clusterDeployment: false
  deployCrds: false  # Deploys the CRDs and the Conversion Webhooks
  deployCrdRoles: false  # Deploys roles to give permissions to users to manage specific ESS CRs
  deployManager: true  # Deploys the controller managers

element-updater:
  clusterDeployment: false
  deployCrds: false  # Deploys the CRDs and the Conversion Webhooks
  deployCrdRoles: false  # Deploys roles to give permissions to users to manage specific ESS CRs
  deployManager: true  # Deploys the controller managers
Without cert-manager present on the cluster
First, let's add the element-updater repositoryand element-operator repositories to helm:helm, replace ems_image_store_username and ems_image_store_token with the values provided to you by Element.
helm repo add element-updater https://registry.element.io/helm/element-updater --username
<ems_image_store_username> --password '<ems_image_store_token>'
Replace ems_image_store_username and ems_image_store_token with the values provided to you by Element.
Secondly, let's add the element-operator repository to helm:
helm repo add element-operator https://registry.element.io/helm/element-operator --username <ems_image_store_username> --password '<ems_image_store_token>'
Replace ems_image_store_username and ems_image_store_token with the values provided to you by Element.
Now that we have the repositories configured, we can verify this by:
helm repo list
and should see the following in that output:
NAME                    URL
element-operator        https://registry.element.io/helm/element-operator
element-updater         https://registry.element.io/helm/element-updater
Creating
N.B. namespacesThis forguide assumes that you are using the element-updater and element-operator and element-updater
To be able to run the helm charts, they will need a namespace to run in.namespaces. You can makecall thisit whatever you wouldwant like,and butif forit thedoesn't sakeexist ofyet, thisyou guide, we willcan create anit element-operatornamespace and an element-updater namespace. To do this, please follow this step:
kubectl create ns .element-operator<name>
Generating an image-pull-image pull secret
with EMS credentials
image-pull-image pull secretTo generate an image-pull-secretems-credentials
kubectl create secret -n element-updater docker-registry image-pull-secretems-credentials --docker-server=gitlab-registry.matrix.orgelement.io --docker-username=<EMSusername> --docker-password=<EMStoken>`
kubectl create secret -n element-operator docker-registry image-pull-secretems-credentials --docker-server=gitlab-registry.matrix.orgelement.io --docker-username=<EMSusername> --docker-password=<EMStoken>`
Generating a TLS secret for the webhook
ToThe doconversion thiswebhooks withneed podman,their run:own self-signed CA and TLS certificate to be integrated into kubernetes.
For example using easy-rsa :
podmaneasyrsa logininit-pki
easyrsa --authfilebatch auth.json"--req-cn=ESS-CA`date gitlab-registry.matrix.org+%s`" build-ca nopass
easyrsa --subject-alt-name="DNS:element-operator-conversion-webhook.element-operator"\
  --days=10000 \
  build-server-full element-operator-conversion-webhook nopass
easyrsa --subject-alt-name="DNS:element-updater-conversion-webhook.element-updater"\
  --days=10000 \
  build-server-full element-updater-conversion-webhook nopass
When prompted for a username, provide your ems_image_store_username. When prompted for a password, provide your ems_image_store_token.
Once this has finished, you will have an auth.json file that has a token which looks similar to:
{
        "auths": {
                "gitlab-registry.matrix.org": {
                        "auth": "iNy00NjE2LWIOTFItMWNlYzg5jOWRiOnN5UVlrc3FiRlBtcHhkSDlaOUQ1ZDA2MWI3NDUtY2F5Zm"
                }
        }
}
Protect this file carefully as it does indeed have your actual login token in it!
Now that we have this file, we need to inject this asCreate a secret intofor botheach theof element-updaterandtwo element-operatornamespaces. The commands are as follows::
kubectl create secret -ntls element-updater generic image-pull-secretoperator-conversion-webhook --from-file=.dockerconfigjson=auth.jsoncert=pki/issued/element-operator-conversion-webhook.crt --type=kubernetes.io/dockerconfigjsonkey=pki/private/element-operator-conversion-webhook.key  --namespace element-operator
kubectl create secret -ntls element-operator generic image-pull-secretupdater-conversion-webhook --from-file=.dockerconfigjson=auth.jsoncert=pki/issued/element-updater-conversion-webhook.crt --type=kubernetes.io/dockerconfigjsonkey=pki/private/element-updater-conversion-webhook.key  --namespace element-updater
Installing the helm chart for the element-updater and the element-operator
element-updater and the element-operatorToCreate installthe following values file to deploy the controller managers in their namespace :
values.element-operator.yml :
clusterDeployment: true
deployCrds: true  # Deploys the CRDs and the Conversion Webhooks
deployCrdRoles: true  # Deploys roles to give permissions to users to manage specific ESS CRs
deployManager: true  # Deploys the controller managers
crds:
  conversionWebhook:
    caBundle: # Paste here the content of `base64 pki/ca.crt -w 0`
    tlsSecretName: element-operator-conversion-webhook
    imagePullSecret: ems-credentials
operator:
  imagePullSecret: ems-credentials
values.element-updater.yml :
clusterDeployment: true
deployCrds: true  # Deploys the CRDs and the Conversion Webhooks
deployCrdRoles: true  # Deploys roles to give permissions to users to manage specific ESS CRs
deployManager: true  # Deploys the controller managers
crds:
  conversionWebhook:
    caBundle: # Paste here the content of `base64 pki/ca.crt -w 0`
    tlsSecretName: element-updater-conversion-webhook
updater:
  imagePullSecret: ems-credentials
Run the helm chartsinstall andcommand actually deploy the element-updater and the element-operator with their default configurations, simply run::
helm install element-operator element-operator/element-operator --namespace element-operator -f values.yaml
helm install element-updater element-updater/element-updater --namespace element-updater --setf updater.imagePullSecret=image-pull-secret
helm install element-operator element-operator/element-operator --namespace element-operator --set operator.imagePullSecret=image-pull-secretvalues.yaml
Now at this point, you should have the following two4 containers up and running:
[user@helm ~]$ kubectl get pods -n element-updateroperator
NAMESPACE            NAME                                                   READY   STATUS    RESTARTS        AGE
element-updater-operator     element-operator-controller-manager-5b4f9cc5d4-9krv6c8fc5c47-nzt2t     2/2     Running   60               (8h6m5s
ago)element-operator     2delement-operator-conversion-webhook-7477d98c9b-xc89s   1/1     Running   0               6m5s
[user@helm ~]$ kubectl get pods -n element-operatorupdater
NAMESPACE            NAME                                                   READY   STATUS    RESTARTS        AGE
element-operator-updater      element-updater-controller-manager-778c8bfbcf-4zzpl6f8476f6cb-74nx5    2/2     Running   60               (8h106s
ago)element-updater      2delement-updater-conversion-webhook-65ddcbb569-qzbfs    1/1     Running   0               81s
Generating the ElementDeployment CRDCR to Deploy Element Server Suite
Generating ElementDeployment CR from the UI Installer
At this point, you have two options:
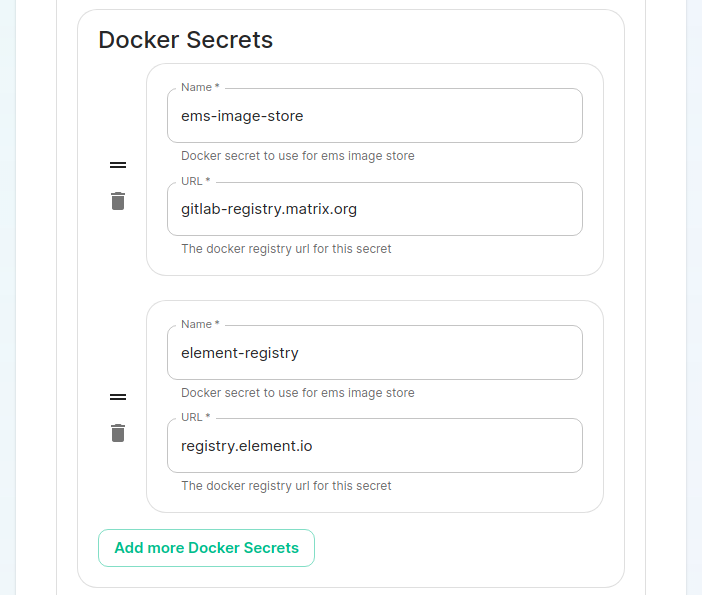
We reccomend using the GUI to generate the ElementDeployment CRDUse the graphical installer to generate an ElementDeployment CRD for you. (This is the easier and preferred route.)You can find theElementDeploymentCRD and theassciatedassociated secrets at~/.element-enterprise-server/configafter running through the installerGUIGUI.YouOn the cluster page in the installer, under the advanced section, you willneedwant to set up everything you normally would plus add the followingblockdocker secrets:
Once you work your way through the installer, set everything up that you wish to
spec.global.k8s.workloadsdockerSecrets:You
-canname:closeems-image-storetheurl:installergitlab-registry.matrix.organd- name: dockerhub url: docker.io - name: element-registry url: registry.element.ioCreate ayour CRDdefinitionisonnow stored in~/.element-enterprise-server/config/asdeployment.yml. Your secrets are stored in the same directory assecrets.yml.Writing your own
startingElementDeploymentfromCRthisHere
baseistemplate:a small sample to deploy the basic components using your own certificate files. This is provided as an example, as ElementDeployment supports a whole range of configuration option that you can explore in the GUI or throughkubectl explaincommand :kubectl explain elementdeployment.matrix.element.io.spec.componentsapiVersion: matrix.element.io/v1alpha1 kind: ElementDeployment metadata: name: <element_deployment_name> namespace: <target namespace> spec: global: k8s: ingresses: ingressClassName: "public" workloads: dockerSecrets: - name: ems-image-store url: gitlab-registry.matrix.org - name: dockerhub url: docker.io - name: element-registry url: registry.element.io storage: storageClassName: "standard" secretName: global config: genericSharedSecretSecretKey: genericSharedSecret domainName: "deployment.tld" components: elementWeb: secretName: external-elementweb-secrets k8s: ingress: tls: mode: certfile certificate: certFileSecretKey: eleweb.tls privateKeySecretKey: eleweb.crt fqdn: element-web.tld synapse: secretName: external-synapse-secrets config: maxMauUsers: 100 media: volume: size: 1 postgresql: host: "<postgresql server>" user: "<user>" database: "<db>" passwordSecretKey: pgpassword sslMode: disabletelemetry: enabled: true username: <ems username> # In the synapse secret, `telemetryPassword` should be `<ems password>` room: '#element-telemetry'k8s: ingress: fqdn: synapse.tld tls: mode: certfile certificate: certFileSecretKey: synapse.tls privateKeySecretKey: synapse.crt wellKnownDelegation: secretName: external-wellknowndelegation-secrets k8s: ingress: tls: mode: certfile certificate: certFileSecretKey: wellknown.tls privateKeySecretKey: wellknown.crt
To
Ifsecret youvalues wantin tothe go with point 1,CR, you will needhave to go getcreate the latestfollowing graphicalsecrets installer.:
-
name: globalwith data keygenericSharedSecretcontaining any random value. It will be used as a seed for all secrets generated by the updater. -
name: external-elementweb-secretswith data keyseleweb.tlscontaining element web private key andeleweb.crtcontaining element web certificate. -
name: external-synapse-secretswith data keyssynapse.tlscontaining synapse private key andsynapse.crtcontaining synapse certificate. You will also needpgpasswordwith the postgres password. All attributes pointing to Secret Keys have a default value, and in this example we are relying on the default values ofconfig.macaroonSecretKey:macaroon,config.registrationSharedSecretSecretKey:registrationSharedSecret,config.signingKeySecretKey:signingKeyand theconfig.adminPasswordSecretKeypointing toadminPasswordin the secret key. -
name: external-wellknowndelegation-secretswithyourdatahelmkeyschartwellknown.tlssetup,containingyouwell known delegation private key andwellknown.crtcontaining well known delegation certificate.
Once the CRD and the Secrets deployed to the namespace, the Updater will needbe able to pickcreate a "Kubernetes Application" install and specifyall the properresources contexthandled forby the k8sOperator, clusterwhich thatwill you wish tothen deploy the applicationworkloads to. If you do not know what the name of the context is, run:
kubectl config view
and you will see a section similar to:
contexts:
- context:
    cluster: microk8s-cluster
    user: admin
  name: microk8s
current-context: microk8s
In this case, I have one context and its name is microk8s so I would tell the installer to deploy to the microk8s context.
On the cluster page in the installer, under the advanced section, you will want to set up everything you normally would plus add the following docker secrets:
Once you workon your waykubernetes through the installer, set everything up that you wish to have deployed, but do not actually start the installation.
You can close the installer and your CRD is now stored in ~/.element-enterprise-server/config/ as deployment.yml. Your secrets are stored in the same directory as secrets.yml.cluster.
Loading secrets into kubernetes in preparation of deployment
N.B. This guide assumes that you are using the element-onprem namespace for deploying Element. You can call it whatever you want and if it doesn't exist yet, you can create it with: kubectl create ns element-onprem.
Now we need to load secrets into kubernetes so that the deployment can access them. If you built your own CRD from scratch, you will need to follow our Element Deployment CRD documentation.
If you went with the installer, you can simply run the following commands:
kubectl create secret -n element-onprem docker-registry ems-image-store --docker-server=gitlab-registry.matrix.org --docker-username=<EMSusername> --docker-password=<EMStoken>
kubectl create secret -n element-onprem docker-registry element-registry --docker-server=gitlab-registry.matrix.org --docker-username=<EMSusername> --docker-password=<EMStoken>
or if you made a podman authfile:
kubectl create secret -n element-onprem generic ems-image-store --from-file=.d
ockerconfigjson=auth.json --type=kubernetes.io/dockerconfigjson
kubectl create secret -n element-onprem generic element-registry --from-file=.d
ockerconfigjson=auth.json --type=kubernetes.io/dockerconfigjson
kubectl apply -f ~/.element-enterprise-server/config/secrets.yml -n element-onprem
At this point, you should have a host of secrets loaded into the element-onprem namespace so that kubectl get secrets -n element-onprem generates output similar to:
NAME                                                      TYPE                             DATA   AGE
element-web                                               Opaque                           2      2d1h
global                                                    Opaque                           2      2d1h
integrator                                                Opaque                           3      2d1h
synapse                                                   Opaque                           7      2d1h
synapse-admin                                             Opaque                           2      2d1h
well-known-delegation                                     Opaque                           2      2d1h
ems-image-store                                           kubernetes.io/dockerconfigjson   1      2d1h
element-registry                                          kubernetes.io/dockerconfigjson   1      2d1h
first-element-deployment-element-tls-secret               kubernetes.io/tls                2      2d1h
first-element-deployment-integrator-secrets               Opaque                           4      2d1h
first-element-deployment-integrator-tls-secret            kubernetes.io/tls                2      2d1h
first-element-deployment-synapse-secrets                  Opaque                           6      2d1h
first-element-deployment-synapse-tls-secret               kubernetes.io/tls                2      2d1h
first-element-deployment-synapseadminui-secrets           Opaque                           1      2d1h
first-element-deployment-synapseadminui-tls-secret        kubernetes.io/tls                2      2d1h
first-element-deployment-synapse-ca                       Opaque                           1      2d1h
first-element-deployment-wellknowndelegation-tls-secret   kubernetes.io/tls                2      2d1h
Deploying the actual CRD
At this point, we are ready to deploy the ElementDeployment CRD into our cluster with the following command:
kubectl apply -f ~/.element-enterprise-server/config/deployment.yml -n element-onprem
To check on the progress of the deployment, you will first watch the logs of the updater:
kubectl logs -f -n element-updater element-updater-controller-manager-<rest of pod name>
You will have to tab complete to get the correct hash for the element-updater-controller-manager pod name.
Once the updater is no longer pushing out new logs, you can track progress with the operator or by watching pods come up in the element-onprem namespace.
Operator status:
kubectl logs -f -n element-operator element-operator element-operator-controller-manager-<rest of pod name>
Watching reconciliation move forward in the element-onprem namespace:
kubectl get elementdeployment -o yaml | grep dependentCRs -A20 -n element-onprem -w
Watching pods come up in the element-onprem namespace:
watch kubectl get pods -n element-onprem Updating the helm charts and the underlying deployment
To update the helm charts, you will need to run:
helm repo update
helm upgrade element-updater element-updater/element-updater -n element-updater
helm upgrade element-operator element-operator/element-operator -n element-operatorw
At this point, you will want to get the newest installer and run it. If you have no changes to make to your config, simply click next to go through the pages. Once you have gotten to the deployment point, close the installer and this will give you an updated CRD if necessary.
If you make any changes to secrets, then you will need to redeploy the secrets.yml following the instructions found earlier in this document.
And then kick off a new deployment of the CRD by doing:
kubectl apply -f ~/.element-enterprise-server/config/deployment.yml -n element-onprem
At this point, you will be running an updated deployment based off of the latest helm charts.
Helm Installation script
#!/bin/bash

# Define your EMS username and token
username="<username>"
token="<token>"

# Add helm repositories
helm repo add element-updater https://registry.element.io/helm/element-updater \
--username "$username" \
--password "$token"

helm repo add element-operator https://registry.element.io/helm/element-operator \
--username "$username" \
--password "$token"

# Create Kubernetes namespaces
kubectl create ns element-operator
kubectl create ns element-updater
kubectl create ns element-onprem

# Create Docker image pull secrets
kubectl create secret -n element-updater docker-registry image-pull-secret \
--docker-server=gitlab-registry.matrix.org \
--docker-username="$username" \
--docker-password="$token"

kubectl create secret -n element-operator docker-registry image-pull-secret \
--docker-server=gitlab-registry.matrix.org \
--docker-username="$username" \
--docker-password="$token"

# Install helm charts
helm install element-updater element-updater/element-updater --namespace element-updater --set updater.imagePullSecret=image-pull-secret
helm install element-operator element-operator/element-operator --namespace element-operator --set operator.imagePullSecret=image-pull-secret

# Create Kubernetes secrets for element-onprem namespace
kubectl create secret -n element-onprem docker-registry ems-image-store \
--docker-server=gitlab-registry.matrix.org \
--docker-username="$username" \
--docker-password="$token"

kubectl create secret -n element-onprem docker-registry element-registry \
--docker-server=gitlab-registry.matrix.org \
--docker-username="$username" \
--docker-password="$token"

echo "Please run the Element Enterprise Installer GUI .bin to generate and deploy your ElementDeployment CRD and associated secrets"
echo "If needed, they can be applied with kubectl apply -f ~/.element-enterprise-server/config/deployment.yml and kubectl apply -f ~/.element-enterprise-server/config/secrets.yml"