EMS Knowledge Base
The knowledge base for all Element Matrix Services provided products.
- I can't upload files after updating to 0.6.1
- synapse-haproxy container in CrashLoopBackOff state
- Can't connect to local registry 127.0.0.1:32000
- Installer fails with AnsibleUnsafeText object has no attribute 'addons'
- How to Setup Local Host Resolution Without DNS
- After upgrading to 1.0.0, postgres-0 is in CrashLoopBackOff state
- Integrator fails with Unable to initialise application. Failed to validate config: data/jitsi_domain must match format "hostname"...
- Installer fails looking for join_local_rooms_only
- Hookshot fails to display configuration widget
- Installer hangs on "microk8s : Wait for microk8s to be ready" task
- After an install, I only have the postgres-0 pod!
- Using Self-Signed Certificates with mkcert
- Installer fails on firewalld, but firewalld is not installed
- Pip cache errors
- What Telemetry Data is Collected by Element?
- Getting a 502 Bad Gateway Error When Accessing Element Web
- Configuring a microk8s Single Node Instance to Use a Network Proxy
- Installer 2022-08.01 fails to pull element web into the cluster
- url.js:354 error starting dimension
- Installer fails on enabling addons
- I'd like to turn off federation
- How do I migrate to SSO while keeping my original accounts?
- How do I give a user admin rights when I am using delegated authentication and cannot log into the admin console?
- How do I run the installer without using the GUI?
- Verifying Well Known CORS Headers
- Submitting Telemetry Data to Element
- What data should I collect when I have an issue?
- I need a new token!
- module 'jsonschema._utils' has no attribute 'load_schema'
- Kubernetes internal certificates have expired
- Setting up Delegated Authentication with SAML on Microsoft Azure
- The Secure Border Gateway
- Using ESS with a local registry in air-gapped networks
- Testing Dehydrated Devices
- Auditbot crashloops due OneTimeKey conflicts
- Attachments
- Updating a Jitsi-only Deployment
I can't upload files after updating to 0.6.1
Issue
- Can no longer upload files after upgrading my PoC environment to 0.6.1.
Environment
- Ubuntu 20.04
- Element Enterprise Installer 0.6.1
Resolution
To resolve this issue, recursively change the permissions of the directory configured in parameters.yml as media_host_data_path. For this example, in paramters.yml, we have:
media_host_data_path: "/mnt/data"
and a quick ls on this path shows the 991 ownership:
$ ls -l /mnt/
total 4
drwxr-xr-x 3 991 991 4096 Apr 27 13:20 data
To fix this, run:
sudo chown 10991:991 -R /mnt/data
afterwards, ls should show the 10991 ownership:
$ ls -l /mnt/
total 4
drwxr-xr-x 3 10991 991 4096 Apr 27 13:20 data
and now you should be able to upload files again.
Root Cause
In this case, the installation started with 0.5.3 and in 0.6.0, we changed the UIDs that synapse runs as in order to avoid conflicting with any potential system UID. Previously, the UID was 991, but we moved to 10991. As such, this breaks permissions on the existing synapse_media directory.
You may see an error similar to this one in your synapse logs, which can be obtained by running kubectl logs -n element-onprem instance-synapse-main-0:
2022-04-27 13:28:02,521 - synapse.http.server - 100 - ERROR - POST-59388 - Failed handle request via 'UploadResource': <XForwardedForRequest at 0x7f9aa49f9e20 method='POST' uri='/_matrix/media/r0/upload' clientproto='HTTP/1.1' site='8008'>
Traceback (most recent call last):
File "/usr/local/lib/python3.9/site-packages/synapse/http/server.py", line 269, in _async_render_wrapper
callback_return = await self._async_render(request)
File "/usr/local/lib/python3.9/site-packages/synapse/http/server.py", line 297, in _async_render
callback_return = await raw_callback_return
File "/usr/local/lib/python3.9/site-packages/synapse/rest/media/v1/upload_resource.py", line 96, in _async_render_POST
content_uri = await self.media_repo.create_content(
File "/usr/local/lib/python3.9/site-packages/synapse/rest/media/v1/media_repository.py", line 178, in create_content
fname = await self.media_storage.store_file(content, file_info)
File "/usr/local/lib/python3.9/site-packages/synapse/rest/media/v1/media_storage.py", line 92, in store_file
with self.store_into_file(file_info) as (f, fname, finish_cb):
File "/usr/local/lib/python3.9/contextlib.py", line 119, in __enter__
return next(self.gen)
File "/usr/local/lib/python3.9/site-packages/synapse/rest/media/v1/media_storage.py", line 135, in store_into_file
os.makedirs(dirname, exist_ok=True)
File "/usr/local/lib/python3.9/os.py", line 215, in makedirs
makedirs(head, exist_ok=exist_ok)
File "/usr/local/lib/python3.9/os.py", line 225, in makedirs
mkdir(name, mode)
PermissionError: [Errno 13] Permission denied: '/media/media_store/local_content/PQ'
synapse-haproxy container in CrashLoopBackOff state
Issue
We are seeing
[karl1@element ~]$ kubectl get pods -n element-onprem
NAME READY STATUS RESTARTS AGE
server-well-known-8c6bd8447-fts78 1/1 Running 2 39h
app-element-web-c5bd87777-745gh 1/1 Running 2 39h
postgres-0 1/1 Running 2 39h
instance-synapse-haproxy-5b4b55fc9c-jv7pp 0/1 CrashLoopBackOff 40 39h
instance-synapse-main-0 1/1 Running 6 39h
and the synapse-haproxy container never leaves the CrashLoopBackOff state.
Environment
- Red Hat Enterprise Linux 8.5
- Element Enterprise On-Premise PoC Installer 0.6.1
Resolution
Add the following lines to /etc/security/limits.conf:
* soft nofile 100000
* hard nofile 100000
and reboot the box. After a reboot, the microk8s environment will come back up and the synapse-haproxy container should run without error.
Root Cause
Check the logs of synapse-haproxy with this command:
kubectl logs -n element-onprem instance-synapse-haproxy-5b4b55fc9c-jv7pp
You will want to replace the instance name with your specific instance. See if you have this message:
'[haproxy.main()] Cannot raise FD limit to 80034, limit 65536.'
If so, you have run out of open file descriptors and as such the container cannot start.
Can't connect to local registry 127.0.0.1:32000
Issue
- Getting a connection refused when trying to upload images to the local registtry.
"msg": "non-zero return code",
"rc": 1,
"start": "2022-05-26 10:37:08.441849",
"stderr": "Error: Get \"https://localhost:32000/v2/\": dial tcp [::1]:32000: connect: connection refused; Get \"http://localhost:32000/v2/\": dial tcp [::1]:32000: connect: connection refused",
"stderr_lines": [
"Error: Get \"https://localhost:32000/v2/\": dial tcp [::1]:32000: connect: connection refused; Get \"http://localhost:32000/v2/\": dial tcp [::1]:32000: connect: connection refused"
],
Environment
- Red Hat Enterprise Linux 8.6
- Element On-Premise Installer 2022-05.04
Resolution
First, let's begin by removing any bits of the old image that may be in containerd. We need the name of the image to do this and looking at this error:
"cdkbot/registry-amd64:2.6": rpc error: code = Unknown desc = failed to pull and unpack image "docker.io/cdkbot/registry-amd64:2.6": failed to extract layer
the image is named docker.io/cdkbot/registry-amd64:2.6. So we will now run:
microk8s.ctr rm docker.io/cdkbot/registry-amd64:2.6
Unmount the offending volume from the kubectl describe pod setup:
sudo umount /var/snap/microk8s/common/var/lib/containerd/tmpmounts/containerd-mount490181863
If this succeeds, then you can issue:
microk8s.ctr pull docker.io/cdkbot/registry-amd64:2.6
and if this succeeds, you can then run:
kubectl delete pod -n container-registry registry
and watch the registry come back up.
If you cannot get the mounted volume to unmount, you may need to reboot to completely clear the issue.
Root Cause
The root cause is that the registry container will not start:
$ kubectl get pods -A
NAMESPACE NAME READY STATUS RESTARTS AGE
kube-system hostpath-provisioner-566686b959-jl2b4 1/1 Running 1 69m
...
container-registry registry-9b57d9df8-kmks4 0/1 ImagePullBackOff 0 44m
To figure out why this won't start, we need to run kubectl describe pod -n container-registry registry:
$ kubectl describe pod -n container-registry registry
Name: registry-9b57d9df8-k7v2r
Namespace: container-registry
Priority: 0
Node: mynode/192.168.122.1
Start Time: Thu, 26 May 2022 11:33:04 -0700
Labels: app=registry
pod-template-hash=9b57dea58
...
Normal BackOff 5m41s (x4 over 7m36s) kubelet Back-off pulling image "cdkbot/registry-amd64:2.6"
Warning Failed 5m41s (x4 over 7m36s) kubelet Error: ImagePullBackOff
Warning Failed 2m58s kubelet Failed to pull image "cdkbot/registry-amd64:2.6": rpc error: code = Unknown desc = failed to pull and unpack image "docker.io/cdkbot/registry-amd64:2.6": failed to extract layer sha256:8aa4fcad5eeb286fe9696898d988dc85503c6392d1a2bd9023911fb0d6d27081: failed to unmount /var/snap/microk8s/common/var/lib/containerd/tmpmounts/containerd-mount490181863: failed to unmount target /var/snap/microk8s/common/var/lib/containerd/tmpmounts/containerd-mount490181863: device or resource busy: unknown
Looking at the above, we can seee that /var/snap/microk8s/common/var/lib/containerd/tmpmounts/containerd-mount490181863 is busy and failing to unmount, thus causing our problem.
We've also noticed in this case that bits of an old image download can be left in containerd and we've updated the resolution to handle this as well.
Installer fails with AnsibleUnsafeText object has no attribute 'addons'
Issue
- The installer fails with this error message:
TASK [microk8s : convert from list to dict] ***************************************************************************************************************************************************************************************
task path: /home/user/element-enterprise-installer-2022-05.06/ansible/roles/microk8s/tasks/addons.yml:12
fatal: [localhost]: FAILED! => {
"msg": "'ansible.utils.unsafe_proxy.AnsibleUnsafeText object' has no attribute 'addons'"
}
Environment
- Element Enterprise On-Premise Installer 2022-05.06
Resolution
Run:
microk8s.start
and then restart the installer.
Root Cause
Situations exist where the installer can get in a state that microk8s has not started but the installer thinks microk8s is running.
How to Setup Local Host Resolution Without DNS
Overview
In an Element Enterprise On-Premise environment, hostnames must resolve to the appropriate IP addresses. If you have a proper DNS server with records for these hostnames in place, then you will be good to go.
In the event that a DNS server is not available for proper hostname resolution, you may use /etc/hosts and host_aliases. This article will walk you through that.
If you choose to use this method, do note that federation outside of your local environment will not be possible. Further, using the mobile applications will not be possible as they must be able to access your environment, which typically requires DNS.
Further, this assumes that you are using the single node installer based on microk8s.
Steps
For single node installations with microk8s, if we were setting up was synapse and element and these ran on the local domain with the IP of 192.168.122.39, we would set the following entries in /etc/hosts:
192.168.122.39 element.element.local admin.element.local synapse.element.local integrator.element.local element.local
and the following in host_aliases in the parameters.yml file found in your configuration directory:
host_aliases:
- ip: "192.168.122.39"
hostnames:
- "element.element.local"
- "admin.element.local"
- "synapse.element.local"
- "integrator.element.local"
- "element.local"
After upgrading to 1.0.0, postgres-0 is in CrashLoopBackOff state
Issue
-
I upgraded my environment from 0.6.1 to 1.0.0 and now postgres-0 is in CrashLoopBackOff state:
[user@element2 element-enterprise-installer-1.0.0]$ kubectl get pods -n element-onprem ... postgres-0 0/1 CrashLoopBackOff 6 (36s ago) 6m44s ... -
Running
kubectl logs -n element-onprem postgres-0gives me:initdb: error: directory "/var/lib/postgresql/data" exists but is not empty If you want to create a new database system, either remove or empty the directory "/var/lib/postgresql/data" or run initdb with an argument other than "/var/lib/postgresql/data".
Environment
- Element Enterprise Installer 1.0.0
- Existing 0.6.1 installation
- Using the installer's built in postgresql database
Resolution
To fix this issue, first read the root cause and issue sections and double check that this is your issue. The resolution is to delete the sts, pvc, and pv for postgres, the empty data directory and then re-run the installer. These steps WILL destroy any existing Postgresql data, which in the ephemeral case (that this issue decsribes) is none.
To find where the data directory is, run:
kubectl describe pv postgres | grep -i path
This will show output similar to:
StorageClass: microk8s-hostpath
Type: HostPath (bare host directory volume)
Path: /mnt/data/synapse-postgres
HostPathType:
From here, we can see that /mnt/data/synapse-postgres is where postgres is trying to initiate the database. Let's take a look at that directory:
[user@element2 element-enterprise-installer-1.0.0]$ sudo ls -l /mnt/data/synapse-postgres/
total 0
drwx------. 2 systemd-coredump input 6 Apr 26 15:13 data
[user@element2 element-enterprise-installer-1.0.0]$ sudo ls -l /mnt/data/synapse-postgres/data
total 0
As you can see, we have the data directory and it is empty. Make a note of this directory for later.
Now we need to remove the pvc and the pv. If you really do have just an empty data directory, there is no need to make a backup. If you have more than data in your postgres pv path, you will want to STOP AND MAKE A BACKUP OF THAT PATH'S CONTENTS.
Now, to delete the PVC, you will need two terminals. In one terminal, you will run:
kubectl delete pvc -n element-onprem postgres
You will notice that this command just sits there waiting once run. In another terminal, run this command:
kubectl delete pod -n element-onprem postgres-0
As soon as the pod is deleted, you should notice that the kubectl delete pvc command also completes. At this point, we need to now delete the pv:
kubectl delete pv -n element-onprem postgres
Now it is time to remove the sts for postgres:
kubectl delete sts -n element-onprem postgres
Remove the data directory:
sudo rm -r /mnt/data/synapse-postgres/data
Now re-run the installer. Once the installer is re-run, you should have a working postgresql. You should notice a running pod in kubectl get pods -n element-onprem:
postgres-0 1/1 Running 0 2m11s
and your /mnt/data/synapse-postgres directory should have entries similar to:
drwx------. 6 systemd-coredump input 54 May 6 10:14 base
drwx------. 2 systemd-coredump input 4096 May 6 10:15 global
drwx------. 2 systemd-coredump input 6 May 6 10:14 pg_commit_ts
drwx------. 2 systemd-coredump input 6 May 6 10:14 pg_dynshmem
-rw-------. 1 systemd-coredump input 4782 May 6 10:14 pg_hba.conf
-rw-------. 1 systemd-coredump input 1636 May 6 10:14 pg_ident.conf
drwx------. 4 systemd-coredump input 68 May 6 10:14 pg_logical
drwx------. 4 systemd-coredump input 36 May 6 10:14 pg_multixact
drwx------. 2 systemd-coredump input 6 May 6 10:14 pg_notify
drwx------. 2 systemd-coredump input 6 May 6 10:14 pg_replslot
drwx------. 2 systemd-coredump input 6 May 6 10:14 pg_serial
drwx------. 2 systemd-coredump input 6 May 6 10:14 pg_snapshots
drwx------. 2 systemd-coredump input 6 May 6 10:14 pg_stat
drwx------. 2 systemd-coredump input 63 May 6 10:15 pg_stat_tmp
drwx------. 2 systemd-coredump input 18 May 6 10:14 pg_subtrans
drwx------. 2 systemd-coredump input 6 May 6 10:14 pg_tblspc
drwx------. 2 systemd-coredump input 6 May 6 10:14 pg_twophase
-rw-------. 1 systemd-coredump input 3 May 6 10:14 PG_VERSION
drwx------. 3 systemd-coredump input 60 May 6 10:14 pg_wal
drwx------. 2 systemd-coredump input 18 May 6 10:14 pg_xact
-rw-------. 1 systemd-coredump input 88 May 6 10:14 postgresql.auto.conf
-rw-------. 1 systemd-coredump input 28156 May 6 10:14 postgresql.conf
-rw-------. 1 systemd-coredump input 36 May 6 10:14 postmaster.opts
-rw-------. 1 systemd-coredump input 94 May 6 10:14 postmaster.pid
Finally, restart the synapse pod by doing:
kubectl delete pod -n element-onprem instance-synapse-main-0
Wait for that pod to restart and be completely running again. Verify with kubectl get pods -n element-onprem that you have a line similar to:
instance-synapse-main-0 1/1 Running 0 2m36s
Root Cause
In 0.6.1, we had a bug which caused the included postgresql database to not get written to disk and thus it did not survive restarts. The bug has been fixed in 1.0.0, however, prior versions of the installer did get as far as writing a data directory into the postgresql storage set up by microk8s. As such, postgres finds this directory on start up and fails to init a new database with the specific log mentioned in the Issue section.
If you do not have this specific error, please do not run the steps in the Resolution section of this knowledge base solution.
Integrator fails with Unable to initialise application. Failed to validate config: data/jitsi_domain must match format "hostname"...
Issue
-
After installing integrator and browsing to it by hostname, I get the following error:
Unable to initialise application. Failed to validate config: data/jitsi_domain must match format "hostname", data/jitsi_domain must be equal to constant, data/jitsi_domain must match a schema in anyOf
Environment
- Element Enterprise Installer 2022-09.06
- Integrator
Resolution
-
Add the following line to your
<config-dir>/integrator/integrator.ymlfile:jitsi_domain: meet.element.ioReplacing
meet.element.iowith whatever Jitsi host you would like to use.
Root Cause
There is a bug in this installer which specifies https:// in front of the default domain and this causes the error. This will be fixed in a future installer.
Installer fails looking for join_local_rooms_only
Issue
-
When updating my existing Element On-Premise instance, the installer fails with:
2022-10-05 10:44:11,992 p=48974 u=user n=ansible | [WARNING]: Unable to find '/home/user/.element-onprem-config/certs//ca.pem' in expected paths (use -vvvvv to see paths) 2022-10-05 10:44:11,993 p=48974 u=user n=ansible | An unhandled exception occurred while running the lookup plugin 'file'. Error was a <class 'ansible.errors.AnsibleError'>, original message: could not locate file in lookup: /home/user/.element-onprem-config/certs//ca.pem 2022-10-05 10:44:12,077 p=42819 u=user n=ansible | fatal: [localhost]: FAILED! => { "msg": "The task includes an option with an undefined variable. The error was: {{ lookup('template', item) | split_regex('^---$') | map('from_yaml') | list | select }}: 'dict object' has no attribute 'join_local_rooms_only'\n\nThe error appears to be in '/home/user/element-enterprise-installer-2022-09.06/ansible/roles/matrix_components/tasks/setup_component.yml': line 15, column 3, but may\nbe elsewhere in the file depending on the exact syntax problem.\n\nThe offending line appears to be:\n\n\n- name: \"{{ component_type }}: Load manifests\"\n ^ here\nWe could be wrong, but this one looks like it might be an issue with\nmissing quotes. Always quote template expression brackets when they\nstart a value. For instance:\n\n with_items:\n - {{ foo }}\n\nShould be written as:\n\n with_items:\n - \"{{ foo }}\"\n" }
Environment
- Element Enterprise Installer 2022-09.06
Resolution
If you have previously installed adminbot, please add the following line to your CONFIG_DIR/adminbot/adminbot.yml:
join_local_rooms_only: true
If you have previously installed auditbot, please add the following line to your CONFIG_DIR/auditbot/auditbot.yml:
join_local_rooms_only: true
and re-run the installer. Afterwards, you should not hit this error message.
Root Cause
We added a required variable join_local_rooms_only to the adminbot and auditbot configuration that must be set for the installer to complete successfully.
Hookshot fails to display configuration widget
Issue
- While trying to load the hookshot configuration widget, I get:
Error occured during widget load: Could not contact your homeserver. Your instance may be misconfigured.
Environment
- Element Enterprise Installer 2022-10.01
- Integrator Installed
- Hookshot Installed
Resolution
You will need to rewrite the Disallowed IP list into the hookshot config so as not to include your IP address's range. Assuming that your IP address was in the 192.168.122.0/24 range, you could add the following to CONFIG_DIR/hookshot/hookshot.yml:
disallowed_ip_ranges:
- 127.0.0.0/8
- 10.0.0.0/8
- 172.16.0.0/12
- 100.64.0.0/10
- 169.254.0.0/16
- 192.88.99.0/24
- 198.18.0.0/15
- 192.0.2.0/24
- 198.51.100.0/24
- 203.0.113.0/24
- 224.0.0.0/4
- ::1/128
- fe80::/10
- fc00::/7
- 2001:db8::/32
- ff00::/8
- fec0::/10
After this, you would re-run the installer. This removes all ranges that are closely related to the 192.168.122.0/24 subnet. You will need to adjust this for your particular use case. To build the above list, we took the list mentioned in the root cause and edited it down.
Root Cause
Looking at the logs for hookshot while attempting this configuration (kubectl logs -n element-onprem instance-hookshot-0) shows:
INFO 18:04:13:625 [Appservice] 10.1.108.141 - - [11/Oct/2022:18:04:13 +0000] "PUT /transactions/133?access_token=%3Credacted%3E HTTP/1.1" 200 2 "-" "Synapse/1.65.0"
Oct-11 18:04:21.668 WARN ProvisioningApi Failed to fetch the server URL for element.demo ApiError: API error M_AS_BAD_OPENID: Server is disallowed
at ProvisioningApi.checkIpBlacklist (/bin/matrix-hookshot/node_modules/matrix-appservice-bridge/lib/provisioning/api.js:235:19)
at async ProvisioningApi.postExchangeOpenId (/bin/matrix-hookshot/node_modules/matrix-appservice-bridge/lib/provisioning/api.js:259:17) {
error: 'Server is disallowed',
errcode: 'M_AS_BAD_OPENID',
statusCode: 500,
additionalContent: {}
}
Oct-11 18:04:21.668 ERROR ProvisioningApi ApiError: API error M_AS_BAD_OPENID: Could not identify server url
at ProvisioningApi.postExchangeOpenId (/bin/matrix-hookshot/node_modules/matrix-appservice-bridge/lib/provisioning/api.js:264:19) {
error: 'Could not identify server url',
errcode: 'M_AS_BAD_OPENID',
statusCode: 500,
additionalContent: {}
}
The "Server is disallowed" message tells us that the IP address of synapse is disallowed by hookshot. Hookshot has a default list of disallowed IPs as documented here: https://github.com/matrix-org/matrix-hookshot/blob/main/docs/advanced/widgets.md to prevent Server Side Request Forgery. If your IP address is in that list, then you will need to redefine the disallow list to not include your IP range.
Installer hangs on "microk8s : Wait for microk8s to be ready" task
Issue
- The installer is hanging at this step:
2022-10-20 18:41:25,994 p=304 u=element-user n=ansible | TASK [microk8s : Wait for microk8s to be ready] ********************************
Environment
- Element Enterprise Installer 2022-09.02
- Red Hat Enterprise Linux 8.6
- Airgapped
Resolution
In parameters.yml, make sure the following is set for local_registry:
local_registry: localhost:32000
Once you have set this to localhost instead of 127.0.0.1, you can re-run the installer and the issue should be resolved.
Root Cause
The root cause of this issue is that specifying 127.0.0.1 for the local_registry causes microk8s to not be able to access the local registry and thus cannot finish setting itself up. As a result, the installer constantly waits for microk8s to be up, which never happens.
After an install, I only have the postgres-0 pod!
Issue
-
After installing Element On-Premise, I only have a
postgres-0in theelement-onpremnamespace:[user@element element-enterprise-installer-1.0.0]$ kubectl get pods -n element-onprem NAME READY STATUS RESTARTS AGE postgres-0 1/1 Running 0 3m33s -
Installer hangs while trying to connect to the local microk8s registry.
-
calico-kube-controllersin thekube-systemnamespace throwing this error:[FATAL][1] main.go 114: Failed to initialize Calico datastore error=Get https://10.152.183.1:443/apis/crd.projectcalico.org/v1/clusterinformations/default: context deadline exceeded(N.B. You must include the hash behind calico-kube-controllers to get the logs. So in the event that your pod is named
calico-kube-controllers-f7868dd95-dqd6bthen you would need to runkubectl logs -n kube-system calico-kube-controllers-f7868dd95-dqd6bto get the logs.)
Environment
- Element Enterprise Installer 1.0.0
- Red Hat Enterprise Linux 8.5.0
Resolution
-
On Ubuntu, edit
/etc/modulesand add in there a new line:br_netfilter -
On Red Hat Enterprise Linux, edit
/etc/modules-load.d/snap.microk8s.confand add in there a new line:br_netfilter -
Run:
microk8s stop -
Edit
/var/snap/microk8s/current/args/kube-proxyand remove the--proxy-modeline completely. -
Run:
sudo modprobe br_netfilter -
Then run:
microk8s start -
After this, wait a little bit for all of the pods to finish creating and bring the rest of the stack up.
Root Cause
-
Looking at all my pods, there are several errors:
[user@element element-enterprise-installer-1.0.0]$ kubectl get pods -A NAMESPACE NAME READY STATUS RESTARTS AGE kube-system coredns-7f9c69c78c-9g5xf 0/1 Running 0 8m3s kube-system calico-node-l8xmn 1/1 Running 0 11m container-registry registry-9b57d9df8-xjcf5 0/1 Pending 0 2m8s kube-system coredns-ddd489c4d-bhwq5 0/1 Running 0 2m8s kube-system dashboard-metrics-scraper-78d7698477-pcpbg 1/1 Running 0 2m8s kube-system hostpath-provisioner-566686b959-bvgr5 1/1 Running 0 2m8s kube-system calico-kube-controllers-f7868dd95-dqd6b 0/1 CrashLoopBackOff 10 11m element-onprem postgres-0 1/1 Running 0 2m9s kube-system kubernetes-dashboard-85fd7f45cb-m7lkb 1/1 Running 2 2m8s ingress nginx-ingress-microk8s-controller-tlrqk 0/1 Running 3 2m9s operator-onprem osdk-controller-manager-644775db9d-jzqnb 1/2 Running 2 2m8s kube-system metrics-server-8bbfb4bdb-tlnzk 1/1 Running 2 2m8s -
Looking at the logs for
calico-kube-controllersin thekube-systemnamespace:[user@element ~]$ kubectl logs -n kube-system calico-kube-controllers-f7868dd95-swpst 2022-05-09 15:18:10.856 [INFO][1] main.go 88: Loaded configuration from environment config=&config.Config{LogLevel:"info", ReconcilerPeriod:"5m", CompactionPeriod:"10m", EnabledControllers:"node", WorkloadEndpointWorkers:1, ProfileWorkers:1, PolicyWorkers:1, NodeWorkers:1, Kubeconfig:"", HealthEnabled:true, SyncNodeLabels:true, DatastoreType:"kubernetes"} W0509 15:18:10.857670 1 client_config.go:541] Neither --kubeconfig nor --master was specified. Using the inClusterConfig. This might not work. 2022-05-09 15:18:10.858 [INFO][1] main.go 109: Ensuring Calico datastore is initialized 2022-05-09 15:18:20.859 [ERROR][1] client.go 255: Error getting cluster information config ClusterInformation="default" error=Get https://10.152.183.1:443/apis/crd.projectcalico.org/v1/clusterinformations/default: context deadline exceeded 2022-05-09 15:18:20.859 [FATAL][1] main.go 114: Failed to initialize Calico datastore error=Get https://10.152.183.1:443/apis/crd.projectcalico.org/v1/clusterinformations/default: context deadline exceeded
The reason that this is happening is under certain scenarios, microk8s fails to load the br_netfilter kernel module and this allows the calico networking to fall back to user space routing, which fails to work in this environment and causes the calico-kube-controllers pod to not start, which cascades into the rest of the stack not really coming up. More on this specific issue can be seen here: https://github.com/canonical/microk8s/issues/3085. The microk8s team does expect to release a fix and we will work to incorporate it in the future.
Using Self-Signed Certificates with mkcert
Overview
We do not recommend using self-signed certificates with Element Enterprise On-Premise, however, we recognize that there are times when self-signed certificates can be the fastest way forward for demo or PoC purposes. It is in this spirit that these directions are provided.
Steps
The following instructions will enable you to use a tool called mkcert to generate self-signed certificates. Element does not ship this tool and so these directions are provided as one example of how to get self-signed certificates.
Ubuntu:
sudo apt-get install wget libnss3-tools
EL:
sudo yum install wget nss-tools -y
Both EL and Ubuntu:
wget -O mkcert "https://dl.filippo.io/mkcert/latest?for=linux/amd64"
sudo mv mkcert /usr/bin/
sudo chmod +x /usr/bin/mkcert
Once you have mkcert executable, you can run:
mkcert -install
The local CA is now installed in the system trust store! ⚡️
Now, you can verify the CA Root by doing:
mkcert -CAROOT
/home/element-demo/.local/share/mkcert
Your output may not be exactly the same, but it should be similar. Once we’ve done this, we need to generate self-signed certificates for our hostnames.
You can either do this by generating a wildcard certificate that works for all subdomains or you can do this per domain.
The following is an example for how to build a wildcard cert for element.local. You will only need to run this once and then you can use the generated certificate for all hostnames that require a certificate:
mkcert *.element.local element.local 192.168.122.39 127.0.0.1
Created a new certificate valid for the following names 📜 - "*.element.local"
- "element.local"
- "192.168.122.39"
- "127.0.0.1"
Reminder: X.509 wildcards only go one level deep, so this won't match a.b.element.local ℹ
The certificate is at "./_wildcard.element.local+3.pem" and the key at "./_wildcard.element.local+3-key.pem" ✅
It will expire on 5 July 2025 🗓
The following is an example of how to do it for element.local. You will need
to do this for all of the aforementioned hostnames, including the fqdn.tld.
The run for the element fqdn looks like this:
mkcert element.local element 192.168.122.39 127.0.0.1
Created a new certificate valid for the following names
- "element.local"
- "element"
- "192.168.122.39"
- "127.0.0.1"
The certificate is at "./element.local+3.pem" and the key at
"./element.local+3-key.pem" ✅
It will expire on 1 May 2024
Once you have self-signed certificates, you need to rename them for each host with the form of fqdn.crt and fqdn.key.
Using our above example, these are the commands we would need to run from
the installer directory just for the element.local certificate: (We ran mkcert in that directory as well.)
cp element.local+3.pem element.local.crt
cp element.local+3-key.pem element.local.key
In the case of the wildcard certificate, we could run:
cp ./_wildcard.element.local+3.pem wildcard.element.local.crt
cp ./_wildcard.element.local+3-key.pem wildcard.element.local.key
and then use this file where needed in the graphical installer for a crt/key pair.
Installer fails on firewalld, but firewalld is not installed
Issue
I'm seeing this with the installer, but I don't have firewalld installed:
2022-08-15 15:52:20,258 p=33 u=element n=ansible | TASK [microk8s : Check that firewalld is started if installed] ******************************************************************************************************************************************************************************
2022-08-15 15:52:20,299 p=33 u=element n=ansible | fatal: [localhost]: FAILED! => {
"changed": false,
"msg": "Firewalld is installed. Please start it for the installer to successfully configure it.\n"
}
Environment
- Element Enterprise Installer 2022-08.01
- Ubuntu 20.04
Resolution
Upgrade to Element Enterprise Installer 2022-08.02, which has the fixes for this.
Root Cause
On Ubuntu, systemd will report data for firewalld if it has been installed but is then uninstalled. Our installer did not account for this scenario and upon finding this scenario, we modified our checks. Those fixes went into 2022-08.02.
Pip cache errors
Issue
- The installer is failing at the pip stage with such kind of error message:
Collecting pycparser Using cached pycparser-2.21-py2.py3-none-any.whl (118 kB) ERROR: THESE PACKAGES DO NOT MATCH THE HASHES FROM THE REQUIREMENTS FILE. If you have updated the package versions, please update the hashes. Otherwise, examine the package contents carefully; someone may have tampered with them. ansible-core==2.13.5 from https://files.pythonhosted.org/packages/ee/84/5d22ae84e2a2644f631be42c9be81f5704a556ac2b705b14e83f343d37a6/ansible_core-2.13.5-py3-none-any.whl#sha256=3d2503ede324e0e73051b14e77f732a3cb0aed2437f94608af53929d2d1d54c8 (from -r requirements.txt (line 3)): Expected sha256 3d2503ede324e0e73051b14e77f732a3cb0aed2437f94608af53929d2d1d54c8 Got d9cb3de3cb5383a6effdab05486a3ffc34a813b4647e53634bb4505517e1abfa
Environment
- Ubuntu 20.04
- Standalone installer 2022-10.02 updating to 2022-11.01-pre1
Resolution
- You need to clear the pip cache dir to force pip to re-download the collection.
cd ~/.cache/pip
rm -rf http
Root cause
- Undetermined at this time, probable cause is a storage issue.
What Telemetry Data is Collected by Element?
https://ems-docs.element.io/link/690#bkmrk-what-telemetry-data-
Getting a 502 Bad Gateway Error When Accessing Element Web
Issue
- We are getting a 502 Bad Gateway Error from nginx when accessing Element Web.
Environment
- Element Enterprise Installer 1.0.0
- Red Hat Enterprise Linux 8.5
Resolution
- Allow access to ports 80 and 443 and enable masquerading in the firewall:
sudo firewall-cmd --add-service={http,https} --permanent
sudo firewall-cmd --add-masquerade --permanent
sudo firewall-cmd --reload
Root Cause
By default, firewalld does not allow masquerading (Network Address Translation, NAT) through the firewall. This causes all sorts of trouble with doing the NAT required to access pods in microk8s.
Configuring a microk8s Single Node Instance to Use a Network Proxy
Overview
If you are using the microk8s Single Node Installer and your site requires proxy access to get to the internet, making a few quick changes to your operating system configuration will enable our installer to access the resources it needs over the internet. This document discusses these changes.
Steps
We also cover the case where you need to use a proxy to access the internet. Please make sure that the following host variables are set:
Ubuntu Specific Directions
If your company's proxy is http://corporate.proxy:3128, you would edit /etc/environment and add the following lines:
HTTPS_PROXY=http://corporate.proxy:3128
HTTP_PROXY=http://corporate.proxy:3128
https_proxy=http://corporate.proxy:3128
http_proxy=http://corporate.proxy:3128
NO_PROXY=10.1.0.0/16,10.152.183.0/24,<node ip>,localhost,*.svc
no_proxy=10.1.0.0/16,10.152.183.0/24,<node ip>,localhost,*.svc
The IP Ranges specified to NO_PROXY and no_proxy are specific to the microk8s cluster and prevent microk8s traffic from going over the proxy. <node_ip> needs to be replaced by the IP of your server
EL Specific Directions
Using the same example of having a company proxy at http://corporate.proxy:3128, you would edit /etc/profile.d/http_proxy.sh and add the following lines:
export HTTP_PROXY=http://corporate.proxy:3128
export HTTPS_PROXY=http://corporate.proxy:3128
export http_proxy=http://corporate.proxy:3128
export https_proxy=http://corporate.proxy:3128
export NO_PROXY=10.1.0.0/16,10.152.183.0/24,<node ip>,127.0.0.1,localhost,*.svc
export no_proxy=10.1.0.0/16,10.152.183.0/24,<node ip>,127.0.0.1,localhost,*.svc
The IP Ranges specified to NO_PROXY and no_proxy are specific to the microk8s cluster and prevent microk8s traffic from going over the proxy. <node_ip> needs to be replaced by the IP of your server
In Conclusion
You will need to log out and back in for the environment variables to be re-read after setting them. If you already have microk8s running, you will need to issue:
microk8s.stop
microk8s.start
to have it reload the new environment variables.
If you need to use an authenticated proxy, then the URL schema for both EL and Ubuntu is as follows:
protocol:user:password@host:port
So if your proxy is corporate.proxy and listens on port 3128 without SSL and requires a username of bob and a password of inmye1em3nt then your url would be formatted:
http://bob:inmye1em3nt@corporate.proxy:3128
For further help with proxies, we suggest that you contact your proxy administrator or operating system vendor.
Installer 2022-08.01 fails to pull element web into the cluster
Issue
- After running the setup, the element web pod is stuck in
ImagePullBackoff
Environment
- Element Enterprise Installer 2022-08.01
Resolution
It is necessary to uncomment the following variables in secrets.yml :
dockerhub_username:
dockerhub_token:
If you have a dockerhub_username and dockerhub_token, please define them in secrets.yml. If not, then please leave them blank but uncommented.
Root Cause
Version 2022-08.01 uses an element web image hosted in ems-image-store. A defect appeared during the migration of the image, and the installers looks for the variables dockerhub_username and dockerhub_token to know if it has to configure docker secrets into the cluster.
url.js:354 error starting dimension
Issue
- I'm getting the following error trying to start dimension:
Starting matrix-dimension
url.js:354
this.auth = decodeURIComponent(rest.slice(0, atSign));
^
URIError: URI malformed
at decodeURIComponent (<anonymous>)
at Url.parse (url.js:354:19)
at Object.urlParse [as parse] (url.js:157:13)
at new Sequelize (/home/node/matrix-dimension/node_modules/sequelize/dist/lib/sequelize.js:1:1292)
at new Sequelize (/home/node/matrix-dimension/node_modules/sequelize-typescript/dist/sequelize/sequelize/sequelize.js:16:9)
at new _DimensionStore (/home/node/matrix-dimension/build/app/db/DimensionStore.js:42:30)
at Object.<anonymous> (/home/node/matrix-dimension/build/app/db/DimensionStore.js:106:26)
at Module._compile (internal/modules/cjs/loader.js:1072:14)
at Object.Module._extensions..js (internal/modules/cjs/loader.js:1101:10)
at Module.load (internal/modules/cjs/loader.js:937:32)
Environment
- Element Enterprise Installer 2022.05-02
Resolution
Ensure that you do not have any % characters in your PostgreSQL password. Once you have removed any % characters from your PostgreSQL password, please update your configuration files and re-run the installer.
Root Cause
Dimension does not properly encode the % for it's Postgresql connection URL and this triggers the above error.
Installer fails on enabling addons
Issue
The installer is stating that it's failed and I'm seeing messages like:
skipping: [localhost] => (item=host-access)
changed: [localhost] => (item=ingress)
FAILED - RETRYING: [localhost]: enable addons (3 retries left).
FAILED - RETRYING: [localhost]: enable addons (2 retries left).
FAILED - RETRYING: [localhost]: enable addons (1 retries left).
failed: [localhost] (item=metrics-server) => {"ansible_loop_var": "item", "attempts": 3, "changed": true, "cmd": ["/snap/bin/microk8s.enable", "metrics-server"], "delta": "0:00:09.568390", "end": "2022-04-13 12:08:41.833858", "item": {"enabled": true, "name": "metrics-server"}, "msg": "non-zero return code", "rc": -15, "start": "2022-04-13 12:08:32.265468", "stderr": "Warning: apiregistration.k8s.io/v1beta1 APIService is deprecated in v1.19+, unavailable in v1.22+; use apiregistration.k8s.io/v1 APIService", "stderr_lines": ["Warning: apiregistration.k8s.io/v1beta1 APIService is deprecated in v1.19+, unavailable in v1.22+; use apiregistration.k8s.io/v1 APIService"], "stdout": "Enabling Metrics-Server\nclusterrole.rbac.authorization.k8s.io/system:aggregated-metrics-reader unchanged\nclusterrolebinding.rbac.authorization.k8s.io/metrics-server:system:auth-delegator unchanged\nrolebinding.rbac.authorization.k8s.io/metrics-server-auth-reader unchanged\napiservice.apiregistration.k8s.io/v1beta1.metrics.k8s.io unchanged\nserviceaccount/metrics-server unchanged\ndeployment.apps/metrics-server unchanged\nservice/metrics-server unchanged\nclusterrole.rbac.authorization.k8s.io/system:metrics-server unchanged\nclusterrolebinding.rbac.authorization.k8s.io/system:metrics-server unchanged\nclusterrolebinding.rbac.authorization.k8s.io/microk8s-admin unchanged", "stdout_lines": ["Enabling Metrics-Server", "clusterrole.rbac.authorization.k8s.io/system:aggregated-metrics-reader unchanged", "clusterrolebinding.rbac.authorization.k8s.io/metrics-server:system:auth-delegator unchanged", "rolebinding.rbac.authorization.k8s.io/metrics-server-auth-reader unchanged", "apiservice.apiregistration.k8s.io/v1beta1.metrics.k8s.io unchanged", "serviceaccount/metrics-server unchanged", "deployment.apps/metrics-server unchanged", "service/metrics-server unchanged", "clusterrole.rbac.authorization.k8s.io/system:metrics-server unchanged", "clusterrolebinding.rbac.authorization.k8s.io/system:metrics-server unchanged", "clusterrolebinding.rbac.authorization.k8s.io/microk8s-admin unchanged"]}
skipping: [localhost] => (item=rbac)
changed: [localhost] => (item=registry)
Environment
- Red Hat Enterprise Linux 8.5
- Element Enterprise Installer 0.6.1
Resolution
Re-run the installer until these errors clear and all of the microk8s addons are enabled.
Root Cause
There is a microk8s timing issue that we have not quite figured out.
I'd like to turn off federation
Issue
- Need to turn off federation, which is on by default.
Environment
- Element On-Premise Installer
Resolution
Add an empty federation_domain_whitelist. To do this, add the following in a .yml file in the Synapse config folder:
federation_domain_whitelist: []
See https://matrix-org.github.io/synapse/latest/usage/configuration/config_documentation.html?highlight=federation#federation for further details.
N.B. we recommend also firewalling your federation listener to limit inbound federation traffic as early as possible, rather than relying purely on this application-layer restriction. If not specified, the default is to whitelist everything.
Root Cause
Federation is on by default.
How do I migrate to SSO while keeping my original accounts?
Issue
- When having previously used Matrix without SSO, after setting up SSO, new matrix accounts are created for all users. Users would prefer to keep using there existing accounts, whilst still making use of SSO.
Environment
- Element On-Premise
- Element Cloud
- SSO Configured
Resolution
Transferring SSO external_ids to original users
To transfer 'external_ids' from SSO accounts, to your original accounts you will need to use the Admin API.
Getting an Access Token
Before being able to use the Admin API, you will need an admin account and it's 'Access Token', you can make a user a Synapse Admin by either following the steps in the link above (required for On-Premise), or following these steps on the EMS Control Panel:
- Access the 'Server Admin' tab
- Under the 'Users' tab, select the user that should be made Synapse Admin
- Click the checkbox, next to 'Synapse Admin' and click 'Yes' to confirm
Once a user is a Synapse Admin, you can retrieve their 'Access Token' by logging in via the Element Matrix client:
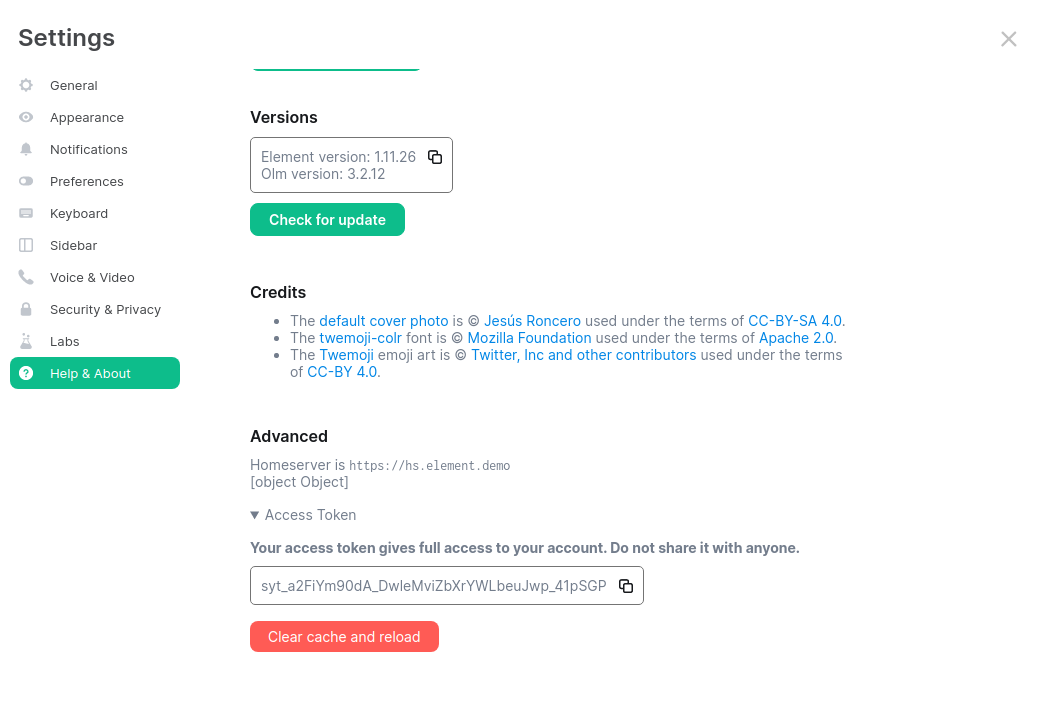
- Click on the users' profile icon in the top-left and select 'All Settings'
- Open the 'Help & About' settings page, then scroll down to the 'Advanced' section
- Click 'Access Token' to reveal the token, copy this to interact with the Admin API
Using an Access Token
Access tokens will need to be passed into all API requests as an Authorization Bearer token, see examples below:
Bash:
curl --request GET 'https://example.com/_synapse/admin/v2/users?from=0&limit=10&guests=false' \
--header 'Authorization: Bearer syt_adminToken'
Windows:
$headers.Add("Authorization", "Bearer syt_adminToken")
Python:
import requests
headers = {
'Authorization': 'Bearer syt_adminToken',
}
Customising commands for your specific enviroment
The commands to follow are generic and will need to be modified to suit your specific environment:
- Replace
example.comwith your homseserver hostname.- Note, for EMS customers, this is always the .ems.host domain - even if your server uses Custom DNS.
- Replace
@user:example.comwith the Matrix ID of the user you want to edit.- Remember to replace
example.comper the above step
- Remember to replace
- Replace
syt_adminTokenwith an access token on your server with admin privileges.- See previous section for how to obtain
- Replace
samlin"auth_provider": "saml", with the SSO type you are using. - Replace
email@address.comin"external_id": "email@address.com"with the user's ID in your SSO provider.
Getting SSO users' external_ids
-
Using the link above, you can use a GET request to
/_synapse/admin/v2/usersto retrieve a list of all accounts on your home server. Follow the guidance on pagination to ensure all users are retrieved.Bash:
curl --request GET 'https://example.com/_synapse/admin/v2/users?from=0&limit=10&guests=false' \ --header 'Authorization: Bearer syt_adminToken'Windows:
$headers = New-Object "System.Collections.Generic.Dictionary[[String],[String]]" $headers.Add("Authorization", "Bearer syt_adminToken") $response = Invoke-RestMethod 'https://example.com/_synapse/admin/v2/users?from=0&limit=10&guests=false' -Method 'GET' -Headers $headers $response | ConvertTo-Json
-
For each user you can then use their
namein another GET request to/_synapse/admin/v2/users/<user_id>, replacing<user_id>withname.Bash:
curl --request GET 'https://example.com/_synapse/admin/v2/users/@user:example.com' \ --header 'Authorization: Bearer syt_adminToken'Windows:
$headers = New-Object "System.Collections.Generic.Dictionary[[String],[String]]" $headers.Add("Authorization", "Bearer syt_adminToken") $response = Invoke-RestMethod 'https://example.com/_synapse/admin/v2/users/@user:example.com' -Method 'GET' -Headers $headers $response | ConvertTo-Json -
You will find the
external_idsfor each user within the JSON output. You can programatically run through all users and generate a list of only those withexternal_ids, removing unneeded information. (See example below)Python:
import requests # REPLACE THESE VALUES WITH ACCESS TOKEN AND HOME SERVER URL headers = { 'Authorization': 'Bearer syt_adminToken', } url = 'https://example.com' # GET LIST OF ALL USERS ON HOME SERVER # OUTPUT: 'all_users' contains a list of all users next_token = '0' last_token = '' all_users = [] get_users = requests.get(url + '/_synapse/admin/v2/users?from=' + next_token + '&limit=10&guests=false', headers=headers).json() for user in get_users['users']: all_users.append(user['name']) while ('next_token' in get_users) and (next_token != last_token): next_token = get_users['next_token'] get_users = requests.get(url + '/_synapse/admin/v2/users?from=' + next_token + '&limit=10&guests=false', headers=headers).json() for user in get_users['users']: all_users.append(user['name']) # FOR EACH USER, GET ALL INFO, EXCLUDE THOSE WITHOUT 'external_ids' # OUTPUT: 'all_external_ids' contains a list of all users with external ids all_external_ids = [] for user in all_users: get_user = requests.get(url + '/_synapse/admin/v2/users/' + user, headers=headers).json() if get_user['external_ids'].__len__() != 0: all_external_ids.append( { 'sso_username': user, 'original_username': '', 'external_ids': get_user['external_ids'] } )
Transferring SSO external_ids information
Admin API Create or Modify Account
With all external_ids collected, you will need to identify each SSO Account and the associated original account that you'd like to transfer the associated SSO information over too.
If using the Python example above, you will need to store the original username within all_external_ids[X]['original_username'], replacing X with the index of the SSO user. If you create a dictionary with keys named of the SSO username, and values of the desired Original username you could use the following to update all_external_ids:
Python:
# ADD REQUIRED ORIGINAL USERNAME
for user in all_external_ids:
dict_storing_sso2orig = {'@example_sso_user:example.com': '@example_orig_user:example.com'}
user['original_username'] = dict_storing_sso2orig[str(user['sso_username'])]
Once you have related all SSO Usernames to Original Usernames you can then, using the link above, use a PUT request to /_synapse/admin/v2/users/<user_id> to change the external_ids data for each account.
- Remember to remove the
external_idsinformation from the soon to be defunct SSO accounts, this is done by sending blank data{"external_ids":[]} - Adding of
external_idsshould follow the below JSON format:{ "external_ids": [ { "auth_provider": "<provider1>", "external_id": "<user_id_provider_1>" }, { "auth_provider": "<provider2>", "external_id": "<user_id_provider_2>" } ] }
Bash:
- Removing
external_ids:curl --request PUT 'https://example.com/_synapse/admin/v2/users/@user:example.com' \ --header 'Authorization: Bearer syt_adminToken' \ --header 'Content-Type: application/json' \ --data-raw '{"external_ids":[]}' - Adding
external_ids:curl --location --request PUT 'https://example.ems.host/_synapse/admin/v2/users/@user:example.com' \ --header 'Authorization: Bearer syt_adminToken' \ --header 'Content-Type: application/json' \ --data-raw '{ "external_ids": [ { "auth_provider": "saml", "external_id": "email@address.com" } ] }'
Windows:
- Removing
external_ids:$headers = New-Object "System.Collections.Generic.Dictionary[[String],[String]]" $headers.Add("Authorization", "Bearer syt_adminToken") $headers.Add("Content-Type", "application/json") $body = "{`"external_ids`": []}" $response = Invoke-RestMethod 'https://example.ems.host/_synapse/admin/v2/users/@user:example.com' -Method 'PUT' -Headers $headers -Body $body $response | ConvertTo-Json - Adding
external_ids:$headers = New-Object "System.Collections.Generic.Dictionary[[String],[String]]" $headers.Add("Authorization", "Bearer syt_adminToken") $headers.Add("Content-Type", "application/json") $body = "{`"external_ids`": [{`"auth_provider`": `"saml`",`"external_id`": `"email@address.com`"}]}" $response = Invoke-RestMethod 'https://example.com/_synapse/admin/v2/users/@user:example.com' -Method 'PUT' -Headers $headers -Body $body $response | ConvertTo-Json
Continuing with the Python example, you can now use this to remove the external_ids from each SSO account, and add that information to the associated Original account.
Python:
# REMOVE 'external_ids' from 'sso_username' ACCOUNTS FROM 'all_external_ids' THEN
# UPDATE ALL 'original_username' ACCOUNTS FROM 'all_external_ids' WITH 'external_ids' FROM 'sso_username'
for user in all_external_ids:
data = '{"external_ids":' + str(user['external_ids']).replace("'", '"').replace(" ", "") + '}'
remove_sso = requests.put(url + '/_synapse/admin/v2/users/' + user['sso_username'], headers=headers, data='{"external_ids":[]}')
if remove_sso.status_code == 200:
add_sso = requests.put(url + '/_synapse/admin/v2/users/' + user['original_username'], headers=headers, data=data)
Python Example
The full python script is available below:
import requests
# REPLACE THESE VALUES WITH ACCESS TOKEN AND HOME SERVER URL
headers = {
'Authorization': 'Bearer syt_adminToken',
}
url = 'https://example.com'
# GET LIST OF ALL USERS ON HOME SERVER
# OUTPUT: 'all_users' contains a list of all users
next_token = '0'
last_token = ''
all_users = []
get_users = requests.get(url + '/_synapse/admin/v2/users?from=' + next_token + '&limit=10&guests=false',
headers=headers).json()
for user in get_users['users']:
all_users.append(user['name'])
while ('next_token' in get_users) and (next_token != last_token):
next_token = get_users['next_token']
get_users = requests.get(url + '/_synapse/admin/v2/users?from=' + next_token + '&limit=10&guests=false',
headers=headers).json()
for user in get_users['users']:
all_users.append(user['name'])
# FOR EACH USER, GET ALL INFO, EXCLUDE THOSE WITHOUT 'external_ids'
# OUTPUT: 'all_external_ids' contains a list of all users with external ids
all_external_ids = []
for user in all_users:
get_user = requests.get(url + '/_synapse/admin/v2/users/' + user, headers=headers).json()
if get_user['external_ids'].__len__() != 0:
all_external_ids.append(
{
'sso_username': user,
'original_username': '',
'external_ids': get_user['external_ids']
}
)
# ADD REQUIRED ORIGINAL USERNAME
# REPLACE CONTENTS OF 'dict_storing_sso2orig' TO SET UP RELATED SSO -> ORIGINAL ACCOUNTS
# CHANGE 'readme' VARIABLE BELOW TO 'True' TO CONTINUE
readme = False
dict_storing_sso2orig = {'@example_sso_user:example.com': '@example_orig_user:example.com'}
for user in all_external_ids:
if readme is True:
user['original_username'] = dict_storing_sso2orig[str(user['sso_username'])]
# REMOVE 'external_ids' from 'sso_username' ACCOUNTS FROM 'all_external_ids' THEN
# UPDATE ALL 'original_username' ACCOUNTS FROM 'all_external_ids' WITH 'external_ids' FROM 'sso_username'
# CHANGE 'dict_storing_sso2orig_check' VARIABLE BELOW TO 'True' TO CONTINUE
dict_storing_sso2orig_check = False
for user in all_external_ids:
if (dict_storing_sso2orig_check is True) and (dict_storing_sso2orig != {'@example_sso_user:example.com': '@example_orig_user:example.com'}):
data = '{"external_ids":' + str(user['external_ids']).replace("'", '"').replace(" ", "") + '}'
remove_sso = requests.put(url + '/_synapse/admin/v2/users/' + user['sso_username'], headers=headers, data='{"external_ids":[]}')
if remove_sso.status_code == 200:
add_sso = requests.put(url + '/_synapse/admin/v2/users/' + user['original_username'], headers=headers, data=data)
Root Cause
If SSO is not setup prior to using matrix, new SSO duplicate accounts are created following it's configuration. Users would prefer to keep their existing accounts and associated setup (Rooms / etc.) so migrating external_ids from these new SSO accounts to the originals is required.
How do I give a user admin rights when I am using delegated authentication and cannot log into the admin console?
Issue
- I am trying to log into the admin console, but cannot log in with the provided
onprem-admin-donotdeleteuser as I am using delegated authentication.
Environment
- Element Server Suite
Resolution
If you wish to give @bob:server.name admin access, then as a user with kubernetes access to your environment, run:
kubectl exec -n element-onprem -it pods/synapse-postgres-0 -- /usr/bin/psql -d synapse -U synapse_user -c "update users set admin = 1 where name = '@bob:server.name';"
You will want to replace @bob:server.name with the actual user that you wish to give admin to.
Root Cause
The issue is that the delegated authentication does not have an onprem-admin-donotdelete user and so there is no way to log in with the provided admin account.
How do I run the installer without using the GUI?
Issue
- I need to be able to automate my install with configuration files and an unattended installation.
- I prefer to configure everything with the command line.
Environment
- Element Enterprise Graphical Installer 2023-03.02 or Later
Resolution
You will need to prepare the cluster.yml, deployment.yml, secrets.yml, and legacy configuration directory to cater to your deployment. The best way to do this is to use the GUI installer and just not click install. Then you can move those files around and edit them as needed.
Once you have them configured correctly, you can run the installer in an unattended fashion without the GUI by doing:
$ ./element-enterprise-graphical-installer-YYYY-MM.VERSION-gui.bin unattended
replacing YYYY-MM.VERSION with the specific string for your downloaded installer.
Root Cause
When we switched to a GUI installer, the primary interface stopped being command line based.
Verifying Well Known CORS Headers
Issue
- Specifying a homeserver using Well Known delegation but without CORS headers results in an error.
Environment
- Element On-Premise
- Element Cloud Offerings
Resolution
Enable CORS Headers, see enable-cors.org for instructions on how to do this. Then you can verify your .well-known files from the command line:
Note the lines access-control-allow-origin: * and content-type: application/json
-
On Mac or Linux, using the
terminal$ curl -i https://element.io/.well-known/matrix/client HTTP/2 200 date: Fri, 31 Jul 2020 09:11:21 GMT content-type: application/json content-length: 129 set-cookie: __cfduid=x...; expires=Sun, 30-Aug-20 09:11:21 GMT; path=/; domain=.element.io; HttpOnly; SameSite=Lax access-control-allow-origin: * cf-cache-status: DYNAMIC cf-request-id: 0... expect-ct: max-age=604800, report-uri="https://report-uri.cloudflare.com/cdn-cgi/beacon/expect-ct" server: cloudflare cf-ray: 5... { "m.homeserver": { "base_url": "https://element.ems.host" }, "m.identity_server": { "base_url": "https://vector.im" } } $ curl -i https://element.io/.well-known/matrix/server HTTP/2 200 date: Fri, 31 Jul 2020 09:11:25 GMT content-type: application/json content-length: 52 set-cookie: __cfduid=x...; expires=Sun, 30-Aug-20 09:11:25 GMT; path=/; domain=.element.io; HttpOnly; SameSite=Lax access-control-allow-origin: * cf-cache-status: DYNAMIC cf-request-id: 0... expect-ct: max-age=604800, report-uri="https://report-uri.cloudflare.com/cdn-cgi/beacon/expect-ct" server: cloudflare cf-ray: 5... { "m.server": "element.ems.host:443" } -
On Windows, using
PowerShellPS C:\Users\twilight> Invoke-WebRequest -Uri https://element.io/.well-known/matrix/client StatusCode : 200 StatusDescription : OK Content : { "m.homeserver": { "base_url": "https://element.ems.host" }, "m.identity_server": { "base_url": "https://vector.im" } } RawContent : HTTP/1.1 200 OK Connection: keep-alive Access-Control-Allow-Origin: * CF-Cache-Status: DYNAMIC cf-request-id: 0... Expect-CT: max-age=604800, report-uri="https://repor... Forms : {} Headers : {[Connection, keep-alive], [Access-Control-Allow-Origin, *], [CF-Cache-Status, DYNAMIC], [cf-request-id, 0...]...} Images : {} InputFields : {} Links : {} ParsedHtml : System.__ComObject RawContentLength : 129 PS C:\Users\twilight> Invoke-WebRequest -Uri https://element.io/.well-known/matrix/server StatusCode : 200 StatusDescription : OK Content : { "m.server": "element.ems.host:443" } RawContent : HTTP/1.1 200 OK Connection: keep-alive Access-Control-Allow-Origin: * CF-Cache-Status: DYNAMIC cf-request-id: 0... Expect-CT: max-age=604800, report-uri="https://repor... Forms : {} Headers : {[Connection, keep-alive], [Access-Control-Allow-Origin, *], [CF-Cache-Status, DYNAMIC], [cf-request-id, 0...]...} Images : {} InputFields : {} Links : {} ParsedHtml : System.__ComObject RawContentLength : 52
Root Cause
Without cross-origin resource sharing, access to fetch the well known files will be blocked by CORS policy as No 'Access-Control-Allow-Origin' header is present on the requested resource.
Submitting Telemetry Data to Element
Issue
- I am unable to allow Element's telemetry upload to take place and need to submit my telemetry data to Element.
Environment
- Element Server Suite
Resolution
By default, ESS servers connected to the internet will automatically send telemetry to Element. Please allow this to happen by making sure you have not blocked ems.element.io on port 443 from your homeserver. If you are air-gapped or need to block ems.element.io, then please follow the resolution below to manually submit telemetry.
In order to gather telemetry data, you will need to use the element-telemetry-export.py script, which comes with the installer.
To do this, run:
cd ~/.element-enterprise-server/installer/lib
/usr/bin/env python3 ./element-telemetry-export.py
You will be prompted for an access token:
Matrix user access token not specified in the "MATRIX_USER_ACCESS_TOKEN" environment variable. Please provide the access token and hit enter:
You will need to provide a valid access token for a user who has access to the telemetry room. This can be found by logging in to Element Web as this user, going to "All Settings", then clicking "Help & About" and finally expanding the section for "Access Token".
Provide the access token to the prompt and hit enter.
Once you have done this, you will have some messages that look similar to:
2023-04-18 15:36:41,580:INFO:Parsing configuration file (/home/karl1/.element-enterprise-server/config/telemetry-config.json)
2023-04-18 15:36:41,581:INFO:Performing Matrix sync with homeserver (https://hs.element.demo)
2023-04-18 15:36:41,643:INFO:Scanning page 1
2023-04-18 15:36:41,716:INFO:Scanning page 2
2023-04-18 15:36:41,782:INFO:Writing 19 telemetry events to ZIP file (/home/karl1/.element-enterprise-server/installer/lib/telemetry_2023-04-18.zip)
2023-04-18 15:36:41,783:INFO:Saving some internal state (for next time)
and you will have a new zip file in this directory with a date stamp in the format telemetry_YYYY-MM-DD.zip. In my case, I have telemetry_2023-04-18.zip.
If you are having SSL connectivity issues with the exporter, you may wish to either disable TLS verification or provide a CA certificate to the exporter with these optional command line parameters:
--disable-tls-verification
Do not check SSL certificate validity when querying the Matrix server
--ca-cert-path CA_CERT_PATH
Specify the path to the CA file (or a directory) to use when verifying Matrix server's
SSL certificate. Consult README.md for more details
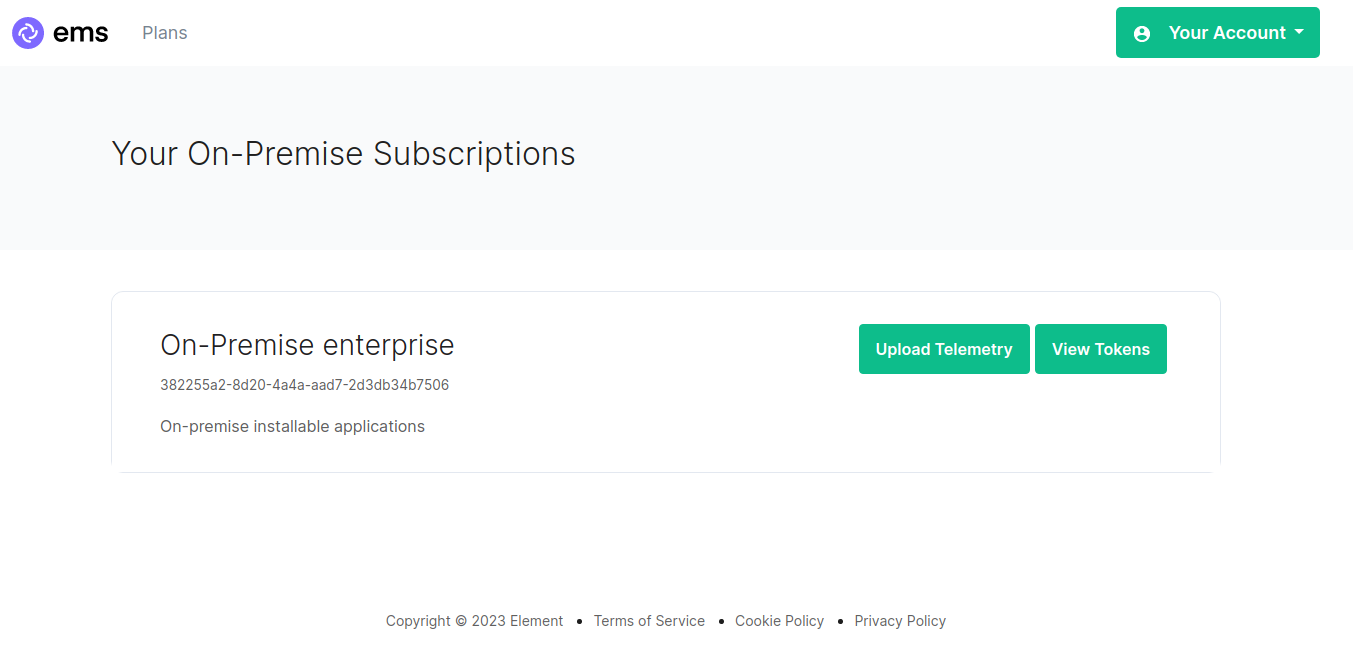
I can now browse to https://ems.element.io/on-premise/subscriptions and click "Upload Telemetry" next to the subscription that I wish to upload the data for:
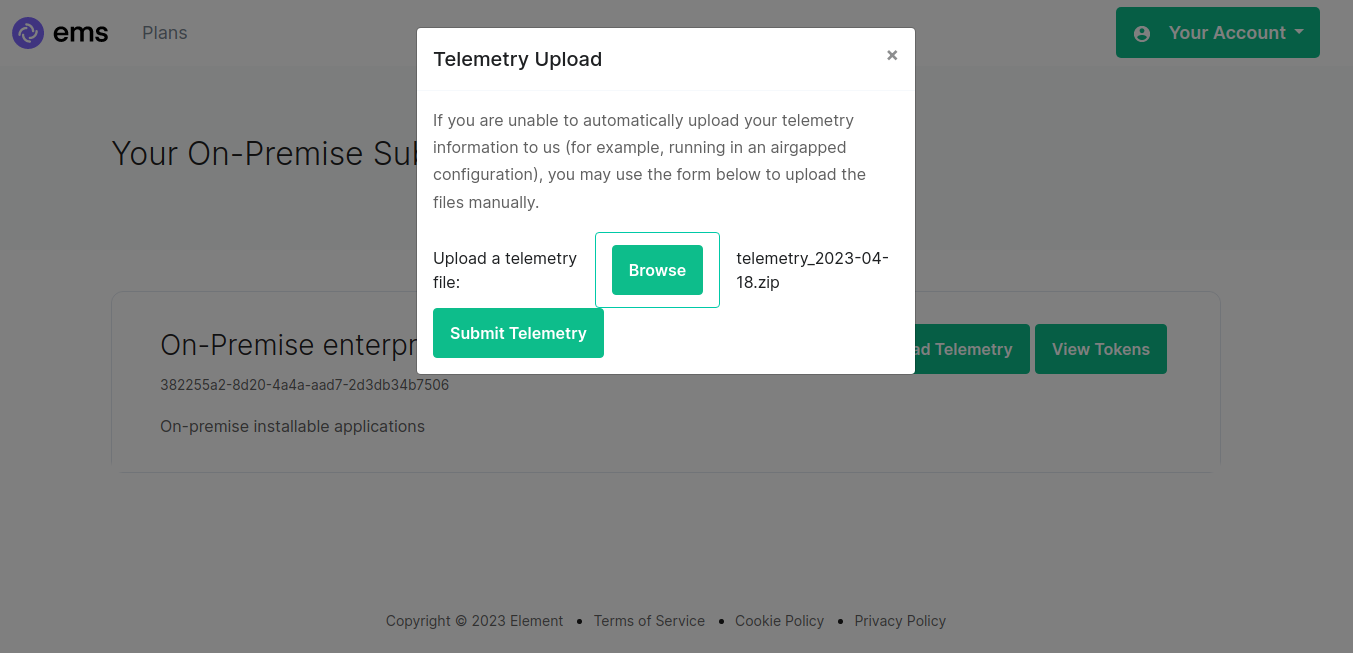
I can then browse for my telemetry file and click "Submit Telemetry":
Once successful, you will see this screen:

You can then close the upload window.
Root Cause
- Some environments do not allow telemetry data to be uploaded to Element. This is caused by blocking access from the homeserver to
ems.element.ioon port 443.
What data should I collect when I have an issue?
Issue
- I'm having an issue with Element's on premise server suite and need to know what data to collect to share with Element.
Environment
- Element Server Suite (ESS) On-Premise
Resolution
The following data is helpful to collect for Element:
For issues perceived to be with the installer, please run:
kubectl logs -n operator-onprem $(kubectl get pods -n operator-onprem | grep -i running | awk '{print $1}') > ~/operator-$(hostname).log
kubectl logs -n updater-onprem $(kubectl get pods -n updater-onprem | grep -i running | awk '{print $1}') > ~/updater-$(hostname).log
tar cvjf element-installer-config-logs-$(hostname).tar.bz2 ~/.element-enterprise-server/config ~/.element-enterprise-server/logs ~/operator-$(hostname).log ~/updater-$(hostname).log
and send element-installer-config-logs-your.hostname.com.tar.bz2 to Element. Replace your.hostname.com with the hostname of your server to find the file.
For issues perceived to be with microk8s in single node environments, please run:
microk8s.inspect
This command will build a tarball of microk8s related data and tell you at the end where that tarball is located:
Building the report tarball
Report tarball is at /var/snap/microk8s/4950/inspection-report-20230419_074048.tar.gz
Please send that specific tarball to Element for analysis.
I need a new token!
https://ems-docs.element.io/link/679#bkmrk-ess-subscription-cre
module 'jsonschema._utils' has no attribute 'load_schema'
Issue
- On-Premise installer fails to install with error:
module 'jsonschema._utils' has no attribute 'load_schema'
Environment
- On-Premise
2023-02.01->2023-07.01(Non-Airgapped)
Resolution
Please pause any updates to your installer before updating to 2023-07.02.
If you need to run an update, you can work around the error by editing ~/.element-enterprise-server/installer/requirements.txt and change openapi_schema_validator==0.4.0 to openapi_schema_validator==0.5.0 .
Please update your version of the installer to 2023-07.02 or newer. Installations using these newer versions will prevent this issue from re-occurring.
Root Cause
The On-Premise installer installs required dependancies when run. The update of jsonschema to 4.18.0 has broken compatibility with the version of openapi_schema_validator the affected installer versions use.
Customers using the airgapped installer of affected versions will not be affected as the dependancies included in the build pre-date the 4.18.0 update.
Kubernetes internal certificates have expired
Issue
- Errors within cluster relating to expired Kubernetes internal certificates, i.e.
E0830 12:45:48.789064 34964 proxy_server.go:147] Error while proxying request: x509: certificate has expired or is not yet valid: current time 2023-08-30T12:45:48+03:00 is after 2023-08-15T14:55:09Z
Environment
- Element On-Premise Installer
Resolution
Run the following commands to refresh your internal certificates:
-
sudo microk8s.refresh-certs -e server.crt -
sudo microk8s.refresh-certs -e front-proxy-client.crt -
sudo snap restart microk8s
Root Cause
Most likely caused by an open issue with microk8s regarding auto-renewing of certificates, see Issue 2489.
Setting up Delegated Authentication with SAML on Microsoft Azure
https://ems-docs.element.io/link/691#bkmrk-saml-on-microsoft-az-1
The Secure Border Gateway
The Secure Border Gateway (SBG) is an HTTP proxy designed to filter and analyze Matrix traffic between both clients and the homeserver, as well as between the homeserver and other federating homeservers. This guide outlines the key functionalities and configuration you need to be aware of when using the SBG.
Enable the Secure Border Gateway
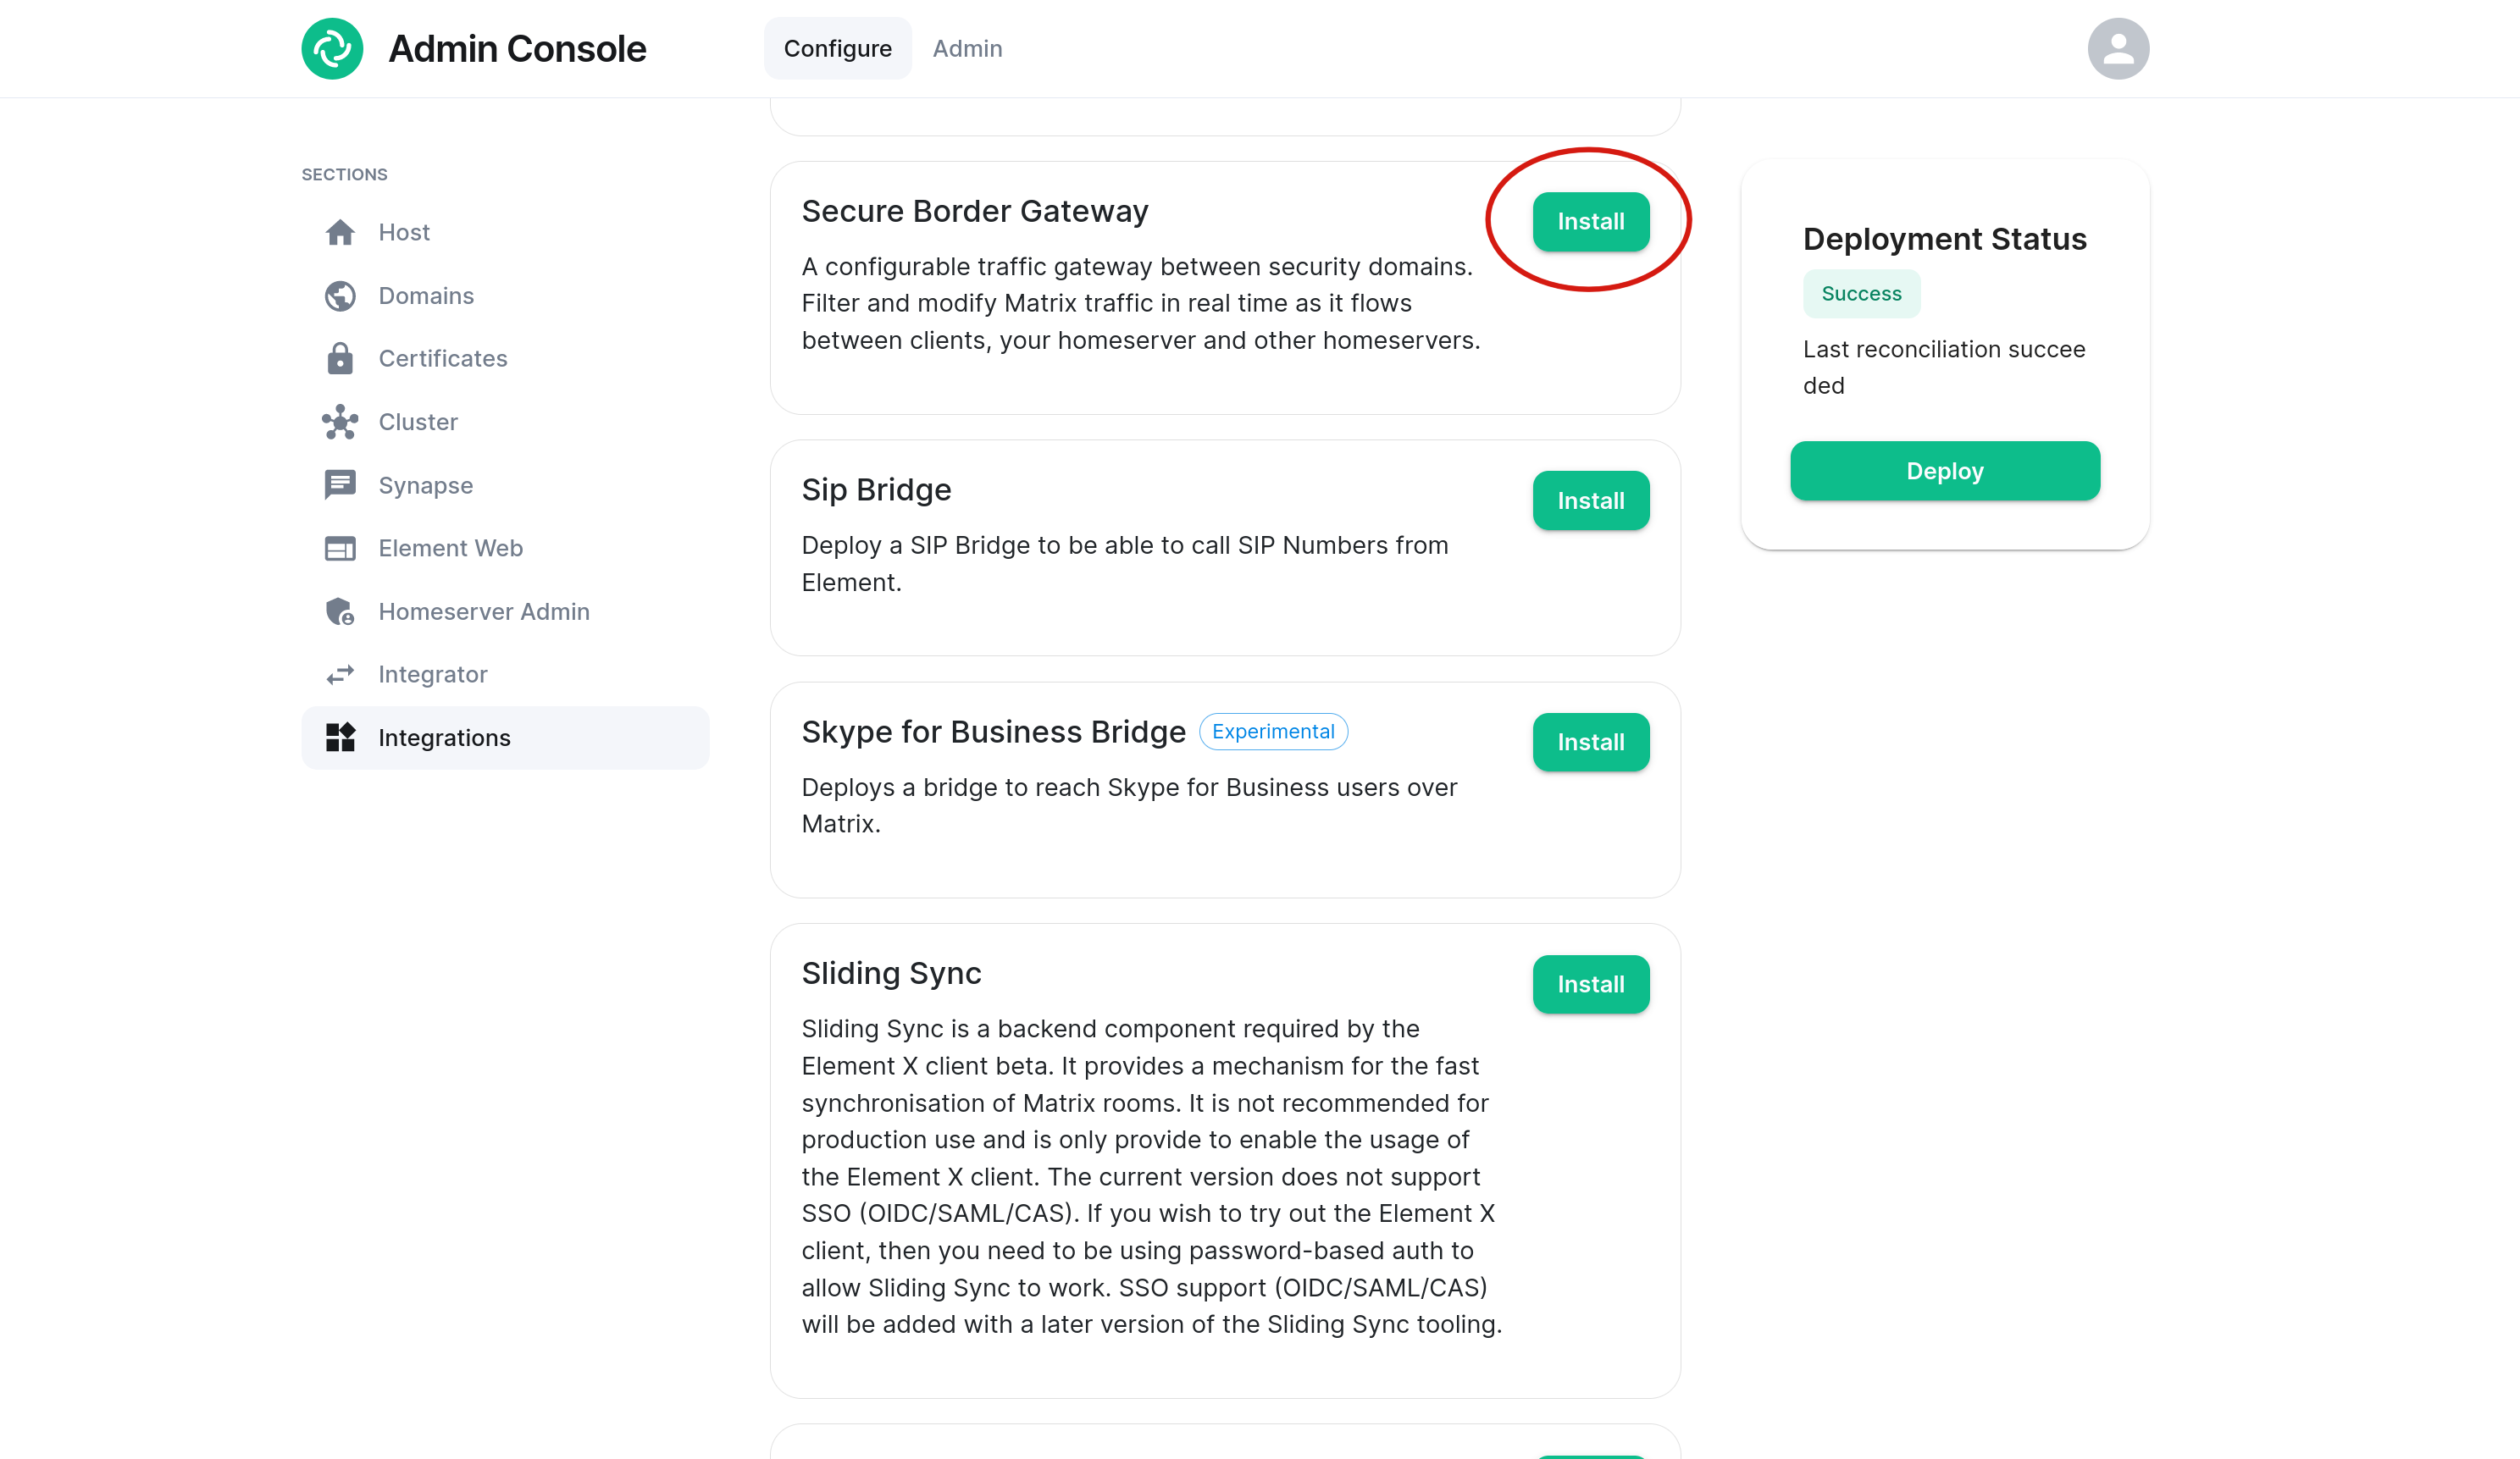
On the Integrations page, locate the Secure Border Gateway add-on and select Install. Once installed, you can access its configuration.
Configuration
Required Client Headers
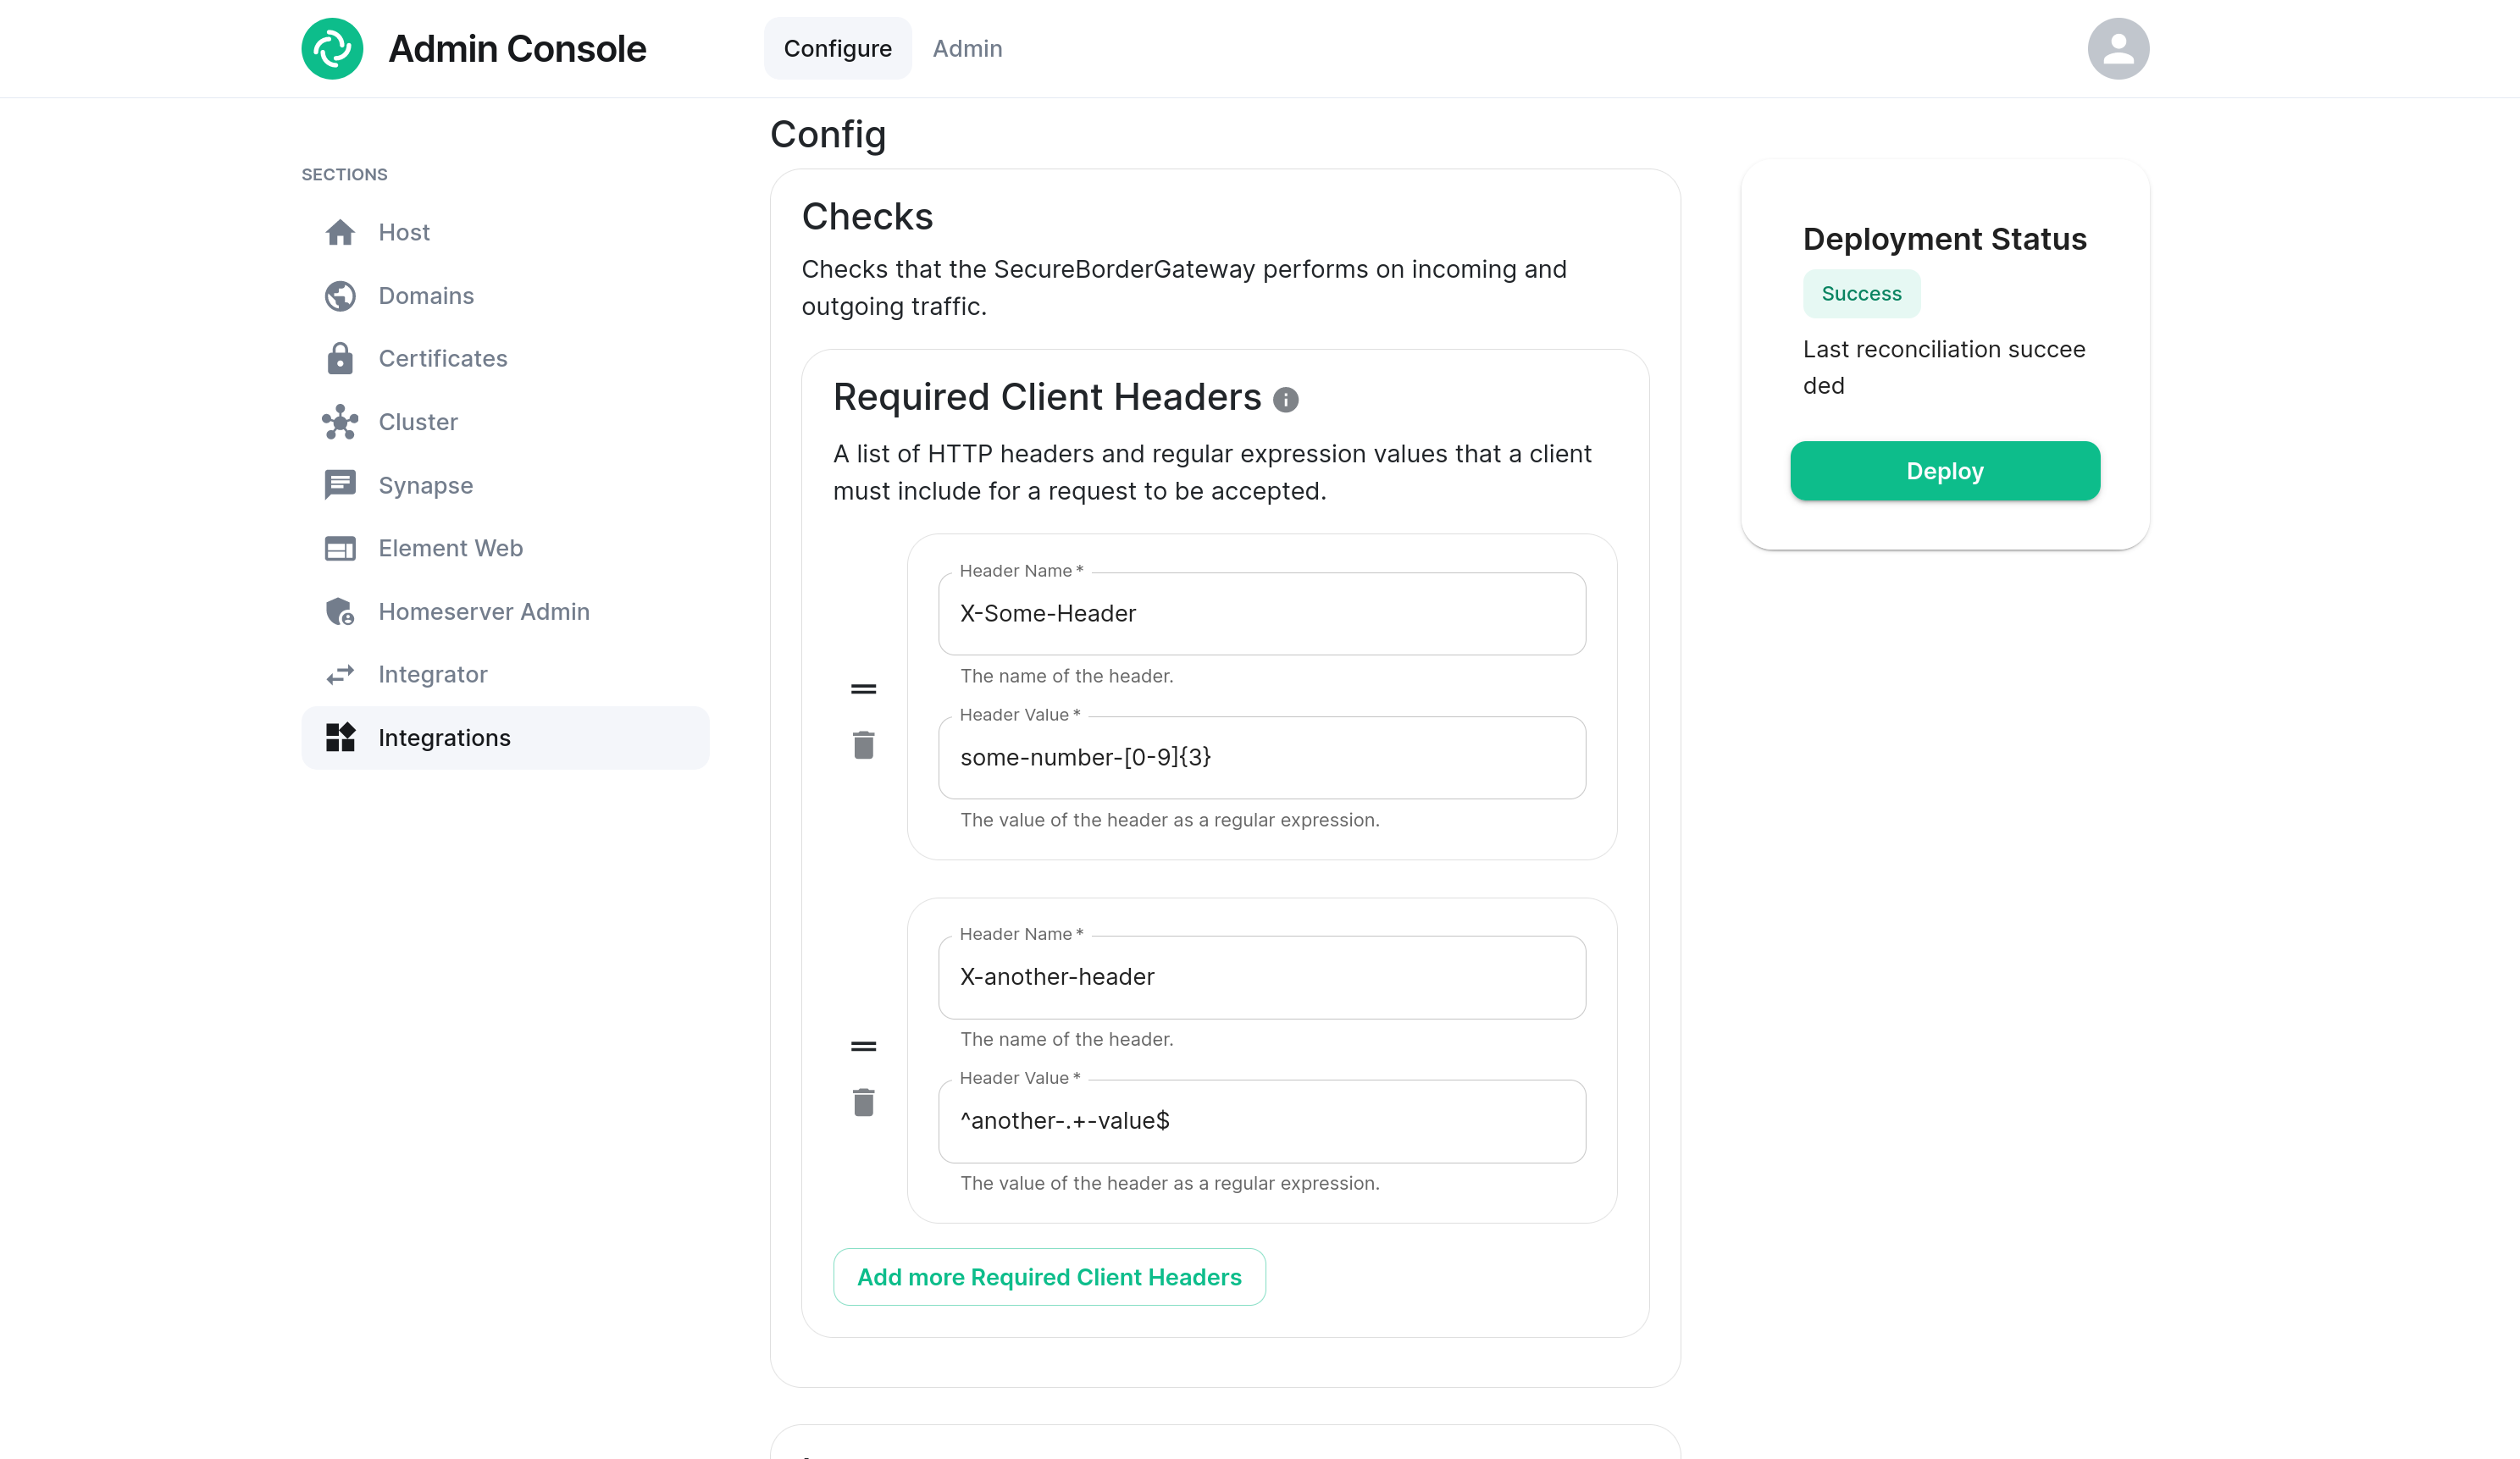
A set of headers can be configured such that a Matrix client must supply at least one of in order to access the homeserver.
For each header, enter the name of the header (case-insensitive) and a regular expression pattern that the header's value must match.
If a client does not supply the appropriate headers in a request, that request will be rejected with HTTP status code 403, and a standard Matrix error response with errcode field M_FORBIDDEN.
A header name that is stripped by the SBG should not be used as a required client header. Otherwise no client will be able to access the service. For example, an Element Web client that does not supply the appropriate headers will see the following when attempting to log in:
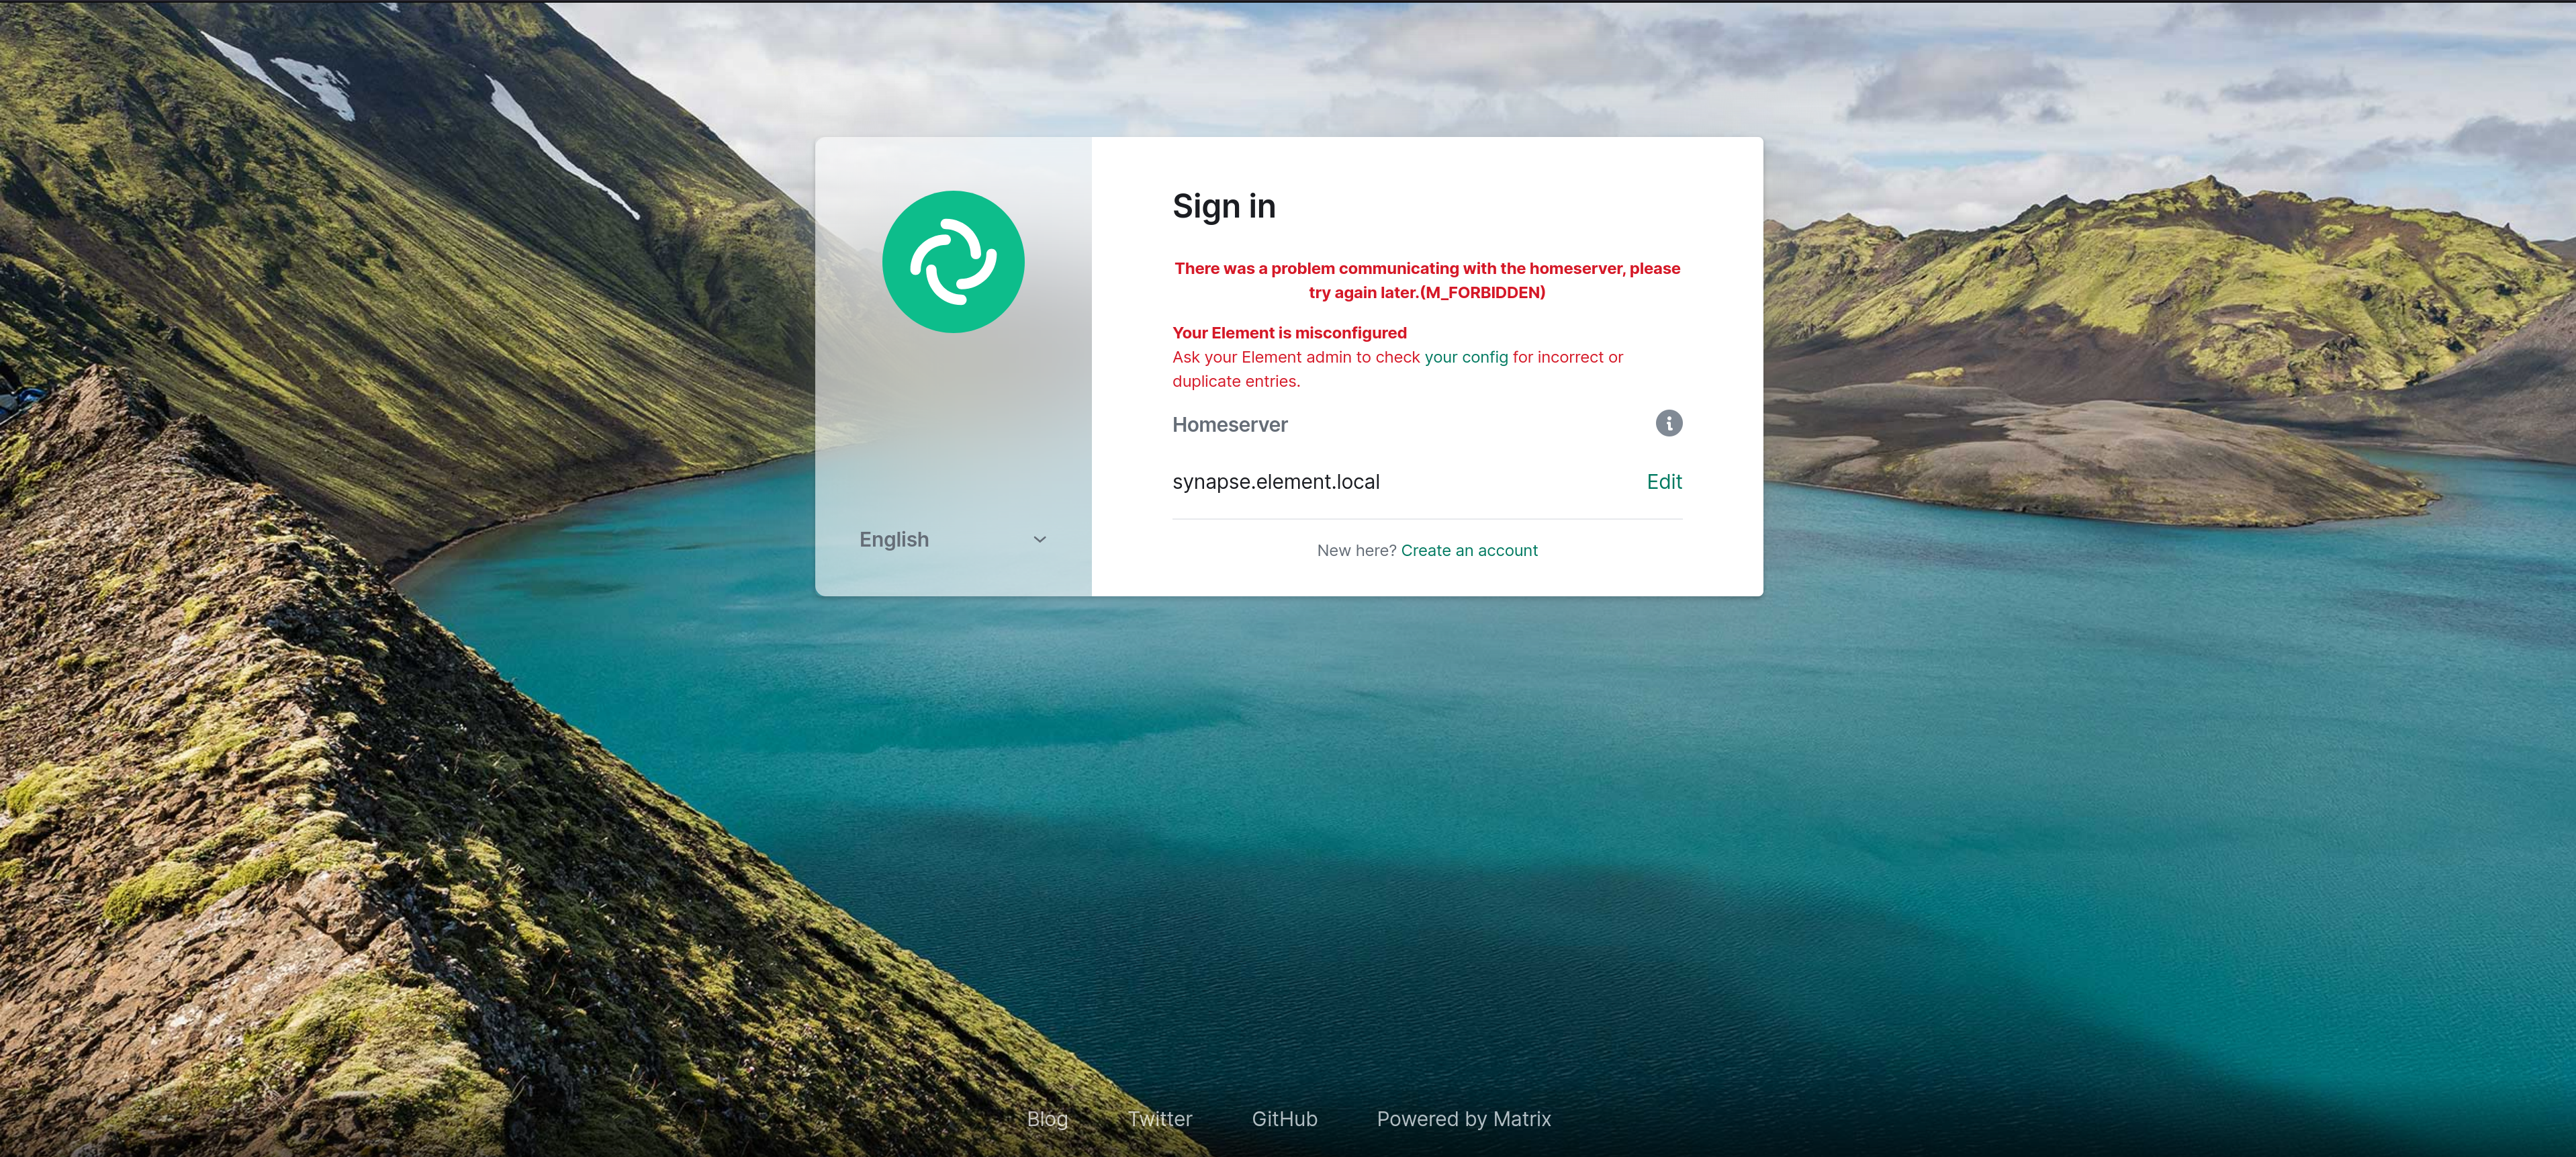
or if they are already logged in when the check was enabled:
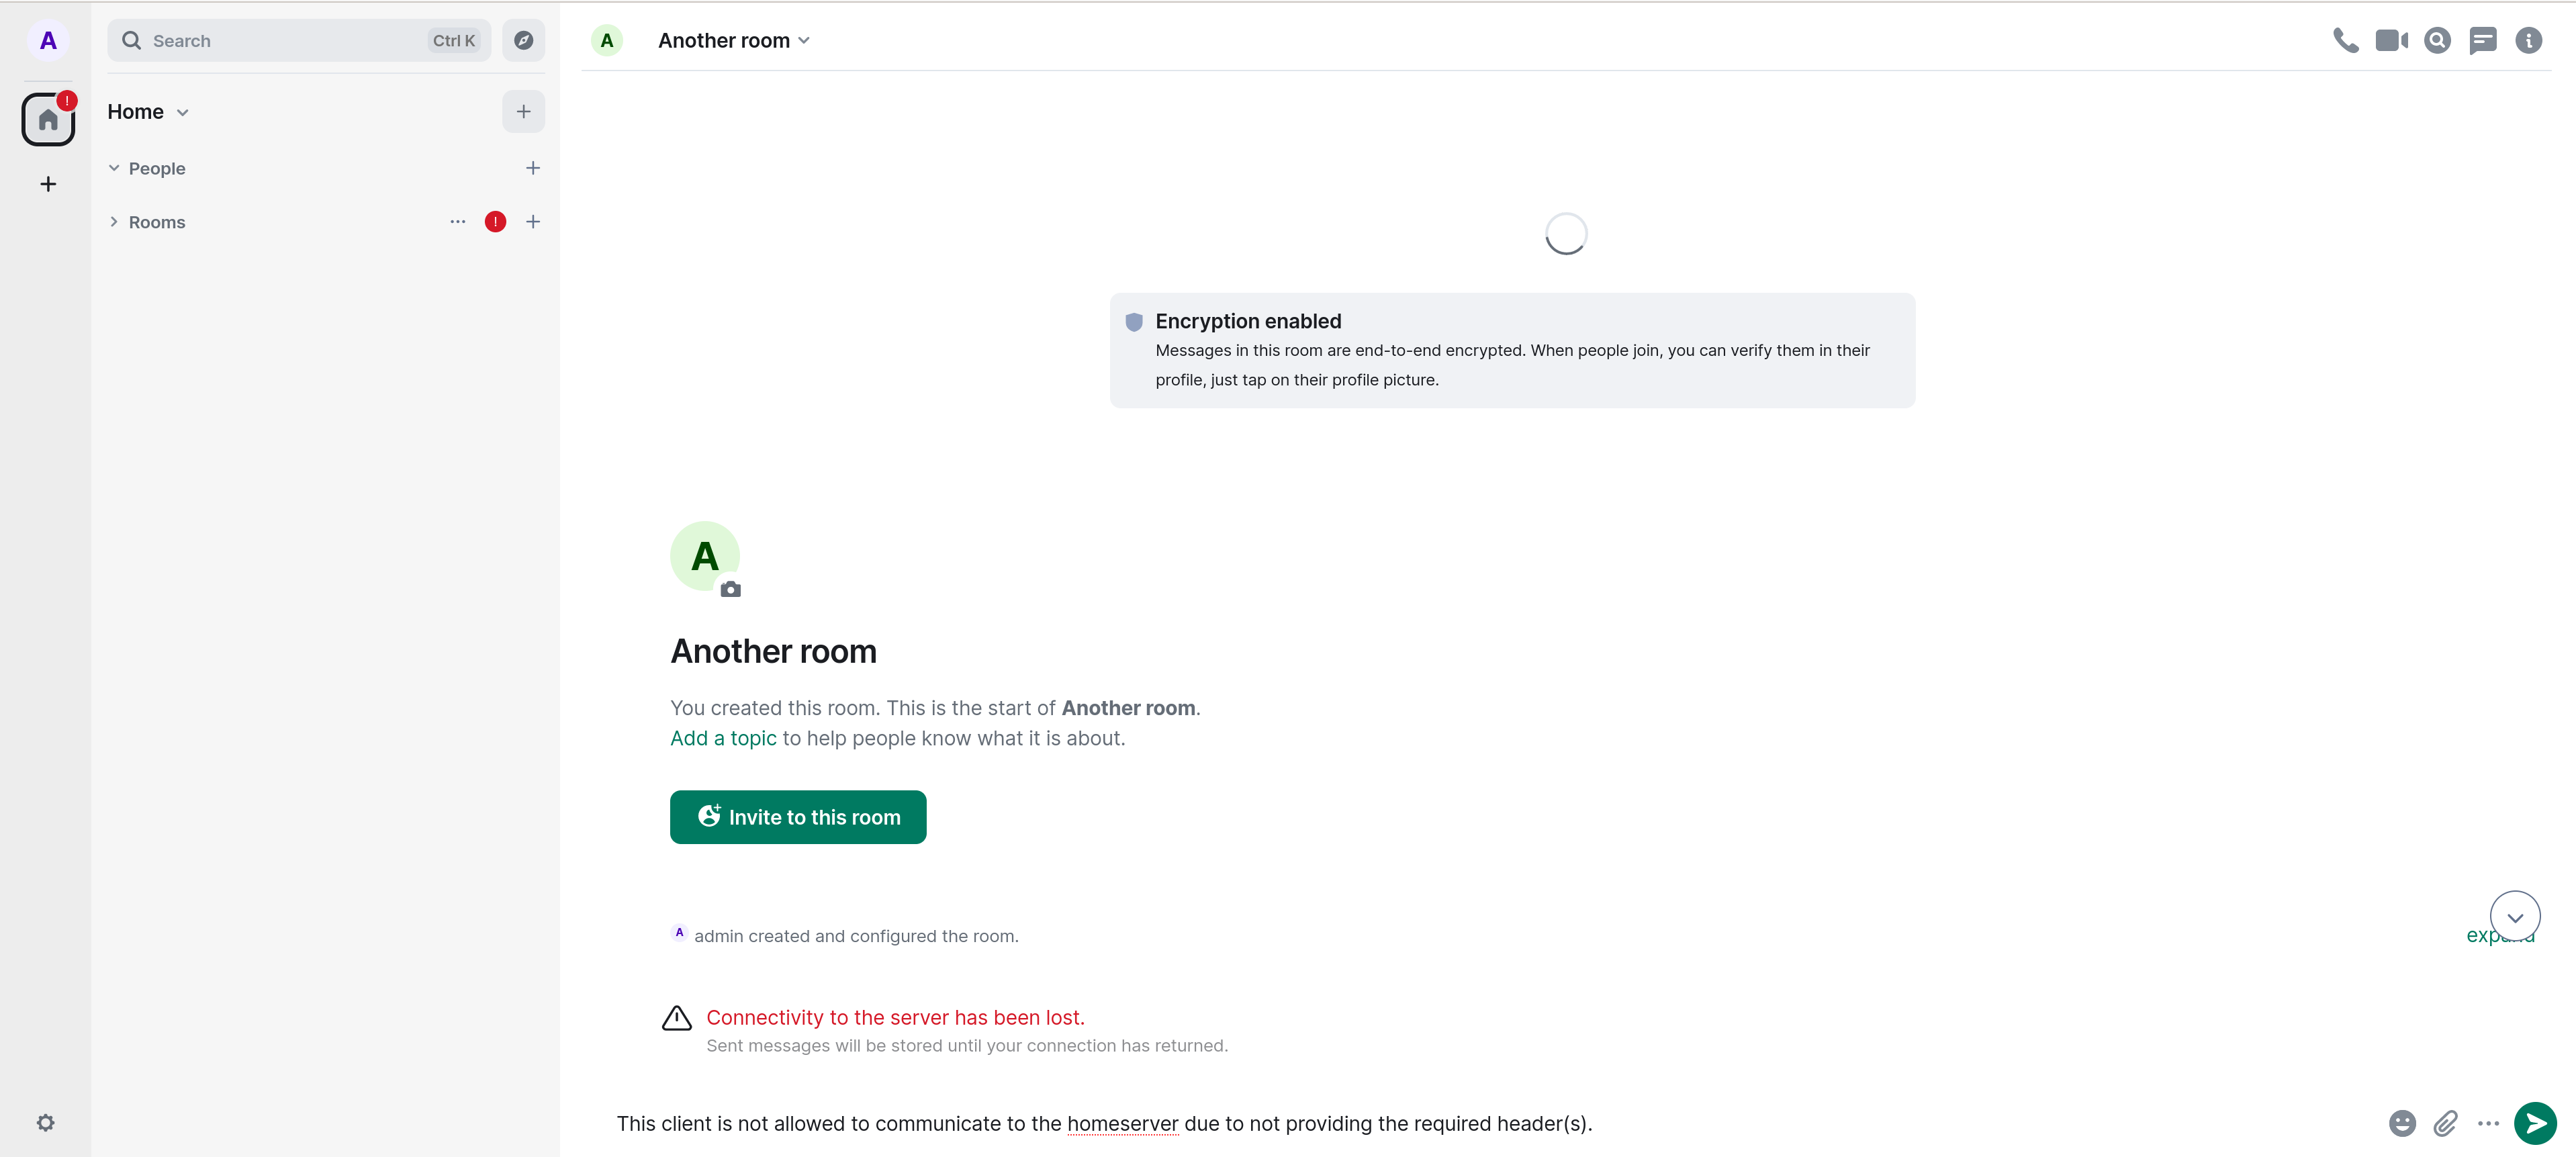
Once any required client headers are defined, both the included Element Web instance and the "Admin" tab of the ESS Installer will not be able to connect to the homeserver, as they will not provide the appropriate client header. You may see the following under the ESS Installer Admin tab:
If no header entries are defined, this option has no effect.
Header Stripping
For each incoming request, the SBG will strip all request headers other than the following:
- Any header beginning with
X- -
Content-Type -
Authorization -
User-Agent -
Accept -
Accept-Language -
Host -
Access-Control-Request-Headers -
Access-Control-Request-Method -
Cookie
If making use of the Required Client Headers feature, be sure not to use a header name that isn't on the above list.
Similarly, the SBG will strip all response headers other than the following:
- Any header beginning with
X- -
Content-Type -
Content-Disposition -
Access-Control-Allow-Credentials -
Access-Control-Allow-Headers -
Access-Control-Methods -
Access-Control-Allow-Origin -
Access-Control-Expose-Headers -
Access-Control-Max-Age -
Date -
Cache-Control -
Strict-Transport-Security -
Set-Cookie
Private Federation Enforcement
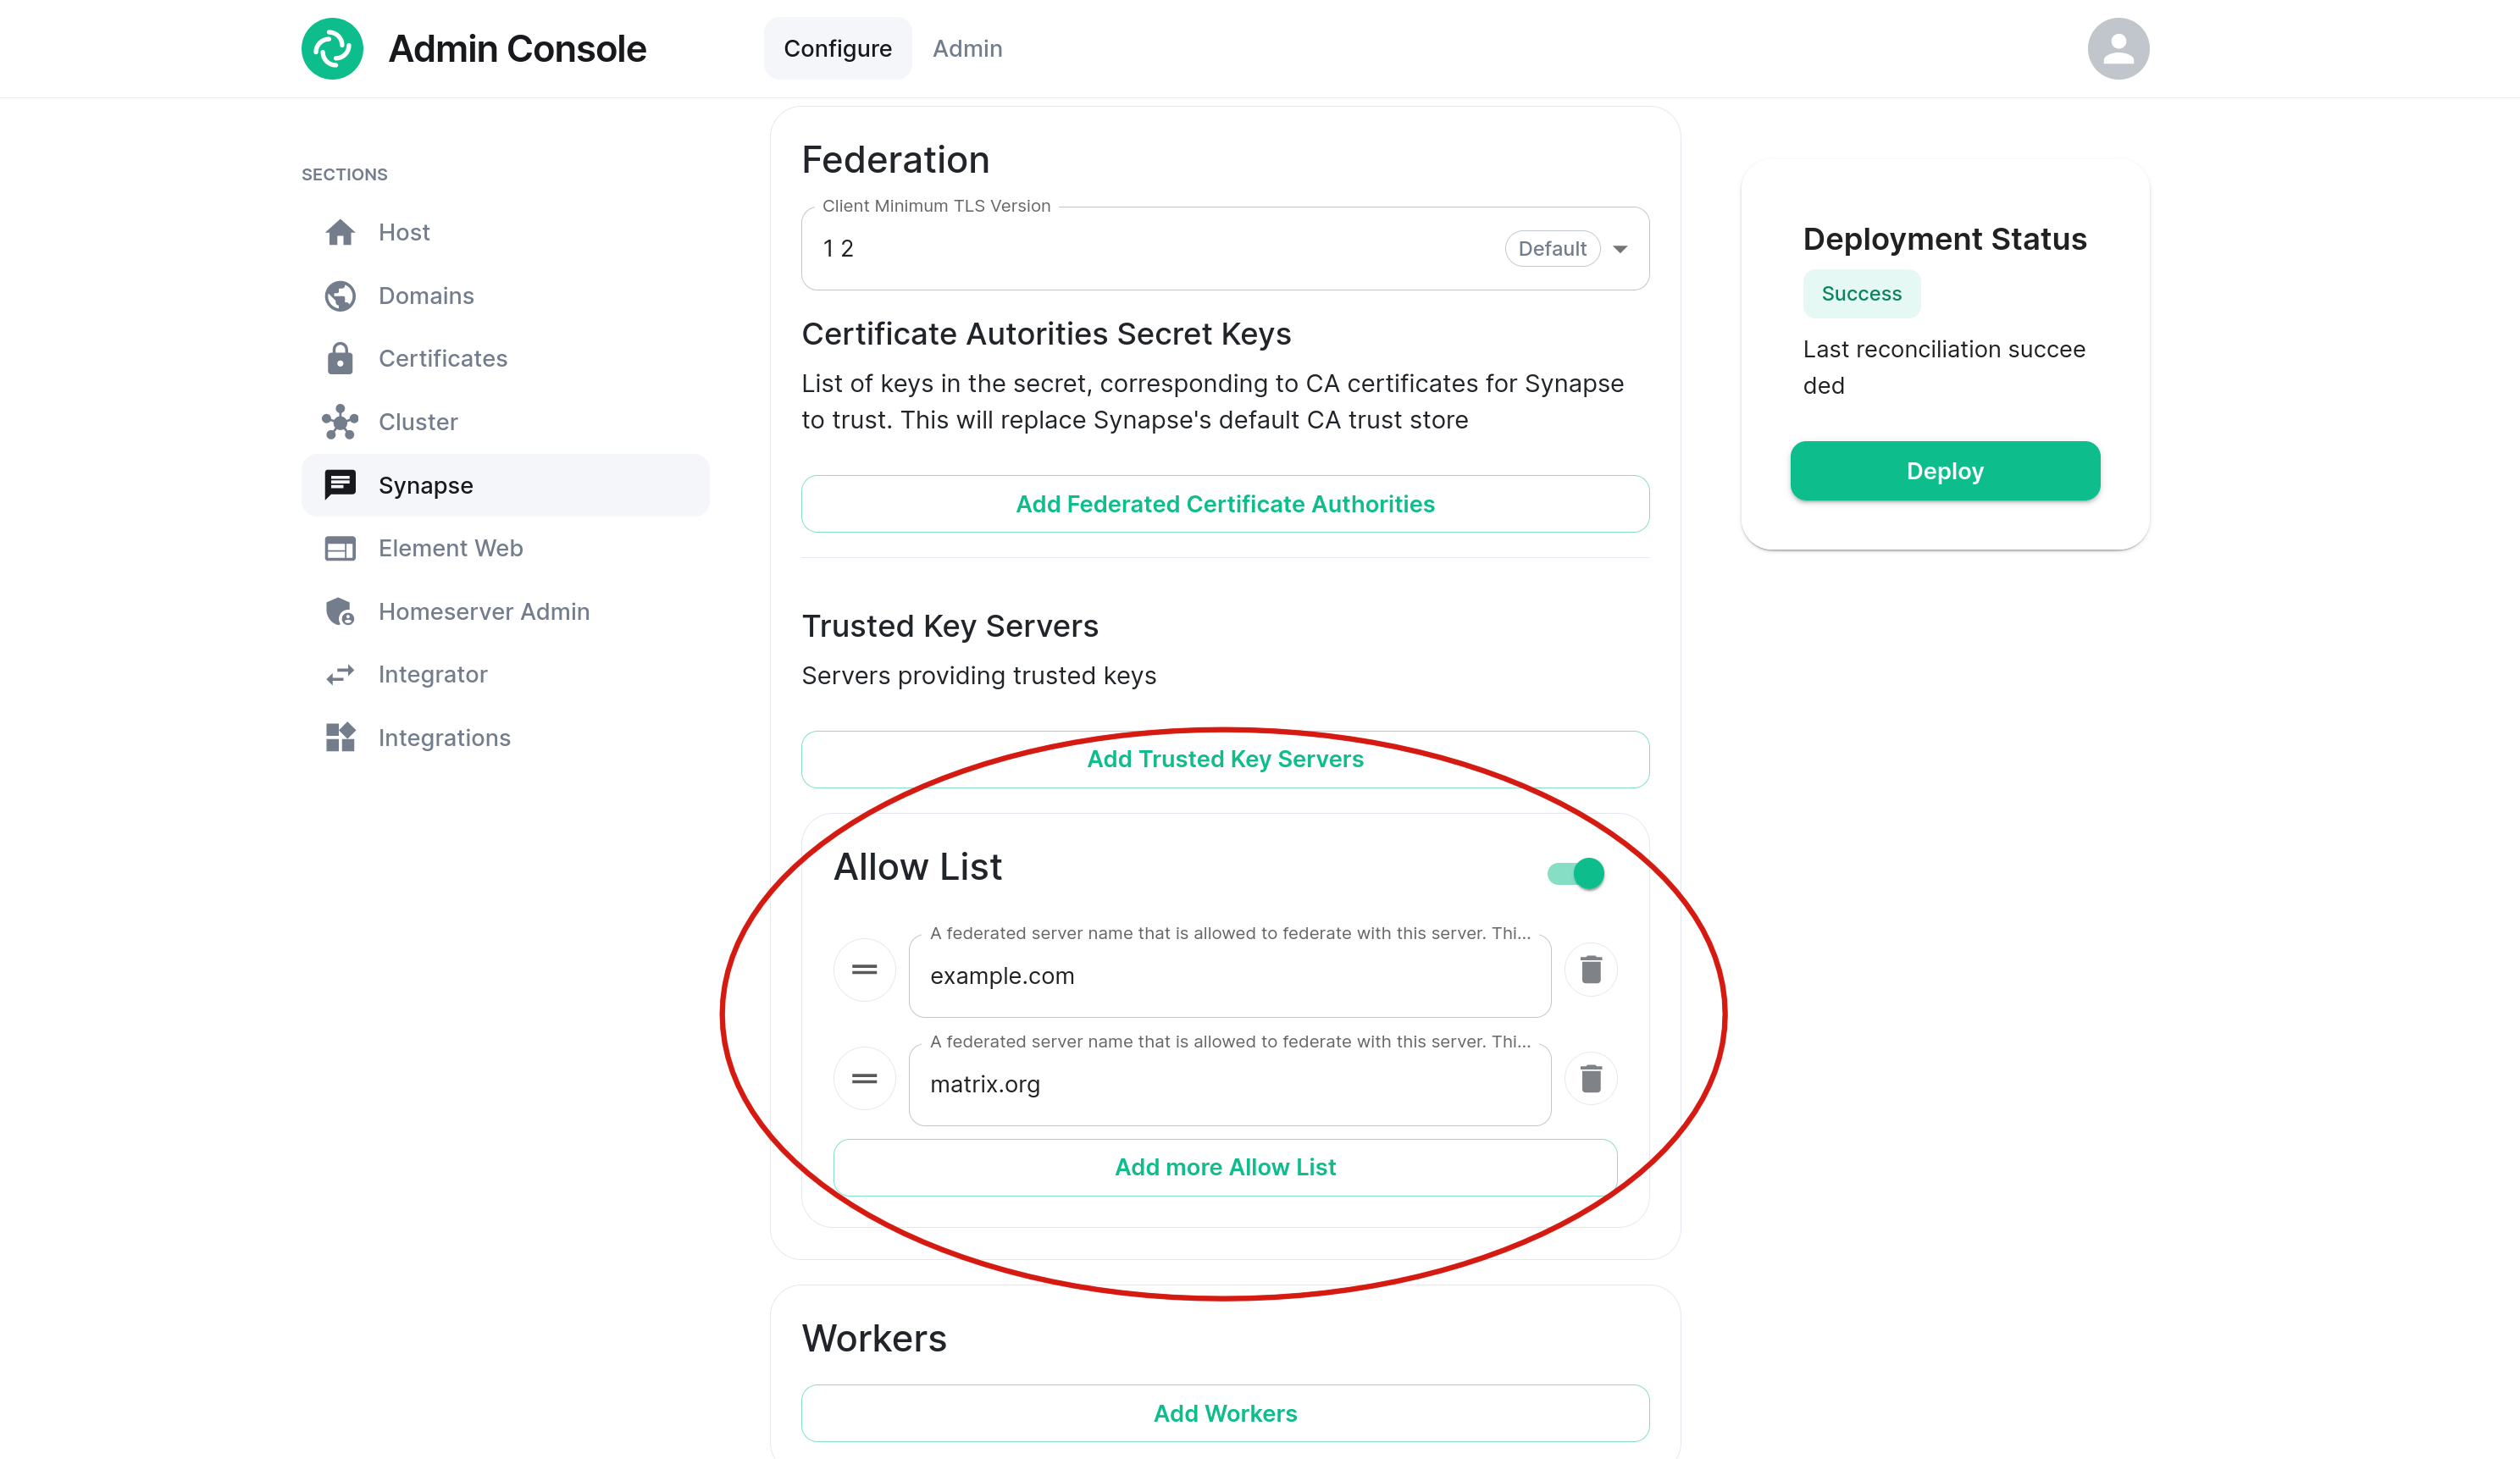
If you have configured a Federation Allow List in Synapse settings, the SBG will similarly enforce this private federation.
Homeservers that are not on the configured allow list will receive a HTTP status code 403 and a standard Matrix error response with errcode field M_FORBIDDEN. This adds an extra layer of protection, preventing outside traffic from even reaching the Synapse process.
The SBG determines whether a request from a remote homeserver is allowed based on the Authorization header that is included in the request. For incoming requests, it checks that the origin field matches one of the allowed remote server names. It also checks that the destination field matches the local server name.
Note that destination is an optional field in the Matrix Federation spec, and was only added in Matrix v1.3. Thus, your deployment will not be able to federate with older homeserver versions (Synapse <1.58) if a Synapse federation allow list is configured.
-
/_matrix/key/v2/server -
/_matrix/key/v2/query
The following endpoints are always blocked, even if an Authorization header is passed. This is necessary to ensure that a homeserver that isn't in the private federation cannot access them:
-
/_matrix/federation/v1/version -
/_matrix/federation/v1/3pid/onbind -
/_matrix/federation/v1/openid/userinfo
If no federation allow list is configured in the Synapse settings, the SBG will not perform this check.
Sentry
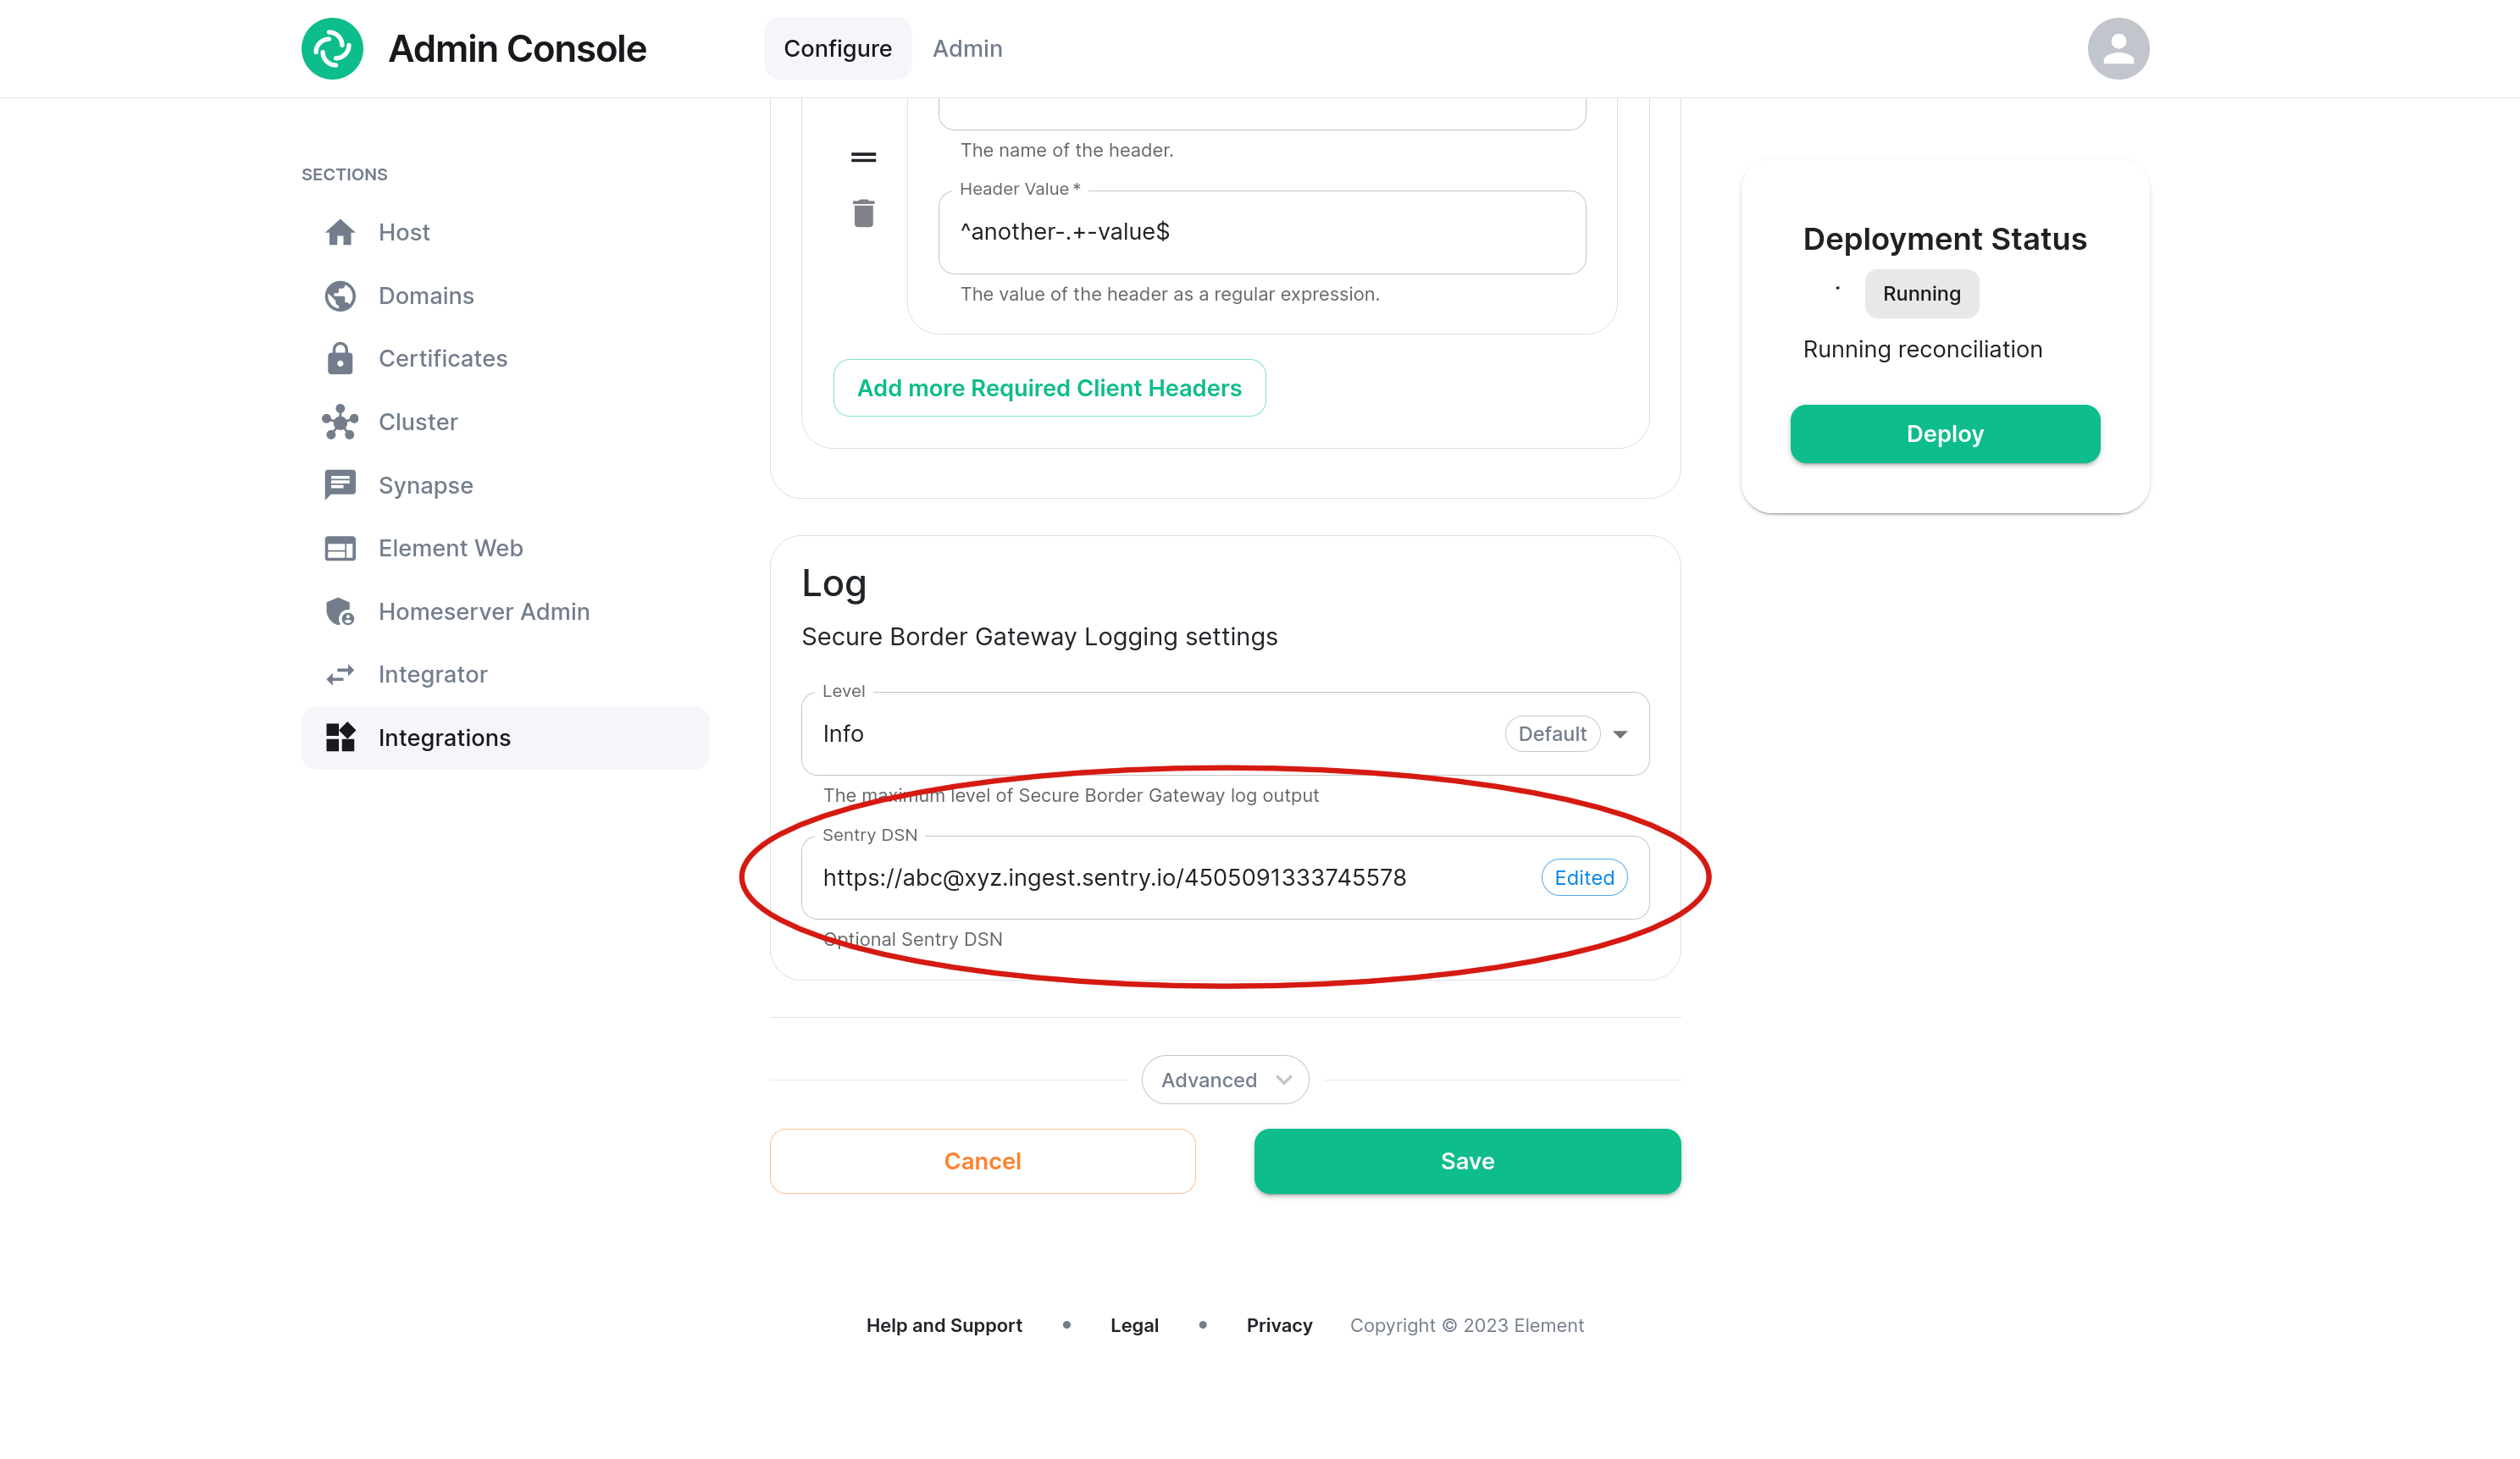
An optional Sentry DSN can be configured in order to log traffic to your external sentry.io instance.
Set the log level
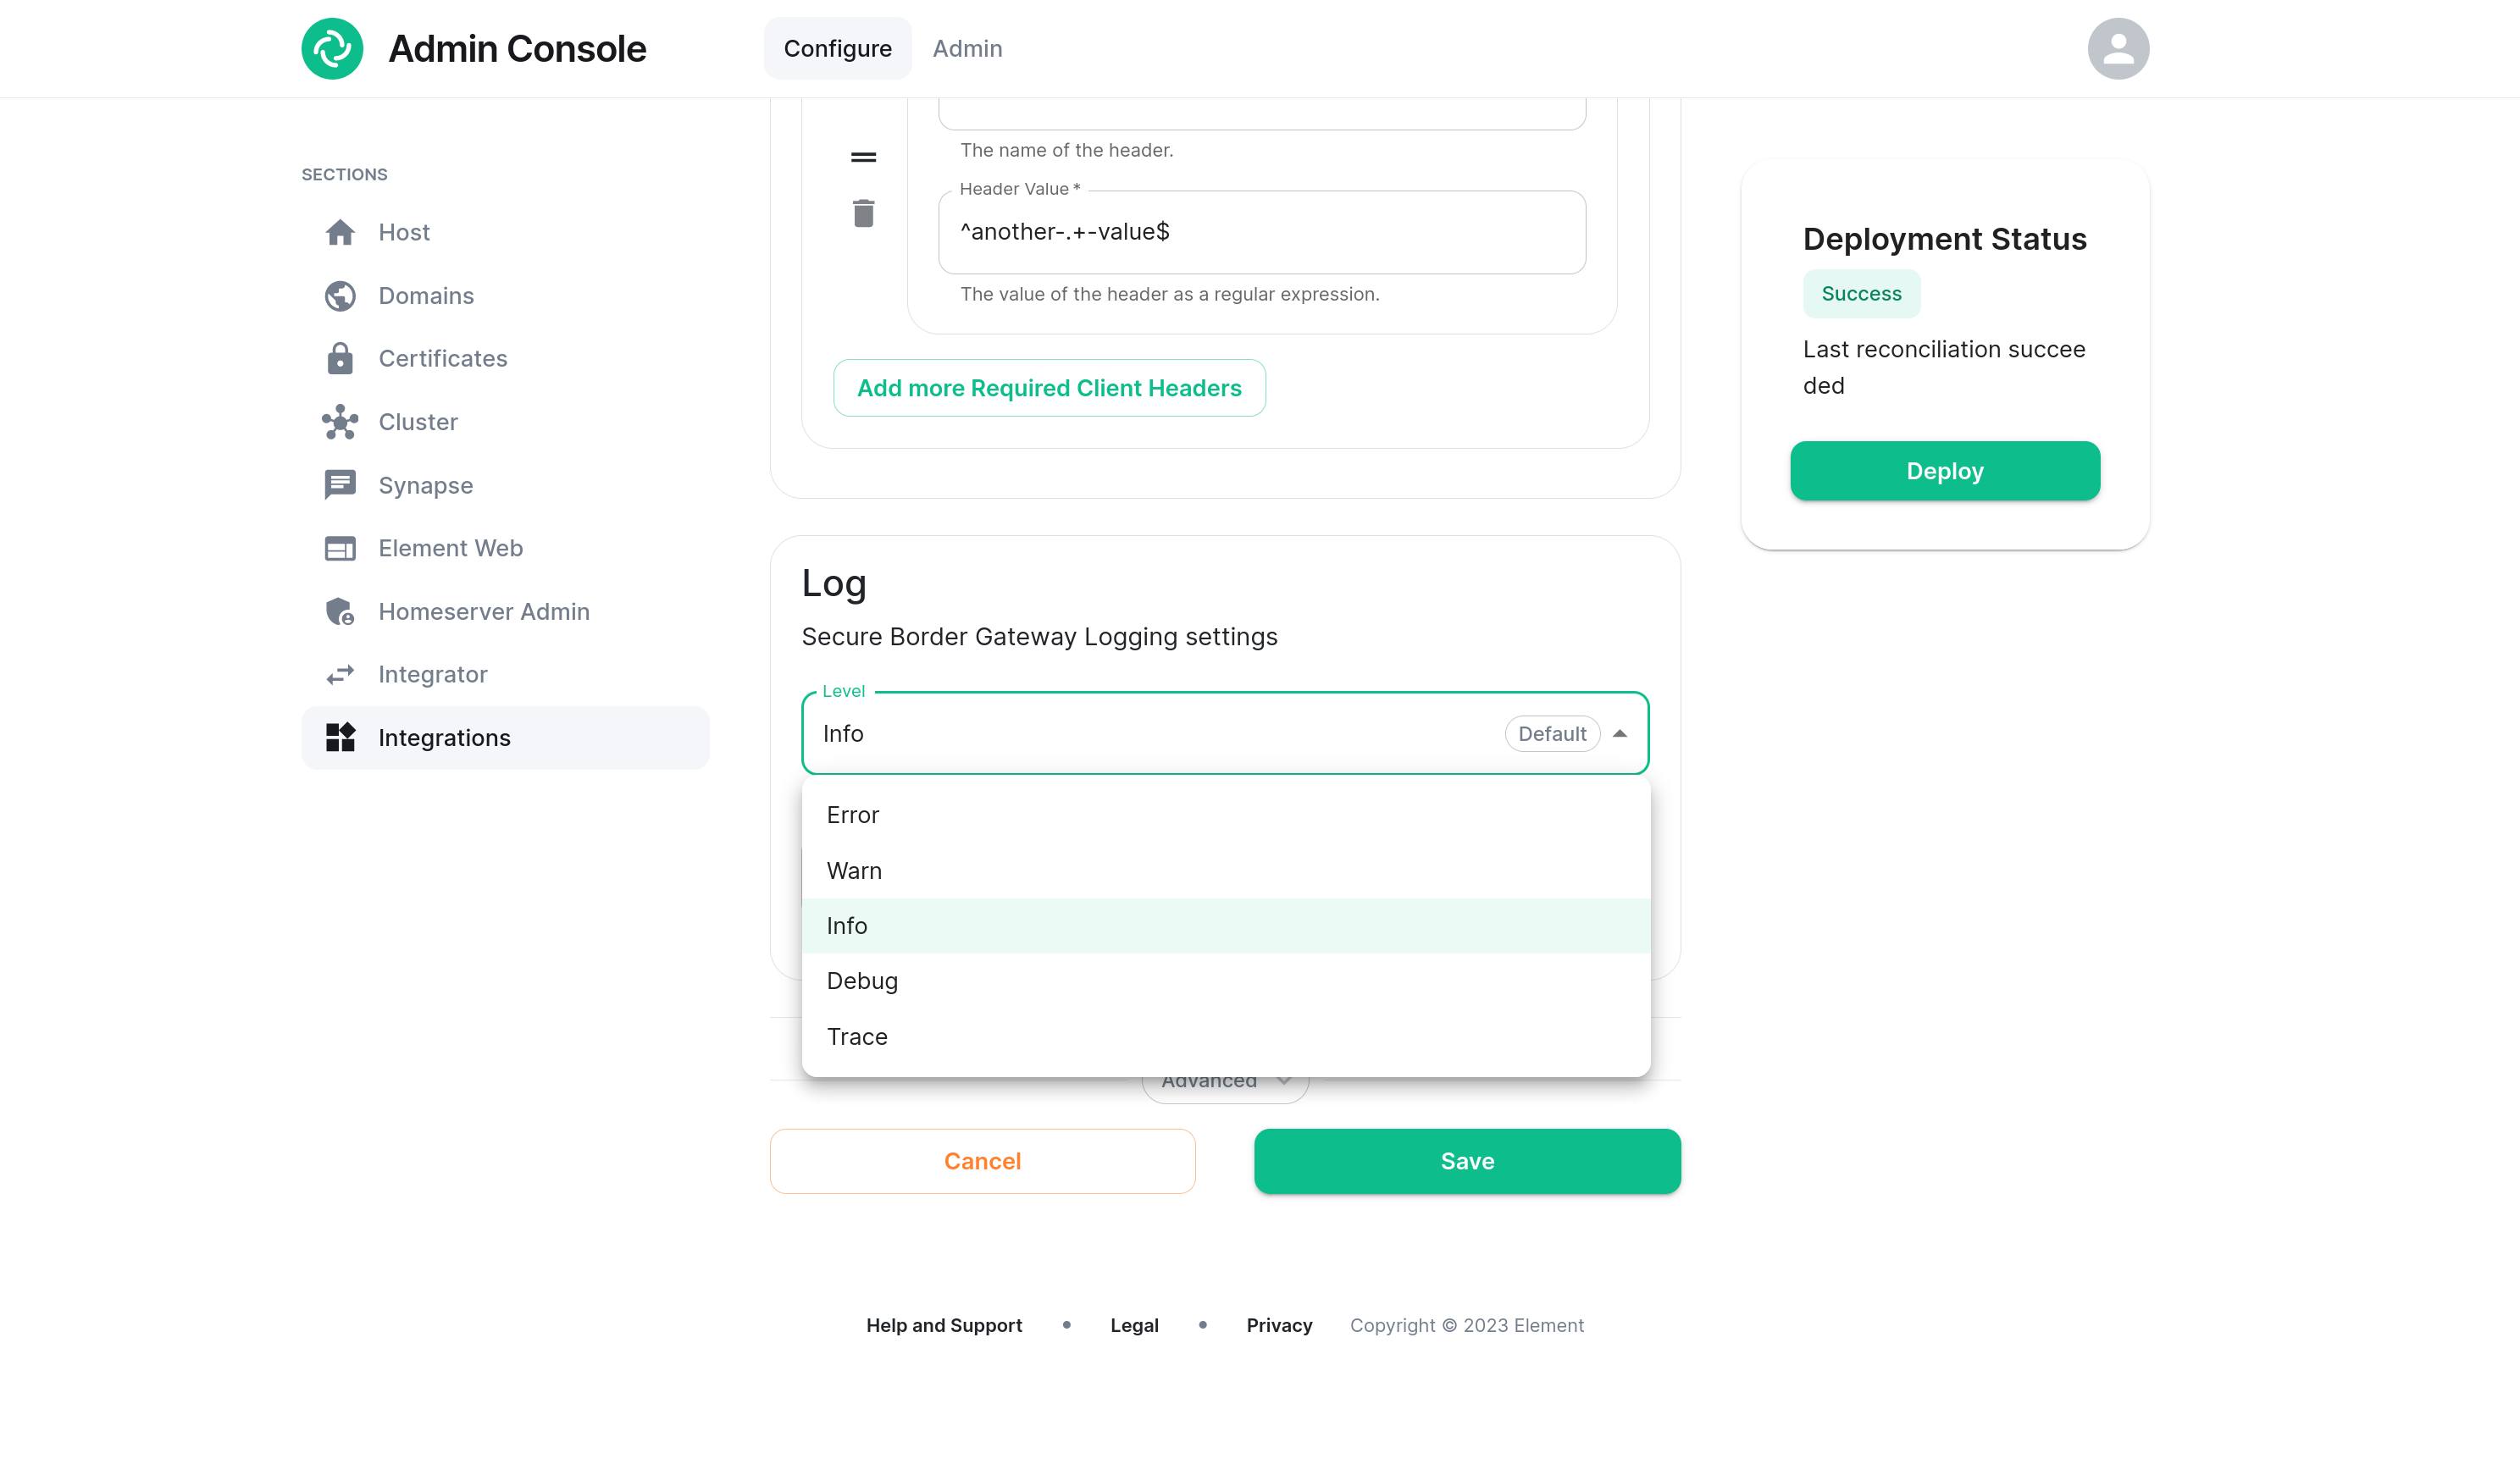
The level at which the SBG logs at can be selected via drop-down. "Info" is the least verbose, whereas "Trace" will provide the maximum amount of logging. Consider using "Debug" to debug issues as it will still log requests and responses, whereas "Trace" will additionally output information only relevant to developers.
URL Previews
URL previews are currently not proxied through the SecureBorderGateway. To protect against the homeserver reaching out to external services without proxying those requests through the Secure Border Gateway, URL Previews on the homeserver are automatically disabled if the Secure Border Gateway is enabled. This can be overridden by adding url_preview_enabled: true to your extra Synapse config.
Maximum Request Size
The SBG will enforce a maximum request size of 64 MiB (mebibytes) for client-server traffic as well as both incoming and outgoing federation traffic. This cannot currently be configured.
Using ESS with a local registry in air-gapped networks
Issue
- In some air-gapped environments, rather than downloading the air-gapped artifacts from the Element EMS service, it may be prefereble to setup your local repository to download the artifacts automatically and make them available to the air-gapped K8s cluster. This article explains the steps required to enable this.
Environment
- Element Server Suite (ESS) On-Premise
- Air-gapped Networks
Resolution
The steps are:
- Configure your repository to link to all remote repositories required by ESS.
- Create a new configmap definition with the required artifacts pointing to your local registry and inject it into the cluster.
- Configure the installer to use the new Images Digests Config Map.
- Generate secret for local registry (if it requires authentication) and add it to ESS.
ESS remote repositories
In a connected environment, the ESS Installer downloads artifacts from several remote repositories including:
- gitlab-registry.matrix.org *
- docker.io
- ghcr.io
- quay.io
- gcr.io
* requires authentication using the EMS Image Store Token and password.
In an air-gapped environment, there are two options to download the dependencies:
- Download the air-gapped zipped repositories as described here
- Configure a local repository to pull the artifacts from the remote repositories when required.
The image_repository_path, image_repository_server and image_tag for each artifact are defined in the images_digests.yml file supplied with the ESS Installer.
An example extract from that file (for auditbot and adminbot integrations) is below:
images_digests:
adminbot:
access_element_web:
image_digest: sha256:1e7e1503ff73ae01af72dd27d9be387667dbbbcc53870ca02b3b02a1890696a9
image_repository_path: ems-image-store/enterprise/access-token-elementweb
image_repository_server: gitlab-registry.matrix.org
image_tag: v1.11.45
haproxy:
image_digest: sha256:75fc37d6372cc22410bdd6ad0191a8dfeababef2a7d8d585694f21b73c2bb3d6
image_repository_path: library/haproxy
image_repository_server: docker.io
image_tag: 2.8-alpine
pipe:
image_digest: sha256:fdef296a8cc72a6deba2f879ddc8cc94da8a49027c5da6627ababd100efa9e57
image_repository_path: ems-image-store/enterprise/pipe
image_repository_server: gitlab-registry.matrix.org
image_tag: 2.7.0
auditbot:
access_element_web:
image_digest: sha256:1e7e1503ff73ae01af72dd27d9be387667dbbbcc53870ca02b3b02a1890696a9
image_repository_path: ems-image-store/enterprise/access-token-elementweb
image_repository_server: gitlab-registry.matrix.org
image_tag: v1.11.45
haproxy:
image_digest: sha256:75fc37d6372cc22410bdd6ad0191a8dfeababef2a7d8d585694f21b73c2bb3d6
image_repository_path: library/haproxy
image_repository_server: docker.io
image_tag: 2.8-alpine
pipe:
image_digest: sha256:fdef296a8cc72a6deba2f879ddc8cc94da8a49027c5da6627ababd100efa9e57
image_repository_path: ems-image-store/enterprise/pipe
image_repository_server: gitlab-registry.matrix.org
image_tag: 2.7.0
If you have a cluster admin role, you can include all the components in the images_digests.yml file.
If your cluster admins have already installed the ElementDeployment CRDs using the Helm Charts, you can omit the Operator and Updater sections from this file. If you are using an external PostgreSQL database, you can omit the PostegreSQL section.
Configuring local repository to download artifacts
You will need to configure your local repository to download the artifacts from the remote repositories. Once downloaded, they can be organised into folders, or added to the same base directory.
Creating the new Images Digests Config Map
In order to override the automatic download of the images from the remote repository by ESS during the install, you will need to inject a new ConfigMap which specifies the local repository to use for each artifact. To do that, you will need to inject a ConfigMap with the following example structure:
data:
images_digests: |
adminbot:
access_element_web:
haproxy:
pipe:
auditbot:
access_element_web:
haproxy:
pipe:
element_call:
element_call:
jwt:
redis:
sfu:
element_web:
element_web:
groupsync:
groupsync:
hookshot:
hookshot:
integrator:
appstore:
integrator:
modular_widgets:
matrix_authentication_service:
init:
matrix_authentication_service:
matrix_content_scanner:
clam_anti_virus:
icap:
matrix_content_scanner:
sliding_sync:
api:
poller:
sydent:
sydent:
sygnal:
sygnal:
synapse:
haproxy:
redis:
synapse:
synapse_admin:
synapse_admin:
well_known_delegation:
well_known_delegation:
Each container on this tree needs at least the following properties to override the source of download :
image_repository_path: elementdeployment/vectorim/element-web
image_repository_server: localregistry.local
You can also override the image tag and the image digest if you want to enforce using digests in your deployment :
image_digest: sha256:ee01604ac0ec8ed4b56d96589976bd84b6eaca52e7a506de0444b15a363a6967
image_tag: v0.2.2
For example, the required configmap manifest (e.g. images_digest_configmap.yml) format would be, to override the element_web/element_web container source path :
apiVersion: v1
kind: ConfigMap
metadata:
name: <config map name>
namespace: <namespace of your deployment>
data:
images_digests: |
element_web:
element_web:
image_repository_path: elementdeployment/vectorim/element-web
image_repository_server: localregistry.local
Notes:
- the
image_digest:may need to be regenerated, or it can be removed. - The
image_repository_pathneeds to reflect the path in your local repository. - The
image_repository_servershould be replaced with your local repository URL
The new ConfigMap can then be injected into the cluster with:
kubectl apply -f images_digest_configmap.yml -n <namespace of your deployment>
You will also need to configure the ESS Installer to use the new Images Digests Config Map by adding the <config map name> into the Cluster advanced section.
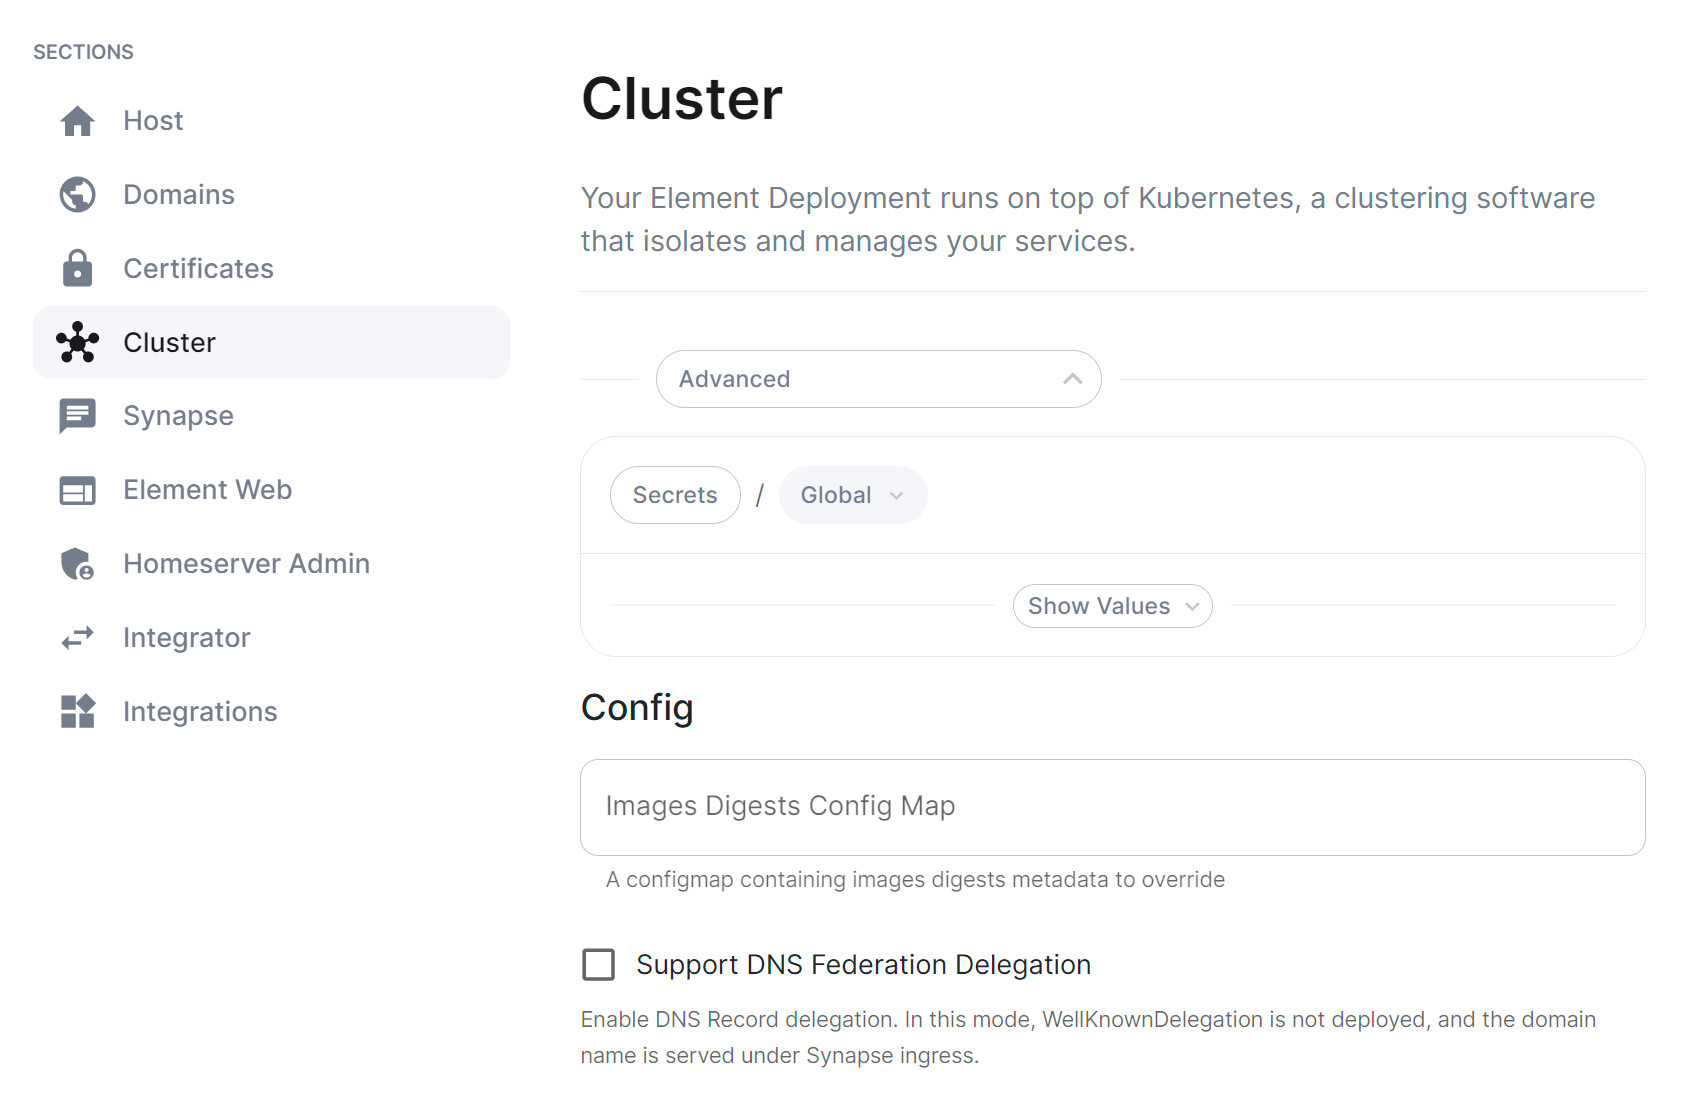
If your local repository requires authentication, you will need to create a new secret. So for example, if your local registry is called localregistry and the URL of the registry is localregistry.local, the command would be:
kubectl create secret docker-registry localregistry --docker-username=<localregistry user> --docker-password=<localregistry password> --docker-server=localregistry.local -n <your namespace>
The new secret can then be added into the ESS Installer GUI advanced cluster Docker Secrets:
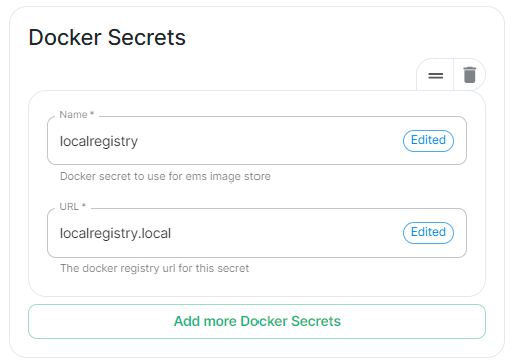
Handling new releases of ESS
If you are overriding image tags, you will need to make sure that your tags are available with the new releases of ESS. You can use a staging environment to tests the upgrades for example.
Some releases of ESS might require new containers, or might provide new components to deploy. In which case you will have to add them to your local registry to successfully deploy them.
Testing Dehydrated Devices
Enabling Dehydrated Devices Support
To enable the dehydrated devices feature Element Server Suite, follow these steps.
Access the Admin Console
-
Run the ESS Installer:
-
./element-enterprise-graphical-installer-YYYY-MM.VERSION-gui.bin - Access the installer GUI from the link outputted by the installer to the console.
-
Enable the Experimental Feature in Synapse
-
Navigate to the
Additionalconfig from the Synapse Section:- In the installer GUI, access the Synapse section, expand
Advancedand find theAdditionalconfig section.
- In the installer GUI, access the Synapse section, expand
-
Enable the Experimental Feature:
-
Add or modify the configuration to include:
experimental_features: msc3814_enabled: true msc2697_enabled: false
-
-
Save your changes:
- Save the changes in the installer GUI.
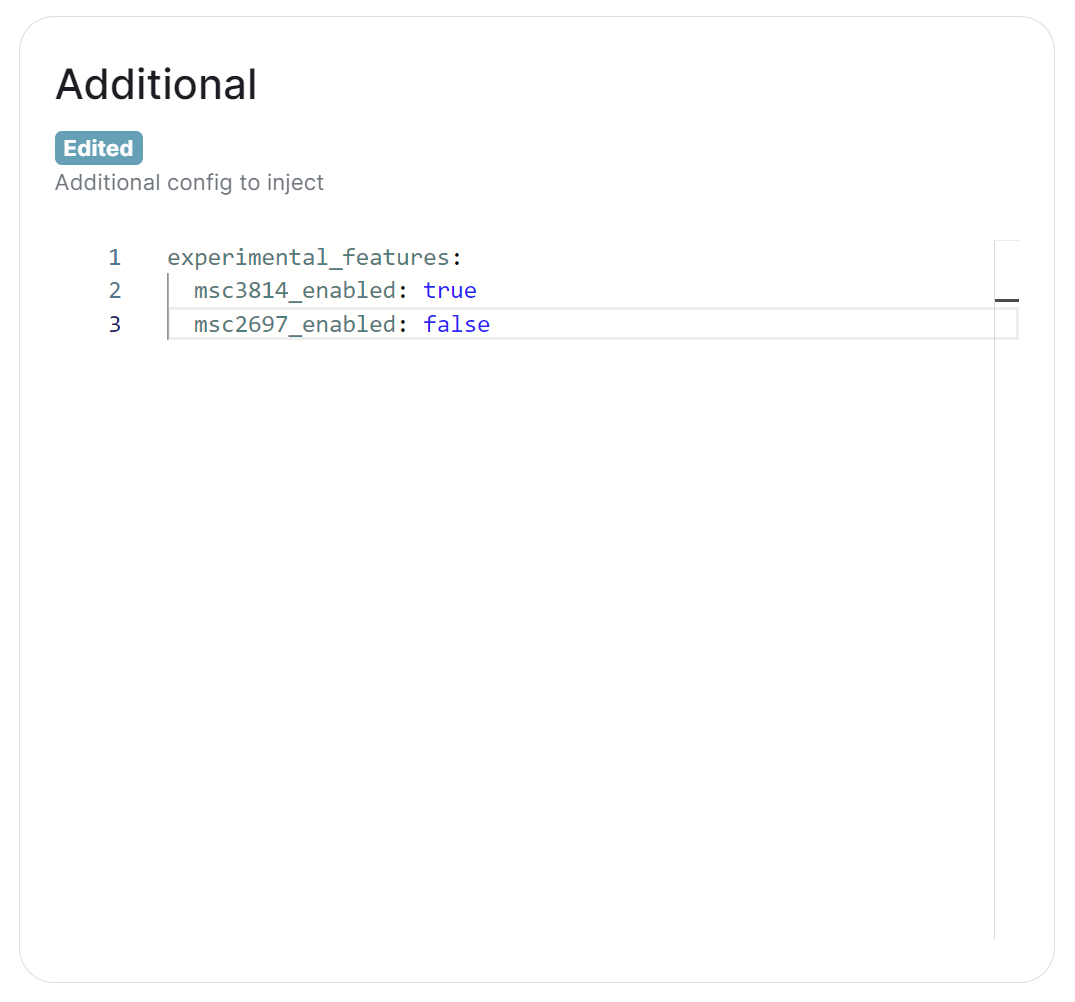
Configure the .well-known Endpoint
-
Navigate to the
Additional Client Configurationconfig from the .Well-Known Section:- In the installer GUI, access the Well-Known section of the installer from the Integrations section.

- In the installer GUI, access the Well-Known section of the installer from the Integrations section.
-
Add the .well-known Key:
-
Add the following key-value pair:
{ "org.matrix.msc3814": "true" }
-
-
Save and Apply Changes:
- Save the changes in the installer GUI.

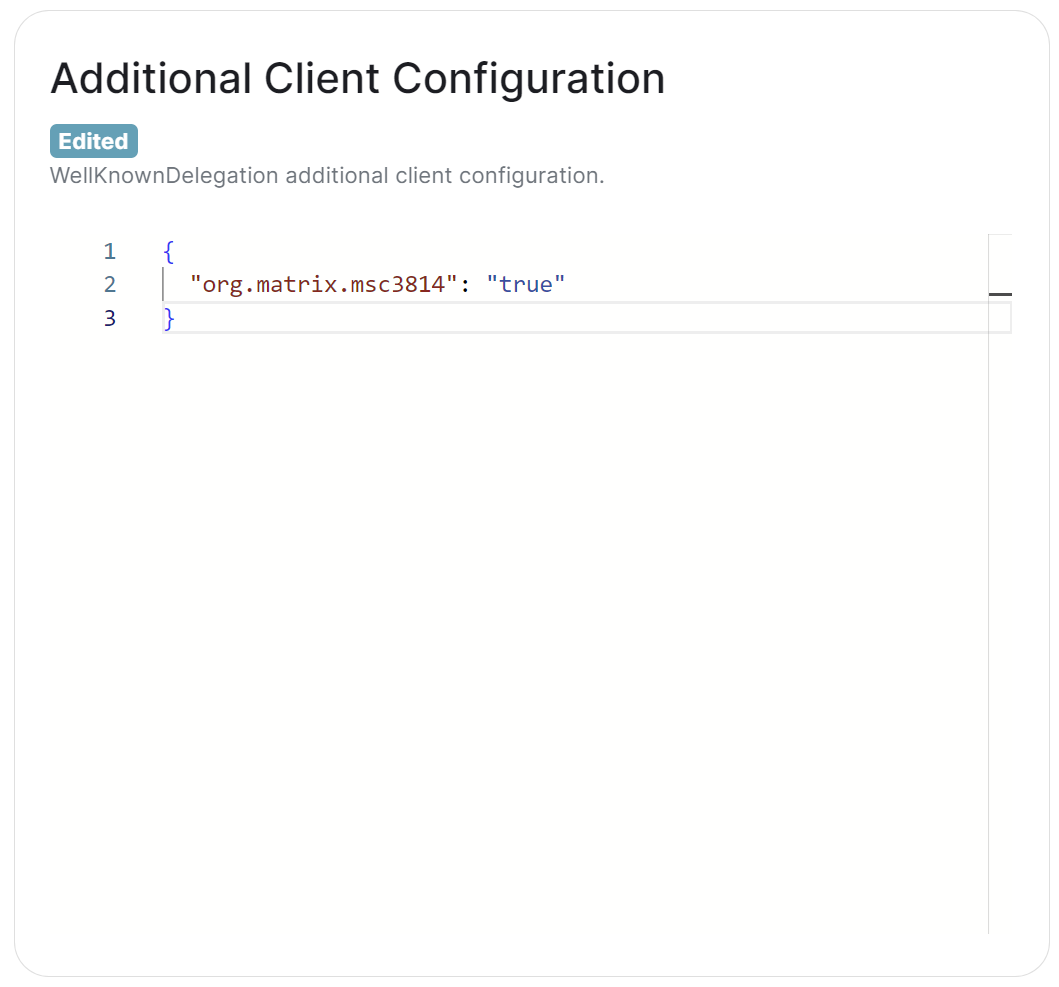
Deploy your ESS changes
-
Click Deploy and wait for reconcilliation to complete:
- Your Synapse and Well-Known pods should be recreated with the updated configuration.

- Your Synapse and Well-Known pods should be recreated with the updated configuration.
Testing Dehydrated Devices
Enable the Feature via Element Web (per User)
Test the Configuration
-
Log in to Account A:
- Ensure Account A has only one active web session.
- Ensure you have enabled device dehydration.
- Log out of Account A.
-
Send a Message from Account B to Account A:
- Using Account B, send a message to Account A.
- Using Account B, send a message to Account A.
-
Log Back into Account A and Verify:
- Log in to Account A again.
- Verify the account using the recovery key.
Account A should be able to read the message sent by Account B, despite having no logged-in sessions when the message was sent.
Additional Notes
-
Web Client and iOS Only:
- The dehydrated devices feature works only on Element Web and iOS. Ensure you are using one of these clients to test the feature.
Auditbot crashloops due OneTimeKey conflicts
Issue
Auditbot crashloops due OneTimeKey conflicts. You see logs such as One time key signed_curve25519:AAAAAAAAAAA already exists
Environment
ESS 24.04 and more
Resolution
#!/bin/bash
SERVER_NAME=<server name>
URL='https://<synapse fqdn>/_matrix/client/v3/keys/claim'
TOKEN=
echo "Stopping the operator"
kubectl scale deploy/element-operator-controller-manager -n operator-onprem --replicas=0
echo "Stopping auditbot"
kubectl delete sts/first-element-deployment-auditbot-pipe -n element-onprem
while true; do
out=$(curl -s $URL -H "authorization: Bearer $TOKEN" --data '{"one_time_keys": {"@auditbot:$SERVER_NAME": { "AUDITBOTPIPE": "signed_curve25519"}}}')
echo $out
# Check if the response contains an empty "one_time_keys" property
isempty=$(echo $out | jq 'if .one_time_keys == {} then true else false end')
if [[ "$isempty" == "true" ]]; then
echo "All claims are exhausted"
break
fi
sleep 1
done
echo "Restarting the operator so that it restarts auditbot"
kubectl scale deploy/element-operator-controller-manager -n operator-onprem --replicas=1
Root Cause
This issue can occur when you have an incident on your filesystem : unreliable writes, full disks, etc.
Attachments
Updating a Jitsi-only Deployment
Preparing to upgrade
-
Download the
.binfile and copy it onto the Jitsi ESS deploymentelementusers' home directory (with the others) -
Use
chmod +x ./element-installer-enterprise-edition-jitsi-cors-fix.binto make the binary executable -
Make a backup of your
.element-enterprise-server/configdirectory -
Before running the installer, adjust the TLS configured under the
synapseAdmin:section of the.element-enterprise-server/config/deployment.ymlfile is set toexisting. It should look like:synapseAdmin: config: hostOrigin: >- https://matrix-admin.example.com,https://matrix-admin.example.com:8443 verifyTls: useGlobalSetting k8s: common: annotations: {} ingress: annotations: {} fqdn: matrix-admin.example.com services: {} tls: certificate: secretName mode: existing
Upgrading
- Run the binary with
./element-installer-enterprise-edition-jitsi-cors-fix.bin, it will display a link to access the installer. - Open the link (replacing the IP address with the Jitsi VM external IP address)
- If you don't have access, you will need to add your machines' external IP address to the associated AWS Security Group for port
8443
- If you don't have access, you will need to add your machines' external IP address to the associated AWS Security Group for port
- Click on the
Certificatessection from the left navigation menu, ensure all exceptWell-Known Delegationare set toExternally Managed, then clickSaveat the bottom of the page. - Click the
Deploybutton found on the right of the screen. Finally on theDeployprompt that appears, click theStart Deploymentbutton.
 |
 |
- You will be prompted for your
sudopassword, switch back to the terminal and provide, then switch back to watch the deployment progress.
Post-deployment Cleanup
Removing the wrong sections from your ElementDeployment will cause your deployment to break. You can easily repair any changes by repeating the upgrade process documented on this page to restore your ElementDeployment. Doing this is entirely optional, and only needed if your host doesn't have enough CPU / Memory to run all the pods.
-
In the terminal, use
export KUBE_EDITOR=nanoto allow editing Kubernetes objects withnano -
Edit ElementDeployment resource and remove everything but Jitsi, Coturn and Well-Known from the spec:
kubectl edit ElementDeployment first-element-deployment -n element-onpremFirst, jump down to the start of the
spec: components:section. Then remove each entry that isn'tcoturn:,jitsi:orwellKnownDelegation:. You can tell when a section ends as it's last line before the new component should besecretName: COMPONENT_NAME.Your final file should be roughly structured like so:
apiVersion: matrix.element.io/v1alpha2 kind: ElementDeployment metadata: example: data spec: components: coturn: example: data secretName: coturn jitsi: example: data secretName: jitsi wellKnownDelegation: example: data secretName: well-known-delegation global: example: data secretName: global status: example: data -
Finally selete Synapse, Integrator, SynapseAdminUI and ElementWeb custom resources to remove their pods and clean-up the resources they use:
kubectl delete Synapse/first-element-deployment -n element-onprem kubectl delete Integrator/first-element-deployment -n element-onprem kubectl delete SynapseAdminUI/first-element-deployment -n element-onprem kubectl delete ElementWeb/first-element-deployment -n element-onprem
Reset Jitsi Widgets in rooms
If you still observe the Authentication prompt in any rooms' Jitsi widgets, you simply need to remove the widget and re-add. Follow the below steps to do so:
- Click the
iicon, found on the room toolbar at the top, to access the room info panel, then selectExtensions. Click the3-dot menunext to the Jitsi widget listed, and clickRemove for everyone.

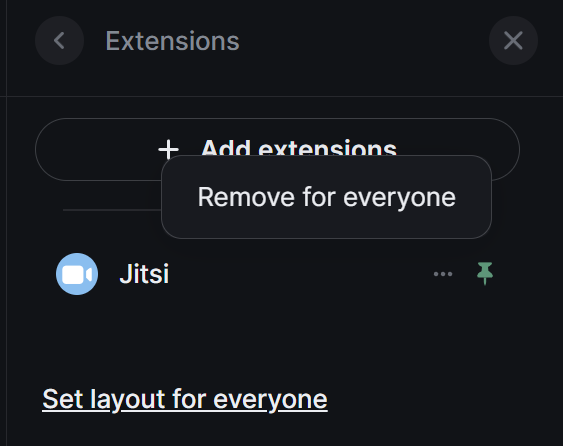
- Click
Add Extensions, then theJitsi Meetbutton underAdded to this room. Then clickDelete.
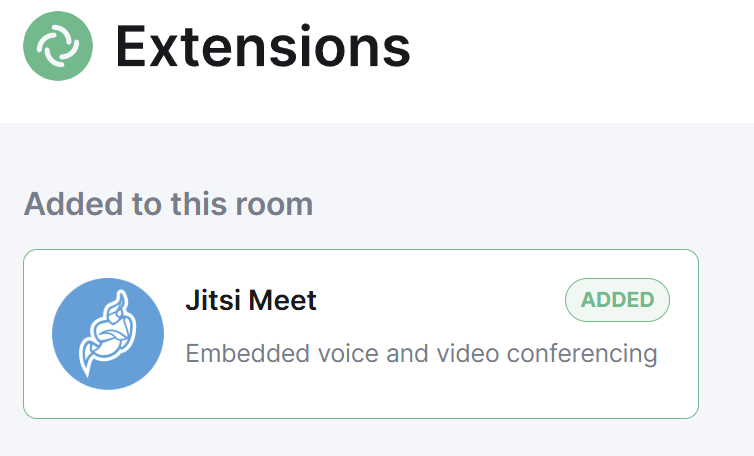

- Re-add the Jitsi widget, by clicking the
Video Callbutton, found on the room toolbar at the top.

- The widget will be re-added, and a prompt will appear when you click
Join Conferenceto allow the Jitsi widget to verify your identity. ClickContinue. Note: You can optionally set this prompt to remember your choice.
