Your access token grants full access to your Matrix account, threat it carefully like you would with a password
- Grab the room ID for the room you wish to add Hookshot to by clicking the `(i)` `Room Info` button, then Settings in the right column - Under Advanced, copy the Internal room ID [](https://ems-docs.element.io/uploads/images/gallery/2024-12/image-1733915724247.png) - Replace the leading `!` (exclamation mark) with `%21` (for example, `!QrmxBsBKPajykCohPz:localhost:8448` becomes `%21QrmxBsBKPajykCohPz:localhost:8448`) - Find the URL where your Matrix server is exposed. This may not be the same as the domain in your Matrix ID - Open a terminal on your computer. On Windows; PowerShell, on Mac; Terminal - Send the command below for your operating system. Replace `domain-where-your-matrix-server-is-exposed`, `room-id` and `access-toke` with the values from earlier. Note, if you are sending more than one message using your terminal, you need to change `1234` to another value each time. - Mac and Linux: ```bash curl --request PUT \ --url 'https://domain-where-your-matrix-server-is-exposed/_matrix/client/r0/rooms/room-id/send/m.room.message/1234' \ --header 'Authorization: Bearer access-token' \ --header 'content-type: application/json' \ --data '{ "msgtype":"m.text", "body":"!hookshot setup-widget" }' ``` For example: ```bash curl --request PUT \ --url 'https://localhost:8448/_matrix/client/r0/rooms/%21QrmxBsBKPajykCohPz:localhost:8448/send/m.room.message/1234' \ --header 'Authorization: Bearer syt_YWRtaW4_epoEMAUauwwFpsOGJxIg_471LjM' \ --header 'content-type: application/json' \ --data '{ "msgtype":"m.text", "body":"!hookshot setup-widget" }' ``` - Windows: ```powershell $url = "https://domain-where-your-matrix-server-is-exposed/_matrix/client/r0/rooms/room-id/send/m.room.message/1234" $headers = @{ "Authorization" = "Bearer access-token" "Content-Type" = "application/json" } $body = @{ msgtype = "m.text" body = "!hookshot setup-widget" } | ConvertTo-Json Invoke-RestMethod -Uri $url -Method Put -Headers $headers -Body $body ``` For example: ```powershell $url = "https://localhost:8448/_matrix/client/r0/rooms/%21QrmxBsBKPajykCohPz:localhost:8448/send/m.room.message/1234" $headers = @{ "Authorization" = "Bearer syt_YWRtaW4_epoEMAUauwwFpsOGJxIg_471LjM" "Content-Type" = "application/json" } $body = @{ msgtype = "m.text" body = "!hookshot setup-widget" } | ConvertTo-Json Invoke-RestMethod -Uri $url -Method Put -Headers $headers -Body $body ``` [](https://ems-docs.element.io/uploads/images/gallery/2024-12/image-1733916724815.png) [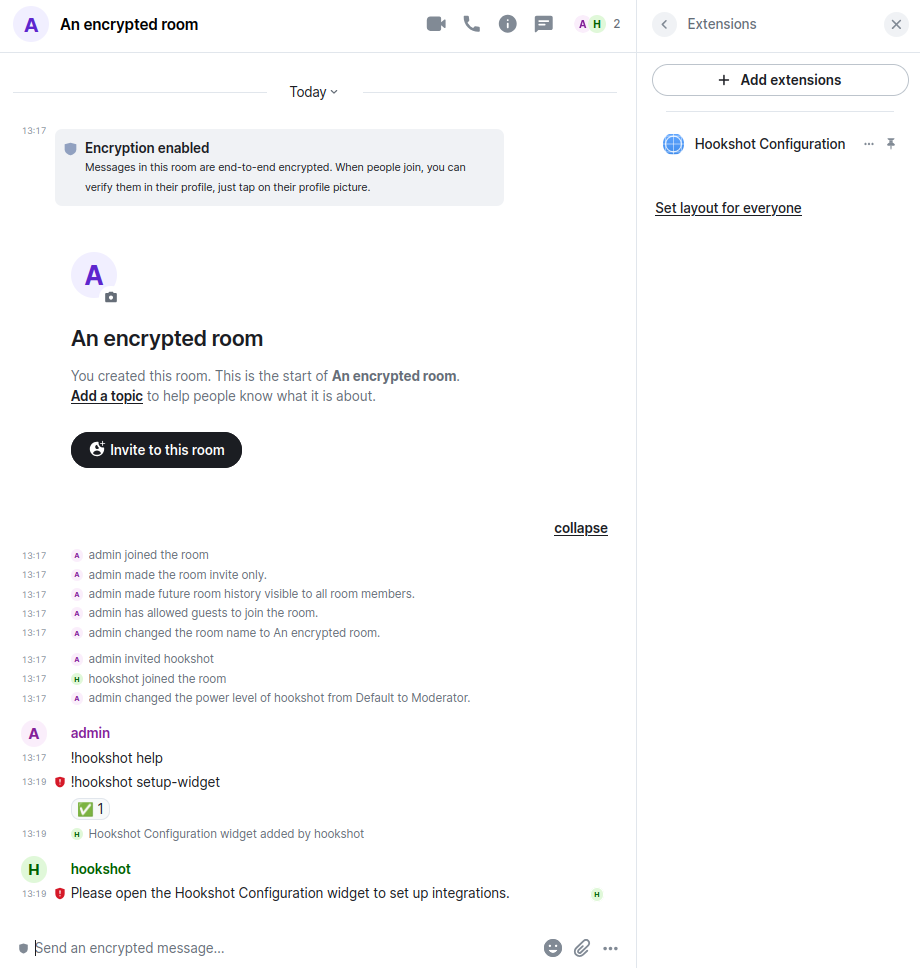](https://ems-docs.element.io/uploads/images/gallery/2024-12/image-1733923241297.png) My message was sent without encryption and Hookshot responded. You can now use Hookshot via the widget normally. Note that all messages sent by Hookshot remain unencrypted. Element warns you with the red shield on the messages. [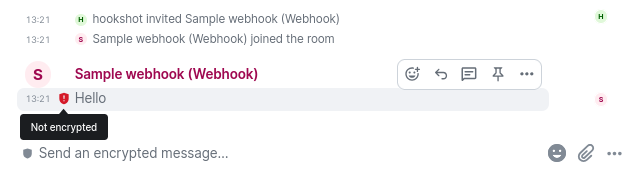](https://ems-docs.element.io/uploads/images/gallery/2024-12/image-1733923333978.png) # Using the Matrix IRC Bridge The Matrix IRC Bridge is an IRC bridge for Matrix that will pass all IRC messages through to Matrix, and all Matrix messages through to IRC. If you're an end user of the bridge, it's unlikely you will need to use the below commands, your IRC Channels may already be bridged to specific Matrix Rooms so you can simply join the Room from Matrix, or the Channel from IRC and communicate with Matrix/IRC users. Our End User focused documentation might be better suited to getting started with Matrix and IRC - [Using the Matrix IRC Bridge as an End User](https://ems-docs.element.io/books/element-support/page/using-the-matrix-irc-bridge-as-an-end-user) Please also refer to the Bridge Documentation for additional guidance. The bridge is currently used on the matrix.org homeserver to bridge a number of popular IRC networks. ### Getting Started with the Matrix IRC BridgeIn this guide we will be using the Matrix.org bridge to the Open and Free Technology Community (OFTC) IRC network. The key information to note is the Room alias format (#_oftc_#channame:matrix.org) and Appservice user (@oftc-irc:matrix.org). Though note this may differ from time of writing, check the link above to up-to-date details.
The Appservice user is the bot that interacts with the bridge, from a Direct Message with this user you will issue commands to connect to the desired channels and perform specific functions. First, invite the user to a DM: [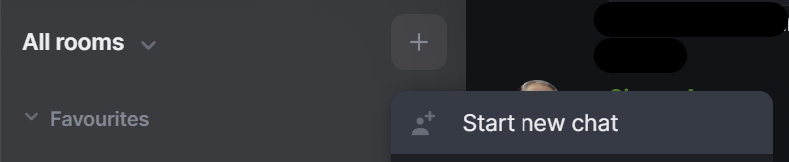](https://ems-docs.element.io/uploads/images/gallery/2023-08/image-1691576604761.png) [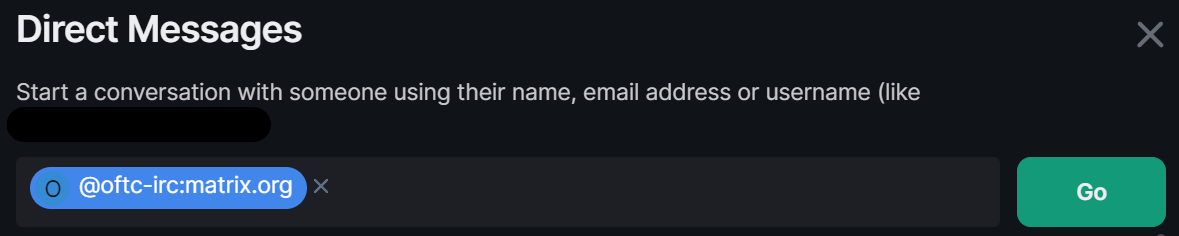](https://ems-docs.element.io/uploads/images/gallery/2023-08/image-1691578090577.png) Using `@oftc-irc:matrix.org` we start a chat, your first message can be anything to create the room. The bot should join the room and then be responsive to commands. [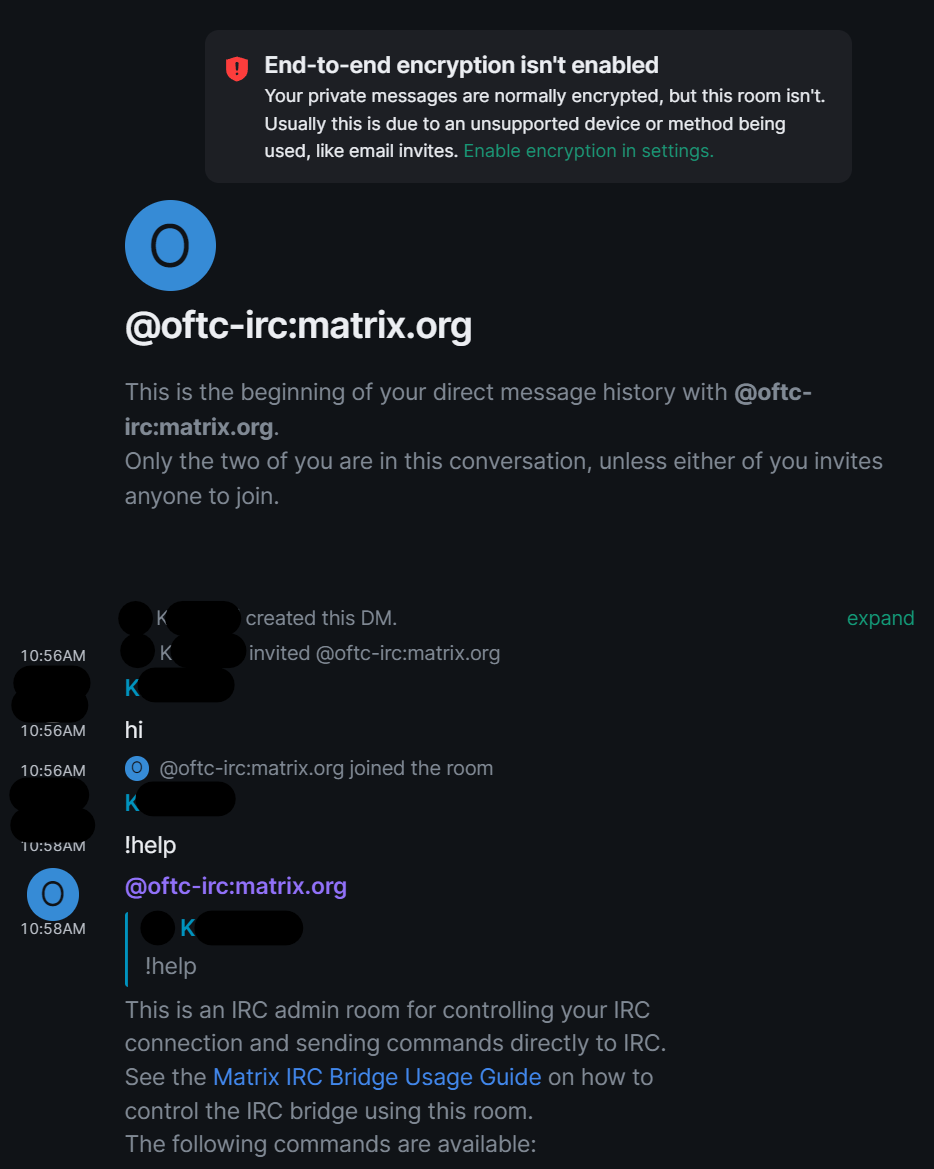](https://ems-docs.element.io/uploads/images/gallery/2023-08/image-1691578178653.png) ### Matrix IRC Bridge Bot Command Overview Commands to the bot are prefixed with `!`, to get started try `!help`, which should result in the bot listing out the available commands for use. You should see something like the below: **Actions** - `!cmd [irc.example.net] COMMAND [arg0 [arg1 [...]]]`: Issue a raw IRC command. These will not produce a reply.(Note that the command must be all uppercase.) - `!feature feature-name [true/false/default]`: Enable, disable or default a feature's status for your account.Will display the current feature status if true/false/default not given. - `!join [irc.example.net] #channel [key]`: Join a channel (with optional channel key) - `!nick [irc.example.net] DesiredNick`: Change your nick. If no arguments are supplied, your current nick is shown. - `!quit`: Leave all bridged channels, on all networks, and remove your connections to all networks. - `!active`: Mark yourself as active, which will exclude you from any idleness kicks. **Authentication** - `!storepass [irc.example.net] passw0rd`: Store a NickServ OR SASL password (server password) - `!reconnect [irc.example.net]`: Reconnect to an IRC network. - `!removepass [irc.example.net]`: Remove a previously stored NickServ password - `!username [irc.example.net] username`: Store a username to use for future connections. **Info** - `!bridgeversion`: Return the version from matrix-appservice-irc bridge. - `!listrooms [irc.example.net]`: List all of your joined channels, and the rooms they are bridged into. - `!whois [irc.example.net] NickName|@alice:matrix.org`: Do a /whois lookup. If a Matrix User ID is supplied, return information about that user's IRC connection. **Management** *These commands only work for [bridge administrators](https://ems-docs.element.io/link/191#bkmrk-irc-bridge-admins).* - `!unlink !room:example.com irc.example.net #foobar`: Unlink an IRC channel from a Matrix room. You need to be a moderator of the Matrix room or an [administrator of this bridge](https://ems-docs.element.io/link/191#bkmrk-irc-bridge-admins). - `!plumb !room:example.com irc.network.net #channel`: This command allows you to plumb a IRC channel into a room without using the HTTP provisioning API. This command does NOT validate that you have permission to do this on the IRC channel so please take care to ensure that the IRC channel is aware of your actions. You must invite the bridge bot into the Matrix room for this to work. ### Using the Matrix IRC Bridge Depending on your bridge setup you may have multiple IRC Networks accessible from your IRC Bridge bot, if so, you will need to specify the IRC Network after the each command. This guide is using `@oftc-irc:matrix.org` which is dedicated to the W3C IRC network so commands do not need to specify. For any command given arguments wrapped in `[]` are optional, make sure to specify them if required for your usecase. #### Joining a IRC Channel The most basic usage of the bridge is to join IRC channels to talk with IRC users, you can do this with the `!join` command. Simply specify the channel you'd like the join: - `!join [irc.example.net] #channel [key]` [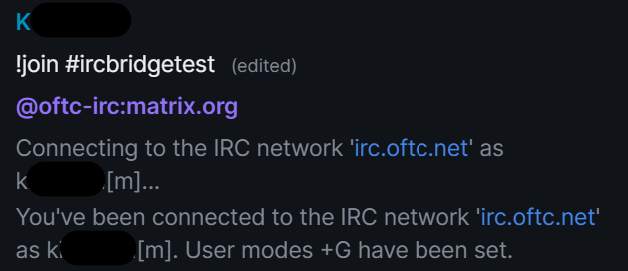](https://ems-docs.element.io/uploads/images/gallery/2023-08/image-1691578403665.png) The first time you run such a command, the bot will connect to the IRC network, then inform you that you are connected. The nickname your user appears as in IRC is dependant on the bridge's configuration. Using the example above, you can see `[m]` has been appended to the users Matrix display name. If the Channel you are joining hasn't yet been joined via the bot, it will create a Matrix room linking it with the IRC Channel. If the room already exists, the command will simply invite you to the already created room. Likewise, if the Channel doesn't yet exist on the IRC Network, it will be created and your user sent an invite. You will then recieve an invite to a Matrix room, connected to that IRC Channel. [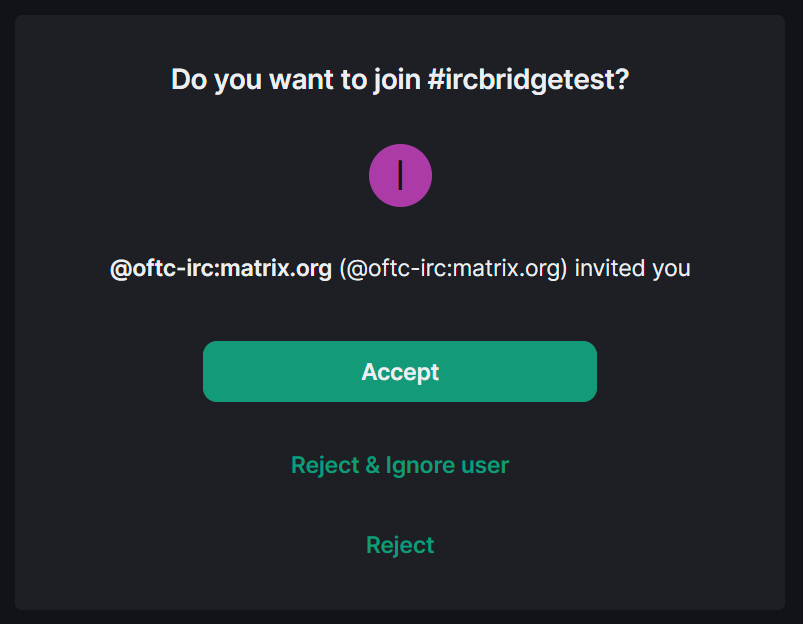](https://ems-docs.element.io/uploads/images/gallery/2023-08/image-1691579350178.png) Once you've joined the room, you can then communicate with others within the channel. [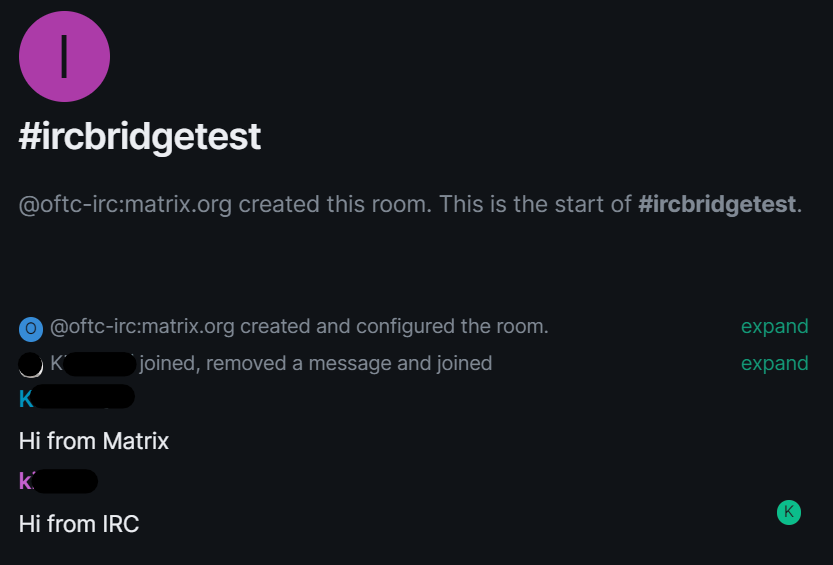](https://ems-docs.element.io/uploads/images/gallery/2023-08/image-1691579708574.png) [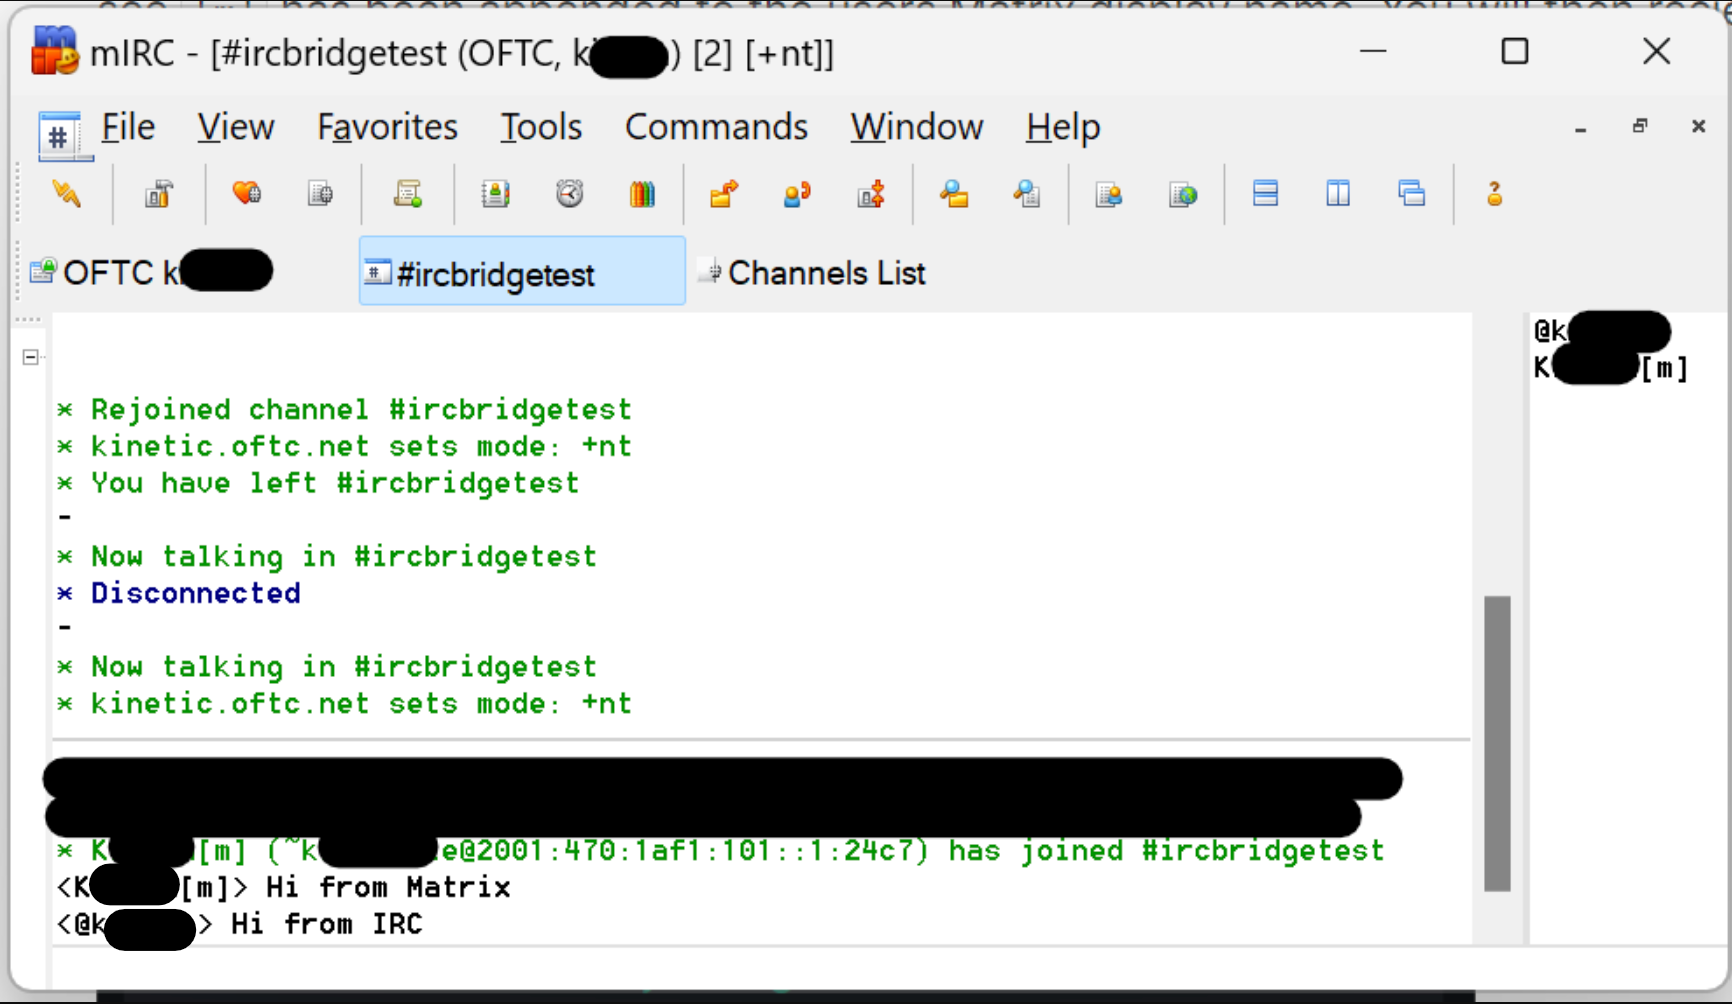](https://ems-docs.element.io/uploads/images/gallery/2023-08/image-1691580515658.png) #### Listing joined IRC Channels After joining a number of IRC Channels you may want to retrieve a list of all the Channels you are joined to, and the associated Matrix rooms. You can do this with the `!listrooms` command. The bot will respond including clickable links to jump straight to the Matrix room. - `!listrooms [irc.example.net]` [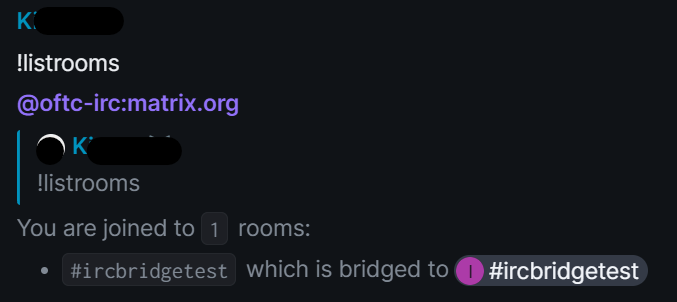](https://ems-docs.element.io/uploads/images/gallery/2023-08/image-1691581430145.png) #### Staying active You can use the `!active` command to mark yourself as active, which will exclude you from any idleness kicks. [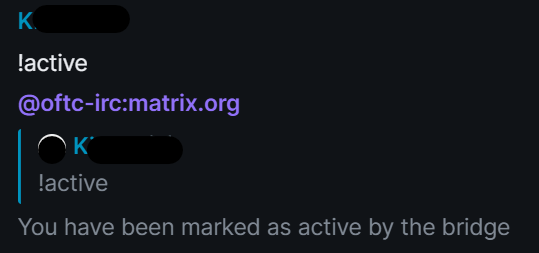](https://ems-docs.element.io/uploads/images/gallery/2023-08/image-1691581565496.png) #### Changing your Nickname To change the nickname presented to IRC users, simply use `!nick`. Provide your desired nickname and it will be updated on the IRC Network, you can also not provide any nickname for the bot to output your current nickname. - `!nick [irc.example.net] DesiredNick` [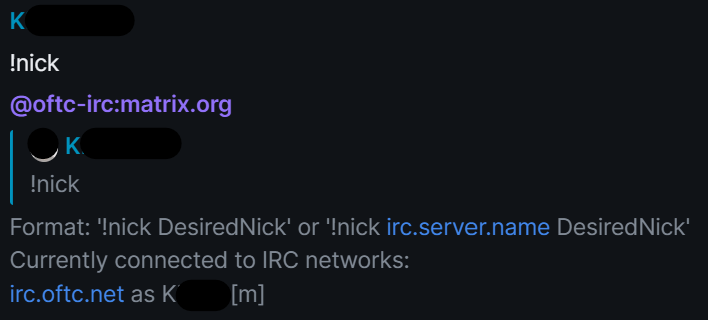](https://ems-docs.element.io/uploads/images/gallery/2023-08/image-1691580688371.png) [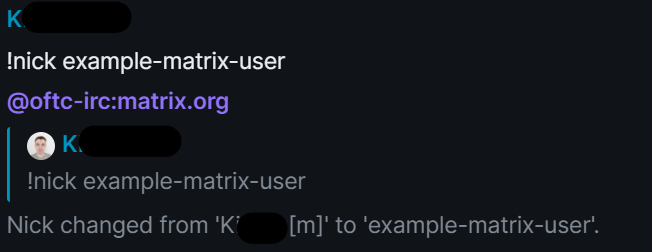](https://ems-docs.element.io/uploads/images/gallery/2023-08/image-1691580836542.png) [](https://ems-docs.element.io/uploads/images/gallery/2023-08/image-1691580876773.png) #### Finding out more information on IRC / Matrix users You can use the `!whois` command, supplying either a Matrix ID to retrieve their IRC nickname, or a IRC nickname to information on what channels that user is in. The `!whois` command is also useful to test your connection to the IRC network, supply your own Matrix ID and if there's any issues with the connection the command will produce an error. - `!whois [irc.example.net] NickName|@alice:matrix.org` [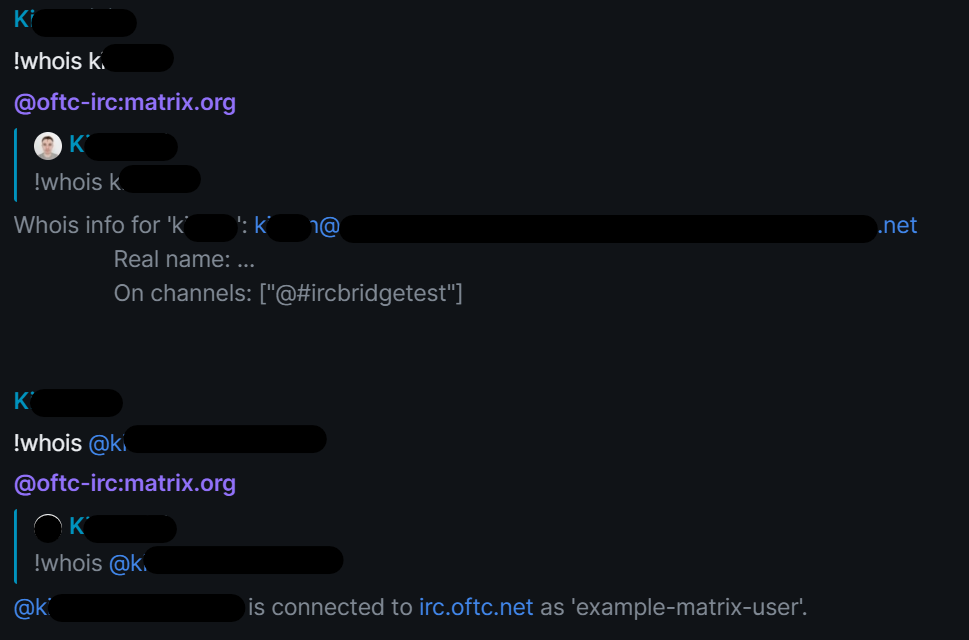](https://ems-docs.element.io/uploads/images/gallery/2023-08/image-1691581859325.png) #### Direct Messaging between Matrix and IRC You can start a DM with an IRC user by simply clicking there profile icon from an existing room linked to an IRC Channel. Then from their profile panel, click `Message` to start a chat. Enter a message to create the room (note they will not see this message), then wait for there user to join the room - once joined, you can send a message which will then be sent to the IRC user. IRC users can also start DMs with Matrix users, they can do this by double clicking the Matrix users' name within the participants list of a channel, or if supported by your client, using the `/query NICKNAME` or `/msg NICKNAME MESSAGE` commands. Once a message is sent, the Matrix user will receive an invite from them to start chatting. [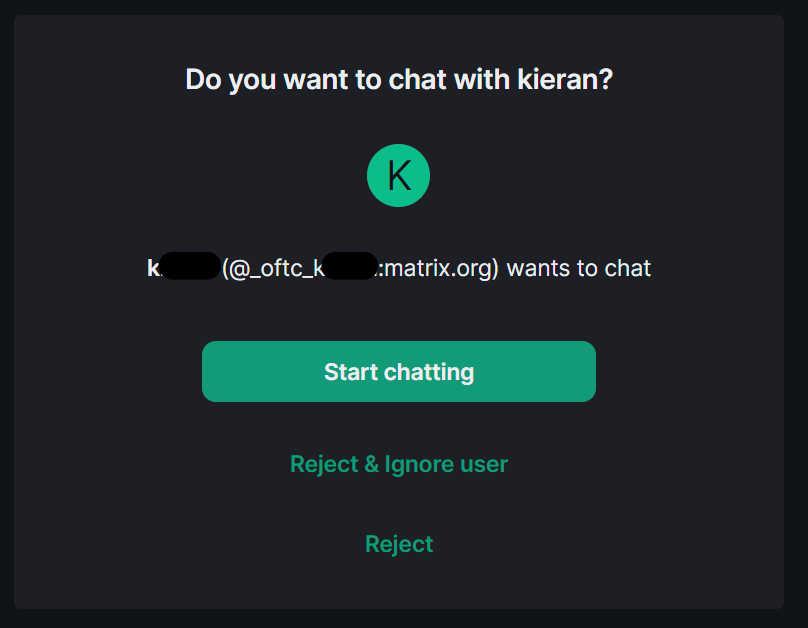](https://ems-docs.element.io/uploads/images/gallery/2023-08/image-1691582633480.png) If you know the configuration of your bridge (or by checking existing IRC users), you can also manually start a DM with a user. Simply start a new chat using the username format the bridge uses. In the example above we can see that the format is `@_oftc_NICKNAME:matrix.org`. So we can initiate chats with any nickname by following that format. #### Leaving an IRC Channel Leaving a Channel is simply a case of leaving the Matrix room. Find the room in the [Left Panel](https://ems-docs.element.io/books/element-support/page/the-left-panel), hoover over its name, then click the 3-dot menu then Leave. [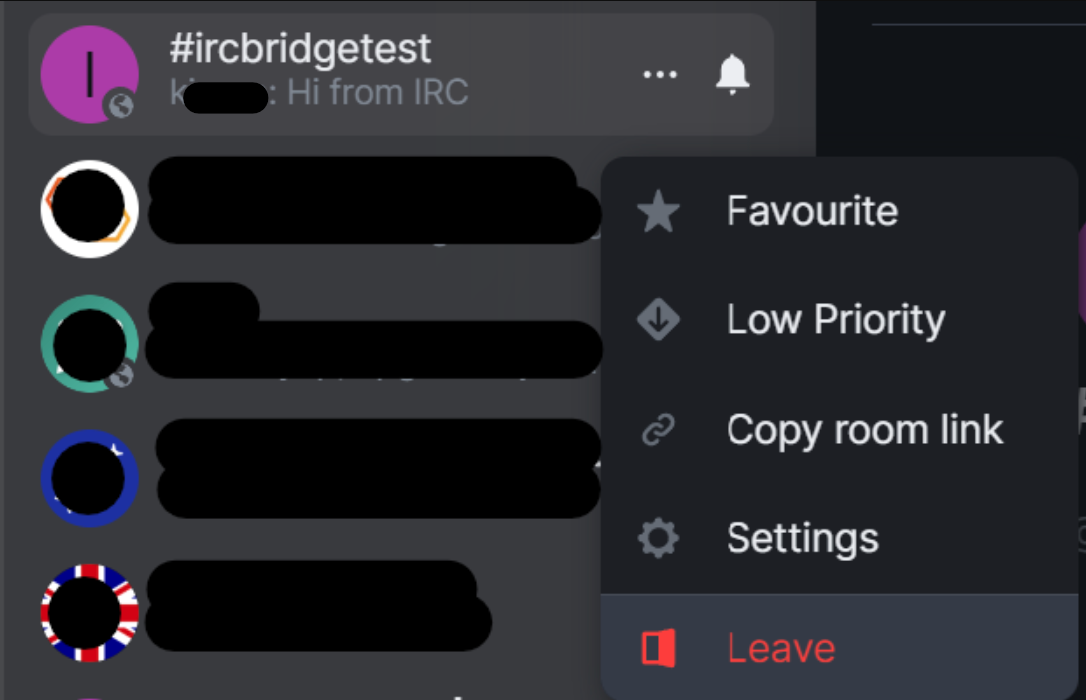](https://ems-docs.element.io/uploads/images/gallery/2023-08/image-1691580574311.png) ##### Leaving all IRC Channels If you wish to disconnect from IRC and leave all Channels (/ Matrix linked rooms) you can simply issue the `!quit` command. Doing so will remove you from all the rooms, you can find them again at the bottom of the [Left Panel](https://ems-docs.element.io/books/element-support/page/the-left-panel) under `Historical`. [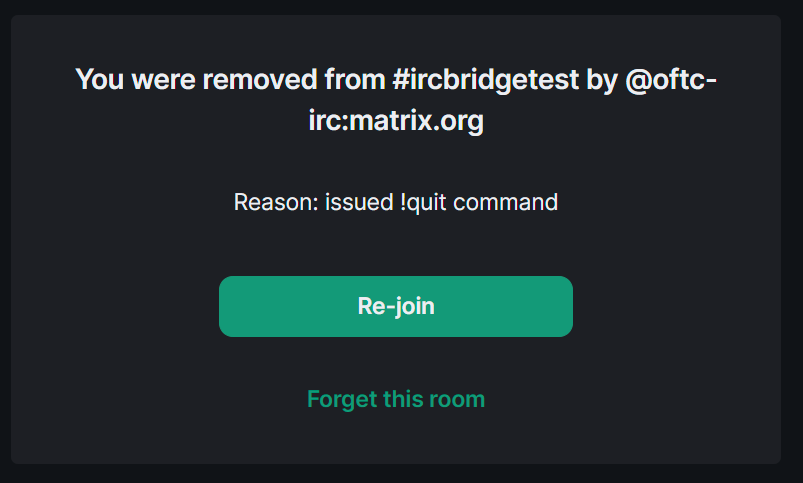](https://ems-docs.element.io/uploads/images/gallery/2023-08/image-1691581004442.png) ### Advanced Bridge Usage #### IRC Authentication If you need to join the IRC Network using authentication credentials you will need to use the `!storepass` and possibly `!username` commands. With these you can set NickServ / SASL password and username respectively. Once completed, simply use `!reconnect` to rejoin the network with the provided credentials. - `!storepass [irc.example.net] passw0rd` - `!username [irc.example.net] username` - `!reconnect [irc.example.net]` You can also remove your stored password using, you will then need to use `!reconnect` to rejoin without the credential: - `!removepass [irc.example.net]` #### Troubleshooting bridge problems If you are encountering issues with the bridge, first try using `!reconnect`, to see if disconnecting and reconnecting solves your issues. Otherwise `!bridgeversion` is a useful command to advise the version of the bridge. Supply this information, alongside any debug logs to the administrator of the bridge to help them troubleshoot your issue. [](https://ems-docs.element.io/uploads/images/gallery/2023-08/image-1691583000864.png) #### Sending raw IRC commands It's possible to use the bot to issue raw IRC commands, to do so you'll need to use `!cmd`, followed by the commmand (in CAPS) and any additional arguments. Unless there is an error with the command, sending `!cmd` will not produce a reply. - `!cmd [irc.example.net] COMMAND [arg0 [arg1 [...]]]` For example, if you wanted to send a private message without creating DM in Matrix, you could use the `/PRIVMSG` IRC command. To do so you'd send: `!cmd PRIVMSG USERNAME MESSAGE` The recipient will then receive the message, but a room in Matrix wont have been created. #### Unlinking an IRC channel from a Matrix room In order to unlink a channel you will need to use the `!unlink` command, followed by the matrix room ID, IRC network and channel name. To successfully perform this action you will need to be a moderator of the Matrix room or an administrator of the bridge. - `!unlink !room:example.com irc.example.net #foobar` You can find the matrix room id by accessing the room's settings page, then within the `Advanced` section you will find the `Internal Room ID`. [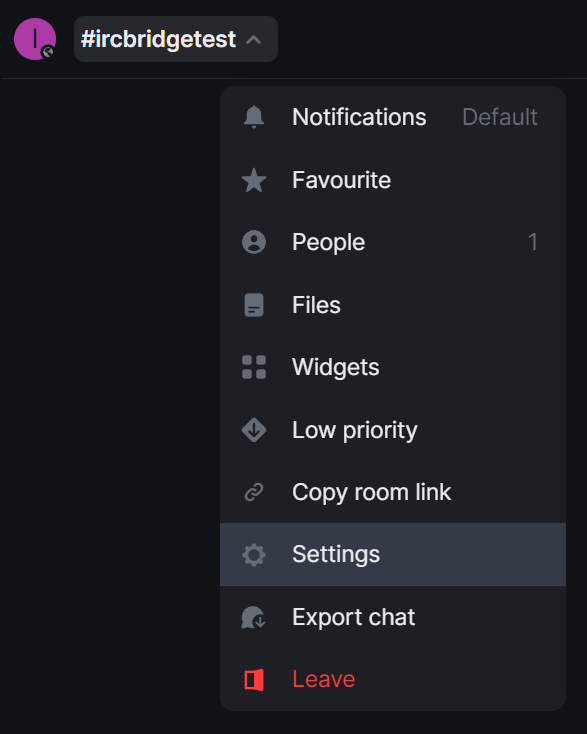](https://ems-docs.element.io/uploads/images/gallery/2023-08/image-1691586982296.png) [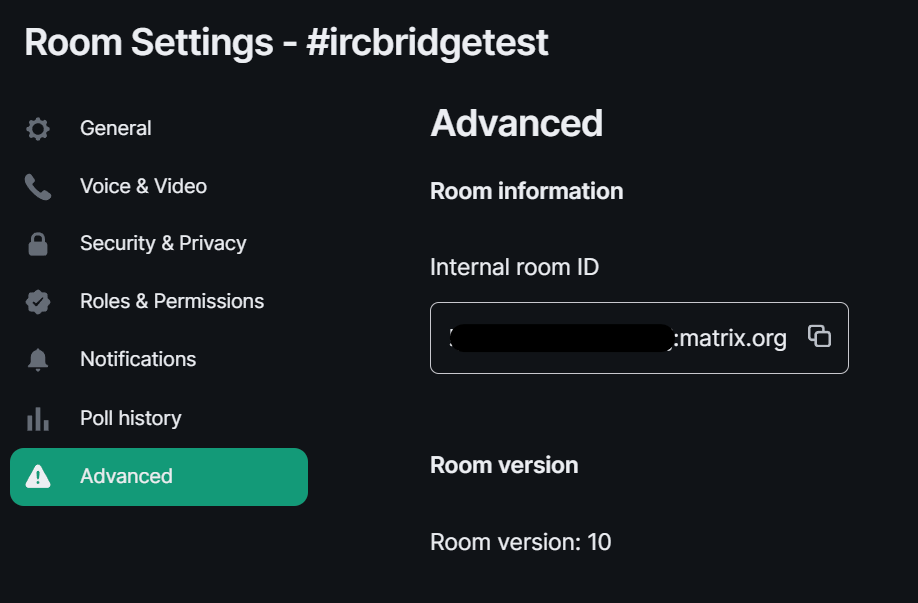](https://ems-docs.element.io/uploads/images/gallery/2023-08/image-1691587008743.png) # Using the Matrix IRC Bridge as an End User If your homeserver has the Matrix IRC Bridge configured it will pass messages to and from IRC. Depending on your homeservers' IRC bridge configuration you will interact with IRC through various means; for instance your homeserver may have pre-configured Matrix Rooms bridged to IRC Channels; you may have the ability to join / create bridged rooms dynamically; or you may use private messaging to speak directly with a specific user in IRC. ### Getting Started #### Joining your first IRC Channel via a bridged Matrix Room To start, the most basic usage of the IRC bridge would be to join an IRC Channel to communicate with both Matrix and IRC users together. Your homeserver administrators will have preconfigured bridging from specific IRC Channels to Matrix Rooms, they should be able to advise which rooms you should initially join, for instance, a `#welcome` Channel / Room. When you join a bridged room and send a message for the first time, you'll be sent an invitation to a DM with your homeservers' IRC Bridge Bot. The Matrix User ID of the bridge bot is configurable by your homeservers administrator, but the DM room should be called `IRC Bridge status` prepended with the IRC Network name that the room was bridged to. [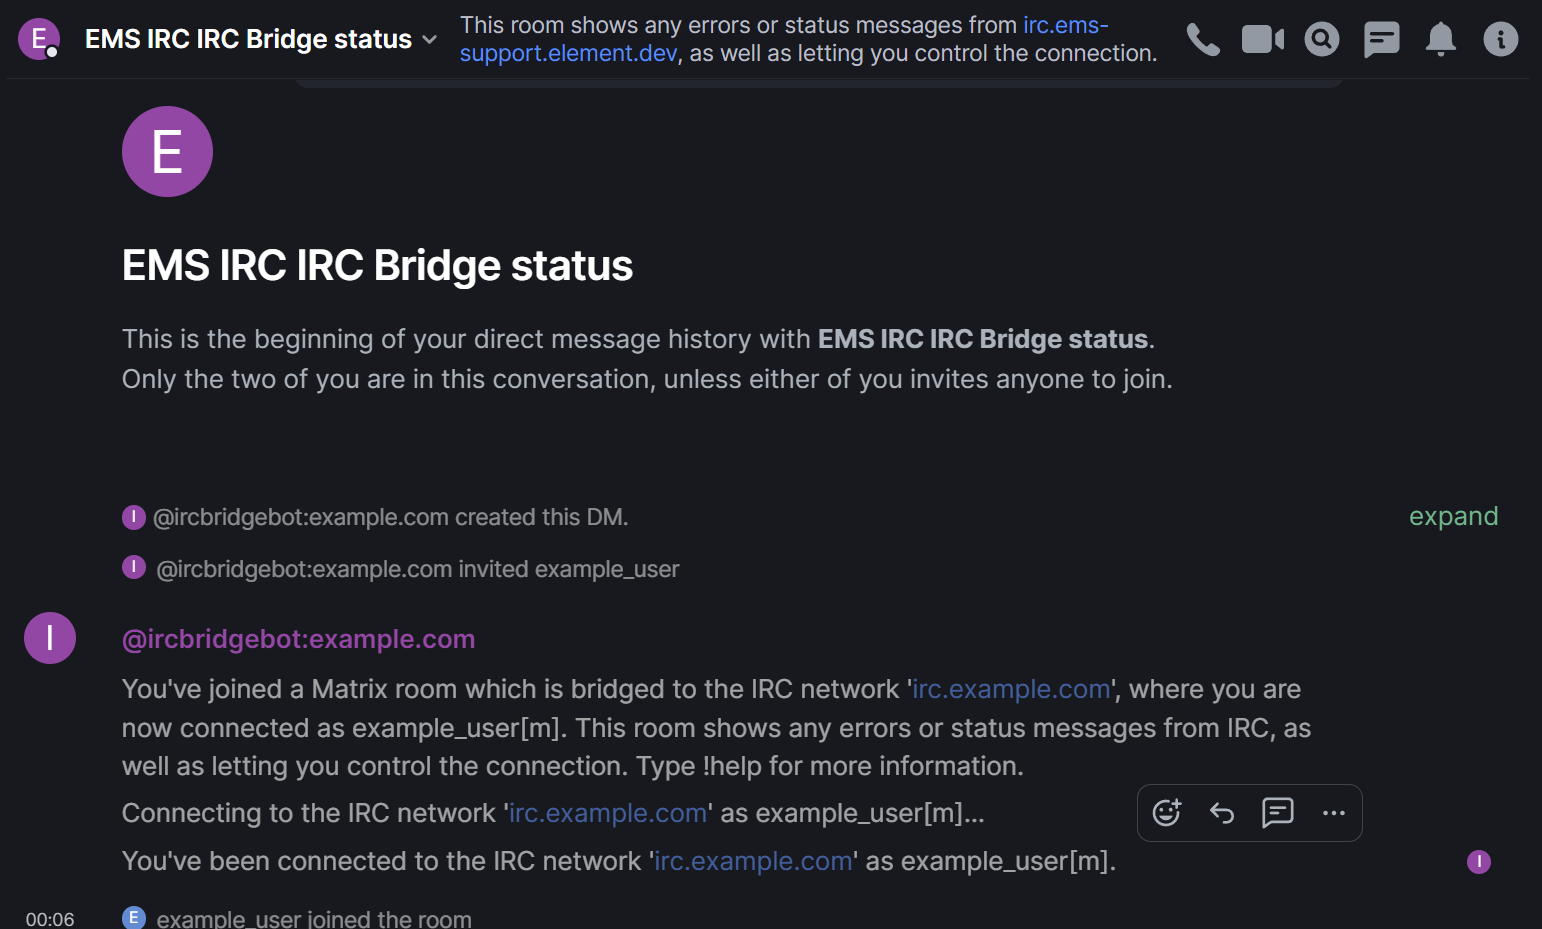](https://ems-docs.element.io/uploads/images/gallery/2023-08/image-1692660623334.png) This room will allow you to keep check on your connection to the IRC network, the initial message from the bridge bot should confirm you connected successfully and the nick name in IRC you have connected as. This is customisable by your homeserver admin, in this guides' example environment, you can see Matrix users appear in IRC as their Display Name followed by `[m]`. #### Messaging in IRC Channels Once you have joined a bridged Matrix Room you're already able to communicate with any IRC users connected to the IRC Channel bridged with the room. You can send messages, emoji 👋, even upload attachments or send voice messages. So what does an IRC user see? While Matrix messages can be formatted in a number of ways, supporting Markdown and HTML, IRC messaging is mostly simple text. You'll find sending simple text messages and emoji works best whereas Markdown and HTML, whilst it will be sent, may not be correctly rendered in an IRC client. When sending attachments, voice messages, and multi-line messages (if restricted by your homeserver) IRC users will instead see a message that you uploaded a file, a voice message or a truncated version of your multi-lined messages each with a link to download / listen / view. From the below examples, of the Element Matrix and mIRC IRC clients respectively, you can see differences in how messages are rendered, that reactions are not supported in IRC etc. [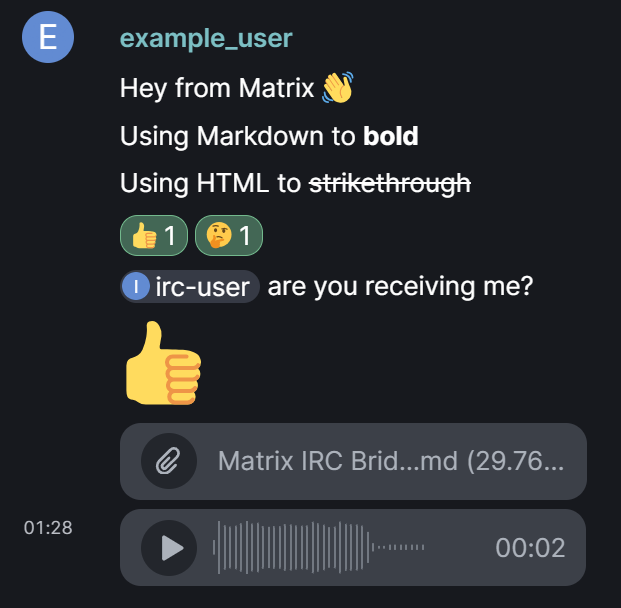](https://ems-docs.element.io/uploads/images/gallery/2023-08/image-1692664135585.png) [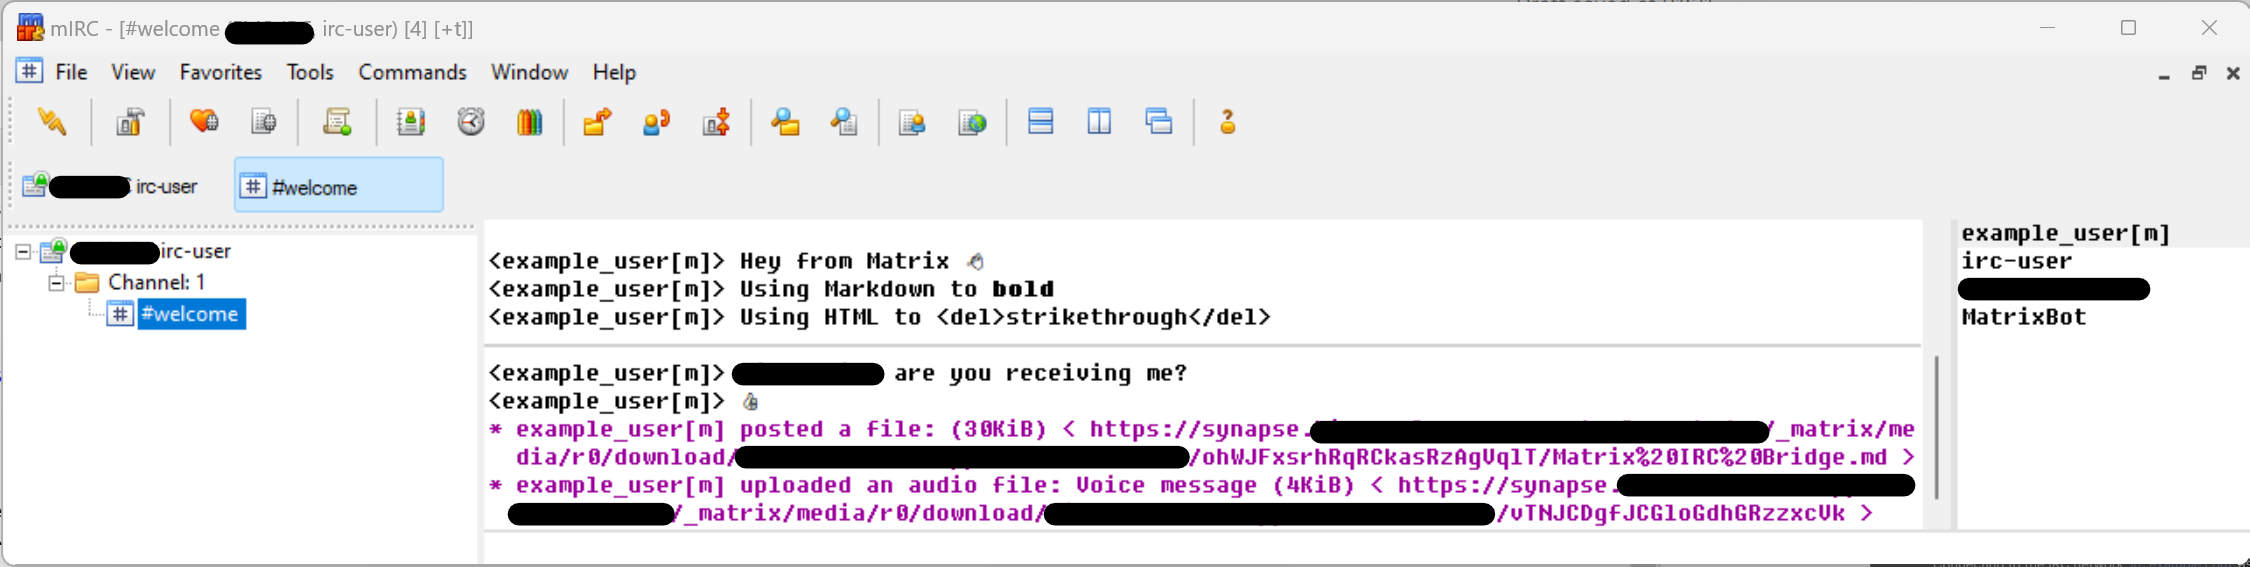](https://ems-docs.element.io/uploads/images/gallery/2023-08/image-1692664956715.png) #### Private Messaging IRC Users So long as private messaging is enabled by your administrator you can do so just like with any other Matrix user. IRC users appear in Matrix as Matrix users, you can view the list of people in a room by clicking the `i` icon in the top-right of the client, then selecting `People`. Here you can see all users within the room, including those users created to represent IRC users. The format for their Matrix User IDs is configured by your homeserver administrator, but is usually prefixed with `irc_` followed by their IRC nick name. Just like with any other Matrix user; you can click on a person from this pane; click on their profile picture next to any message they've sent within the room; or simply search for them to initiate the DM. Compose your initial message and send to start a Direct Message with the IRC user. IRC user can likewise start a private message with you, using your IRC nickname - if they do, you will be invited to a DM just like any other Direct Message. [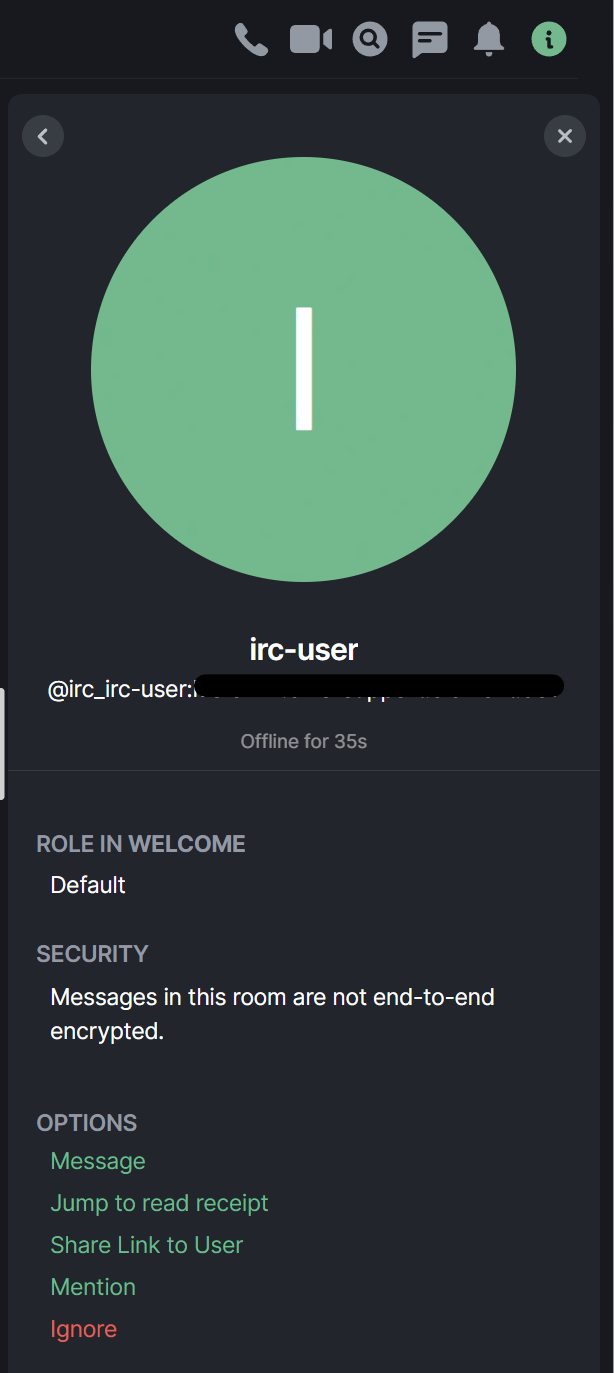](https://ems-docs.element.io/uploads/images/gallery/2023-08/image-1692665352384.png) ### Going Further #### Changing your IRC Nickname If permitted, you may wish to change the nick name used when you connect to the IRC Network. You can do this by speaking with the bridge bot within the `IRC Bridge status` room you were invited too. Don't worry if you left the room, simply invite the bridge bot into a new DM and it'll work just the same. You can do this by sending `!nick` to the bot, you'll notice the bot will respond advising on how to format the command to change your nick name and supply the nick name your are currently using on each connect IRC Network. [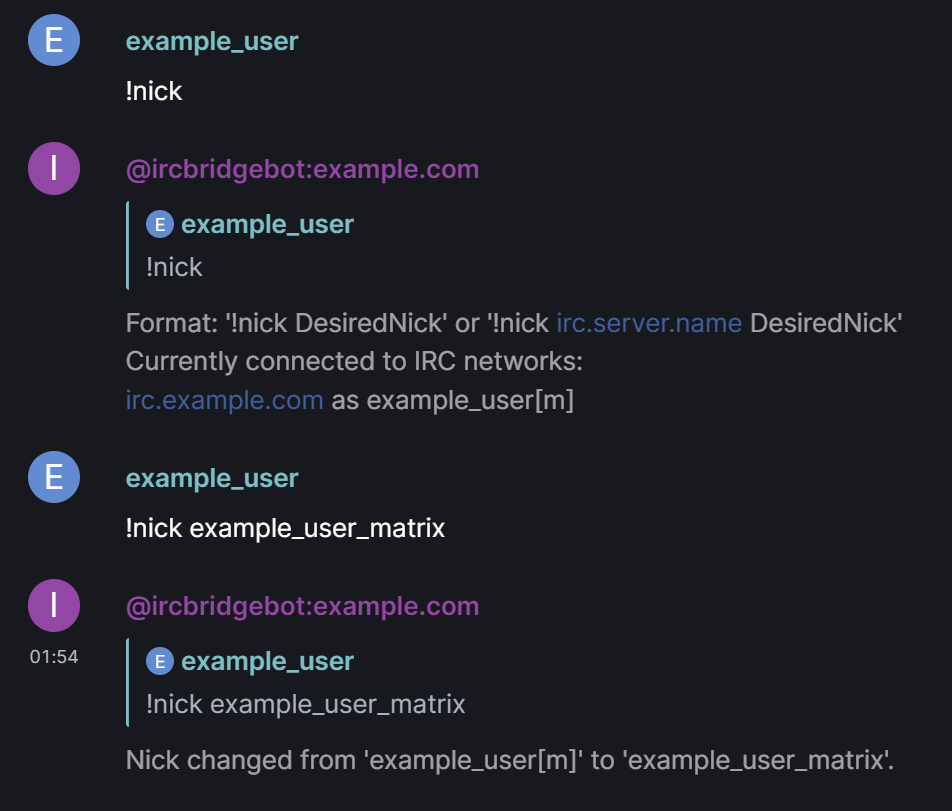](https://ems-docs.element.io/uploads/images/gallery/2023-08/image-1692665943012.png) #### Joining an as-yet unbridged IRC Channel If permitted, you may want to join a conversation within an IRC Channel, not yet bridged to any specific Matrix room. Just like with changing your nick name, you can do this by speaking with the bridge bot within the `IRC Bridge status` room you were invited too. Send the `!join [irc.example.net] #channel [key]` command, making sure to specify the IRC Network if there are multiple, then the IRC Channel name. Make sure to include the key if needed. A complete command to join the `#locked` IRC Channel requiring a key of `password` would look like, `!join irc.example.com #locked password`. Assuming you have permission to use the `!join` command, and that the channel specified is not excluded, you will recieve an invite to the newly created room for the specified IRC Channel. #### Using the bridge bot To delve deeper into using the bridge bot and it's commands, or for a more in-depth doc on the IRC Bridge, you can check out [Using the Matrix IRC Bridge](https://ems-docs.element.io/books/element-support/page/using-the-matrix-irc-bridge). # Using the Matrix XMPP Bridge as an End User If your homeserver has the Matrix XMPP Bridge configured it will pass messages to and from XMPP. You will interact with XMPP by; joining Matrix Rooms specifically bridged to existing XMPP rooms; speaking with XMPP users who have joined public Matrix rooms; or you may use private messaging to speak directly with a specific user in XMPP. ### Getting Started #### Messaging in public Matrix Rooms To start, the most basic usage of the XMPP bridge would be to join a Public Matrix room that XMPP users also join to communicate. You or your homeserver administrators will have created a Public room, which XMPP users can search for using a configured endpoint, by default `matrix` instead of `conference`. That's it, by messaging in this room, anyone who is joined from XMPP will be able to see and respond to your messages. As far as how you appear in XMPP, you'll be displayed in room member lists using your Matrix display name, with a full username formatted based on how your homeserver administrators configured. Usually in a format like `DISPLAYNAME_HOMESERVER@EXTERNALCOMPONENT.XMPPSERVER`, so an example user would look like: ``` alice_example.com@matrix.xmpp.example.com ``` In Matrix, XMPP users will appear with Matrix User IDs, following a format like `@PREFIX_USERNAME=40XMPPSERVER:HOMESERVER`, so an example user would look like: ``` @xmpp_alice=40xmpp.example.com:example.com ``` However it's unlikely you will ever need to directly type these, you can use your native clients' functions to interact with users, just like any other Matrix user in Element, or XMPP user in your XMPP client. #### Messaging in an XMPP room via a bridged Matrix Room The alternative to speaking with XMPP users in a public Matrix room they join, is to join an existing XMPP room. To do this all you need to know is the XMPP rooms name and how your homeservers have configured the room name format in Matrix. By default, XMPP rooms in Matrix are translated following a format like `#PREFIX_XMPPROOMNAME_CONFERENCE.XMPPSERVER:HOMESERVER`, so an example room alias would look like: ``` #_xmpp_exampleroom_conference.xmpp.example.com:example.com ``` So you can either enter this in the room search prompt, or simply send `/join #_xmpp_exampleroom_conference.xmpp.example.com:example.com` in any room (nothing is sent to the room you send this to), for the Element Client to automatically join you to the room. Once joined, exactly as with public Matrix rooms, you can communicate with anyone else in the room just as you normally would in Matrix. #### Private Messaging XMPP Users XMPP users appear in Matrix as Matrix users, you can view the list of people in a room by clicking the `i` icon in the top-right of the client, then selecting `People`. Here you can see all users within the room, including those users created to represent XMPP users. The format for their Matrix User IDs is configured by your homeserver administrator, see above for defaults. Just like with any other Matrix user; you can click on a person from this pane; click on their profile picture next to any message they've sent within the room; or simply search for them to initiate the DM. Compose your initial message and send to start a Direct Message with the XMPP user. A XMPP user can likewise start a private message with you, using your XMPP username - if they do, you will be invited to a DM just like any other Direct Message. # Using the WhatsApp bridge ### Overview This guide describes how to bridge your Element and WhatsApp accounts. This allows you to chat with WhatsApp contacts and groups natively within Element. Before you can carry out the steps in this guide, ensure you have the following: - WhatsApp - You will need a phone with WhatsApp installed and a registered account. - Element - You will need a Matrix account to log into Element, and a WhatsApp bridge set up on your Matrix homeserver. Note: When setting up the Whatsapp bridge you will need to scan a QR code generated in Element from your phone. To make this process as easy as possible, we recommend using Element Web for the initial setup, once set up you can then login to any platform with your Element account and use the bridge which you have set up. However, it is possible with two mobile phones if you can quickly take a photo of the QR code with one phone and then scan it with the original phone. ### Setting up Sign into Element Web using your Element username and password. (If asked to verify your login, see [docs on verifying a new login](https://ems-docs.element.io/books/element-support/page/verify-new-login). Once signed in, start a new direct message with the WhatsApp bridge bot. (It will not work if you create a room with the bridge bot, it needs to be a direct message) The username of the bot will be _@whatsappbot:your.server (for example @whatsappbot:matrix.org)_ Ensure that _your.server_ is the homeserver where the bridge is hosted. This may be different to the homeserver hosting your own account. Click on the suggested **WhatsApp bridge bot**, and click **Go** to start the direct message. [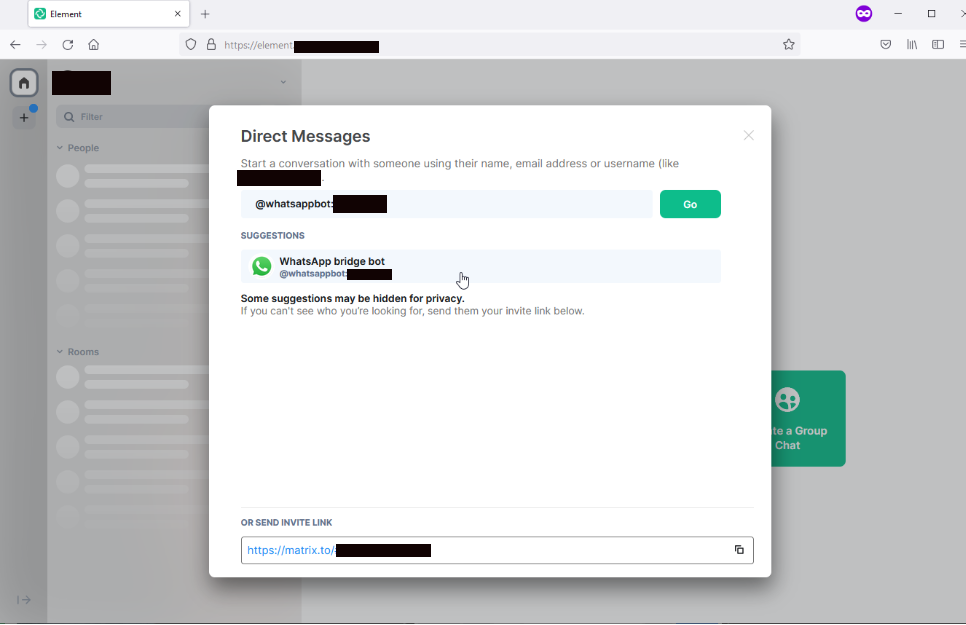](https://ems-docs.element.io/uploads/images/gallery/2025-03/scr-20231103-ktgi-new-copy2.png) You will be taken into a new room with the WhatsApp bridge bot. The bot automatically joins the room. [](https://ems-docs.element.io/uploads/images/gallery/2025-03/kulm-copy.png) Remaining in the room, send the login command by sending **login** into the room. `Tip: You can also send the command **help** to get a list of all available commands.` The bot will generate a QR code to scan from WhatsApp on your phone. [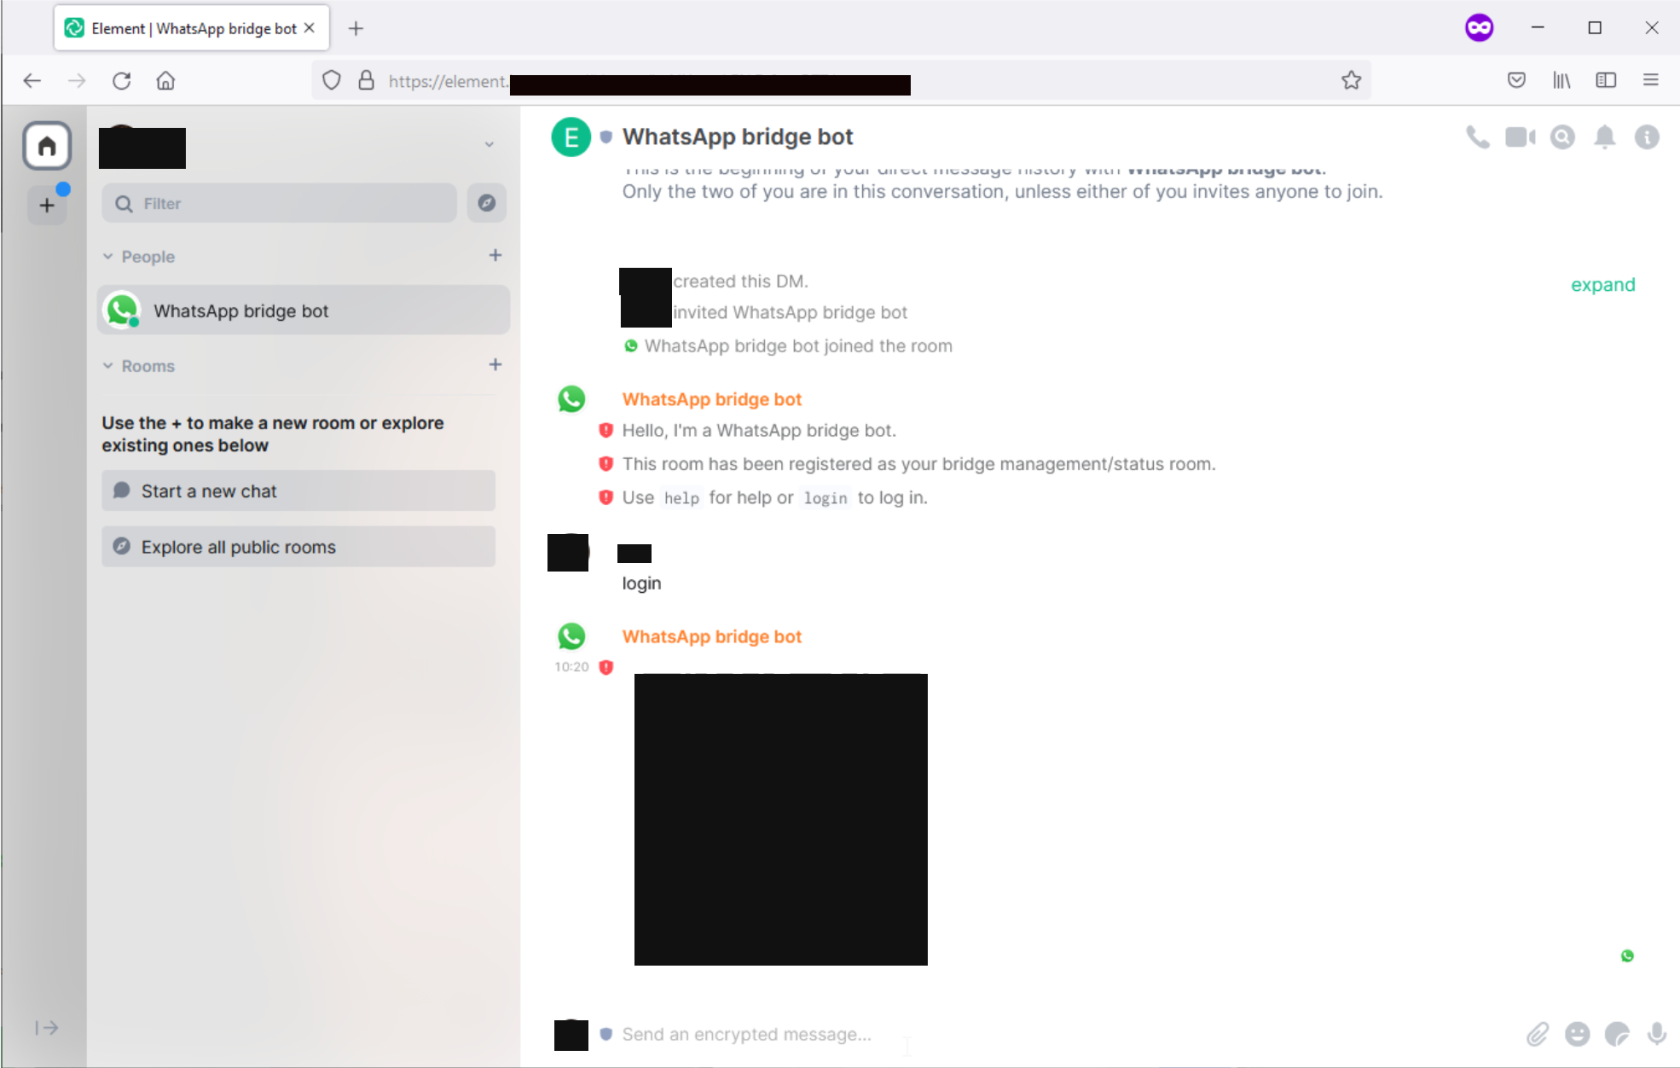](https://ems-docs.element.io/uploads/images/gallery/2025-03/scr-20231103-kvet-copy.png) Leaving Element open, open WhatsApp on your phone for the next step In WhatsApp, tap the three dots **(⋮)** in the top right corner of the app. From the drop-down menu tap **Linked devices**. Tap **LINK A DEVICE**. [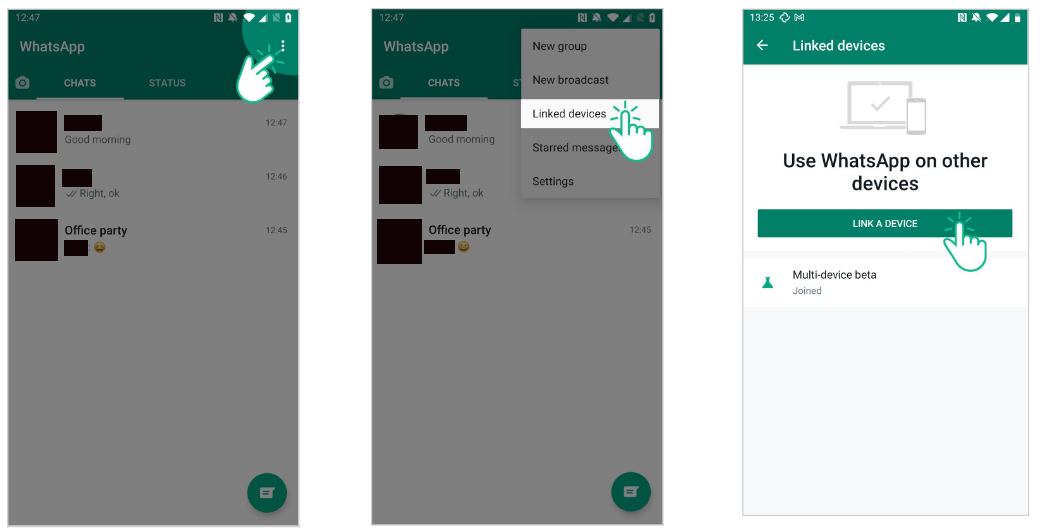](https://ems-docs.element.io/uploads/images/gallery/2025-03/scr-20231103-kwvi-new.png) Tap **OK** to begin scanning the QR code. Scan the QR code generated by the WhatsApp bot in Element. The WhatsApp bridge now shows as a linked device in **DEVICE STATUS**. If this doesn't work the first time, it is likely that the QR code has expired, you will need to repeat the steps again and scan the QR code before it expires. [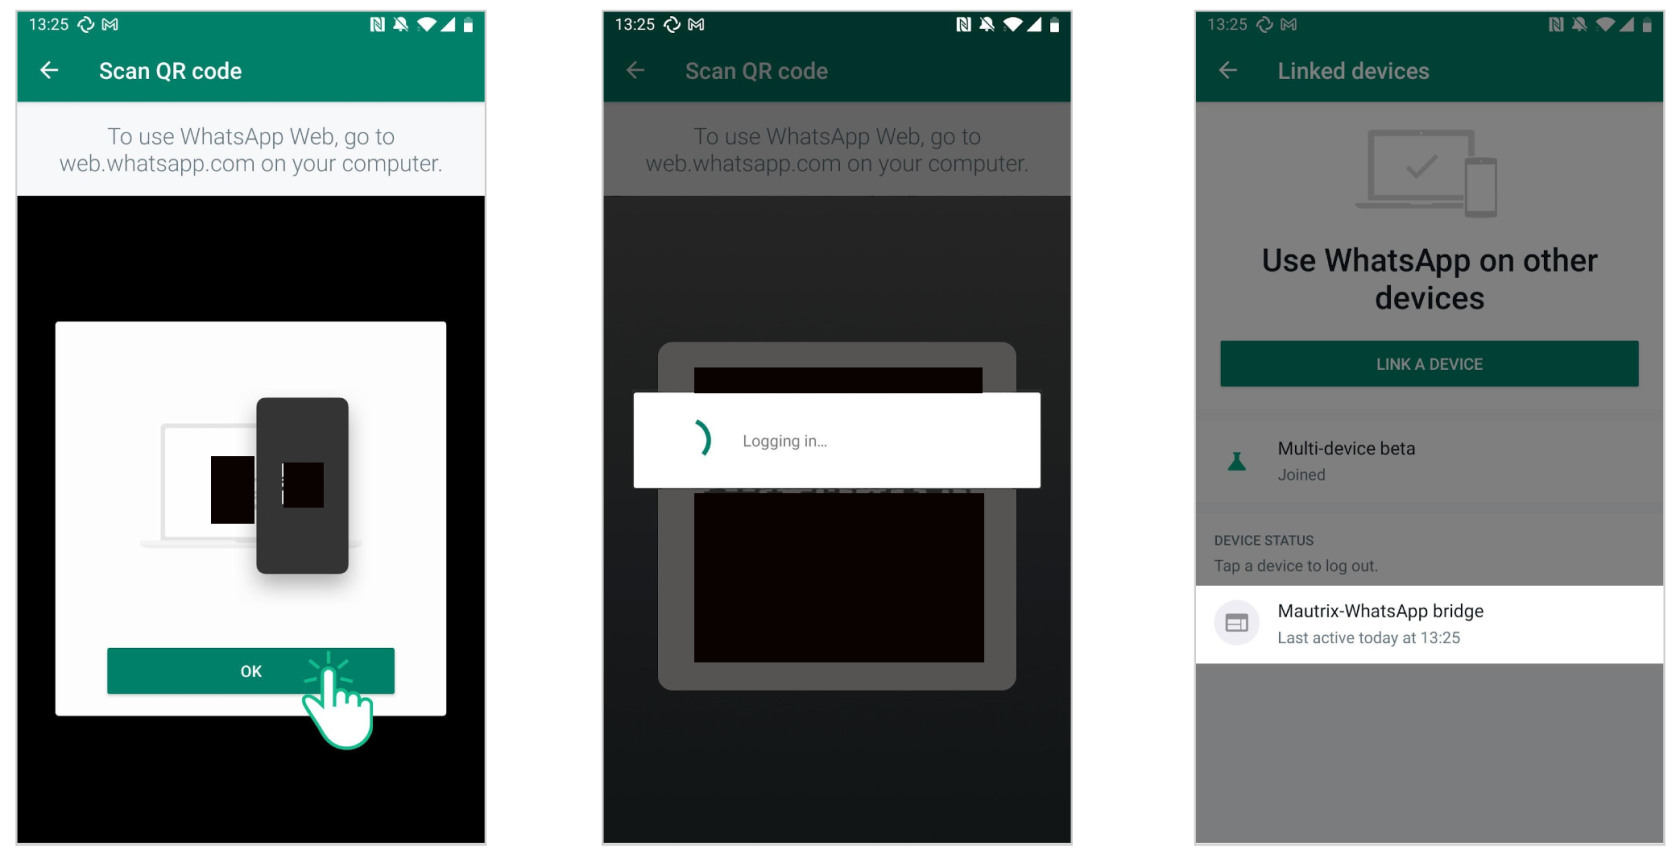](https://ems-docs.element.io/uploads/images/gallery/2025-03/25Vscr-20231103-kxmz-new.png) Back in Element, the bridge bot will confirm that you have logged in to WhatsApp. The bridge then creates rooms to allow you to chat with WhatsApp contacts and groups. By default the bridge automatically creates rooms for people or groups you have interacted with in the last week. Others are created as new messages arrive. See below for how to use bridged rooms. Note: WhatsApp requires your phone to connect to your WhatsApp account every 14 days to keep the bridge active, otherwise you will need to QR code scan again. So ensure you open the WhatsApp app every 14 days to ensure you are not disconnected. ### Using direct messages The bridge will automatically invite you to new rooms for your recent contacts. You will be able to see in the upper left-hand corner that WhatsApp contacts automatically have (WA) added to their display name. To start, click on a room invite and join the room.You will be taken into the new room for your WhatsApp contact. You can now begin chatting with your WhatsApp contact in the same way as any other Element user. (Note that the bridge does not support voice or video calling.) Starting new chats (or resuming older ones that were not automatically set up) can be done with the pm command, followed by the number for the other person in international format. For example to invite whatsapp number +4412345678 you would send the command **pm +4412345678** into the WhatsApp bridge bot room. `Tip: Using the list contacts command retrieves your existing WhatsApp contacts, including their numbers. You can then click on the contact and click message to start chatting.` Once the pm command is sent the bridge will invite you to a new room for the WhatsApp chat. ### Using rooms You will automatically be invited to some rooms for WhatsApp group chats that have been automatically created by the bridge. If this has not happened you can manually open an existing group chat. To open an existing WhatsApp group in Element, you can use the list groups command (send the message **list groups** into the WhatsApp bridge bot room) to get a list of all WhatsApp groups. All groups will be shown in a list together with their group IDs. Use the open command, followed by the ID of the group. For example you can see the Office part group chat has the room ID 441234567891-9876543219, so you would send the command **open 441234567891-9876543219**. The bridge will then create a room for the group and invite you. [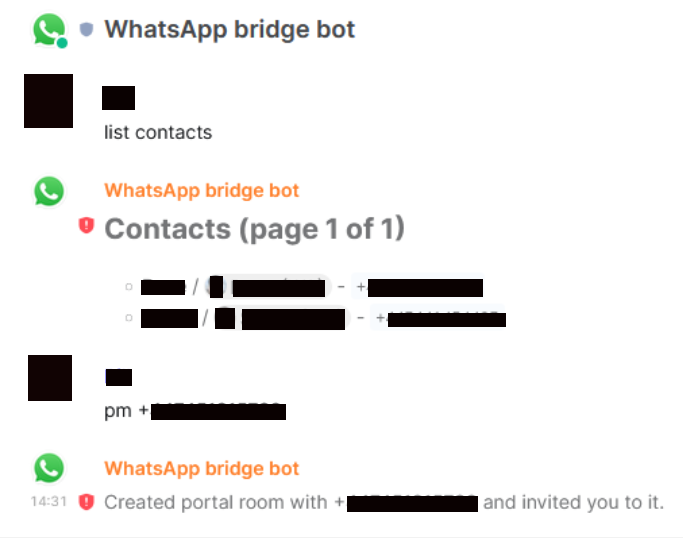](https://ems-docs.element.io/uploads/images/gallery/2025-03/e7Bscr-20231107-kcks-copy.png) ### Disconnecting from WhatsApp To disconnect WhatsApp from Element enter the logout command, by sending **logout** into the WhatsApp brtidge bot room. This will remove the linked device from WhatsApp. As a further option, the connection to WhatsApp can be forcibly disconnected by using the **delete-session** command. This removes the connection at the Element side but does not perform a graceful logout from WhatsApp. Once logged out, the **delete-all-portals** command can be used to clean up rooms previously created by the bridge. [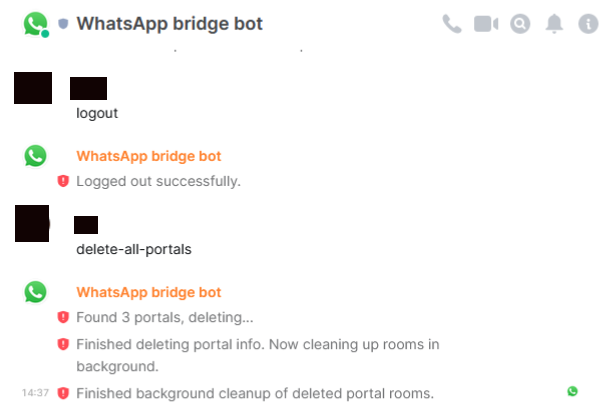](https://ems-docs.element.io/uploads/images/gallery/2025-03/scr-20231107-kfqi-new.png) # Using the Telegram Bridge ### Overview This guide describes how to bridge your Element and Telegram accounts. This allows you to chat with Telegram contacts and groups natively within Element. Before you can carry out the steps in this guide, ensure you have the following: - Telegram - You will need a phone with the Telegram app installed and a registered account. - Element - You will need a Matrix account to log into Element, and a Telegram bridge set up on your Matrix homeserver. ### Setting up Sign into Element Web using your Element username and password. (If asked to verify your login, see [docs on verifying login](https://ems-docs.element.io/books/element-support/page/verify-new-login).) Once signed in, start a new direct message with the Telegram bridge bot. (It will not work if you create a room with the bridge bot, it needs to be a direct message) The username of the bot will be _@telegram:your.server (for example @telegram:matrix.org)_ Ensure that _your.server_ is the homeserver where the bridge is hosted. This may be different to the homeserver hosting your own account. Click on the suggested **Telegram bridge bot**, and click **Go** to start the direct message. You will be taken into a new room with the Telegram bridge bot. The bot automatically joins the room. Remaining in the room, send the login command by sending **login** into the room. `Tip: You can also send the command **help** to get a list of all available commands.` Then enter the number of the Telegram account you are wanting to connect to in international format e.g +4412345678. Your Telegram account will then receive a 4 digit login code, enter this code into the Element room to connect. `Note: If you get this wrong the first time, you will need to use the "cancel" command and start again from "login".` Your Telegram account should now be linked to your Element account and the bot should confirm this in your room. [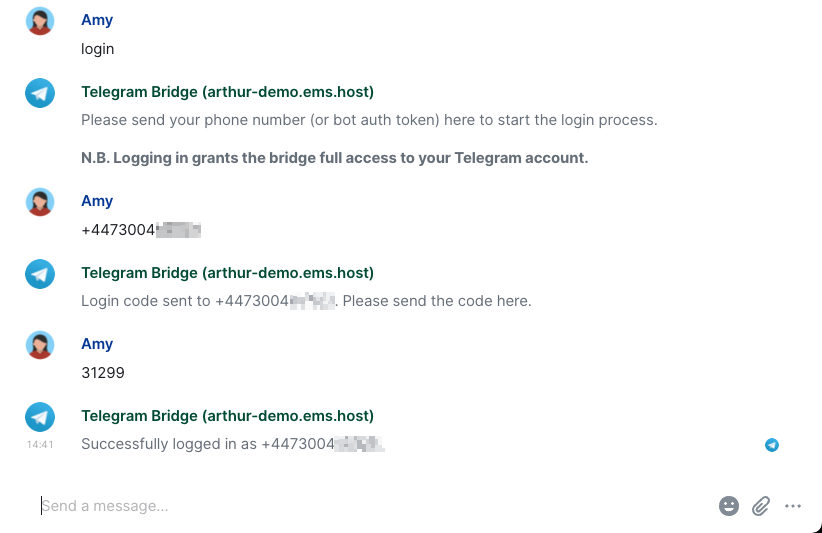](https://ems-docs.element.io/uploads/images/gallery/2023-11/scr-20231123-nbbs.png) ### Using direct messages The bridge will automatically invite you to new rooms for your recent contacts. To start, click on a room invite and join the room. You will be taken into the new room for your Telegram contact. You can now begin chatting with your Telegram contacts in the same way as any other Element user. `Note: The bridge does not support voice or video calling.` To start a chat with a new contact, first ensure you have added the contact in your Telegram contacts. If you send your first message from Telegram you will then get a new invite in Element to join the room. Or it can be done with the **pm** command, followed by the number for the other person in international format. For example to invite Telegram contact number +4412345678 you would send the command **pm +4412345678** into the Telegram bridge bot room. [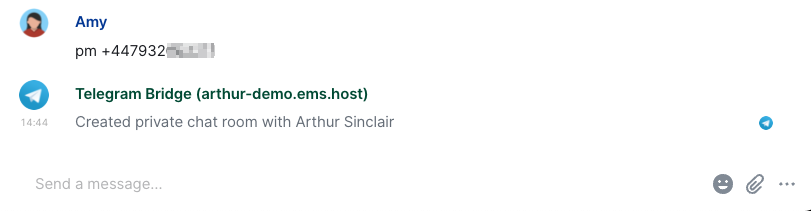](https://ems-docs.element.io/uploads/images/gallery/2023-11/scr-20231123-nbzw.png) ### Using rooms You will automatically be invited to some rooms for Telegram group chats that have been automatically created by the bridge. If this has not happened you can manually open an existing group chat.