Administration
Migrating? Automate your deployment? Configuring Backups? Guides for Administrators here!
- Authentication Configuration Examples
- Backup and Restore
- Calculate monthly active users
- Configuring Element Desktop
- Guidance on High Availability
- Migrating from Self-Hosted to ESS
- Mobile client provisioning
- Starting and Stopping ESS Services
Authentication Configuration Examples
Authentication Configuration Examples
Authentication configuration examples for LDAP, OpenID on Azure and SAML.
Provided below are some configuration examples covering how you can set up various types of Delegated Authentication.
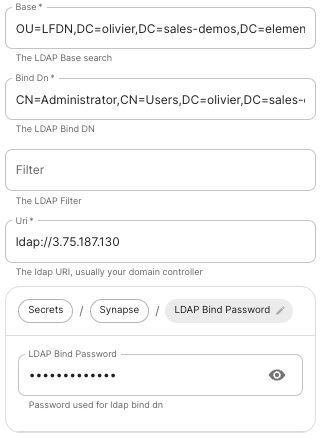
LDAP on Windows AD
 |
 |
-
Base.
The distinguished name of the root level Org Unit in your LDAP directory.- The distinguished name can be displayed by selecting
View/Advanced Featuresin the Active Directory console and then, right-clicking on the object, selectingProperties/Attributes Editor.
- The distinguished name can be displayed by selecting
-
Bind DN.
The distinguished name of the LDAP account with read access. -
Filter.
A LDAP filter to filter out objects under the LDAP Base DN. -
URI.
The URI of your LDAP serverldap://dc.example.com.-
This is often your Domain Controller, can also pass in
ldaps://for SSL connectivity. -
The following are the typical ports for Windows AD LDAP servers:
-
ldap://ServerName:389 -
ldaps://ServerName:636
-
-
-
LDAP Bind Password.
The password of the AD account with read access. -
LDAP Attributes.
-
Mail.
mail -
Name.
cn -
UID.
sAMAccountName
-
OpenID on Microsoft Azure
Before configuring within the installer, you have to configure Microsoft Azure Active Directory.
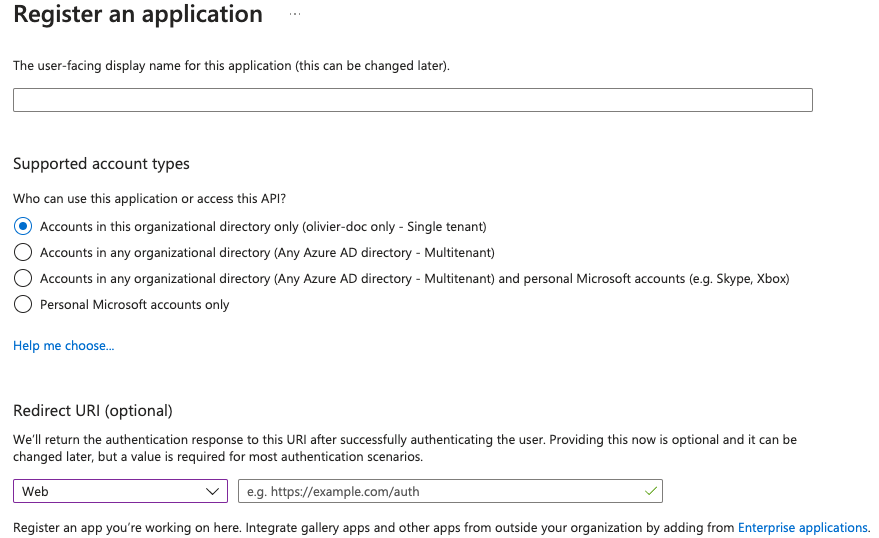
Set up Microsoft Azure Active Directory
-
You need to create an
App registration. -
You have to select
Redirect URI (optional)and set it to the following, wherematrixis the subdomain of Synapse andexample.comis your base domain as configured on the Domains section:https://matrix.example.com/_synapse/client/oidc/callback
For the bridge to be able to operate correctly, navigate to API permissions, add Microsoft Graph APIs, choose Delegated Permissions and add:
-
openid -
profile -
email
Remember to grant the admin consent for those.
To setup the installer, you'll need:
-
The
Application (client) ID -
The
Directory (tenant) ID -
A secret generated from
Certificates & Secretson the app.
Configure the installer
 |
 |
 |
-
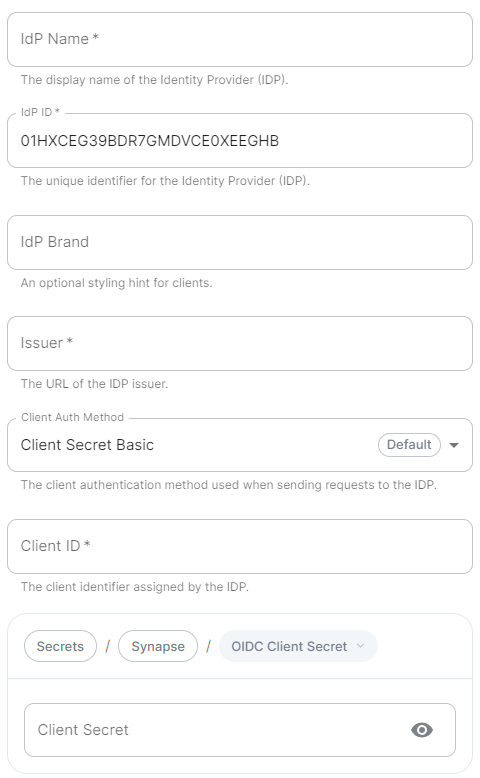
IdP Name.
A user-facing name for this identity provider, which is used to offer the user a choice of login mechanisms in the Element UI. -
IdP ID.
A string identifying your identity provider in your configuration, this will be auto-generated for you (but can be changed). -
IdP Brand.
An optional brand for this identity provider, allowing clients to style the login flow according to the identity provider in question. -
Issuer.
The OIDC issuer. Used to validate tokens and (if discovery is enabled) to discover the provider's endpoints. Usehttps://login.microsoftonline.com/DIRECTORY_TENNANT_ID/v2.0replacingDIRECTORY_TENNANT_ID. -
Client Auth Method.
Auth method to use when exchanging the token. Set it toClient Secret Postor any method supported by your IdP. -
Client ID.
Set this to yourApplication (client) ID. -
Client Secret.
Set this to the secret value defined under "Certificates and secrets". -
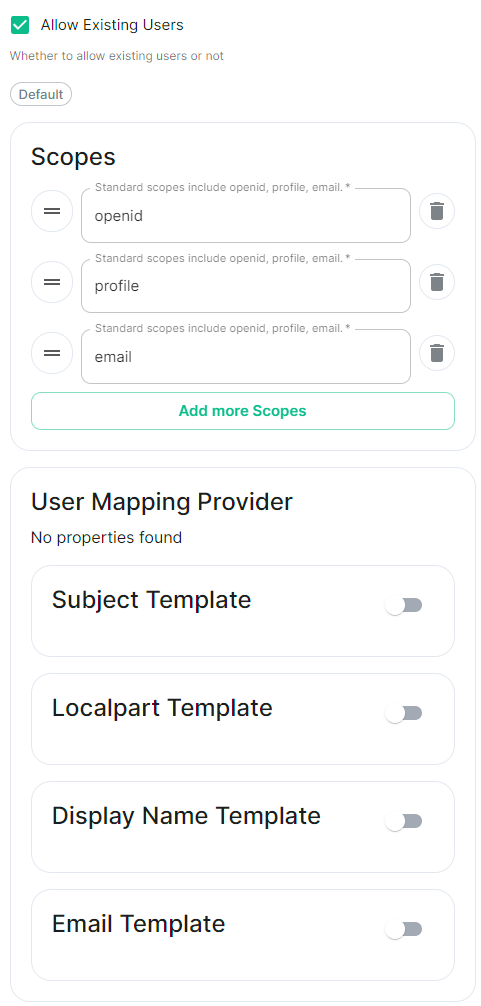
Scopes.
By defaultopenid,profileandemailare added, you shouldn't need to modify these. -
User Mapping Provider.
Configuration for how attributes returned from a OIDC provider are mapped onto a matrix user.-
Localpart Template.
Jinja2 template for the localpart of the MXID.
Set it to{{ user.preferred_username.split('@')[0] }}if using Legacy Auth, or{{ (user.preferred_username | split('@'))[0] }}if using MAS. -
Display Name Template.
Jinja2 template for the display name to set on first login.
If unset, no display name will be set. Set it to{{ user.name }}.
-
-
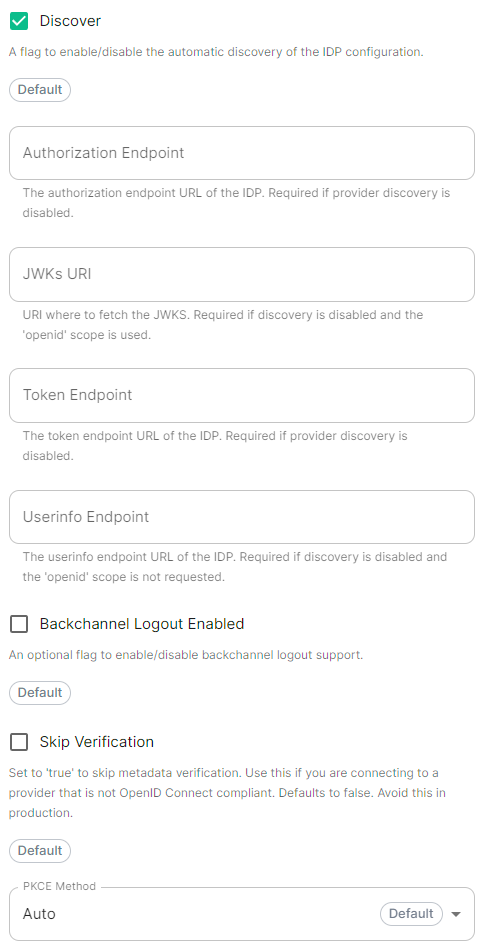
Discover.
Enable / Disable the use of the OIDC discovery mechanism to discover endpoints. -
Backchannel Logout Enabled.
Synapse supports receiving OpenID Connect Back-Channel Logout notifications. This lets the OpenID Connect Provider notify Synapse when a user logs out, so that Synapse can end that user session. This property has to bet set tohttps://matrix.example.com/_synapse/client/oidc/backchannel_logoutin your identity provider, wherematrixis the subdomain of Synapse andexample.comis your base domain as configured on the Domains section.
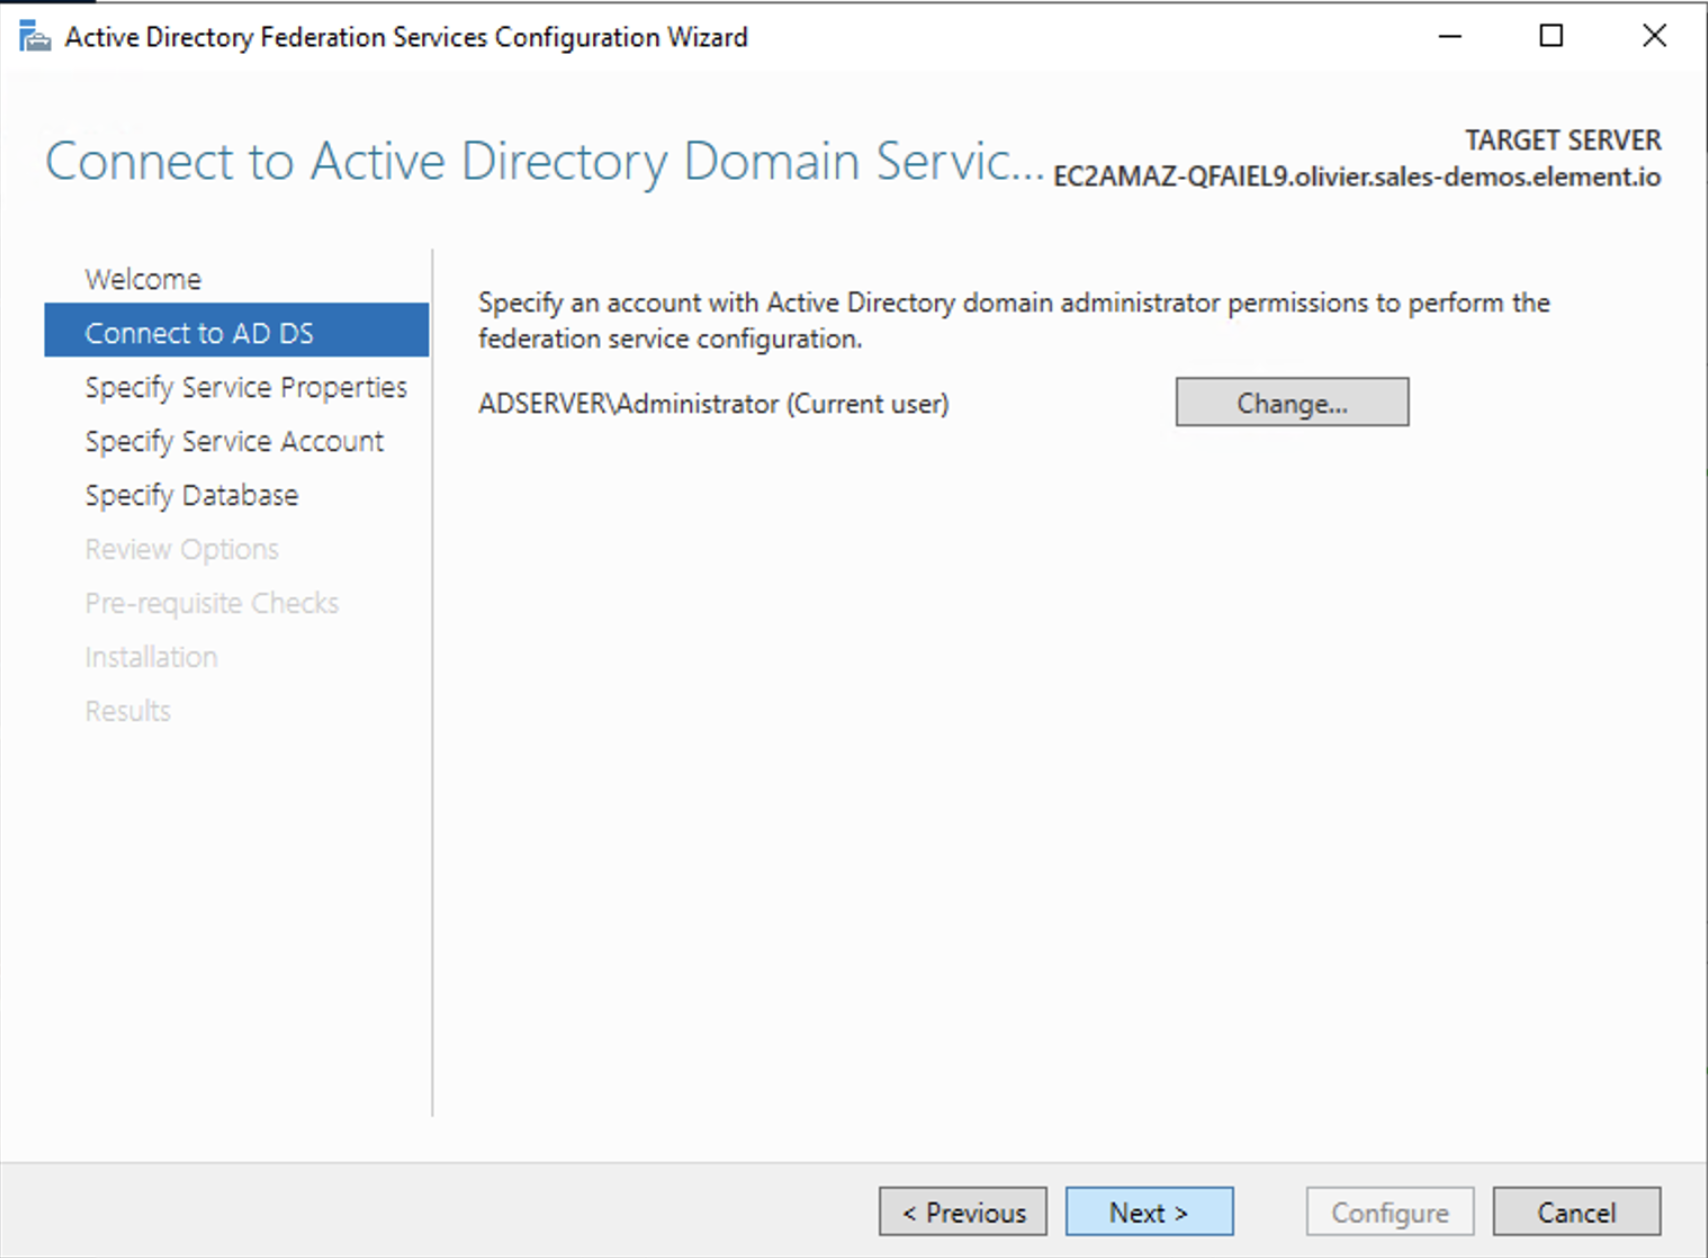
OpenID on Microsoft AD FS
Install Microsoft AD FS
Before starting the installation, make sure:
-
your Windows computer name is correct since you won't be able to change it after having installed AD FS
-
you configured your server with a static IP address
-
your server joined a domain and your domain is defined under Server Manager > Local server
-
you can resolve your server FQDN like computername.my-domain.com
You can find a checklist here.
Steps to follow:
-
Install AD CS (Certificate Server) to issue valid certificates for AD FS. AD CS provides a platform for issuing and managing public key infrastructure [PKI] certificates.
-
Install AD FS (Federation Server)
Install AD CS
You need to install the AD CS Server Role.
- Follow this guide.
Obtain and Configure an SSL Certificate for AD FS
Before installing AD FS, you are required to generate a certificate for your federation service. The SSL certificate is used for securing communications between federation servers and clients.
-
Follow this guide.
-
Additionally, this guide provides more details on how to create a certificate template.
Install AD FS
You need to install the AD FS Role Service.
- Follow this guide.
Configure the federation service
AD FS is installed but not configured.
-
Click on
Configure the federation service on this serverunderPost-deployment configurationin theServer Manager. -
Ensure
Create the first federation server in a federation server farmand is selected
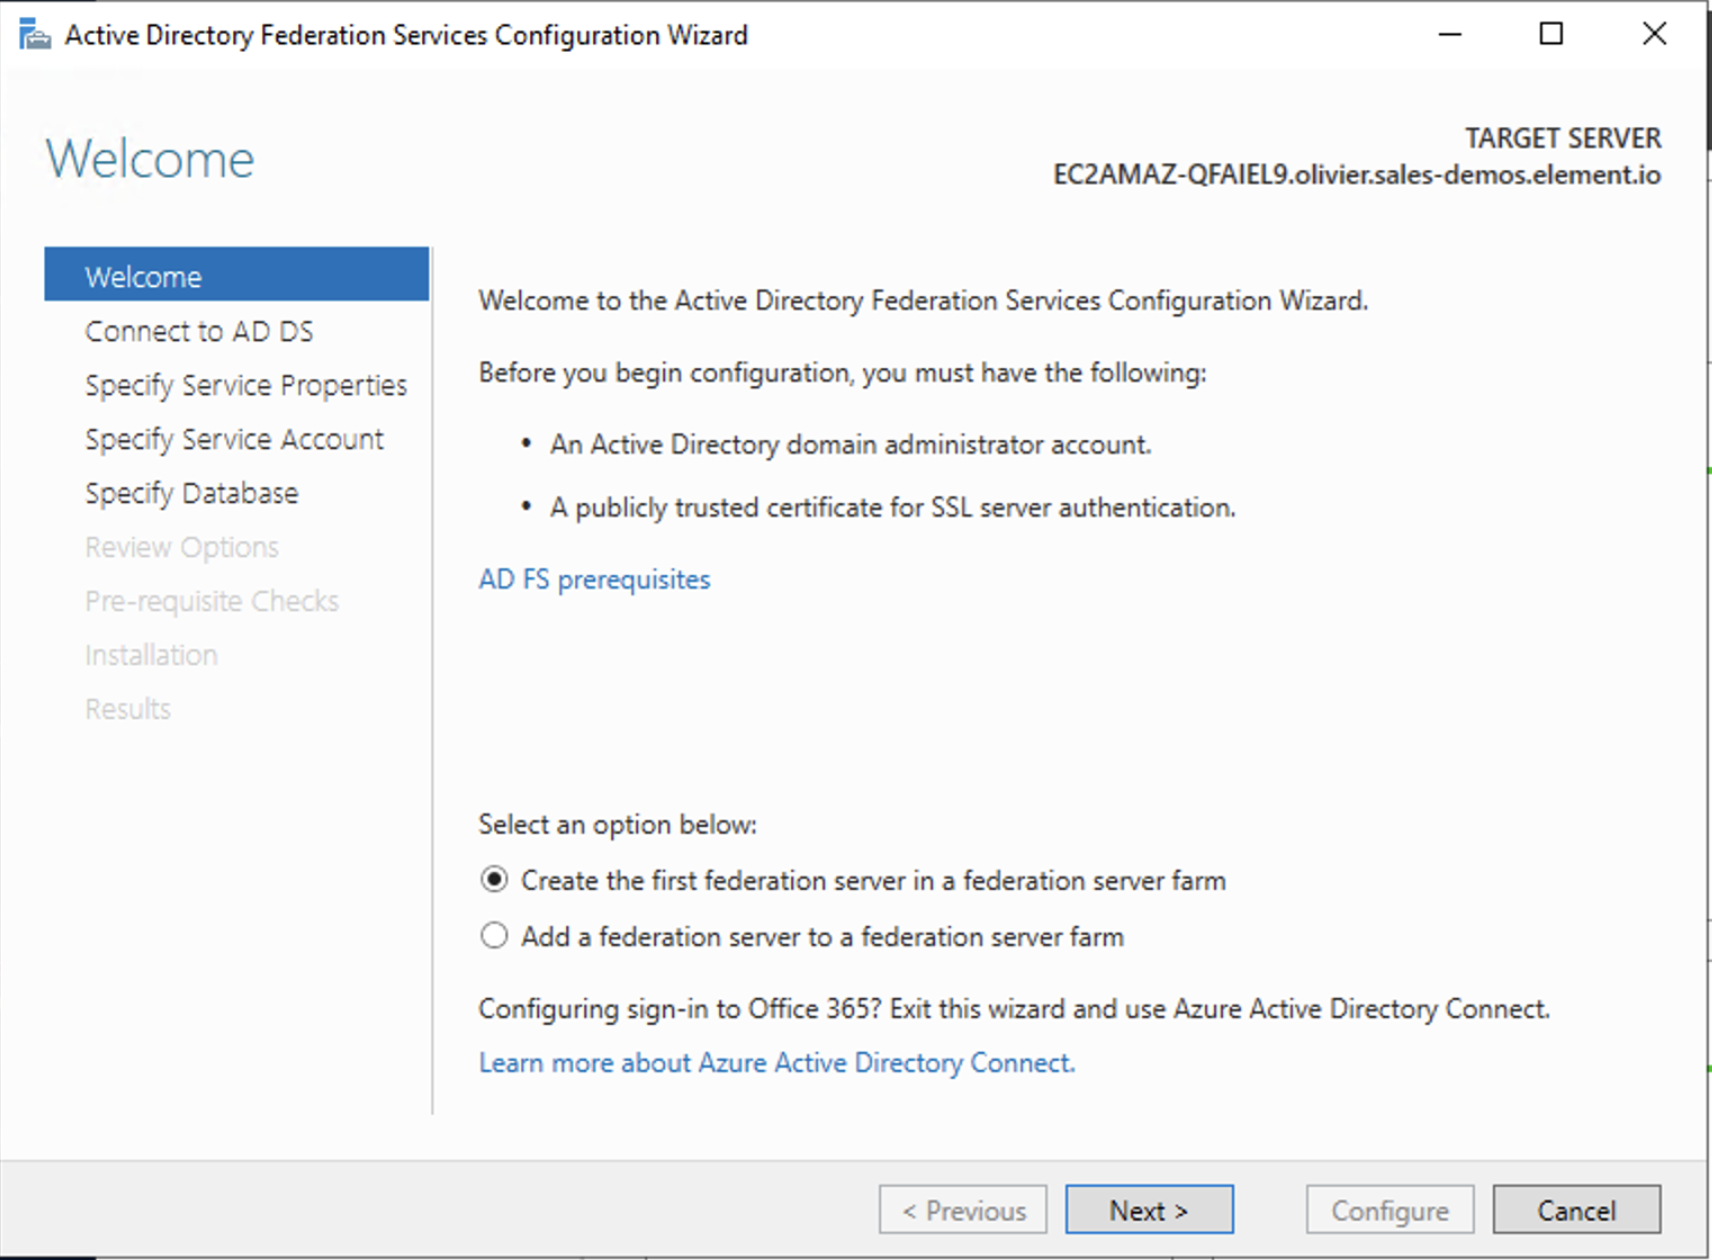
- Click
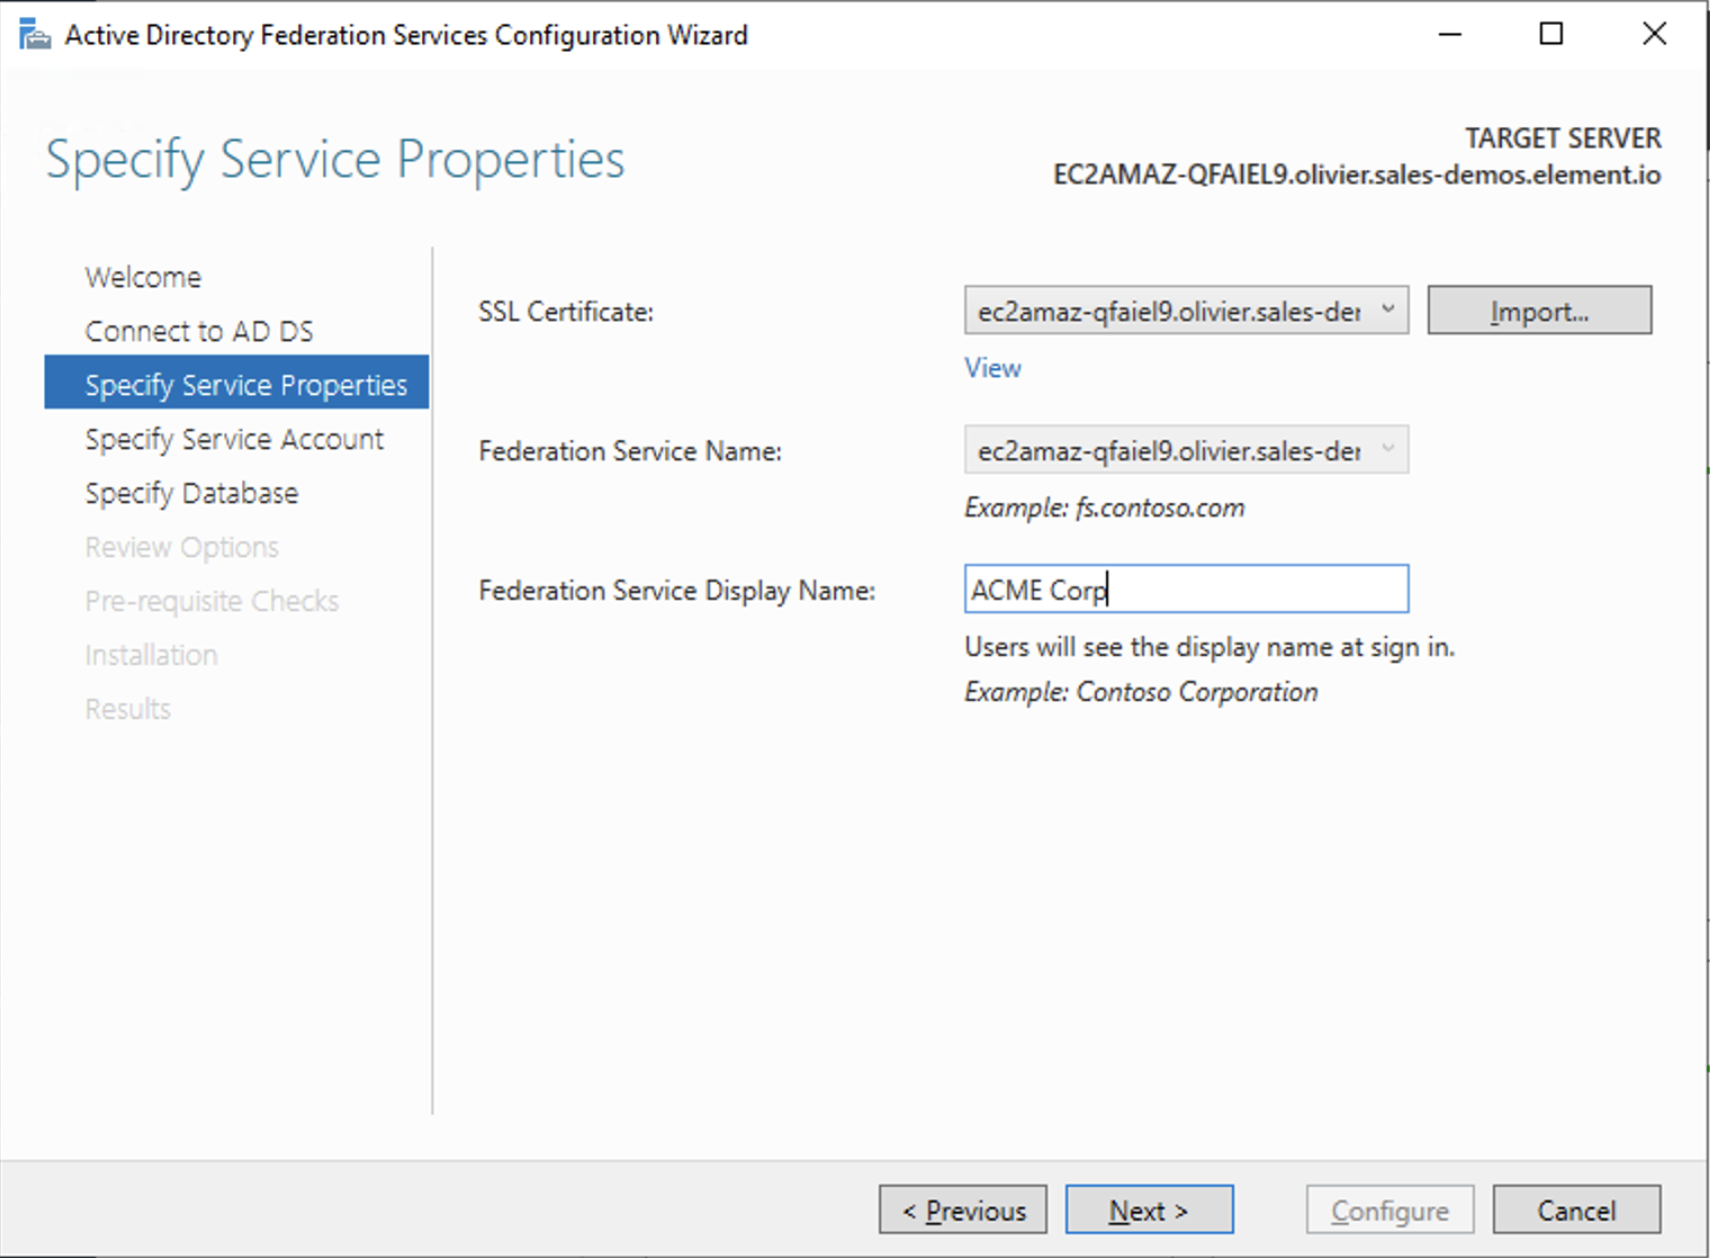
Next
- Select the SSL Certificate and set a Federation Service Display Name
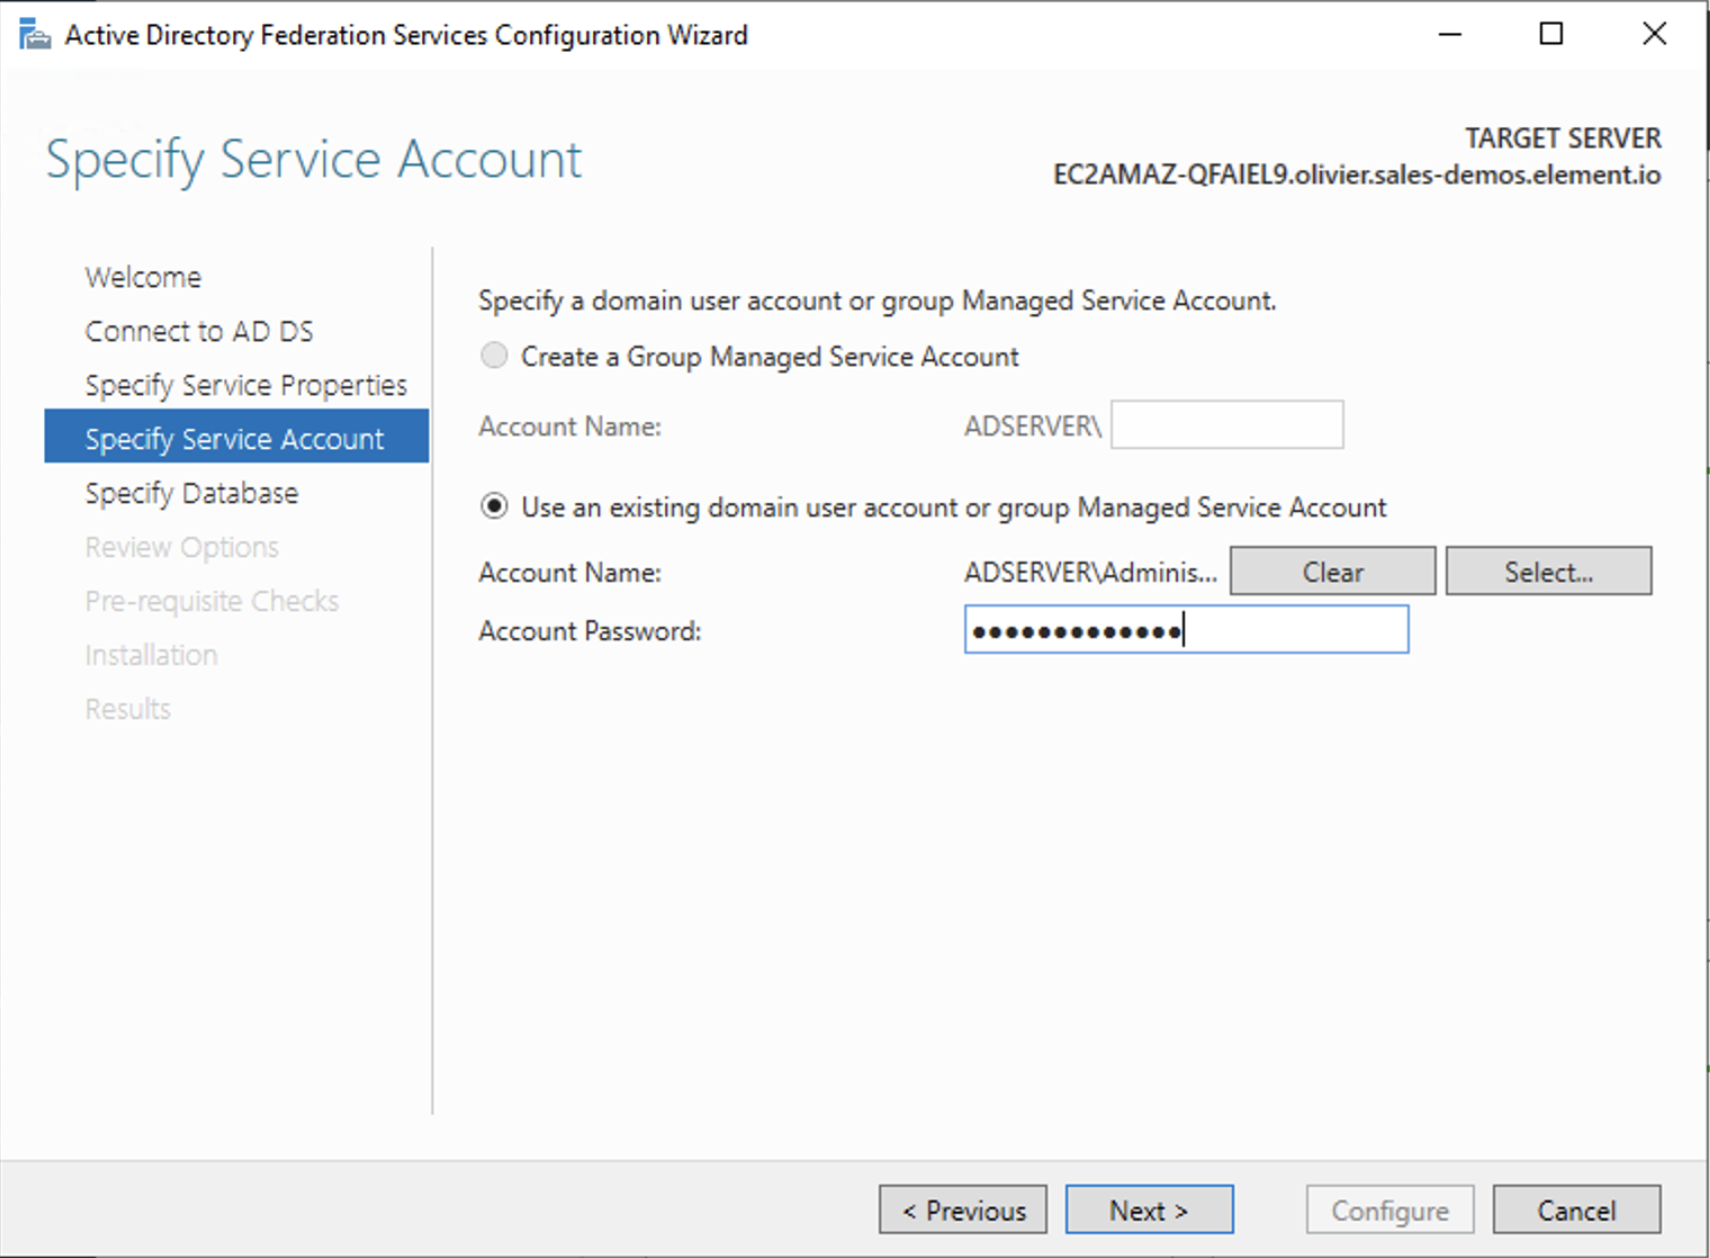
- On the Specify Service Account page, you can either Create a Group Managed Service Account (gMSA) or Specify an existing Service or gMSA Account
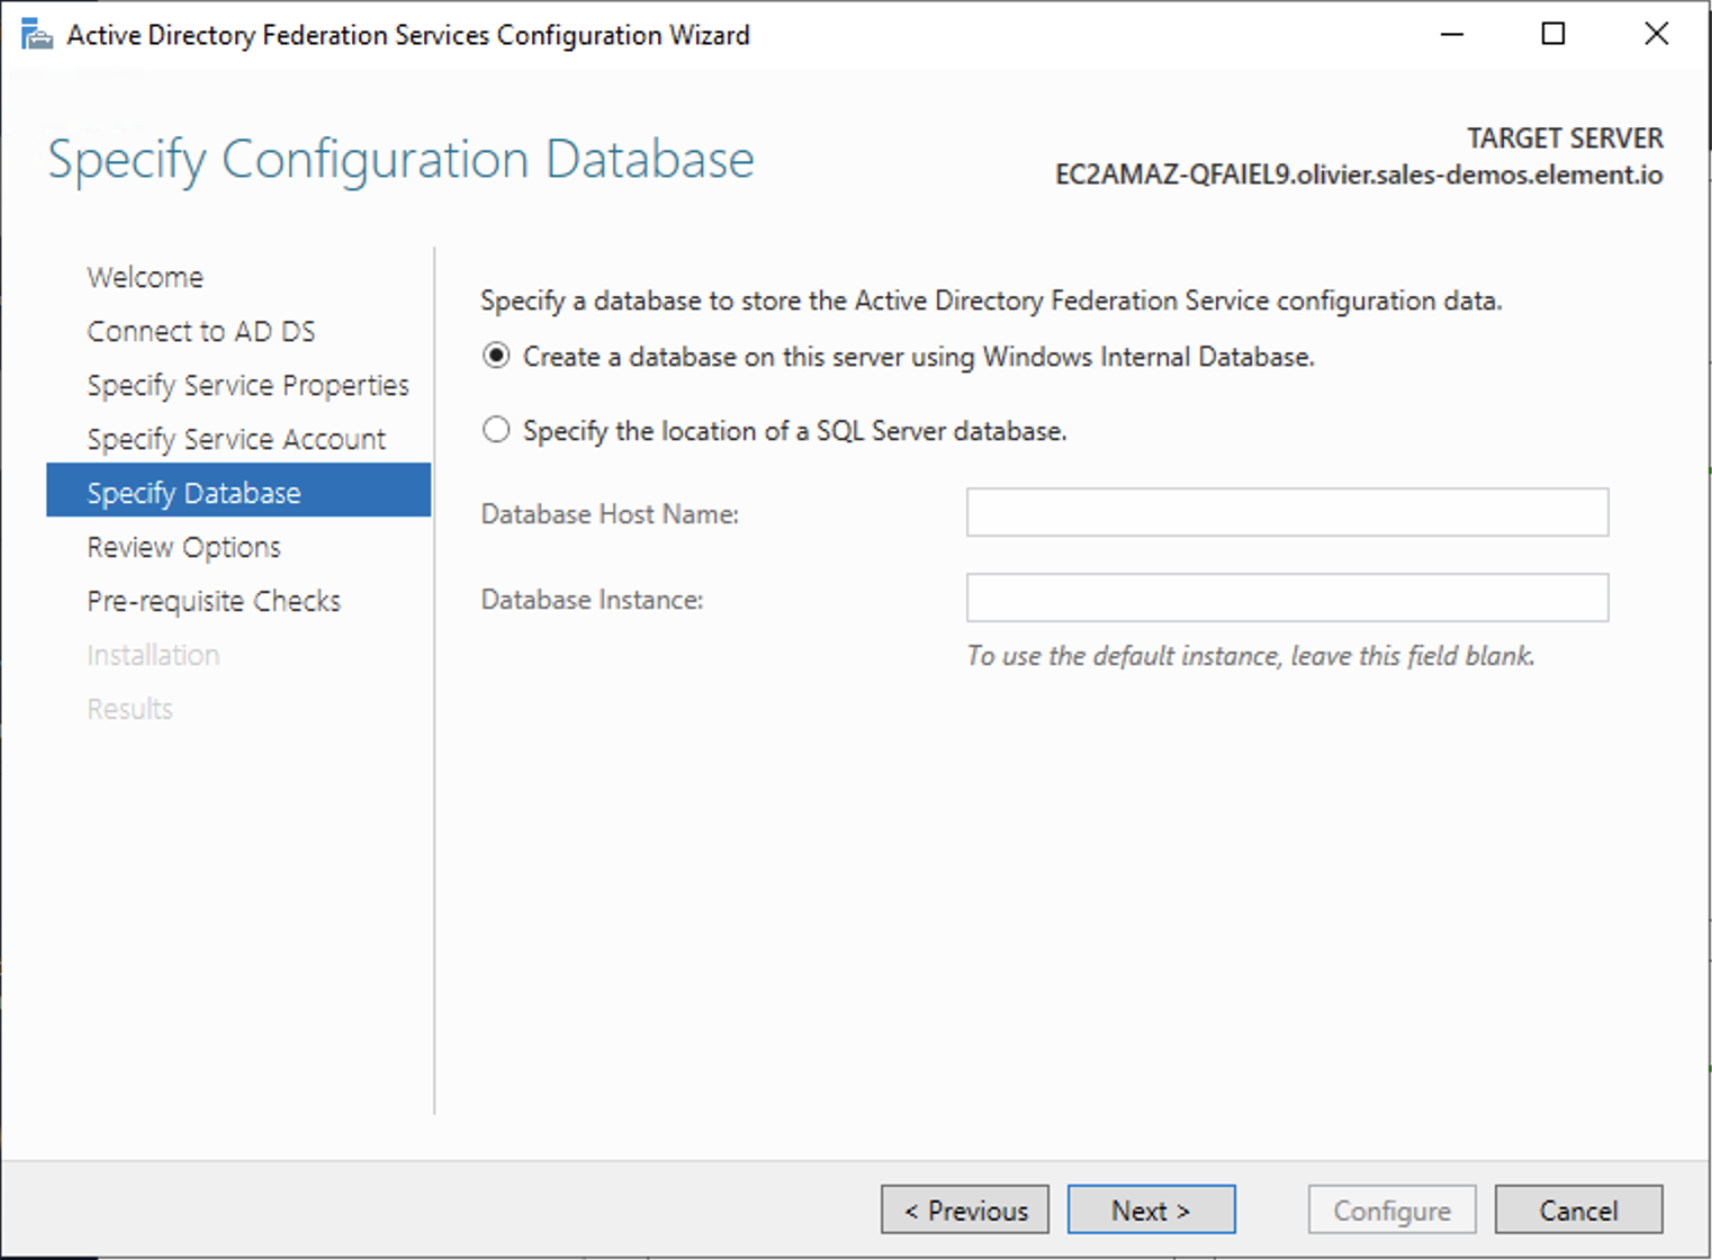
- Choose your database
-
Review Options , check prerequisites are completed and click on
Configure -
Restart the server
Add AD FS as an OpenID Connect identity provider
To enable sign-in for users with an AD FS account, create an Application Group in your AD FS.
To create an Application Group, follow theses steps:
-
In
Server Manager, selectTools, and then selectAD FS Management -
In AD FS Management, right-click on
Application Groupsand selectAdd Application Group -
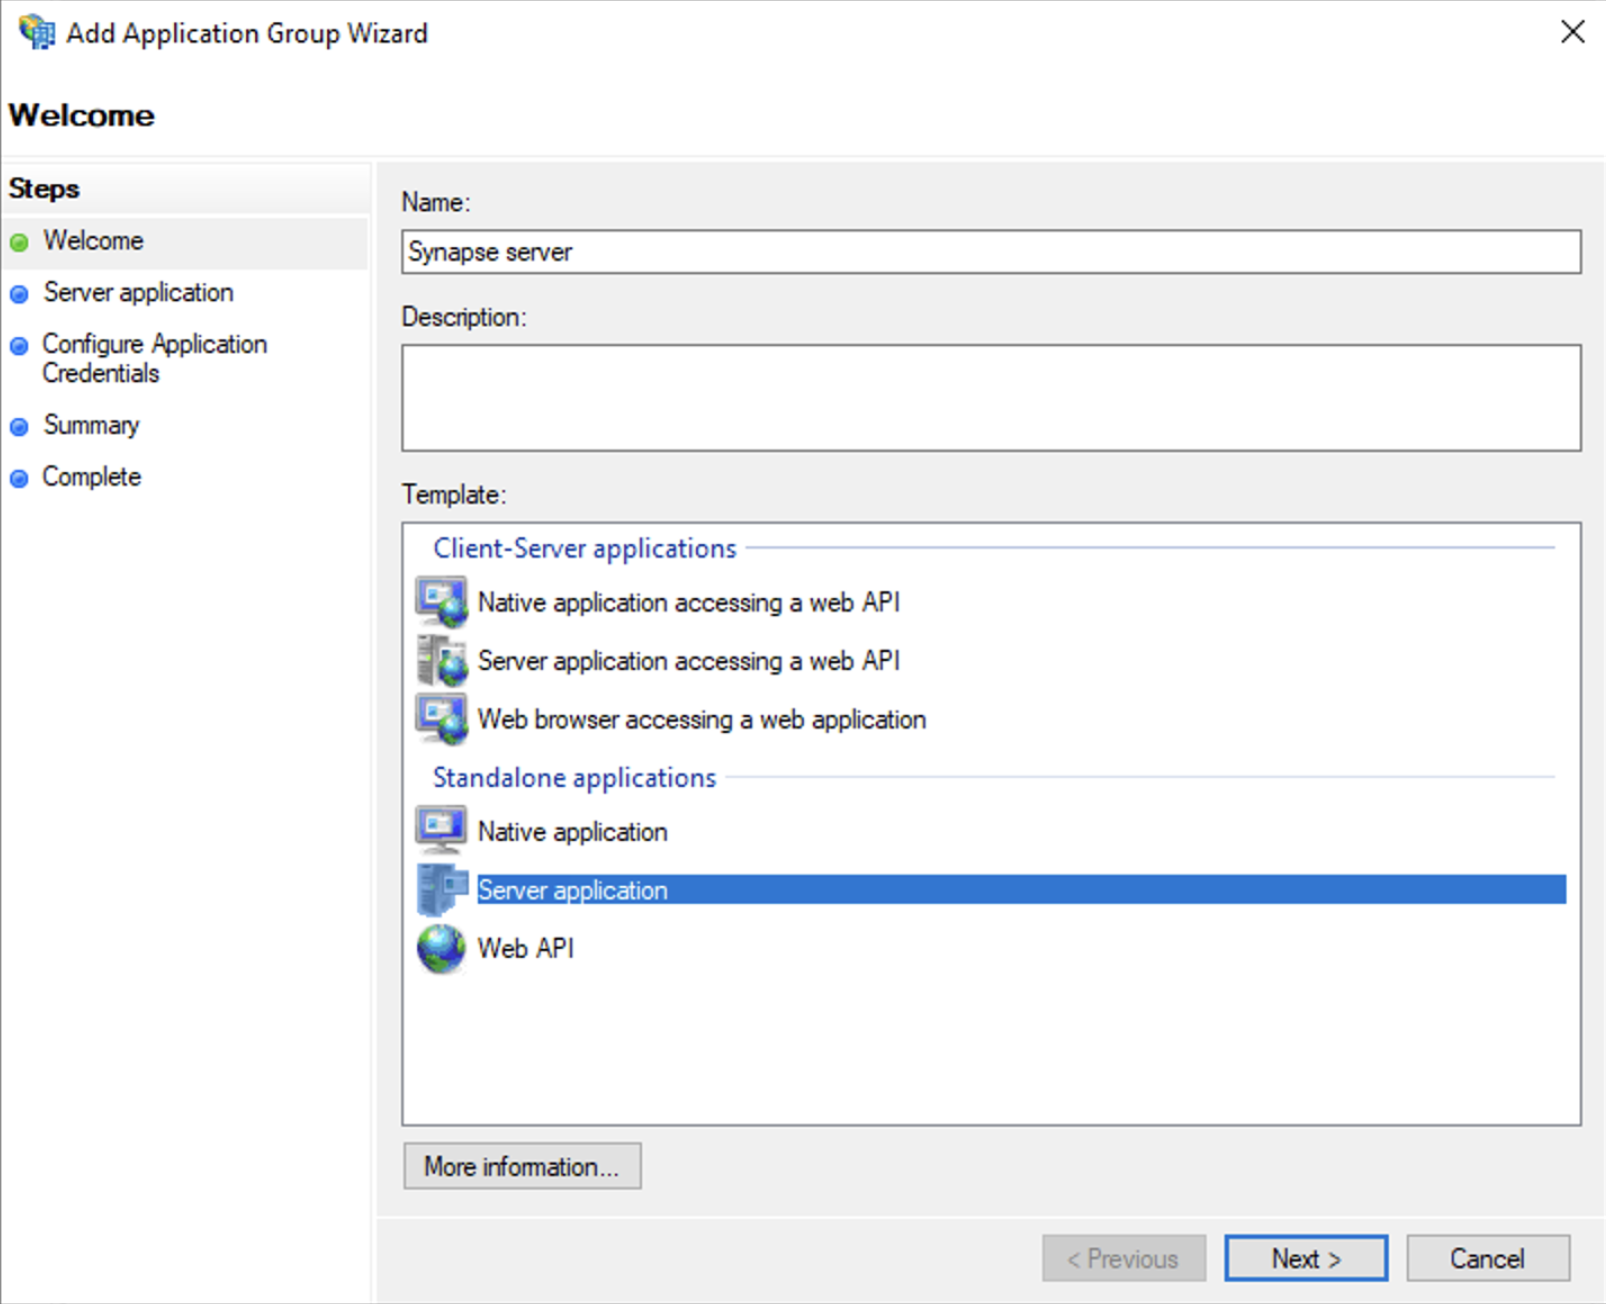
On the Application Group Wizard
Welcomescreen-
Enter the Name of your application
-
Under
Standalone applicationssection, selectServer applicationand clickNext
-
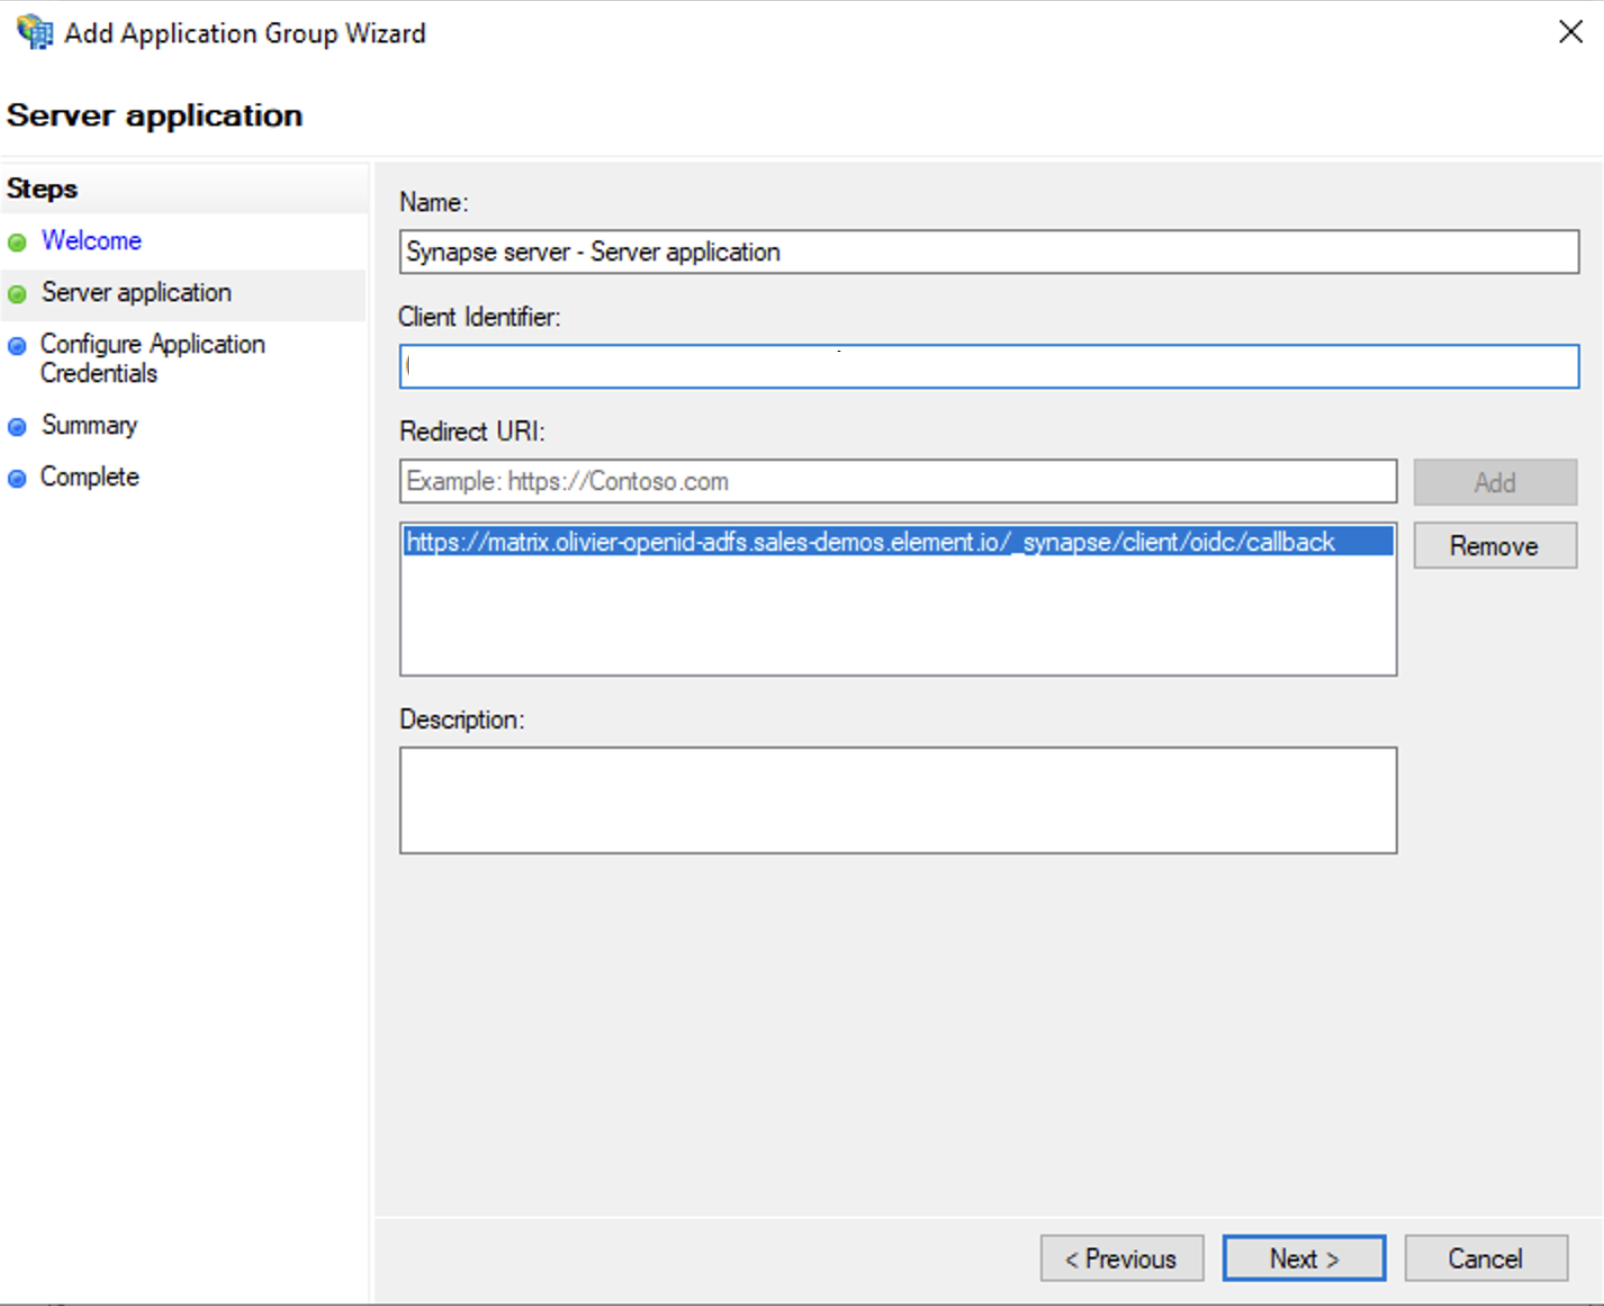
- Enter
https://<matrix domain>/_synapse/client/oidc/callbackin Redirect URI: field, clickAdd, save theClient Identifiersomewhere, you will need it when setting up Element and clickNext(e.g. https://matrix.domain.com/_synapse/client/oidc/callback)
-
Select
Generate a shared secretcheckbox and make a note of the generated Secret and pressNext(Secret needs to be added in the Element Installer GUI in a later step) -
Right click on the created Application Group and select `Properties``
-
Select
Add application...button. -
Select
Web API -
In the
Identifierfield, type in theclient_idyou saved before and clickNext
-
Select
Permit everyoneand clickNext -
Under Permitted scopes: select
openidandprofileand clickNext
-
On
Summarypage, click `Next`` -
Click
Closeand thenOK
Export Domain Trusted Root Certificate
-
Run
mmc.exe -
Add the
Certificatessnap-in- File/Add snap-in for
Certificates,Computer account
- File/Add snap-in for
-
Under
Trusted Root Certification Authorities/Certificates, select your DC cert -
Right click and select
All Tasks/Export...and export asBase-64 encoded X 509 (.CER) -
Copy file to local machine
Configure the installer
Add an OIDC provider in the 'Synapse' configuration after enabling Delegated Auth and set the following fields in the installer:
-
Allow Existing Users: if checked, it allows a user logging in via OIDC to match a pre-existing account instead of failing. This could be used if switching from password logins to OIDC. -
Authorization Endpoint: the oauth2 authorization endpoint. Required if provider discovery is disabled.https://login.microsoftonline.com/<Directory (tenant) ID>/oauth2/v2.0/authorize
-
Backchannel Logout Enabled: Synapse supports receiving OpenID Connect Back-Channel Logout notifications. This lets the OpenID Connect Provider notify Synapse when a user logs out, so that Synapse can end that user session. -
Client Auth Method: auth method to use when exchanging the token. Set it toClient Secret Basicor any method supported by your Idp -
Client ID: theClient IDyou saved before -
Discover: enable/disable the use of the OIDC discovery mechanism to discover endpoints -
Idp Brand: an optional brand for this identity provider, allowing clients to style the login flow according to the identity provider in question -
Idp ID: a string identifying your identity provider in your configuration -
Idp Name: A user-facing name for this identity provider, which is used to offer the user a choice of login mechanisms in the Element UI. In the screenshot bellow,Idp Nameis set toAzure AD
-
Issuer: the OIDC issuer. Used to validate tokens and (if discovery is enabled) to discover the provider's endpointshttps://<your-adfs.domain.com>/adfs/ -
Token Endpoint: the oauth2 authorization endpoint. Required if provider discovery is disabled. -
Client Secret: your client secret you saved before. -
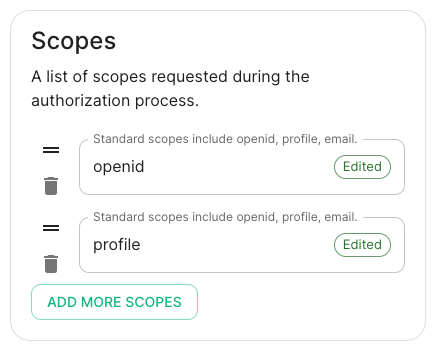
Scopes: add every scope on a different line
-
The openid scope is required which translates to the Sign you in permission in the consent UI
-
You might also include other scopes in this request for requesting consent.
-
-
User Mapping Provider: Configuration for how attributes returned from a OIDC provider are mapped onto a matrix user.
-
Localpart Template: Jinja2 template for the localpart of the MXID. For AD FS set it to{{ user.upn.split('@')[0] }}if using Legacy Auth, or{{ (user.preferred_username | split('@'))[0] }}if using MAS.
-
Other configurations are documented here.
SAML on Microsoft Azure
Before setting up the installer, you have to configure Microsoft Entra ID.
Set up Microsoft Entra ID
With an account with enough rights, go to : Enterprise Applications
-
Click on
New Application -
Click on
Create your own applicationon the top left corner -
Choose a name for it, and select `Integrate any other application you don't find in the
gallery`
-
Click on "Create"
-
Select
Set up single sign on -
Select
SAML -
EditonBasic SAML Configuration -
In
Identifier, add the following URL :https://synapse_fqdn/_synapse/client/saml2/metadata.xml -
Remove the default URL
-
In
Reply URL, add the following URL :https://synapse_fqdn/_synapse/client/saml2/authn_response -
Click on
Save
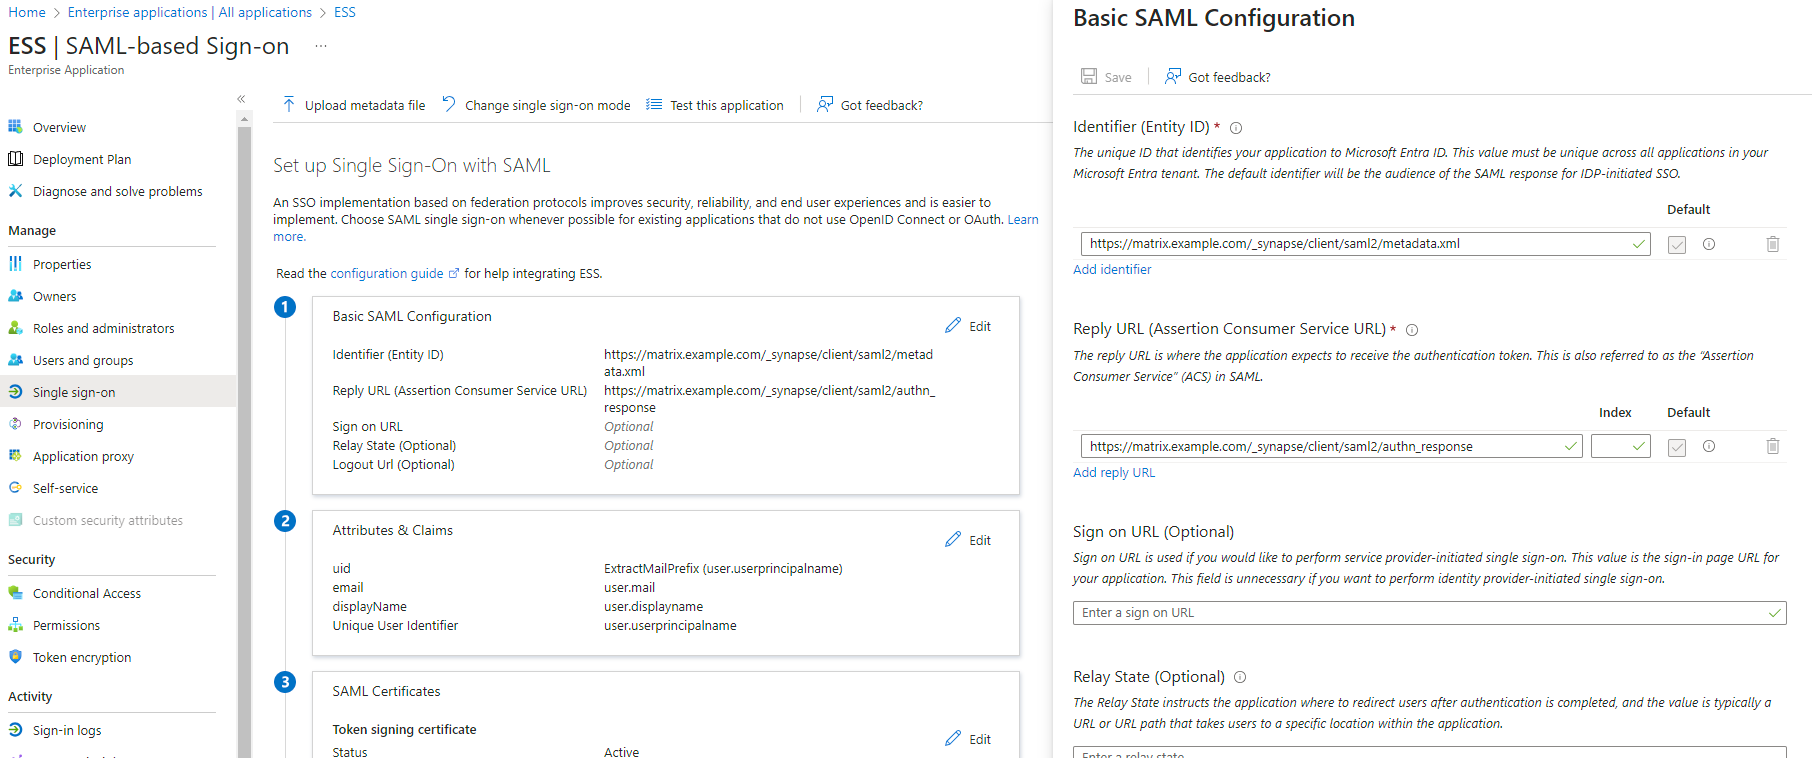
-
Make a note of the
App Federation Metadata UrlunderSAML Certificatesas this will be required in a later step. -
EditonAttributes & Claims -
Remove all defaults for additional claims
-
Click on
Add new claimto add the following (suggested) claims (the UID will be used as the MXID):-
Name:
uid, Transformation :ExtractMailPrefix, Parameter 1 :user.userprincipalname -
Name:
email, Source attribute :user.mail -
Name:
displayName, Source attribute :user.displayname
-
-
Click on
Save

- In the application overview screen select
Users and Groupsand add groups and users which may have access to element
Configure the installer
Add a SAML provider in the 'Synapse' configuration after enabling Delegated Auth and set the following (suggested) fields in the installer:
-
Allow Unknown Attributes.
Checked -
Attribute Map.
SelectURN:Oasis:Names:TC:SAML:2.0:Attrname Format:Basicas theIdentifier -
Mapping.
Set the following mappings:-
From:
Primary EmailTo:email -
From:
First NameTo:firstname -
From:
Last NameTo:lastname
-
-
Entity.
-
Description.
-
Entity ID. (From Azure)
-
Name.
-
-
User Mapping Provider.
Set the following:-
MXID Mapping:Dotreplace -
MXID Source Attribute:uid
-
-
Metadata URL.
Add theApp Federation Metadata URLfrom Azure.
Troubleshooting
Redirection loop on SSO
Synapse needs to have the X-Forwarded-For and X-Forwarded-Proto headers set by the reverse proxy doing the TLS termination. If you are using a Kubernetes installation with your own reverse proxy terminating TLS, please make sure that the appropriate headers are set.
Backup and Restore
An ESS Administrators focused guide on backing up and restoring Element Server Suite.
Welcome, ESS Administrators. This guide is crafted for your role, focusing on the pragmatic aspects of securing crucial data within the Element Server Suite (ESS). ESS integrates with external PostgreSQL databases and persistent volumes and is deployable in standalone or Kubernetes mode. To ensure data integrity, we recommend including valuable, though not strictly consistent, data in backups. The guide also addresses data restoration and a straightforward disaster recovery plan.
Software Overview
ESS provides Synapse and Integrations which require an external PostgreSQL and persistent volumes. It offers standalone or Kubernetes deployment.
-
Standalone Deployments.
The free version of our Element Server Suite.
Allowing you to easily install a Synapse homeserver and hosted Element Web client. -
Kubernetes Deployments.
We strongly recommend to leverage your own cluster backup solutions for effective data protection.
You'll find below a description of the content of each component data and db backup.
Synapse
- Synapse deployments creates a PVC named
<element deployment cr name>-synapse-media. It contains all users medias (avatar, photos, videos, etc). It does not need strict consistency with database content, but the more in sync they are, the more medias can be correctly synced with rooms state in case of restore. - Synapse requires an external postgressql database which contains all the server state.
Adminbot
- Adminbot integration creates a PVC named
<element deployment cr name>-adminbot. It contains the bot decryption keys, and a cache of the adminbot logins.
Auditbot
-
Auditbot integration creates a PVC named
<element deployment cr name>-auditbot. It contains the bot decryption keys, and a cache of the adminbot logins. -
Auditbot store the room logs of your organization either in an S3 Bucket or the aforementioned PVC. Depending on the critical nature of being able to provide room logs for audit, you need to properly backup your S3 Bucket or the PVC.
Matrix Authentication Service
- Matrix Authentication Service requires an external postgresql database. It contains the homeserver users, their access tokens and their Sessions/Devices.
Sliding Sync
- Sliding Sync requires an external postgresql database. It contains Sliding Sync running state, and data cache. The database backup needs to be properly secured. This database needs to be backed-up to be able to avoid UTDs and initial-syncs on a disaster recovery.
Sydent
- Sydent integration creates a PVC named
<element_deployment_cr_name>-sydent. It contains the integration SQLite database.
Integrator
- Integrator requires an external postgresql database. It contains information about which integration was added to each room.
Bridges (XMPP, IRC, Whatsapp, SIP, Telegram)
- The bridges require each an external postgresql database. It contains mapping data between Matrix Rooms and Channels on the other bridge side.
Backup Policy & Backup Procedure
There is no particular prerequisite to do before executing an ESS backup. Only Synapse and MAS Databases should be backed up in sync and stay consistent. All other individual components can be backed up on it's own lifecycle.
Backups frequency and retention periods must be defined according to your own SLAs and SLIs.
Data restoration
The following ESS components should be restored first in case of complete restoration. Other components can be restore on their distinctively, on their own time:
- Synapse Postgresql database
- Synapse media
- Matrix Authentication Service database (if installed)
- Restart Synapse & MAS (if installed)
- Restore and restart each individual component
Disaster Recovery Plan
In case of disaster recovery, the following components are critical for your system recovery:
- Synapse Postgresql Database is critical for Synapse to send consistent data to other servers, integrations and clients.
- Synapse Keys configured in ESS configuration (Signing Key, Macaroon Secret Key, Registration Shared Secret) are critical for Synapse to start and identify itself as the same server as before.
- Matrix Authentication Service Postgresql Database is critical for your system to recover your user accounts, their devices and sessions.
The following systems will recover features subsets, and might involve reset & data loss if not recovered :
-
Synapse Media Storage.
Users will loose their Avatars, and all photos, videos, files uploaded to the rooms wont be available anymore -
AdminBot and AuditBot Data.
The bots will need to be renamed for them to start joining all rooms and logging events again -
Sliding Sync.
Users will have to do an initial-sync again, and their encrypted messages will display as "Unable to decrypt" if its database cannot be recovered -
Integrator.
Integrations will have to be added back to the rooms where they were configured. Their configuration will be desynced from integrator, and they might need to be reconfigured from scratch to have them synced with integrator.
Security Considerations
Some backups will contain sensitive data, Here is a description of the type of data and the risks associated to it. When available, make sure to enable encryption for your stored backups. You should use appropriate access controls and authentication for your backup processes.
Synapse
Synapse media and db backups should be considered sensitive.
Synapse media backups will contain all user media (avatar, photos, video, files). If your organization is enforcing encrypted rooms, the media will be stored encrypted with each user e2ee keys. If you are not enforcing encryption, you might have media stored in cleartext here, and appropriate measures should be taken to ensure that the backups are safely secured.
Synapse postgresql backups will contain all user key backup storage, where their keys are stored safely encrypted with each user passphrase. Synapse DB will also store room states and events. If your organization is enforcing encrypted rooms, these will be stored encrypted with each user e2ee keys.
The Synapse documentation contains further details on backup and restoration. Importantly the e2e_one_time_keys_json table should not be restored from backup.
Adminbot
Adminbot PV backup should be considered sensitive.
Any user accessing it could read the content of your organization rooms. Would such an event occur, revoking the bot tokens would prevent logging in as the AdminBot and stop any pulling of the room messages content.
Auditbot
Auditbot PV backup should be considered sensitive.
Any user accessing it could read the content of your organization rooms. Would such an event occur, revoking the bot tokens would prevent logging in as the AuditBot and stop any pulling of the room messages content.
Logs stored by the AuditBot for audit capabilities are not encrypted, so any user able to access it will be able to read any logged room content.
Sliding Sync
Sliding-Sync DB Backups should be considered sensitive.
Sliding-Sync database backups will contain Users Access tokens, which are encrypted with Sliding Sync Secret Key. The tokens are only refreshed regularly if you are using Matrix Authentication Services. These tokens give access to user messages-sending capabilities, but cannot read encrypted messages without user keys.
Sydent
Sydent DB Backups should be considered sensitive.
Sydent DB Backups contain association between user matrix accounts and their external identifiers (mails, phone numbers, external social networks, etc).
Matrix Authentication Service
Matrix Authentication Service DB Backups should be considered sensitive.
Matrix Authentication Service database backups will contain user access tokens, so they give access to user accounts. It will also contain the OIDC providers and confidential OAuth 2.0 Clients configuration, with secrets stored encrypted using MAS encryption key.
IRC Bridge
IRC Bridge DB Backups should be considered sensitive.
IRC Bridge DB Backups contain user IRC passwords. These passwords give access to users IRC account, and should be reinitialized in case of incident.
Standalone Deployment Guidelines
General storage recommentations for single-node instances
-
/datais where the standalone deployment installs PostgreSQL data and Element Deployment data. It should be a distinct mount point.- Ideally this would have an independent lifecycle from the server itself
- Ideally this would be easily snapshot-able, either at a filesystem level or with the backing storage
Adminbot storage:
- Files stored with
uid=10006/gid=10006, default config uses/data/element-deployment/adminbotfor single-node instances - Storage space required is proportional to the number of user devices on the server. 1GB is sufficient for most servers
Auditbot storage:
- Files stored with
uid=10006/gid=10006, default config uses/data/element-deployment/auditbotfor single-node instances - Storage space required is proportional to the number of events tracked.
Synapse storage:
- Media:
- File stored with
uid=10991/gid=10991, default config uses/data/element-deployment/synapsefor single-node instances - Storage space required grows with the number and size of uploaded media. For more information, see the Synapse Media section from the Requirements and Recommendations doc.
- File stored with
Postgres (in-cluster) storage:
- Files stored with
uid=999/gid=999, default config uses/data/postgresfor single-node instances
Backup Guidance:
-
AdminBot.
Backups should be made by taking a snapshot of the PV (ideally) or rsyncing the backing directory to backup storage -
AuditBot.
Backups should be made by taking a snapshot of the PV (ideally) or rsyncing the backing directory to backup storage -
Synapse Media.
Backups should be made by taking a snapshot of the PV (ideally) or rsyncing the backing directory to backup storage -
Postgres.
-
In Cluster: Backups should be made by
kubectl -n element-onprem exec -it postgres-synapse-0 -- sh -c 'pg_dump --exclude-table-data e2e_one_time_keys_json -U $POSTGRES_USER $POSTGRES_DB' \ > synapse_postgres_backup_$(date +%Y%m%d-%H%M%S).sql - External: Backup procedures as per your DBA, keeping in mind Synapse specific details
-
In Cluster: Backups should be made by
-
Configuration.
Please ensure that your entire configuration directory (that contains at leastparameters.yml&secrets.ymlbut may also include other sub-directories & configuration files) is regularly backed up.
The suggested configuration path in Element's documentation is~/.element-onpremise-configbut could be anything. It is whatever directory you used with the installer.
Calculate monthly active users
Take great care when modifying and running queries in your database. Ensure you understand what the queries do and double check that your query is correct.
Incorrect queries can cause irrecoverable data loss.
We recommend you familiarize yourself with Transactions. That way, changes are not immediately written and you can undo any errors.
- Connect to your Synapse database
- Get the UNIX timestamps in milliseconds for the time frame you are interested in. You want the time set to 00:00:00 GMT. https://www.epochconverter.com/ is a great tool to convert to/from UNIX timestamps.
a. If you are interested in the current MAU number, pick the date 30 days ago. Note that if you have MAU metrics enabled, this information is also available in Grafana (or your metrics system of choice)
b. If you want a specific month, get the timestamps for 1st of that month and 1st of the following month - Modify and run the appropriate query below
Get your current MAU number. This uses the timestamp for 30 days ago. For example, if you're running this on January 7, 2025, you would use December 8 2024. This is similar to the query used by Synapse to calculate user count for phone-home stats (Synapse sourse).
SELECT COUNT(*) FROM (
SELECT user_id
FROM user_ips
WHERE
last_seen >= 1733616000000 AND -- Sunday, 8 December 2024 00:00:00 GMT
user_id NOT IN (
SELECT name
FROM users
WHERE user_type = 'support'
)
GROUP BY user_id
) AS temp;
For reference, this is equal to
SELECT COUNT(*) FROM (
SELECT
user_id,
MAX(timestamp) AS timestamp
FROM user_daily_visits
WHERE
timestamp >= 1733616000000 AND -- Sunday, 8 December 2024 00:00:00 GMT
user_id NOT IN (
SELECT name
FROM users
WHERE user_type = 'support'
)
GROUP BY user_id
) AS temp;
To get retrospective statistics, use this query instead
SELECT COUNT(*) FROM (
SELECT
user_id,
MAX(timestamp) AS timestamp
FROM user_daily_visits
WHERE
timestamp >= 1730419200000 AND -- Friday, 1 November 2024 00:00:00 GMT
timestamp < 1733011200000 AND -- Sunday, 1 December 2024 00:00:00 GMT
user_id NOT IN (
SELECT name
FROM users
WHERE user_type = 'support'
)
GROUP BY user_id
) AS temp;
Configuring Element Desktop
Element Desktop is a Matrix client for desktop platforms with Element Web at its core.
You can download Element Desktop for Mac, Linux or Windows from the Element downloads page.
See https://web-docs.element.dev/ for the Element Web and Desktop documentation.
Aligning Element Desktop with your ESS deployed Element Web
By default, Element Desktop will be configured to point to the Matrix.org homeserver, however this is configurable by supplying a User Specified config.json.
As Element Desktop is mainly Element Web, but packaged as a Desktop application, this config.json is identical to the config.json ESS will configure and deploy for you at https://<element_web_fqdn>/config.json, so it is recommended to setup Element Desktop using that file directly.
How you do this will depend on your specific environment, but you will need to ensure the config.json is placed in the correct location to be used by Element Desktop.
-
%APPDATA%\$NAME\config.jsonon Windows -
$XDG_CONFIG_HOME/$NAME/config.jsonor~/.config/$NAME/config.jsonon Linux -
~/Library/Application Support/$NAME/config.jsonon macOS
In the paths above, $NAME is typically Element, unless you use --profile $PROFILE in which case it becomes Element-$PROFILE.
As Microsoft Windows File Explorer by default hides file extensions, please double check to ensure the config.json does indeed have the .json file extension, not .txt.
Customising your desktop configuration
You may wish to further customise Element Desktop, if the changes you wish to make should not also apply to your ESS deployed Element Web, you will need to add them in addition to your existing config.json.
You can find Desktop specific configuration options, or just customise using any options from the Element Web Config docs.
The Element Desktop MSI
Where to download
Customers who have a subscription to the Enterprise edition of the Element Server Suite (ESS) can download a MSI version of Element Desktop. This version of Element Desktop is by default installed into Program Files (instead of per user) and can be used to deploy into enterprise environments. To download, login to your EMS Accoutn and access from the same download page you'd find the enterprise installer, https://ems.element.io/on-premise/download.
Using the Element Desktop MSI
The Element Desktop MSI can be used to install Element Desktop to all desired machines in your environment, unlike the usual installer, you can customise it's install directory (which now defaults to Program Files).
You can customise the installation directory by installing the MSI using, or just generally configuring the APPLICATIONFOLDER:
msiexec /i "Element 1.11.66.msi" APPLICATIONFOLDER="C:\Element"
MSI and config.json
Once users run Element for the first time, an Element folder will be created in their AppData profile specific to that user. By using Group Policy, Logon Scripts, SCCM or whatever other method you like, ensure the desired config.json is present within %APPDATA%\Element. (The config.json can be present prior to the directories creation.)
Guidance on High Availability
ESS makes use of Kubernetes for deployment so most guidiance on high-availability is tied directly with general Kubernetes guidance on high availability.
Kubernetes
Essential Links
- Options for Highly Available Topology
- Creating Highly Available Clusters with kubeadm
- Set up a High Availability etcd Cluster with kubeadm
- Production environment
High-Level Overview
It is strongly advised to make use of the Kubernetes documentation to ensure your environment is setup for high availability, see links above. At a high-level, Kubernetes achieves high availability through:
-
Cluster Architecture.
-
Multiple Masters: In a highly available Kubernetes cluster, multiple master nodes (control plane nodes) are deployed. These nodes run the critical components such as
etcd, the API server, scheduler, and controller-manager. By using multiple master nodes, the cluster can continue to operate even if one or more master nodes fail. -
Etcd Clustering:
etcdis the key-value store used by Kubernetes to store all cluster data. It can be configured as a cluster with multiple nodes to provide data redundancy and consistency. This ensures that if one etcd instance fails, the data remains available from other instances.
-
-
Pod and Node Management.
-
Replication Controllers and ReplicaSets: Kubernetes uses replication controllers and ReplicaSets to ensure that a specified number of pod replicas are running at any given time. If a pod fails, the ReplicaSet automatically replaces it, ensuring continuous availability of the application.
-
Deployments: Deployments provide declarative updates to applications, allowing rolling updates and rollbacks. This ensures that application updates do not cause downtime and can be rolled back if issues occur.
-
DaemonSets: DaemonSets ensure that a copy of a pod runs on all (or a subset of) nodes. This is useful for deploying critical system services across the entire cluster.
-
-
Service Discovery and Load Balancing.
-
Services: Kubernetes Services provide a stable IP and DNS name for accessing a set of pods. Services use built-in load balancing to distribute traffic among the pods, ensuring that traffic is not sent to failed pods.
-
Ingress Controllers: Ingress controllers manage external access to the services in a cluster, typically HTTP. They provide load balancing, SSL termination, and name-based virtual hosting, enhancing the availability and reliability of web applications.
-
-
Node Health Management.
-
Node Monitoring and Self-Healing: Kubernetes continuously monitors the health of nodes and pods. If a node fails, Kubernetes can automatically reschedule the pods from the failed node onto healthy nodes. This self-healing capability ensures minimal disruption to the running applications.
-
Pod Disruption Budgets (PDBs): PDBs allow administrators to define the minimum number of pods that must be available during disruptions (such as during maintenance or upgrades), ensuring application availability even during planned outages.
-
-
Persistent Storage.
-
Persistent Volumes and Claims: Kubernetes provides abstractions for managing persistent storage. Persistent Volumes (PVs) and Persistent Volume Claims (PVCs) decouple storage from the pod lifecycle, ensuring that data is preserved even if pods are rescheduled or nodes fail.
-
Storage Classes and Dynamic Provisioning: Storage classes allow administrators to define different storage types (e.g., SSDs, network-attached storage) and enable dynamic provisioning of storage resources, ensuring that applications always have access to the required storage.
-
-
Geographical Distribution.
- Multi-Zone and Multi-Region Deployments: Kubernetes supports deploying clusters across multiple availability zones and regions. This geographical distribution helps in maintaining high availability even in the event of data center or regional failures.
-
Network Policies and Security.
-
Network Policies: These policies allow administrators to control the communication between pods, enhancing security and ensuring that only authorized traffic reaches critical applications.
-
RBAC (Role-Based Access Control): RBAC restricts access to cluster resources based on roles and permissions, reducing the risk of accidental or malicious disruptions to the cluster's operations.
-
-
Automated Upgrades and Rollbacks.
-
Cluster Upgrade Tools: Tools like
kubeadmand managed Kubernetes services (e.g., Google Kubernetes Engine, Amazon EKS, Azure AKS) provide automated upgrade capabilities, ensuring that clusters can be kept up-to-date with minimal downtime. -
Automated Rollbacks: In the event of a failed update, Kubernetes can automatically roll back to a previous stable state, ensuring that applications remain available.
-
How does this tie into ESS
As ESS is deployed into a Kubernetes cluster, if you are looking for high availability you should ensure your environment is configured with that in mind. One important factor is to ensure you deploy using the Kubernetes deployment option, whilst Standalone mode will deploy to a Kubernetes cluster, by definition it exists solely on a single node so options for high availability will be limited.
PostgreSQL
Essential links
- PostgreSQL - High Availability, Load Balancing, and Replication
- PostgreSQL - Different replication solutions
High-Level Overview
To ensure a smooth failover process for ESS, it is crucial to prepare a robust database topology. The following list outline the necessary element to take into consideration:
-
Database replicas
- Location: Deploy the database replicas in a separate data center from the primary database to provide geographical redundancy.
- Replication: Configure continuous replication from the primary database to the s econdary database. This ensures that the secondary database has an up-to-date copy of all data.
-
Synchronization and Monitoring
- Synchronization: Ensure that the secondary database is consistently synchronized with the primary database. Use reliable replication technologies and monitor for any lag or synchronization issues.
- Monitoring Tools: Implement monitoring tools to keep track of the replication status and performance metrics of both databases. Set up alerts for any discrepancies or failures in the replication process.
-
Data Integrity and Consistency
- Consistency Checks: Periodically perform consistency checks between the primary and secondary databases to ensure data integrity. -Backups: Maintain regular backups of both the primary and secondary databases. Store backups in a secure, redundant location to prevent data loss.
-
Testing and Validation
- Failover Testing: Conduct regular failover drills to test the transition from the primary to the secondary database. Validate that the secondary database can handle the load and that the failover process works seamlessly.
- Performance Testing: Evaluate the performance of the secondary database under expected load conditions to ensure it can maintain the required service levels.
By carefully preparing the database topology as described, you can ensure that the failover process for ESS is efficient and reliable, minimizing downtime and maintaining data integrity.
How does this tie into ESS
As ESS relies on PostgreSQL for its database if you are looking for high availability you should ensure your environment is configured with that in mind. The database replicas can be achieved the same way in both Kubernetes and Standalone deployment, as the database is not managed by ESS.
ESS failover plan
This document outlines a high-level, semi-automatic, failover plan for ESS. The plan ensures continuity of service by switching to a secondary data center (DC) in the event of a failure in the primary data center.
Prerequisites
- Database Replica: A replica of the main database, located in a secondary data center, continuously reading from the primary database.
- Secondary ESS Deployment: An instance of the ESS deployment, configured in a secondary data center.
- Signing Keys Synchronization: The signing keys stored in ESS secrets need to be kept synchronized between the primary and secondary data centers.
- Media Repository: Media files are stored on a redundant S3 bucket accessible from both data centers.
ESS Architecture for failover capabilities based on 3 datacenters
DC1 (Primary)
-
ElementDeployment Manifest.
- Manifest points to addresses in DC1.
- TLS Secrets managed by ACME.
-
TLS Secrets.
- Replicated to DC2 and DC3.
-
Operator.
- 1 replica.
-
Updater.
- 1 replica.
-
PostgreSQL.
- Primary database.
DC2
-
ElementDeployment Manifest.
- Manifest points to addresses in DC2.
- TLS Secrets pointing to existing secrets, replicated locally from DC1.
-
Operator.
- 0 replica, it prevents the deployment of the kubernetes workloads
-
Updater.
- 1 replica, the base element manifest are ready for the operator to deploy the workloads
-
PostgreSQL.
- Hot-Standby, replicating from DC1.
DC3
-
ElementDeployment Manifest.
- Manifest points to addresses in DC3.
- TLS Secrets pointing to existing secrets, replicated locally from DC1.
-
Operator.
- 0 replica, it prevents the deployment of the kubernetes workloads
-
Updater.
- 1 replica, the base element manifest are ready for the operator to deploy the workloads
-
PostgreSQL.
- Hot-Standby, replicating from DC1.
Failover Process
When DC1 experiences downtime and needs to be failed over to DC2, follow these steps:
-
Disable DC1.
- Firewall outbound traffic to prevent federation/outbound requests such as push notifications.
- Scale down the Operator to 0 replicas and remove workloads from DC1.
-
Activate DC2.
- Promote the PostgreSQL instance in DC2 to the primary role.
- Set Operator Replicas:
- Increase the Operator replicas to 1.
- This starts the Synapse workloads in DC2.
- Update the DNS to point the ingress to DC2.
- Open the firewall if it was closed to ensure proper network access.
-
Synchronize DC3.
- Ensure PostgreSQL Replication:
- Make sure that the PostgreSQL in DC3 is properly replicating from the new primary in DC2.
- Adjust the PostgreSQL topology if necessary to ensure proper synchronization.
- Ensure PostgreSQL Replication:
You should decline your own failover procedure based on this high-level failover overview. By doing so, you can ensure that ESS continues to operate smoothly and with minimal downtime, maintaining service availability even when the primary data center goes down.
Migrating from Self-Hosted to ESS
This document is currently work-in-progress and might not be accurate. Please speak with your Element contact if you have any questions.
Preparation
This section outlines what you should do ahead of the migration in order to ensure the migration goes as quickly as possible and without issues.
- At the latest 48 hours before your migration is scheduled, set the TTL on any DNS records that need to be updated to the lowest allowed value.
- Check the size of your database:
- PostgreSQL: Connect to your database and issue the command
\l+
- PostgreSQL: Connect to your database and issue the command
- Check the size of your media
- Synapse Media Store:
du -hs /path/to/synapse/media_store/
- Synapse Media Store:
- If you are using SQLite instead of PostgreSQL, you should port your database to PostgreSQL by following this guide before dumping your database
Note that the database and media may be duplicated/stored twice on your ESS host during the import process depending on how you do things.
Setup your new ESS server
Follow the ESS docs for first-time installation, configuring to match your existing homeserver before proceeding with the below.
The Domain Name on the Domains page during the ESS initial setup wizard must be the same as you have on your current setup. The other domains can be changed if you wish.
To make the import later easier, we recommend you select the following Synapse Profile. You can change this as required after the import.
- Monthly Active Users: 500
- Federation Type: closed
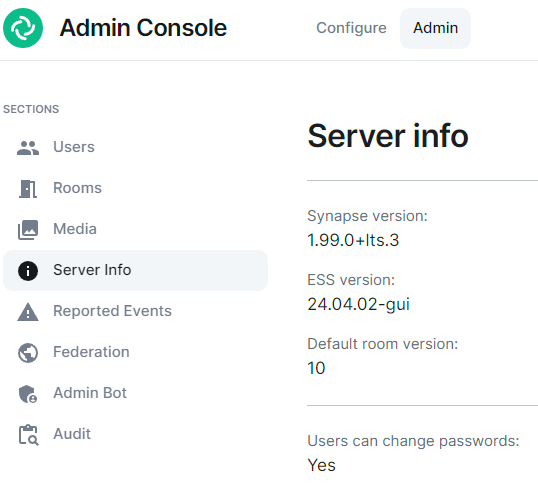
After the ESS installation, you can check your ESS Synapse version on the Admin -> Server Info page:
Export your old Matrix server
SSH to your old Matrix server
You might want to run everything in a tmux or a screen session to avoid disruption in case of a lost SSH connection.
Upgrade your old Synapse to the same version EES is running
Follow https://element-hq.github.io/synapse/latest/upgrade.html
Please be aware that ESS, especially our LTS releases may not run the latest available Synapse release. Please speak with your Element contact for advice on how to resolve this issue. Note that Synapse does support downgrading, but occationally a new Synapse version includes database schema changes and this limits downgrading. See https://element-hq.github.io/synapse/latest/upgrade.html#rolling-back-to-older-versions for additional details and compatible versions.
Start Synapse, make sure it's happy.
Stop Synapse
Create a folder to store everything
mkdir -p /tmp/synapse_export
cd /tmp/synapse_export
The guide from here on assumes your current working directory is /tmp/synapse_export.
Set restrictive permissions on the folder
If you are working as root: (otherwise set restrictive permissions as needed):
chmod 700 /tmp/synapse_export
Copy Synapse config
Get the following files :
- Your Synapse configuration file (usually
homeserver.yaml) - Your message signing key.
- This is stored in a separate file. See the Synapse config file [
homeserver.yaml] for the path. The variable issigning_key_pathhttps://element-hq.github.io/synapse/latest/usage/configuration/config_documentation.html?highlight=signing_key_path#signing_key_path
- This is stored in a separate file. See the Synapse config file [
- grab
macaroon_secret_keyfromhomeserver.yamland place it in the "Secrets \ Synapse \ Macaroon" on your ESS server - If you use native Synapse user authentication,
password.peppermust remain unchanged. If not you need to reset all passwords. Note that setting the pepper is not supported in ESS as time of writing, please check with your Element contact.
Stop Synapse
Once Synapse is stopped, do not start it again after this
Doing so can cause issues with federation and inconsistent data for your users.
While you wait for the database to export or files to transfer, you should edit or create the well-known files and DNS records to point to your new EES host. This can take a while to update so should be done as soon as possible in order to ensure your server will function properly when the migration is complete.
Database export
Dump your database:
pg_dump -Fc -O -h <dbhost> -U <dbusername> -d <dbname> -W -f synapse.dump
-
<dbhost>(ip or fqdn for your database server) -
<dbusername>(username for your synapse database) -
<dbname>(the name of the database for synapse)
Import to your ESS server
Database import
Enter a bash shell on the Synapse postgres container:
Stop Synapse
kubectl .... replicas=0
Note that this might differ depending on how you have your Postgres managed. Please consult the documentation for your deployment system.
kubectl exec -it -n element-onprem synapse-postgres-0 --container postgres -- /bin/bash
Then on postgres container shell run:
psql -U synapse_user synapse
The following command will erase the existing Synapse Database without warning or confirmation. Please ensure that is is the correct database and there is no production data on it.
DO $$ DECLARE
r RECORD;
BEGIN
FOR r IN (SELECT tablename FROM pg_tables WHERE schemaname = current_schema()) LOOP
EXECUTE 'DROP TABLE ' || quote_ident(r.tablename) || ' CASCADE';
END LOOP;
END $$;
DROP sequence cache_invalidation_stream_seq;
DROP sequence state_group_id_seq;
DROP sequence user_id_seq;
DROP sequence account_data_sequence;
DROP sequence application_services_txn_id_seq;
DROP sequence device_inbox_sequence;
DROP sequence event_auth_chain_id;
DROP sequence events_backfill_stream_seq;
DROP sequence events_stream_seq;
DROP sequence presence_stream_sequence;
DROP sequence receipts_sequence;
DROP sequence un_partial_stated_event_stream_sequence;
DROP sequence un_partial_stated_room_stream_sequence;
Use \q to quit, then back on the host run:
gzip -d synapse_export.sql.gz
sudo cp synapse_export.sql /data/postgres/synapse/
# or
kibectl --namespace element-onprem cp synapse_export.sql element-onprem synapse-postgres-0:/tmp
Finally on the pod:
cd /var/lib/postgresql/data
# or
cd /tmo
pg_restore <connection> --no-owner --role=<new role> -d <new db name> dump.sql
Mobile client provisioning
The default sign-in flow in the mobile app requires the user to enter the correct account provider (homeserver) which is error prone and also not effortless.
In order to improve the user experience, and to skip this step, there are 3 options to specify the account provider or other configuration for the user:
- Use mobile device management (MDM).
- Use a deeplink to open the app.
- Use a custom app.
This is a new feature available in since 25.05.2 (iOS) and 25.06.0 (Android).
Deeplinking
Deeplinking is the simplest option (unless the customer is already using MDM for their users or has a custom app).
How does it work?
The customer would send an on-boarding email to its users which contains two major steps:
- Download the app
- Sign in to the app
The second step then contains the deeplink which opens the app and sets the desired account provider. Optionally, a QR code of the link would be included in case the user can't access the mail on their phone.
Here's an example of how such e-mail could look like. Note that currently ESS does not have means for composing and sending these emails to users automatically.
The configuration set by opening the app with the deeplink is retained only until the app is running. If the app is killed and opened without using the deeplink, the default behaviour will apply (e.g. user has to enter account provider).
If account provider is already set by MDM or customer publishes their own app which does not allow using an arbitrary account provider, the account provider in the deeplink is ignored.
If the user tries to open the app with the deeplink, but does not have the app installed yet on their phone, the user lands on a web page that guides them to install it.
How to Create the Deeplink?
The format for the deeplink is:
https://mobile.element.io/<app>/?account_provider=<example.com>&login_hint=<alice>
The <app> specifies the mobile app to open:
-
element-> Element X -
element-pro-> Element Pro - missing -> Element classic
Note: while Element X is supported, it is expected that customers use the Element Pro app.
The <example.com> specifies the server name of the account provider aka homeserver, e.g. example.com. Note that for backward compatibility purposes the hs_url works as an alternative for the Element (classic) app, but it expects an URL, e.g. https://example.com.
The <alice> is intended to populate the username for the login. Since this is implemented by providing it as the login_hint parameter in the OIDC protocol, the exact value/format of it depends on which means of authentication is used.
When MAS is used without an upstream identity provider (e.g. no SSO for users), the format mxid:@alice:example.org is expected. An example deeplink/URL for @alice:example.com to sign to Element Pro in such a case is: https://mobile.element.io/element-pro/?account_provider=example.com&login_hint=mxid:@alice:example.org
When MAS is used with an upstream identity provider, you need to set forward_login_hint: true in your MAS configuration for the hint to be forwarded. See the MAS documentation for more details. The hint itsef depends on what the provider expects, but in many cases the email address is used as the user ID, e.g. alice@example.com. Also, in case of SSO providing the username is less critical, as user is very likely already signed in because they have used other apps with the SSO.
To create a QR code of the link, online services can be used.
App Download Links
The links to download the app are:
- Element Pro
- iOS: https://apps.apple.com/app/element-pro-for-work/id6502951615
- Android: https://play.google.com/store/apps/details?id=io.element.enterprise
- Element X
- iOS: https://apps.apple.com/ee/app/element-x-secure-chat-call/id1631335820
- Android: https://play.google.com/store/apps/details?id=io.element.android.x
Please refer to Apple and Google documentation how to use badges for the download buttons.
Note: Redirect from Element Web
Note: when a user tries to access Element web app with a browser on a mobile device (e.g. they go to https://chat.example.com), the user is directed to a page which also guides them to download the native mobile app and has a button to open the app with the deeplink. In such a case the account provider is set to the one that the Element web installation specifies.
Mobile Device Management (MDM)
If the customer is using MDM, the account provider can be delivered to the user's phone via the AppConfig.
When applying the MDM configuration to Element Pro, the Application/Bundle ID is io.element.enterprise. The key for specifying the account provider is accountProvider. The value must be the server name, e.g. example.com.
The end user just needs to download the app (if not installed by the MDM solution already) and open it.
Note that when MDM is used for specifying the account provider, other means like deeplink are ignored.
Custom app
If the customer is publishing their own custom app in the stores, the account provider(s) is built into the app.
The account provider(s) are specified by the accountProviders parameter of the custom app's build pipeline (by Element who sets up the pipeline). Details are provided in the pipeline inputs documentation.
With custom app it is possible to specify more than one account provider. In such a case the user would still need to make a selection but would not need to input manually.
Note that the account provider(s) in the custom app are overriden by the one from MDM (if exists).
If a custom app is opened with a deeplink that also specifies account provider, the one in the deeplink is only applied when the accountProviders parameter of the custom app contains *. The latter means that users of the custom app are allowed to use arbitrary account providers.
Starting and Stopping ESS Services
Stopping a component
To stop a component, such as Synapse, it is necessary to stop the operator :
kubectl scale deploy/element-operator-controller-manager -n operator-onprem --replicas 0
Once the operator is stopped, you can delete the Synapse resource to remove all Synapse workloads :
kubectl delete synapse/first-element-deployment -n element-onprem
To get a list of resources that you can remove, you can look at the following command :
kubectl get elementdeployment/first-element-deployment -n element-onprem --template='{{range $key, $value := .status.dependentCRs}}{{$key}}{{"\n"}}{{end}}'
Example :
ElementWeb/first-element-deployment
Hookshot/first-element-deployment
Integrator/first-element-deployment
MatrixAuthenticationService/first-element-deployment
Synapse/first-element-deployment
SynapseAdminUI/first-element-deployment
SynapseUser/first-element-deployment-adminuser-donotdelete
SynapseUser/first-element-deployment-telemetry-donotdelete
WellKnownDelegation/first-element-deployment
Starting a component
To stop a component, such as Synapse, it is necessary to start the operator :
kubectl scale deploy/element-operator-controller-manager -n operator-onprem --replicas 1
Because the Synapse resource will automatically have been recreated by the updater, the operator on startup will automatically detect it and recreate all synapse workloads.