# Requirements and Recommendations
What do you need to get started, covering hardware, software and your environment?
### Software
#### Element Enterprise Server
[Element Server Suite Download Page](https://ems.element.io/on-premise/download)
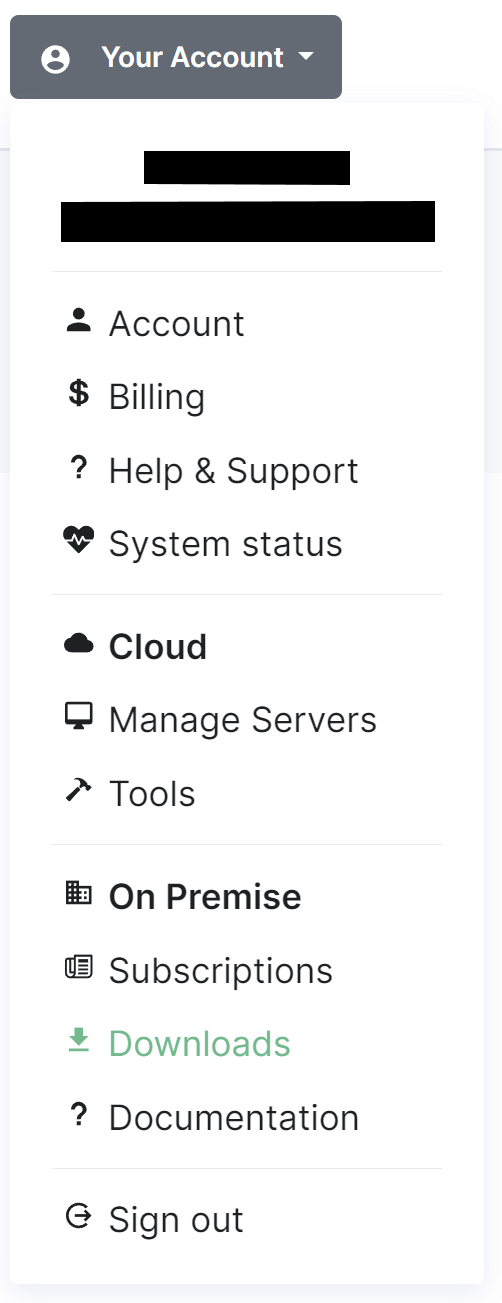
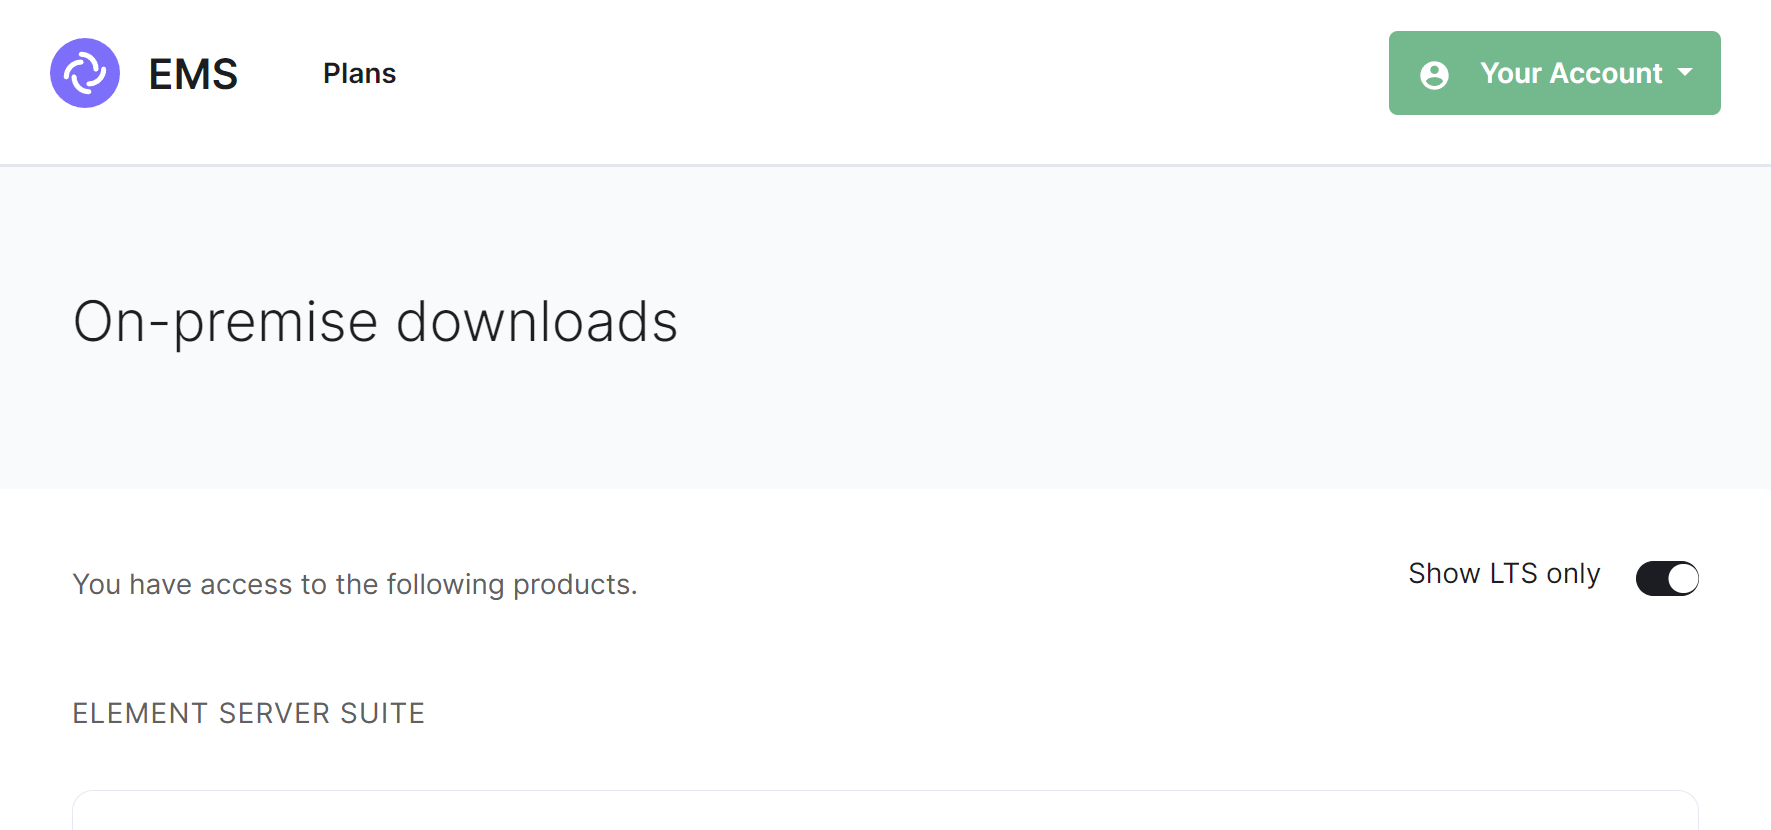
To download the installer you require a [Element Server Suite](https://element.io/pricing) subscription tied with your [EMS Account](https://ems-docs.element.io/link/372#bkmrk-ems-account). If you are already logged in, click the link above to access the download page, otherwise login and then click the `Your Account` button found in the top-right of the page. Select `Downloads` under the `On-Premise` section.
It is highly recommended that you stay on the latest LTS version; by default, only LTS releases will be displayed. However you can untick the `Show LTS Only` toggle to see our monthly releases.
[](https://ems-docs.element.io/uploads/images/gallery/2024-05/image-1714561143314.png)
For each release you will see download options for the installer, the airgapped package (if your subscription allows) and Element Desktop MSIs:
- **Installer****.**
`element-installer-enterprise-edition-YY.MM.00-gui.bin`
Where `YY` is a year indicator, `MM` is the month indicator and `00` is the version.
- **Airgapped Package****.**
`element-installer-enterprise-edition-airgapped-YY.MM.00-gui.tar.gz`
Where `YY` is a year indicator, `MM` is the month indicator and `00` is the version.
- **Element Desktop MSI****.**
`Element 1.11.66 ia32.msi` & `Element 1.11.66.msi`
Once downloaded, copy the installer binary (and the airgapped package if needed) to the machine in which you will be running the installer from. Remember to ensure you've followed the [Requirements and Recommendations](https://ems-docs.element.io/books/element-server-suite-documentation-lts-2410/page/requirements-and-recommendations) page for your environment and specifically the [Operating System](https://ems-docs.element.io/link/475#bkmrk-operating-system) specific Prerequisites for your intended deployment method (Standalone or Kubernetes).
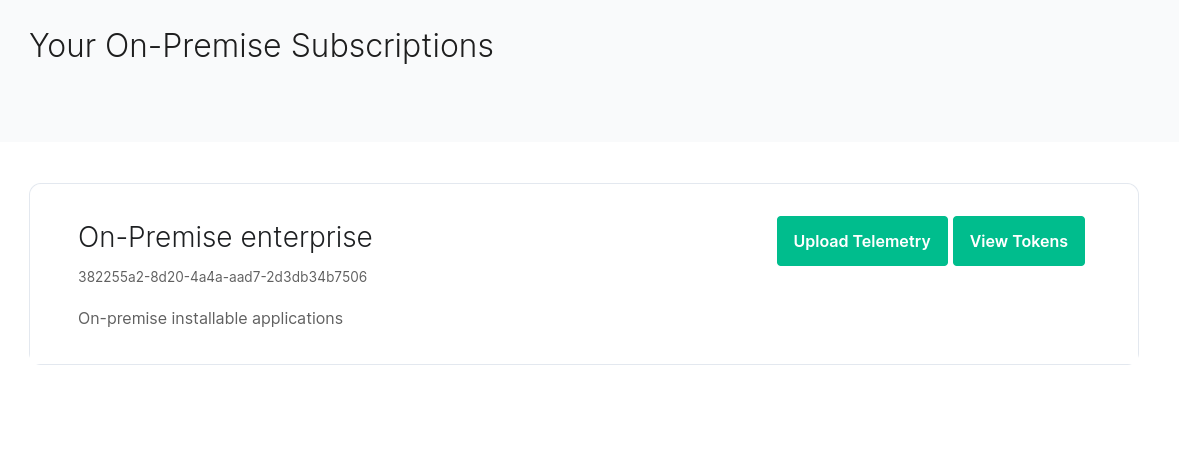
ESS Subscription Credentials
As part of the deployment process, you must supply your ESS Subscription credentials.
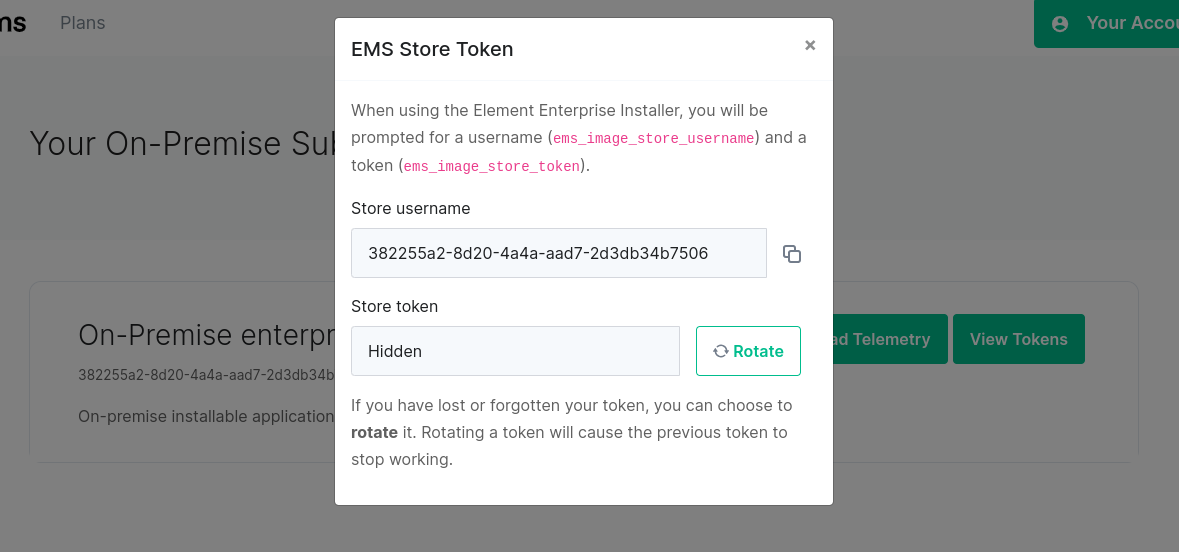
You can access your Store Username and Token by visiting , you will see a page with all of your subscriptions.
[](https://ems-docs.element.io/uploads/images/gallery/2023-04/token-rotation1.png)
For your subscription credentials, click on the `View Tokens` button. On this page, click `Rotate`, you will then be presented with a new token.
[](https://ems-docs.element.io/uploads/images/gallery/2023-04/image-1682099598447.png)
#### Operating System
The installer binary requires a Linux OS to run, supported platforms include:
Please note that Ubuntu 24.04 LTS is only supported on ESS LTS 24.10 and later. For earlier versions, while configuration can be generated, deployment will fail.
LTS ESS Version | Supported Ubuntus | Supported Enterprise Linux (RHEL, Rocky, etc) | General Python Version requirements
| --- | --- | -- | -- |
23.10 | 20.04, 22.04 | 8, 9 | Python 3.8-3.10
24.04 | 20.04, 22.04 | 8, 9 | Python 3.9-3.11
24.10 | 22.04, 24.04 | 8, 9 | Python 3.10-3.12
Element Server Suite 24.04 currently only supports up to Python 3.11
- **Ubuntu****.**
- Ubuntu Server 20.04
- Ubuntu Server 22.04
Ubuntu Prerequisites
**Standalone Deployments**
During installation you should select docker as a package option and set up ssh.
```bash
sudo apt-get update
sudo apt-get upgrade
sudo apt-get install git
```
The installer requires that it is run as a non-root user who has sudo permissions, make sure that you have a user who can use `sudo`. You could create a user called `element-demo` that can use `sudo` by using the following commands (run as root):
```bash
useradd element-demo
gpasswd -a element-demo sudo
```
The installer also requires that your non-root user has a home directory in `/home`.
**Kubernetes Deployments**
The installer needs `python3`, `pip3` and `python3-venv` installed to run and uses your currently active `kubectl` context. This can be determined with `kubectl config current-context`, make sure this is the correct context as all subsequent operations will be performed under it.
More information on configuring this can be found in the [upstream kubectl docs](https://kubernetes.io/docs/reference/kubectl/cheatsheet/#kubectl-context-and-configuration)
Be sure to `export K8S_AUTH_CONTEXT=kube_context_name` for the Installer if you need to use a context aside from your currently active one.
- **Enterprise Linux****.** RHEL, CentOS Stream, etc.
- Enterprise Linux 8
- Enterprise Linux 9
Enterprise Linux Prerequisites
**Standalone Deployments**
During installation make sure to select "Container Management" in the "Additional Software" section.
```bash
sudo dnf update -y
sudo dnf install python3.12-pip python3.12-devel make gcc git -y
sudo dnf install https://dl.fedoraproject.org/pub/epel/epel-release-latest-8.noarch.rpm -y
sudo update-alternatives --config python3
```
You should also follow the steps linked here to [Install microk8s on RHEL](https://snapcraft.io/install/microk8s/rhel), or included below, if you run into `Error: System does not fully support snapd: cannot mount squashfs image using "squashfs"`:
1. Install the EPEL repository
- **RHEL9**:
```bash
sudo dnf install https://dl.fedoraproject.org/pub/epel/epel-release-latest-9.noarch.rpm
sudo dnf upgrade
```
- **RHEL8**:
```bash
sudo dnf install https://dl.fedoraproject.org/pub/epel/epel-release-latest-8.noarch.rpm
sudo dnf upgrade
```
1. Install Snap, enable main snap communication socket and enable classic snap support
```bash
sudo yum install snapd
sudo systemctl enable --now snapd.socket
sudo ln -s /var/lib/snapd/snap /snap
```
1. Reboot
On the `update-alternatives` command, if you see more than one option, select the option with a command string of `/usr/bin/python3.12`.
The installer requires that it is run as a non-root user who has sudo permissions, make sure that you have a user who can use `sudo`. You could create a user called `element-demo` that can use `sudo` by using the following commands (run as root):
```bash
useradd element-demo
gpasswd -a element-demo wheel
```
The installer also requires that your non-root user has a home directory in `/home`.
**Kubernetes Deployments**
The installer needs `python3`, `pip3` and `python3-venv` installed to run and uses your currently active `kubectl` context. This can be determined with `kubectl config current-context`, make sure this is the correct context as all subsequent operations will be performed under it.
More information on configuring this can be found in the [upstream kubectl docs](https://kubernetes.io/docs/reference/kubectl/cheatsheet/#kubectl-context-and-configuration)
Be sure to `export K8S_AUTH_CONTEXT=kube_context_name` for the Installer if you need to use a context aside from your currently active one.
For installation in Standalone mode, i.e. onto the host itself, only the above OS's are supported, otherwise for an installation into a Kubernetes environment, make sure you have a Kubernetes platform deployed that you have access to from the host running the installer.
Network Requirements
Element Enterprise Server needs to bind and serve content over:
- Port 80 TCP
- Port 443 TCP
- Port 8443 TCP ( Installer GUI )
`microk8s` specifically will need to bind and serve content over:
- Port 16443 TCP
- Port 10250 TCP
- Port 10255 TCP
- Port 25000 TCP
- Port 12379 TCP
- Port 10257 TCP
- Port 10259 TCP
- Port 19001 TCP
For more information, see https://microk8s.io/docs/ports.
In a default Ubuntu installation, these ports are allowed through the firewall. You will need to ensure that these ports are passed through your firewall.
For RHEL instances with firewalld enabled, the installer will take care of opening these ports for you.
Further, you need to make sure that your host is able to access the following hosts on the internet:
- `api.snapcraft.io`
- `*.snapcraftcontent.com`
- `gitlab.matrix.org`
- `gitlab-registry.matrix.org`
- `pypi.org`
- `docker.io`
- `*.docker.com`
- `get.helm.sh`
- `k8s.gcr.io`
- `cloud.google.com`
- `storage.googleapis.com`
- `registry.k8s.io`
- `fastly.net`
- `GitHub.com`
In addition, you will also need to make sure that your host can access your distributions' package repositories. As these hostnames can vary, it is beyond the scope of this documentation to enumerate them.
### Hardware
Regardless of if you pick the standalone server or Kubernetes deployment, you will need a base level of hardware to support the application. The general guidance for server requirements is dependant on your Federation settings:
- **Open Federation****.**
Element recommends a minimum of 8 vCPUs/CPUs and 32GB ram for the host(s) running synapse pods.
- **Closed Federation****.**
Element recommends a minimum of 6 vCPUs/CPUs and 16GB ram for the host(s) running synapse pods.
The installer binary requires support for the x86_64 architecture. Note that for Standalone deployments, hosts will need 2 GiB of memory to run both the OS and microk8s and should have at least 50Gb free space in `/var`.
#### Component-Level Requirements
Please note that these values below are indicative and might vary a lot depending on your setup, the volume of federation traffic, active usage, bridged use-cases, integrations enabled, etc. For each profile below:
- CPU is the maximum cpu cores the Homeserver can request
- Memory is the average memory the Homeserver will require
##### Synapse Homeserver
The installer comes with default installation profiles which configure workers depending on your setup.
| Federation |
1 - 500 Users |
501 - 2500 Users |
2501 - 10,000 Users |
| Closed |
2 CPU
2000 MiB RAM |
6 CPU
5650 MiB RAM |
10 CPU
8150 MiB RAM |
| Limited |
2 CPU
2000 MiB RAM |
6 CPU
5650 MiB RAM |
10 CPU
8150 MiB RAM |
| Open |
5 CPU
4500 MiB RAM |
9 CPU
8150 MiB RAM |
15 CPU
11650 MiB RAM |
##### Synapse Postgres Server
Synapse postgres server will require the following resources :
| Federation |
1 - 500 Users |
501 - 2500 Users |
2501 - 10,000 Users |
| Closed |
1 CPU
4 GiB RAM |
2 CPU
12 GiB RAM |
4 CPU
16 GiB RAM |
| Limited |
2 CPU
6 GiB RAM |
4 CPU
18 GiB RAM |
8 CPU
28 GiB RAM |
| Open |
3 CPU
8 GiB RAM |
5 CPU
24 GiB RAM |
10 CPU
32 GiB RAM |
##### Operator & Updater
The Updater memory usage remains at `256Mi`. At least 1 CPU should be provisioned for the operator and the updater.
The Operator memory usage scales linearly with the number of integrations you deploy with ESS. It's memory usage will remain low, but might spike up to `256Mi x Nb Integrations` during deployment and configuration changes.
##### Synapse Media
The disk usage to expect after a year can be calculated using the following formula:
- `average media size` × ( `average number of media uploaded` ÷ `day` ) × `active users` × `365`.
Media retention can be configured with the configuration option in Synapse/Config/Data Retention of the installer.
##### Postgres DB size
The disk usage to expect after a year can be calculated using the following formula:
- If Federation is enabled, `active users` × `0.9GB`.
- If Federation is disabled or limited, `active users` × `0.6GB`.
### Environment
For each of the components you choose to deploy (excluding postgresql, groupsync and prometheus), you must provide a hostname on your network that meets this criteria:
- Fully resolvable to an IP address that is accessible from your clients.
- Signed PEM encoded certificates for the hostname in a crt/key pair. Certificates should be signed by an internet recognised authority, an internal to your company authority, or LetsEncrypt.
It is possible to deploy Element Enterprise On-Premise with self-signed certificates and without proper DNS in place, but this is not ideal as the mobile clients and federation do not work with self-signed certificates.
In addition to hostnames for each component, you will also need a hostname and PEM encoded certificate key/cert pair for your base domain. If we were deploying a domain called `example.com` and wanted to deploy all of the software, we would have the following hostnames in our environment that needed to meet the above criteria:
- **Base Domain****.**
example.com
- **Synapse****.**
matrix.example.com
- **Element Web****.**
element.example.com
- **Integration Manager****.**
integrator.example.com
- **Admin Dashboard****.**
admin.example.com
- **AdminBot****.**
adminbot.example.com
- **AuditBot****.**
auditbot.example.com
- **Hookshot****.**
hookshot.example.com
- **Hydrogen****.**
hydrogen.example.com
- **Jitsi****.**
jitsi.example.com
- **Coturn****.**
coturn.example.com
- **Element Call****.**
call.example.com
- **SFU****.**
sfu.example.com
- **Grafana****.**
grafana.example.com
- **Telegram Bridge****.**
telegrambridge.example.com
- **Teams Bridge****.**
teamsbridge.example.com
Wildcard certificates do work with our application and it would be possible to have a certificate that validated *.example.com and example.com for the above scenario. It is key to do both the base domain and the wildcard in the same certificate in order for this to work.
Further, if you want to do voice or video across network boundaries (ie: between people not on the same local network), you will need a TURN server. If you already have one, you do not have to set up coturn. If you do not already have a TURN server, you will want to set up coturn (our installer can do this for you) and if your server is behind NAT, you will need to have an external IP in order for coturn to work.
#### Standalone Environment Prerequisites
Before beginning the installation of a Kubernetes deployment, there are a few things that must be prepared to ensure a successful deployment and functioning installation.
##### Server Minimum Requirements
It is **crucial** that your storage provider supports `fsync` for data integrity.
- `/var`: 50GB
- `/data/element-deployment`: The default directory that Will contain your Synapse media. See the [Synapse Media](https://ems-docs.element.io/link/475#bkmrk-synapse-media) section above to find an estimation of the expected size growth.
- `/data/postgres`: The default directory that Will contain your Postgres database. See the [Postgres DB size](https://ems-docs.element.io/link/475#bkmrk-postgres-db-size) section above to find an estimation of the expected size.
Check out the [ESS Sizing Calculator](https://ems-docs.element.io/books/element-server-suite-documentation-lts-2410/page/ess-sizing-calculator) for further guidance which you can tailor to your specific desired configuration.
##### Kernel Modules
While above the supported Operating Systems should have this already, please note that `microk8s` requires the kernel module `nf_conntrack` to be enabled.
```bash
if ! grep nf_conntrack /proc/modules; then
echo "nf_conntrack" | sudo tee --append /etc/modules
sudo modprobe nf_conntrack
fi
```
##### Network Proxy
If your environment requires proxy access to get to the internet, you will need to make the folllowing changes to your operating system configuration to enable our installer to access the resources it needs over the internet.
Ubuntu Specific Steps
If your company's proxy is `http://corporate.proxy:3128`, you would edit `/etc/environment` and add the following lines:
```plaintext
HTTPS_PROXY=http://corporate.proxy:3128
HTTP_PROXY=http://corporate.proxy:3128
https_proxy=http://corporate.proxy:3128
http_proxy=http://corporate.proxy:3128
NO_PROXY=10.1.0.0/16,10.152.183.0/24,127.0.0.1,*.svc
no_proxy=10.1.0.0/16,10.152.183.0/24,127.0.0.1,*.svc
```
The IP Ranges specified to `NO_PROXY` and `no_proxy` are specific to the microk8s cluster and prevent microk8s traffic from going over the proxy.
Enterprise Linux Specific Steps
If your company's proxy is `http://corporate.proxy:3128`, you would edit `/etc/profile.d/http_proxy.sh` and add the following lines:
```plaintext
export HTTP_PROXY=http://corporate.proxy:3128
export HTTPS_PROXY=http://corporate.proxy:3128
export http_proxy=http://corporate.proxy:3128
export https_proxy=http://corporate.proxy:3128
export NO_PROXY=10.1.0.0/16,10.152.183.0/24,127.0.0.1,localhost,*.svc
export no_proxy=10.1.0.0/16,10.152.183.0/24,127.0.0.1,localhost,*.svc
```
The IP Ranges specified to `NO_PROXY` and `no_proxy` are specific to the microk8s cluster and prevent microk8s traffic from going over the proxy.
Once your OS specific steps are complete, you will need to log out and back in for the environment variables to be re-read after setting them. If you already have `microk8s` running, you will need to run the following to have `microk8s` reload the new environment variables:
```bash
microk8s.stop
microk8s.start
```
If you need to use an authenticated proxy, then the URL schema for both EL and Ubuntu is as follows:
```
protocol:user:password@host:port
```
So if your proxy is `corporate.proxy` and listens on port 3128 without SSL and requires a username of `bob` and a password of `inmye1em3nt` then your url would be formatted:
```
http://bob:inmye1em3nt@corporate.proxy:3128
```
For further help with proxies, we suggest that you contact your proxy administrator or operating system vendor.
##### PostgreSQL
The installation requires that you have a postgresql database; if you do not already have a database, then the standalone installer will set up PostgreSQL on your behalf.
If you already have PostgreSQL, the installation requires that the database is setup with a locale of C and use UTF8 encoding
See [Synapse Postgres Setup Docs](https://element-hq.github.io/synapse/latest/postgres.html#set-up-database) for further details.
Once setup, or if you have this already, make note of the database name, user, and password as you will need these when configuring ESS via the installater GUI.
#### Kubernetes Environment Prerequisites
Before beginning the installation of a Kubernetes deployment, there are a few things that must be prepared to ensure a successful deployment and functioning installation.
##### PostgreSQL
Before you can begin with the installation you must have a PostgreSQL database instance available. The installer does not manage databases itself.
The database you use must be set to a locale of C and use UTF8 encoding
Look at the [Synapse Postgres Setup Docs](https://element-hq.github.io/synapse/latest/postgres.html#set-up-database) for further details as they relate to Synapse. If the locale / encoding are incorrect, Synapse will fail to initialize the database and get stuck in a `CrashLoopBackoff` cycle.
Please make note of the database hostname, database name, user, and password as you will need these to begin the installation. For testing and evaluation purposes, you can deploy PostgreSQL to k8s before you begin the installation process:
Kubernetes PostgreSQL Quick Start Example
For testing and evaluation purposes only - Element cannot guarantee production readiness with these sample configurations.
Requires [Helm](https://helm.sh/docs/intro/install/) installed locally
If you do not have a database present, it is possible to deploy PostgreSQL to your Kubernetes cluster.
This is great for testing and *can* work great in a production environment, but only for those with a high degree of comfort with PostgreSQL as well as the trade offs involved with k8s-managed databases.
There are many different ways to do this depending on your organization's preferences - as long as it can create an instance / database with the required locale and encoding it will work just fine. For a simple non-production deployment, we will demonstrate deployment of the [bitnami/postgresql](https://github.com/bitnami/charts/tree/main/bitnami/postgresql) into your cluster using [Helm](https://helm.sh/docs/intro/install/).
You can add the `bitnami` repo with a few commands:
``` bash
helm repo add bitnami https://charts.bitnami.com/bitnami
helm repo update
helm search repo bitnami/postgresql ~/Desktop
NAME CHART VERSION APP VERSION DESCRIPTION
bitnami/postgresql 12.5.7 15.3.0 PostgreSQL (Postgres) is an open source object-...
bitnami/postgresql-ha 11.7.5 15.3.0 This PostgreSQL cluster solution includes the P...
```
Next, you'll need to create a `values.yaml` file to configure your PostgreSQL instance. This example is enough to get started, but please consult the chart's [README](https://github.com/bitnami/charts/tree/main/bitnami/postgresql#readme) and [values.yaml](https://github.com/bitnami/charts/blob/main/bitnami/postgresql/values.yaml) for a list of full parameters and options.
``` yaml
auth:
# This is the necessary configuration you will need for the Installer, minus the hostname
database: "synapse"
username: "synapse"
password: "PleaseChangeMe!"
primary:
initdb:
# This ensures that the initial database will be created with the proper collation settings
args: "--lc-collate=C --lc-ctype=C"
persistence:
enabled: true
# Set this value if you need to use a non-default StorageClass for your database's PVC
# storageClass: ""
size: 20Gi
# Optional - resource requests / requirements
# These are sufficient for a 10 - 20 user server
resources:
requests:
cpu: 500m
memory: 512Mi
limits:
memory: 2Gi
```
This example `values.yaml` file is enough to get you started for testing purposes, but things such as TLS configuration, backups, HA and maintenance tasks are outside of the scope of the installer and this document.
Next, pick a namespace to deploy it to - this can be the same as the Installer's target namespace if you desire. For this example we'll use the `postgresql` namespace.
Then it's just a single Helm command to install:
``` bash
# format:
# helm install --create-namespace -n -f (-f )
helm install --create-namespace -n postgresql postgresql bitnami/postgresql -f values.yaml
```
Which should output something like this when it is successful:
```
-- snip --
PostgreSQL can be accessed via port 5432 on the following DNS names from within your cluster:
postgresql.postgresql.svc.cluster.local - Read/Write connection
-- snip --
```
This is telling us that `postgresql.postgresql.svc.cluster.local` will be our hostname for PostgreSQL connections, which is the remaining bit of configuration required for the Installer in addition to the database/username/password set in `values.yaml`. This will differ depending on what namespace you deploy to, so be sure to check everything over.
If needed, this output can be re-displayed with `helm get notes -n `, which for this example would be `helm get notes -n postgresql postgresql`)
How to setup AWS RDS for Synapse
1. Create a database instance, engine type PostgreSQL.
2. From a host (that has access to the db host), install the `postgresql-client`:
```
sudo apt update
sudo apt install postgresql-client
```
3. Connect to the RDS Postgres using:
```
psql -h -p -U
```
4. Create the `synapse` and `integrator` databases using the following:
```
CREATE USER synapse_user WITH PASSWORD 'your_password';
CREATE DATABASE synapse WITH ENCODING='UTF8' LC_COLLATE='C' LC_CTYPE='C' TEMPLATE=template0 OWNER=synapse_user;
GRANT ALL PRIVILEGES ON DATABASE synapse TO synapse_user;
CREATE DATABASE integrator WITH ENCODING='UTF8' LC_COLLATE='C' LC_CTYPE='C' TEMPLATE=template0 OWNER=synapse_user;
GRANT ALL PRIVILEGES ON DATABASE integrator TO synapse_user;
```
##### Kubernetes Ingress Controller
The installer does not manage cluster Ingress capabilities since this is typically a cluster-wide concern - You must have this available prior to installation.
Without a working Ingress Controller you will be unable to route traffic to your services without manual configuration.
If you do not have an Ingress Controller deployed please see [Kubernetes Installations - Quick Start - Deploying ingress-nginx to Kubernetes](https://ems-docs.element.io/books/element-server-suite-documentation-lts-2310/page/kubernetes-installations-quick-start#Deploying%20ingress-nginx%20controller) for information on how to set up a bare-bones `ingress-nginx` installation to your cluster.
Kubernetes Ingress (nginx) Quick Start Example
For testing and evaluation purposes only - Element cannot guarantee production readiness with these sample configurations.
Requires [Helm](https://helm.sh/docs/intro/install/) installed locally
Similar to the PostgreSQL quick start example, this requires [Helm](https://helm.sh/docs/intro/install/)
The [kubernetes/ingress-nginx](https://github.com/kubernetes/ingress-nginx/tree/main/charts/ingress-nginx) chart is an easy way to get a cluster outfitted with Ingress capabilities.
In an environment where LoadBalancer services are handled transparently, such as in a simple test k3s environment with `svclb` enabled there's a minimal amount of configuration.
This example `values.yaml` file will create an IngressClass named `nginx` that will be used by default for any `Ingress` objects in the cluster.
``` yaml
controller:
ingressClassResource:
name: nginx
default: true
enabled: true
```
However, depending on your cloud provider / vendor (i.e. AWS ALB, Google Cloud Load Balancing etc) the configuration for this can vary widely. There are several example configurations for many cloud providers in the chart's [README](https://github.com/kubernetes/ingress-nginx/tree/main/charts/ingress-nginx#configuration)
You can see what your resulting HTTP / HTTPS IP address for this ingress controller by examining the service it creates - for example, in my test environment I have an installed release of the `ingress-nginx` chart called `k3s` under the `ingress-nginx` namespace, so I can run the following:
``` bash
# format:
# kubectl get service -n -ingress-nginx-controller
$ kubectl get service -n ingress-nginx k3s-ingress-nginx-controller
NAME TYPE CLUSTER-IP EXTERNAL-IP PORT(S) AGE
k3s-ingress-nginx-controller LoadBalancer 10.43.254.210 192.168.1.129 80:30634/TCP,443:31500/TCP 79d
```
The value of `EXTERNAL-IP` will be the address that you'll need your DNS to point to (either locally via /etc/hosts or LAN / WAN DNS configuration) to access your installer-provisioned services.
###### Use an existing Ingress Controller
If you have an Ingress Controller deployed already and it is set to the default class for the cluster, you shouldn't have to do anything else.
If you're unsure you can see which providers are available in your cluster with the following command:
``` bash
$ kubectl get IngressClass
NAME CONTROLLER PARAMETERS AGE
nginx k8s.io/ingress-nginx 40d
```
And you can check to see whether an IngressClass is set to default using kubectl, for example:
``` bash
$ kubectl describe IngressClass nginx
Name: nginx
Labels: app.kubernetes.io/component=controller
app.kubernetes.io/instance=ingress-nginx
app.kubernetes.io/managed-by=Helm
app.kubernetes.io/name=ingress-nginx
app.kubernetes.io/part-of=ingress-nginx
app.kubernetes.io/version=1.1.1
argocd.argoproj.io/instance=ingress-nginx
helm.sh/chart=ingress-nginx-4.0.17
Annotations: ingressclass.kubernetes.io/is-default-class: true
Controller: k8s.io/ingress-nginx
Events:
```
In this example cluster there is only an `nginx` IngressClass and it is already default, but depending on the cluster you are deploying to this may be something you must manually set.
#### Airgapped Environments
An airgapped environment is any environment in which the running hosts will not have access to the greater Internet. As such these hosts will be unable to get access to the required software from Element and will also be unable to share telemetry data back with Element.
Your airgapped machine will still require access to airgapped linux repositories depending on your OS. If using Red Hat Enterprise Linux, you will also need access to the EPEL Repository in your airgapped environment.
If you are going to be installing into an airgapped environment, you will need a subscription including airgapped access and to then download the airgapped dependencies `element-enterprise-installer-airgapped--gui.tar.gz` file, which is a ~6GB archive that will need to be transferred to your airgapped environment.
Extract the archive, using `tar -xzvf element-enterprise-installer-airgapped--gui.tar.gz` so that you have an `airgapped` directory. Once complete, your host will be successfully setup for airgapped and ready for when you need to point the installer to that directory during installation.
For Kubernetes deployments, please note that once the image upload has been done, you will need to copy the `airgapped/images/images_digests.yml` file to the same path on the machine which will be used to render or deploy element services. Doing this, the new image digests will be used correctly in the kubernetes manifests used for deployment.