# Authentication Configuration Examples Provided below are some configuration examples covering how you can set up various types of Delegated Authentication. For a more detailed look at what each configuration option does, please refer to the [Authentication Section](https://ems-docs.element.io/books/element-server-suite-documentation-lts-2410/page/authentication-section) detailed document. ### LDAP on Windows AD
- **Base****.**
The distinguished name of the root level Org Unit in your LDAP directory. - The distinguished name can be displayed by selecting `View` / `Advanced Features` in the Active Directory console and then, right-clicking on the object, selecting `Properties` / `Attributes Editor`. - **Bind DN****.**
The distinguished name of the LDAP account with read access. - **Filter****.**
A [LDAP filter](https://ldap.com/ldap-filters/) to filter out objects under the LDAP Base DN. - **URI****.**
The URI of your LDAP server `ldap://dc.example.com`. - This is often your Domain Controller, can also pass in `ldaps://` for SSL connectivity. - The following are the typical ports for Windows AD LDAP servers: - `ldap://ServerName:389` - `ldaps://ServerName:636` - **LDAP Bind Password****.**
The password of the AD account with read access. - **LDAP Attributes****.**
- **Mail****.**
`mail` - **Name****.**
`cn` - **UID****.**
`sAMAccountName` ### OpenID on Microsoft Azure Before configuring within the installer, you have to configure Microsoft Azure Active Directory. #### Set up Microsoft Azure Active Directory - You need to create an `App registration`. - You have to select `Redirect URI (optional)` and set it to the following, where `matrix` is the subdomain of Synapse and `example.com` is your base domain as configured on the Domains section: ``` https://matrix.example.com/_synapse/client/oidc/callback ``` [![Screenshot 2023-05-03 at 16.30.06.png](https://ems-docs.element.io/uploads/images/gallery/2023-05/scaled-1680-/screenshot-2023-05-03-at-16-30-06.png)](https://ems-docs.element.io/uploads/images/gallery/2023-05/screenshot-2023-05-03-at-16-30-06.png) For the bridge to be able to operate correctly, navigate to API permissions, add Microsoft Graph APIs, choose Delegated Permissions and add: - `openid` - `profile` - `email` Remember to grant the admin consent for those. To setup the installer, you'll need: - The `Application (client) ID` - The `Directory (tenant) ID` - A secret generated from `Certificates & Secrets` on the app. #### Configure the installer
- **IdP Name****.**
A user-facing name for this identity provider, which is used to offer the user a choice of login mechanisms in the Element UI. - **IdP ID****.**
A string identifying your identity provider in your configuration, this will be auto-generated for you (but can be changed). - **IdP Brand****.**
An optional brand for this identity provider, allowing clients to style the login flow according to the identity provider in question. - **Issuer****.**
The OIDC issuer. Used to validate tokens and (if discovery is enabled) to discover the provider's endpoints. Use `https://login.microsoftonline.com/DIRECTORY_TENNANT_ID/v2.0` replacing `DIRECTORY_TENNANT_ID`. - **Client Auth Method****.**
Auth method to use when exchanging the token. Set it to `Client Secret Post` or any method supported by your IdP. - **Client ID****.**
Set this to your `Application (client) ID`. - **Client Secret****.**
Set this to the secret value defined under "Certificates and secrets". - **Scopes****.**
By default `openid`, `profile` and `email` are added, you shouldn't need to modify these. - **User Mapping Provider****.**
Configuration for how attributes returned from a OIDC provider are mapped onto a matrix user. - **Localpart Template****.**
Jinja2 template for the localpart of the MXID.
Set it to `{{ user.preferred_username.split('@')[0] }}` if using Legacy Auth, or `{{ (user.preferred_username | split('@'))[0] }}` if using MAS. - **Display Name Template****.**
Jinja2 template for the display name to set on first login.
If unset, no display name will be set. Set it to `{{ user.name }}`. - **Discover****.**
Enable / Disable the use of the OIDC discovery mechanism to discover endpoints. - **Backchannel Logout Enabled****.**
Synapse supports receiving OpenID Connect Back-Channel Logout notifications. This lets the OpenID Connect Provider notify Synapse when a user logs out, so that Synapse can end that user session. This property has to bet set to `https://matrix.example.com/_synapse/client/oidc/backchannel_logout`in your identity provider, where `matrix` is the subdomain of Synapse and `example.com` is your base domain as configured on the Domains section. ### OpenID on Microsoft AD FS #### Install Microsoft AD FS Before starting the installation, make sure: - your Windows computer name is correct since you won't be able to change it after having installed AD FS - you configured your server with a static IP address - your server joined a domain and your domain is defined under Server Manager > Local server - you can resolve your server FQDN like computername.my-domain.com
You can find a checklist [here](https://learn.microsoft.com/en-us/windows-server/identity/ad-fs/deployment/checklist--setting-up-a-federation-server).
Steps to follow: - Install AD CS (Certificate Server) to issue valid certificates for AD FS. AD CS provides a platform for issuing and managing public key infrastructure [PKI] certificates. - Install AD FS (Federation Server) ##### Install AD CS You need to install the AD CS Server Role. - Follow this [guide](https://learn.microsoft.com/en-us/windows-server/networking/core-network-guide/cncg/server-certs/install-the-certification-authority).
##### Obtain and Configure an SSL Certificate for AD FS Before installing AD FS, you are required to generate a certificate for your federation service. The SSL certificate is used for securing communications between federation servers and clients. - Follow this [guide](https://learn.microsoft.com/en-us/previous-versions/windows/it-pro/windows-server-2012-R2-and-2012/dn781428(v=ws.11)). - Additionally, this [guide](https://learn.microsoft.com/en-us/windows-server/networking/core-network-guide/cncg/server-certs/configure-the-server-certificate-template) provides more details on how to create a certificate template. ##### Install AD FS You need to install the AD FS Role Service. - Follow this [guide](https://learn.microsoft.com/en-us/windows-server/identity/ad-fs/deployment/install-the-ad-fs-role-service). ##### Configure the federation service AD FS is installed but not configured. - Click on `Configure the federation service on this server` under `Post-deployment configuration` in the `Server Manager`. - Ensure `Create the first federation server in a federation server farm` and is selected [![Screenshot 2023-06-22 at 15.55.57.png](https://ems-docs.element.io/uploads/images/gallery/2023-06/scaled-1680-/screenshot-2023-06-22-at-15-55-57.png)](https://ems-docs.element.io/uploads/images/gallery/2023-06/screenshot-2023-06-22-at-15-55-57.png) - Click `Next` [![Screenshot 2023-06-22 at 15.57.41.png](https://ems-docs.element.io/uploads/images/gallery/2023-06/scaled-1680-/screenshot-2023-06-22-at-15-57-41.png)](https://ems-docs.element.io/uploads/images/gallery/2023-06/screenshot-2023-06-22-at-15-57-41.png) - Select the SSL Certificate and set a Federation Service Display Name [![Screenshot 2023-06-22 at 15.59.27.png](https://ems-docs.element.io/uploads/images/gallery/2023-06/scaled-1680-/screenshot-2023-06-22-at-15-59-27.png)](https://ems-docs.element.io/uploads/images/gallery/2023-06/screenshot-2023-06-22-at-15-59-27.png) - On the Specify Service Account page, you can either Create a Group Managed Service Account (gMSA) or Specify an existing Service or gMSA Account [![Screenshot 2023-06-22 at 16.04.13.png](https://ems-docs.element.io/uploads/images/gallery/2023-06/scaled-1680-/screenshot-2023-06-22-at-16-04-13.png)](https://ems-docs.element.io/uploads/images/gallery/2023-06/screenshot-2023-06-22-at-16-04-13.png) - Choose your database [![Screenshot 2023-06-22 at 16.05.50.png](https://ems-docs.element.io/uploads/images/gallery/2023-06/scaled-1680-/screenshot-2023-06-22-at-16-05-50.png)](https://ems-docs.element.io/uploads/images/gallery/2023-06/screenshot-2023-06-22-at-16-05-50.png) - Review Options , check prerequisites are completed and click on `Configure` - Restart the server ##### Add AD FS as an OpenID Connect identity provider To enable sign-in for users with an AD FS account, create an Application Group in your AD FS.
To create an Application Group, follow theses steps: - In `Server Manager`, select `Tools`, and then select `AD FS Management` - In AD FS Management, right-click on `Application Groups` and select `Add Application Group` - On the Application Group Wizard `Welcome` screen - Enter the Name of your application - Under `Standalone applications` section, select `Server application` and click `Next` [![Screenshot 2023-06-22 at 16.39.52.png](https://ems-docs.element.io/uploads/images/gallery/2023-06/scaled-1680-/screenshot-2023-06-22-at-16-39-52.png)](https://ems-docs.element.io/uploads/images/gallery/2023-06/screenshot-2023-06-22-at-16-39-52.png) - Enter `https:///_synapse/client/oidc/callback` in Redirect URI: field, click `Add`, save the `Client Identifier` somewhere, you will need it when setting up Element and click `Next` (e.g. https://matrix.domain.com/_synapse/client/oidc/callback) [![Screenshot 2023-06-22 at 16.45.44.png](https://ems-docs.element.io/uploads/images/gallery/2023-06/scaled-1680-/screenshot-2023-06-22-at-16-45-44.png)](https://ems-docs.element.io/uploads/images/gallery/2023-06/screenshot-2023-06-22-at-16-45-44.png) - Select `Generate a shared secret` checkbox and make a note of the generated Secret and press `Next` (Secret needs to be added in the Element Installer GUI in a later step) - 
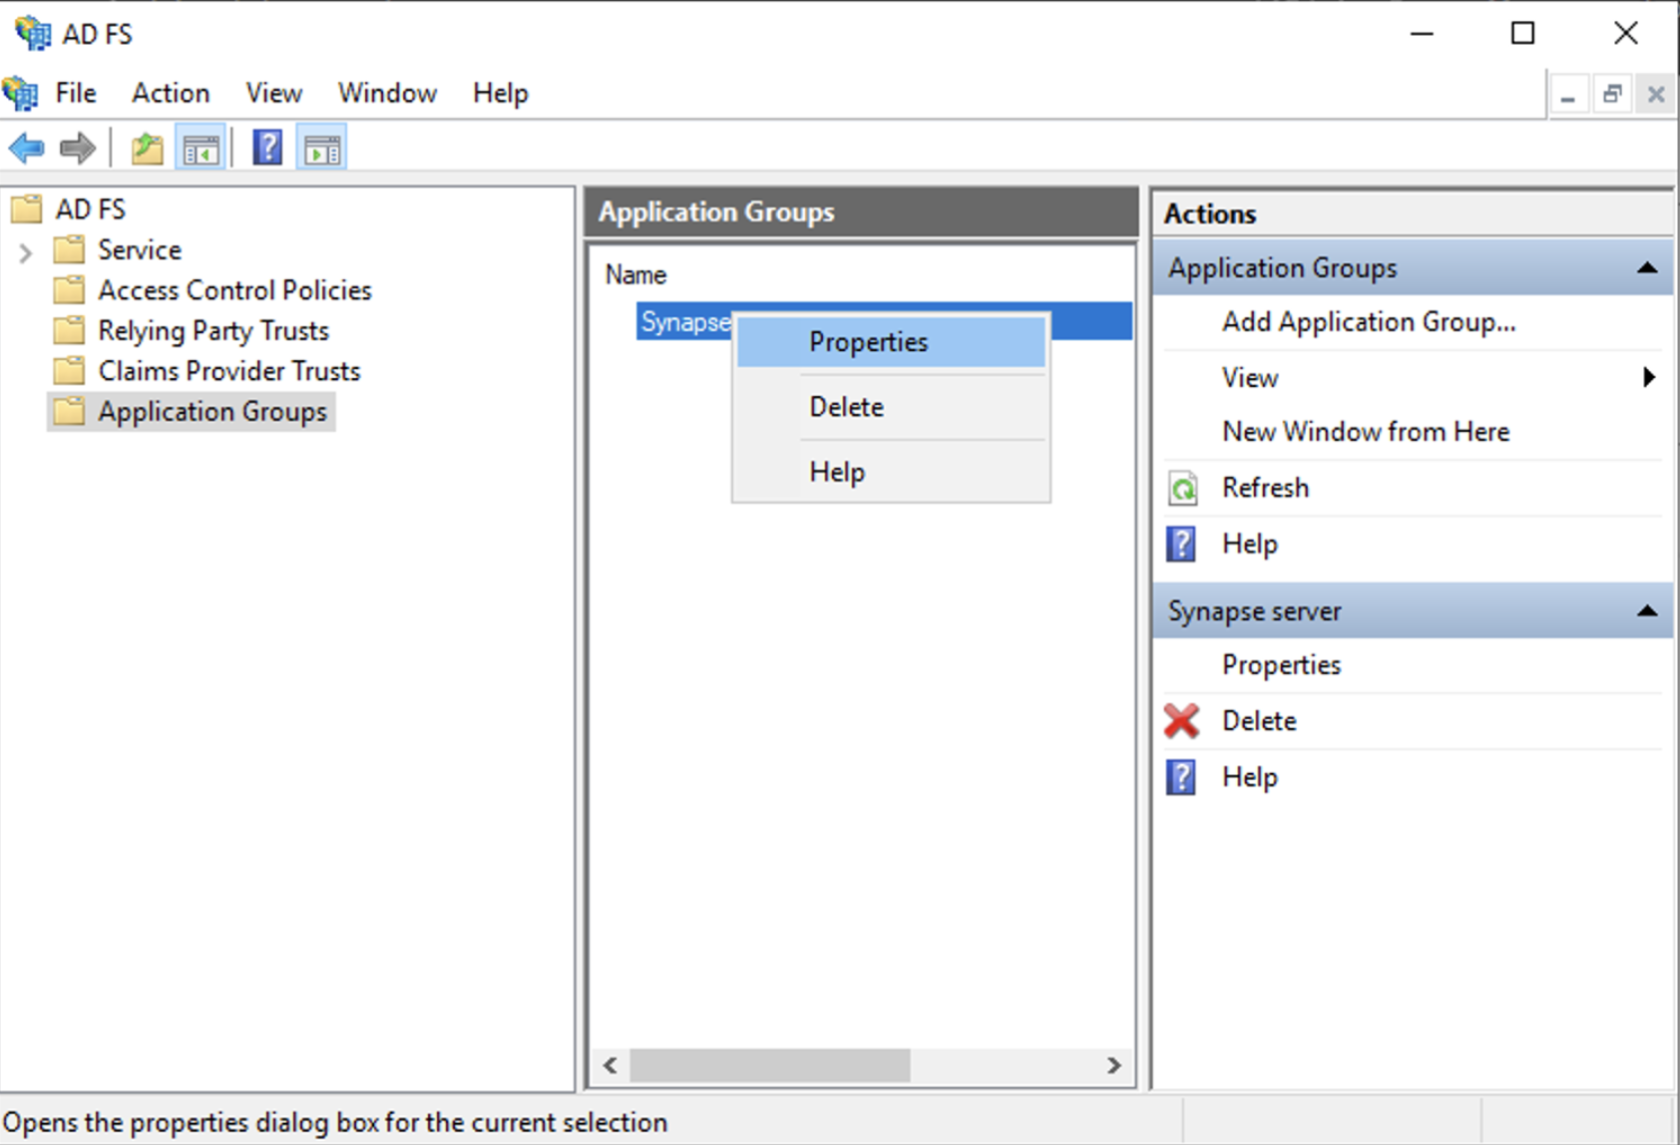
Right click on the created Application Group and select `Properties`` [![Screenshot 2023-06-22 at 16.56.40.png](https://ems-docs.element.io/uploads/images/gallery/2023-06/scaled-1680-/screenshot-2023-06-22-at-16-56-40.png)](https://ems-docs.element.io/uploads/images/gallery/2023-06/screenshot-2023-06-22-at-16-56-40.png) - Select `Add application...` button.
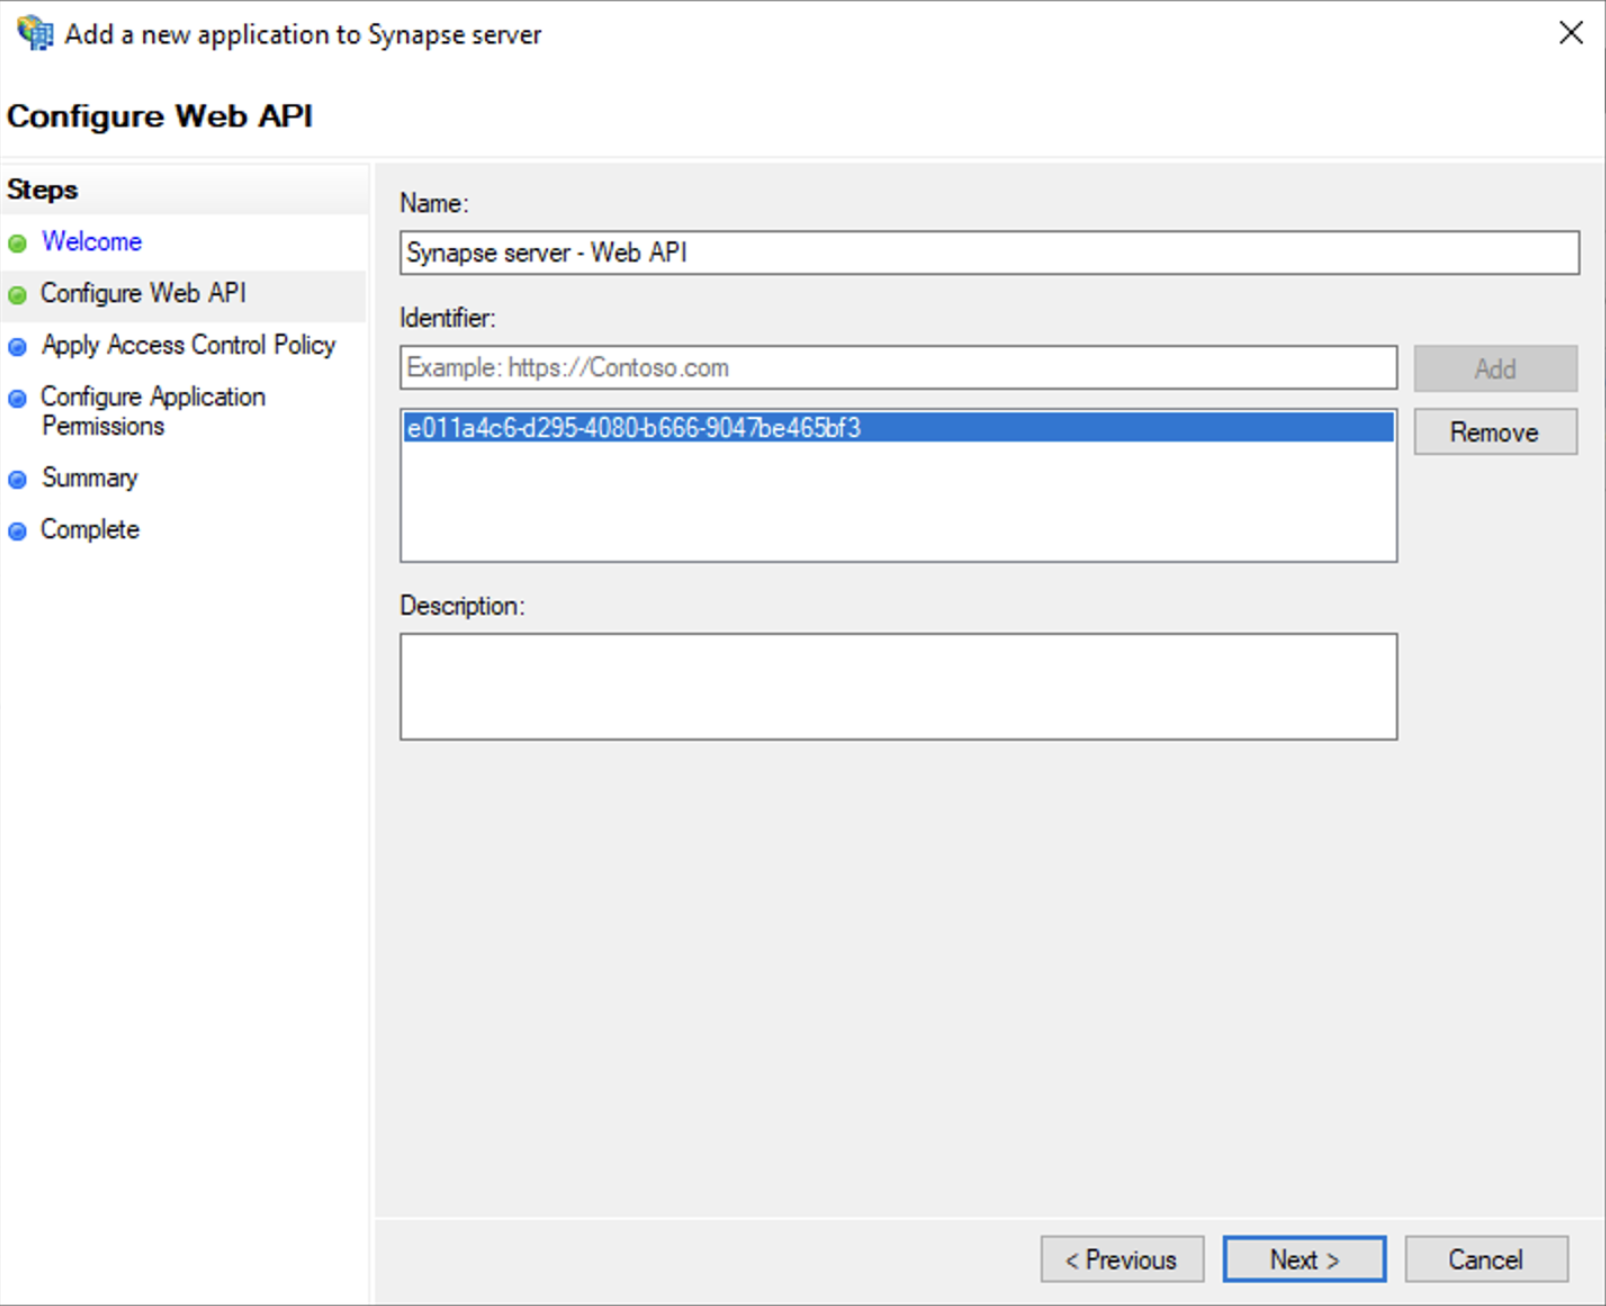
 - Select `Web API` - In the `Identifier` field, type in the `client_id` you saved before and click `Next` [![Screenshot 2023-06-23 at 09.48.07.png](https://ems-docs.element.io/uploads/images/gallery/2023-06/scaled-1680-/screenshot-2023-06-23-at-09-48-07.png)](https://ems-docs.element.io/uploads/images/gallery/2023-06/screenshot-2023-06-23-at-09-48-07.png) - 
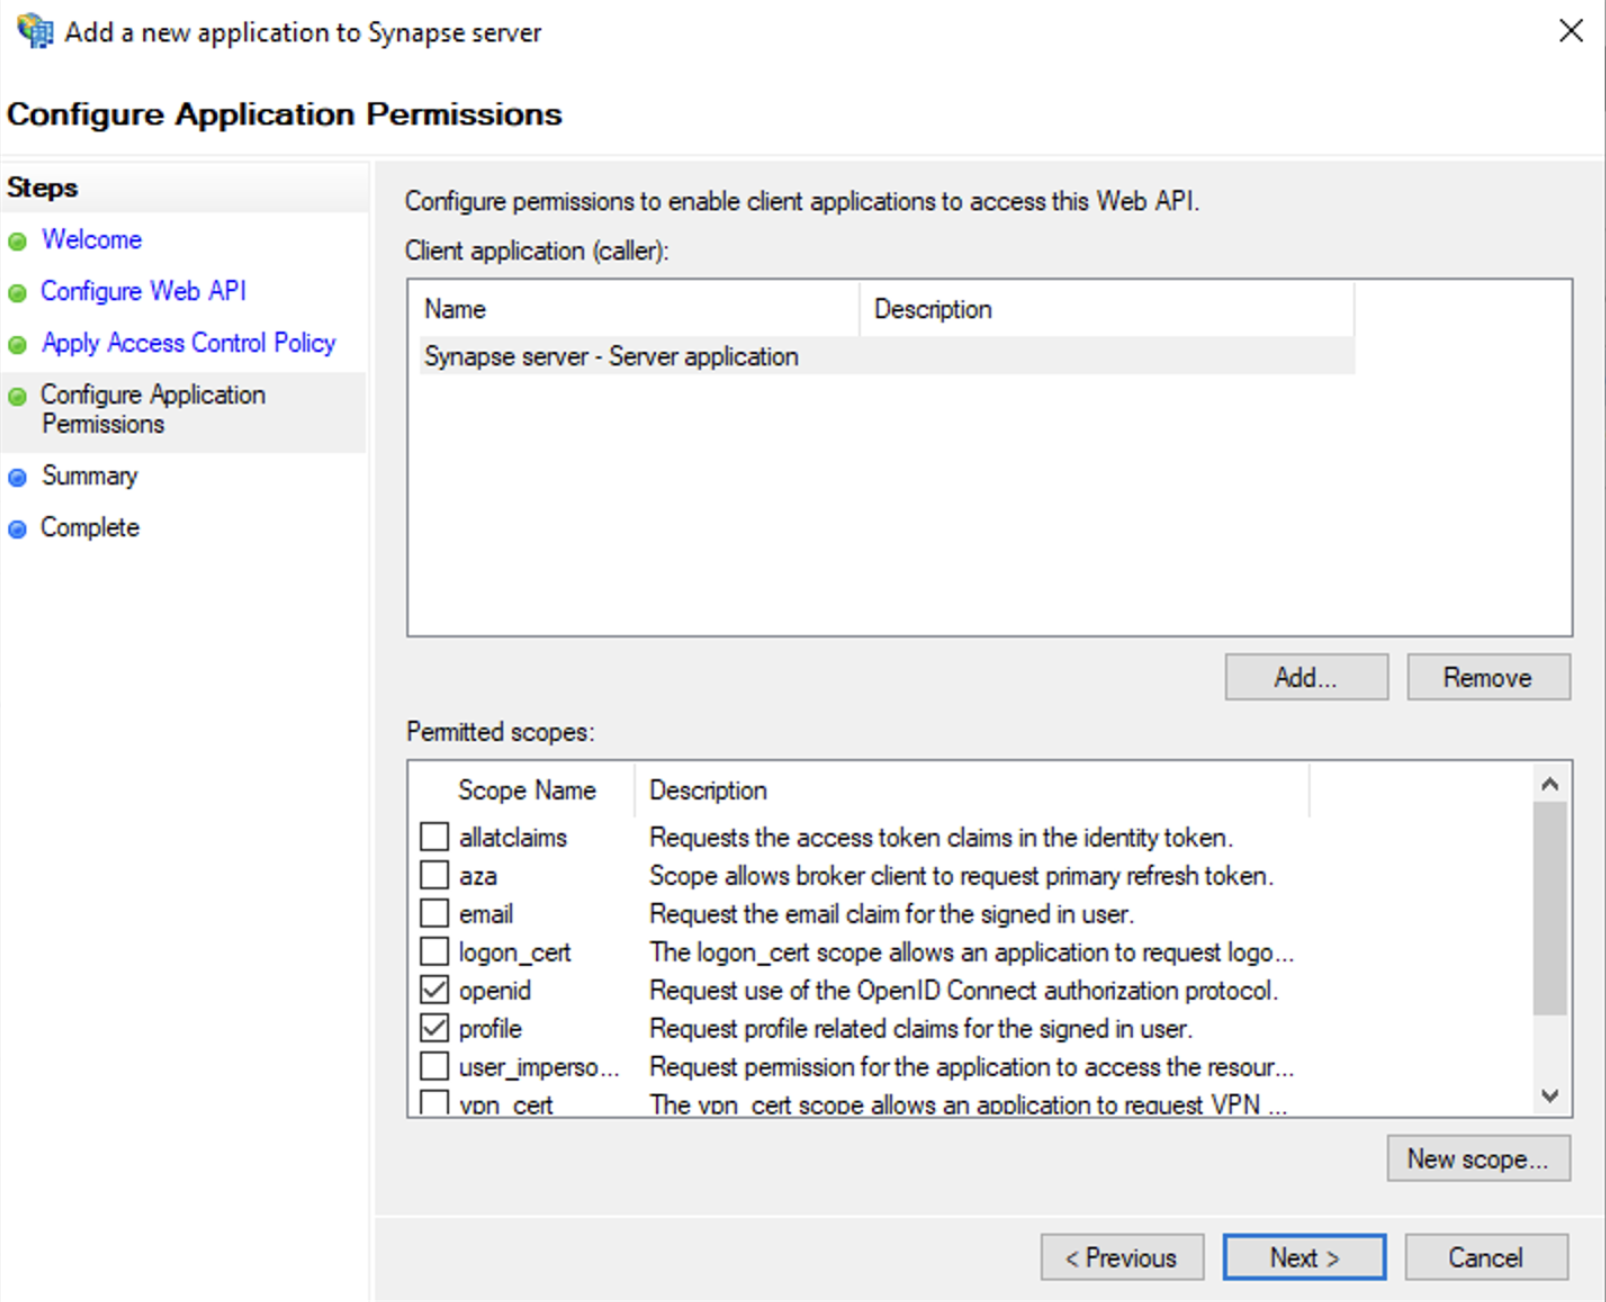
Select `Permit everyone` and click `Next` - Under Permitted scopes: select `openid` and `profile` and click `Next` [![Screenshot 2023-06-23 at 09.51.06.png](https://ems-docs.element.io/uploads/images/gallery/2023-06/scaled-1680-/screenshot-2023-06-23-at-09-51-06.png)](https://ems-docs.element.io/uploads/images/gallery/2023-06/screenshot-2023-06-23-at-09-51-06.png) - On `Summary` page, click `Next`` - Click `Close` and then `OK` ##### Export Domain Trusted Root Certificate - Run `mmc.exe` - Add the `Certificates` snap-in - File/Add snap-in for `Certificates`, `Computer account` - Under `Trusted Root Certification Authorities`/`Certificates`, select your DC cert - Right click and select `All Tasks`/`Export...` and export as `Base-64 encoded X 509 (.CER)` - Copy file to local machine #### Configure the installer Add an OIDC provider in the 'Synapse' configuration after enabling `Delegated Auth` and set the following fields in the installer: - `
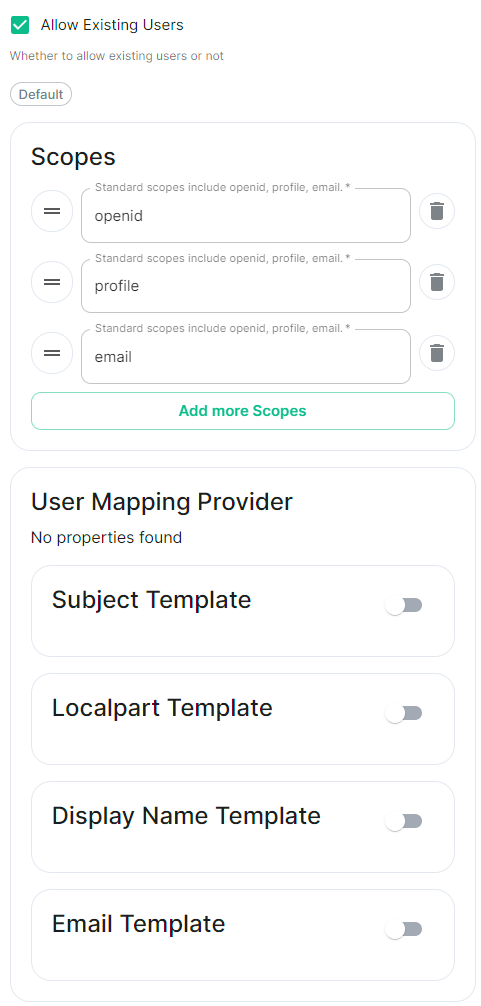
Allow Existing Users`: if checked, it allows a user logging in via OIDC to match a pre-existing account instead of failing. This could be used if switching from password logins to OIDC. - `
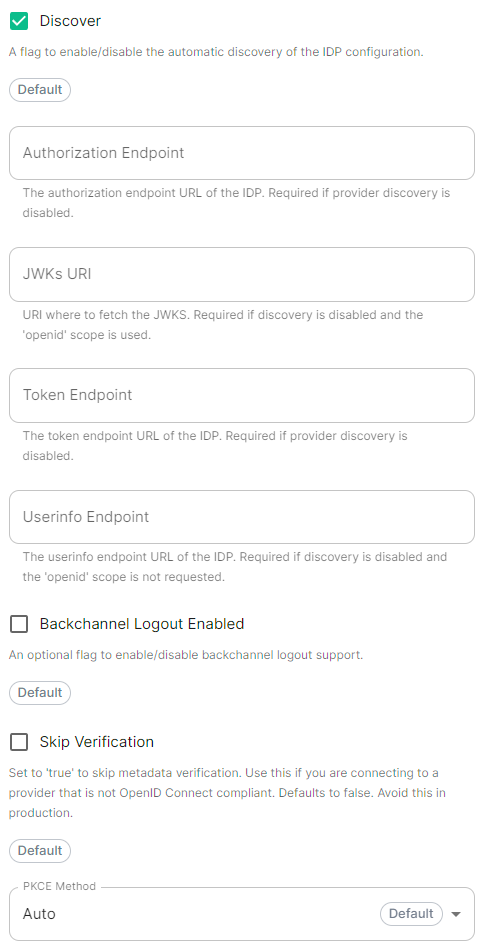
Authorization Endpoint`: the oauth2 authorization endpoint. Required if provider discovery is disabled.

https://login.microsoftonline.com//oauth2/v2.0/authorize - `Backchannel Logout Enabled`: Synapse supports receiving OpenID Connect Back-Channel Logout notifications. This lets the OpenID Connect Provider notify Synapse when a user logs out, so that Synapse can end that user session. - `Client Auth Method`: auth method to use when exchanging the token. Set it to `Client Secret Basic` or any method supported by your Idp - `
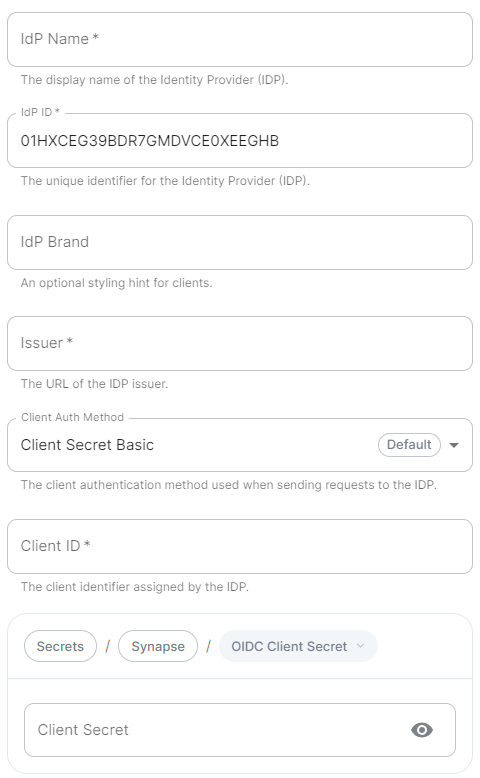
Client ID`: the `Client ID` you saved before - `Discover`: enable/disable the use of the OIDC discovery mechanism to discover endpoints - `Idp Brand`: an optional brand for this identity provider, allowing clients to style the login flow according to the identity provider in question - `Idp ID`: a string identifying your identity provider in your configuration - `Idp Name`: A user-facing name for this identity provider, which is used to offer the user a choice of login mechanisms in the Element UI. In the screenshot bellow, `Idp Name` is set to `Azure AD`

[![Screenshot 2023-05-04 at 10.45.23.png](https://ems-docs.element.io/uploads/images/gallery/2023-05/scaled-1680-/screenshot-2023-05-04-at-10-45-23.png)](https://ems-docs.element.io/uploads/images/gallery/2023-05/screenshot-2023-05-04-at-10-45-23.png)
- `Issuer`: the OIDC issuer. Used to validate tokens and (if discovery is enabled) to discover the provider's endpoints `https:///adfs/` - `Token Endpoint`: the oauth2 authorization endpoint. Required if provider discovery is disabled. - `Client Secret`: your client secret you saved before. - 
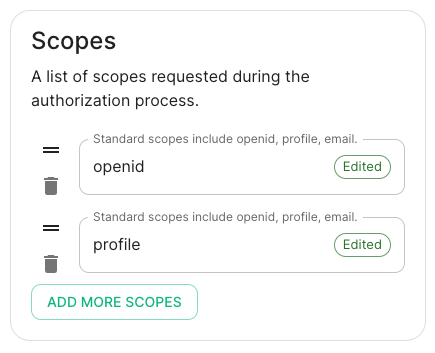
Scopes: add every scope on a different line - The openid scope is required which translates to the Sign you in permission in the consent UI - You might also include other scopes in this request for requesting consent.
[![Screenshot 2023-05-03 at 17.27.00.png](https://ems-docs.element.io/uploads/images/gallery/2023-05/scaled-1680-/screenshot-2023-05-03-at-17-27-00.png)](https://ems-docs.element.io/uploads/images/gallery/2023-05/screenshot-2023-05-03-at-17-27-00.png)
- User Mapping Provider: Configuration for how attributes returned from a OIDC provider are mapped onto a matrix user. - `Localpart Template`: Jinja2 template for the localpart of the MXID. For AD FS set it to `{{ user.upn.split('@')[0] }}` if using Legacy Auth, or `{{ (user.preferred_username | split('@'))[0] }}` if using MAS. Other configurations are documented [here](https://element-hq.github.io/synapse/v1.41/openid.html). ### SAML on Microsoft Azure Before setting up the installer, you have to configure Microsoft Entra ID. #### Set up Microsoft Entra ID With an account with enough rights, go to : `Enterprise Applications` 1. Click on `New Application` 2. Click on `Create your own application` on the top left corner 3. Choose a name for it, and select `Integrate any other application you don't find in the gallery` 4. Click on "Create" 5. Select `Set up single sign on` 6. Select `SAML` 
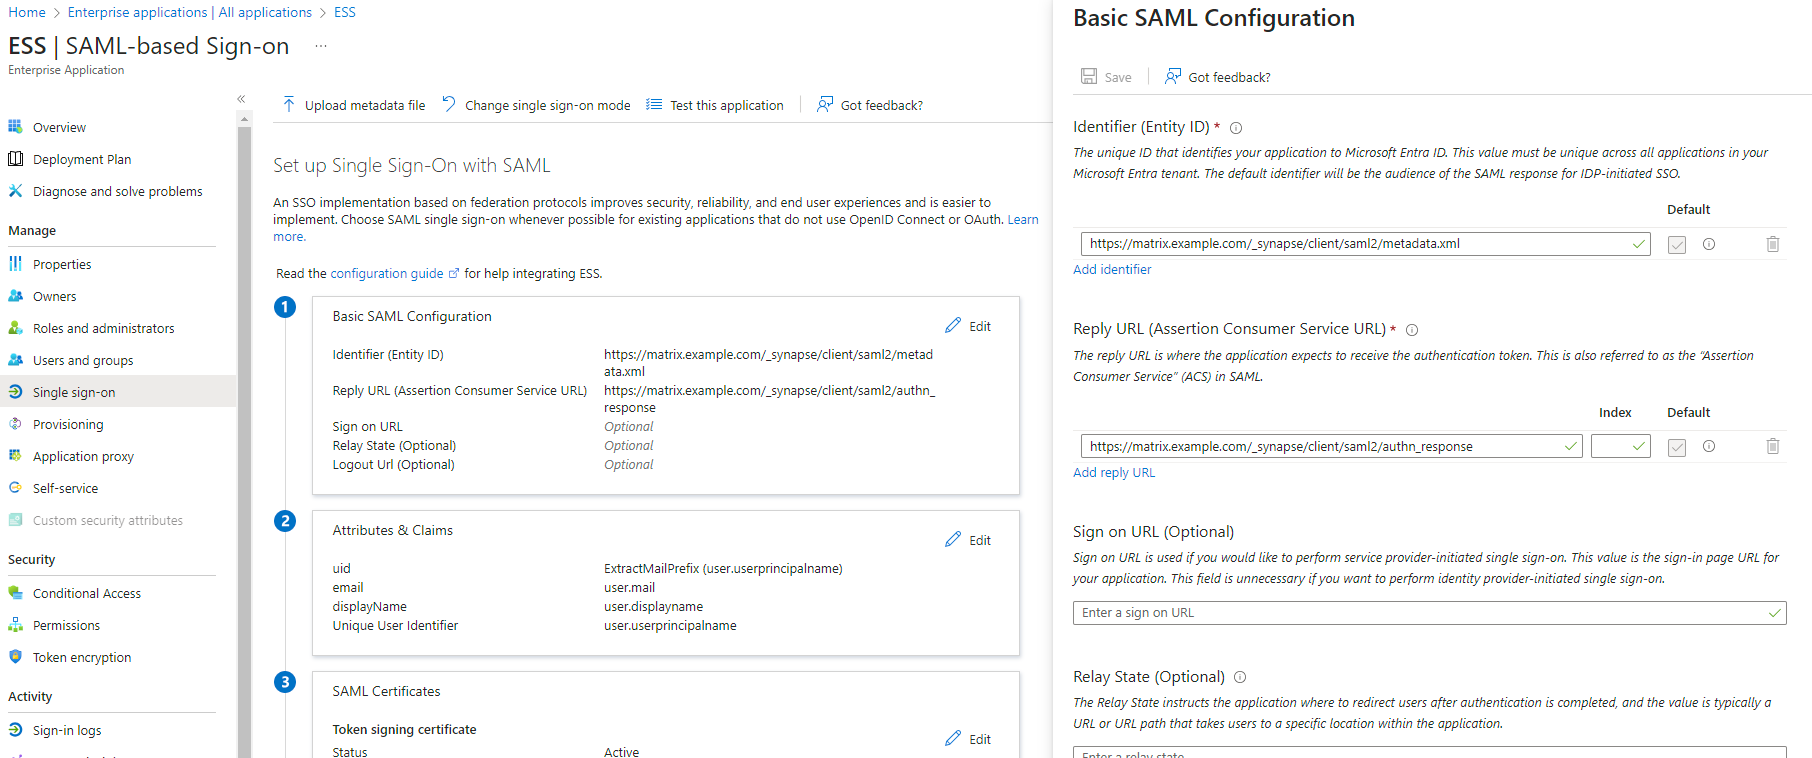
7. `Edit` on `Basic SAML Configuration` 8. In `Identifier` , add the following URL : `https://synapse_fqdn/_synapse/client/saml2/metadata.xml` 9. Remove the default URL 10. In `Reply URL` , add the following URL : `https://synapse_fqdn/_synapse/client/saml2/authn_response` 11. Click on `Save` [![](https://ems-docs.element.io/uploads/images/gallery/2023-11/scaled-1680-/image-1701176026243.png)](https://ems-docs.element.io/uploads/images/gallery/2023-11/image-1701176026243.png) 12. Make a note of the `App Federation Metadata Url` under `SAML Certificates` as this will be required in a later step. 
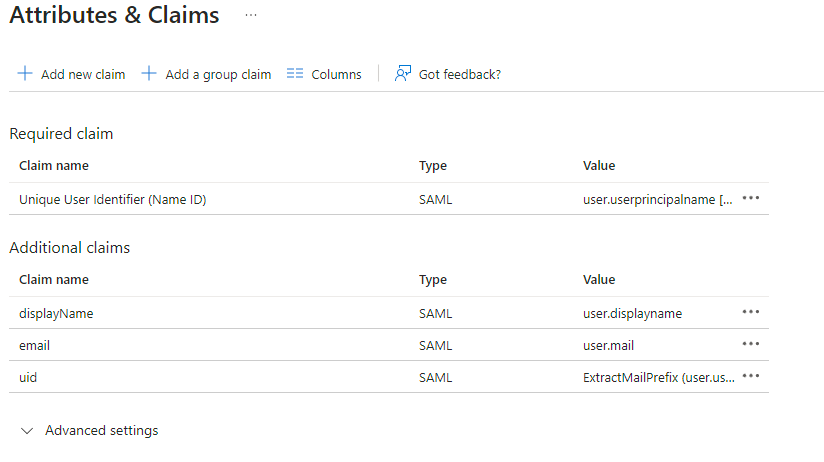
13. `Edit` on `Attributes & Claims` 14. Remove all defaults for additional claims 15. Click on `Add new claim` to add the following (suggested) claims (the UID will be used as the MXID): - Name: `uid` , Transformation : `ExtractMailPrefix` , Parameter 1 : `user.userprincipalname` - Name: `email` , Source attribute : `user.mail` - Name: `displayName` , Source attribute : `user.displayname` 16. Click on `Save` [![](https://ems-docs.element.io/uploads/images/gallery/2023-11/scaled-1680-/image-1701172980662.png)](https://ems-docs.element.io/uploads/images/gallery/2023-11/image-1701172980662.png) 17. In the application overview screen select `Users and Groups` and add groups and users which may have access to element #### Configure the installer Add a SAML provider in the 'Synapse' configuration after enabling `Delegated Auth` and set the following (suggested) fields in the installer: - **Allow Unknown Attributes****.**
Checked - **Attribute Map****.**
Select `URN:Oasis:Names:TC:SAML:2.0:Attrname Format:Basic` as the `Identifier` - **Mapping****.**
Set the following mappings: - From: `Primary Email` To: `email` - From: `First Name` To: `firstname` - From: `Last Name` To: `lastname` - **Entity****.**
- **Description****.**
- **Entity ID****.** (From Azure) - **Name****.**
- **User Mapping Provider****.**
Set the following: - `MXID Mapping`: `Dotreplace` - `MXID Source Attribute`: `uid` - **Metadata URL****.**
Add the `App Federation Metadata URL` from Azure. ### Troubleshooting #### Redirection loop on SSO Synapse needs to have the `X-Forwarded-For` and `X-Forwarded-Proto` headers set by the reverse proxy doing the TLS termination. If you are using a Kubernetes installation with your own reverse proxy terminating TLS, please make sure that the appropriate headers are set.