Administration
Migrating? Automate your deployment? Configuring Backups? Guides for Administrators here!
This chapter ONLY has guides unique to ESS Classic. For all guides, check the Administration chapter from the ESS Pro book.
Automating ESS Deployment
Understand your ESS configuration files and how you can automate ESS deployment(s).
The .element-enterprise-server Directory
Config examples included on this page may not up-to-date and are solely provided for demonstration purposes. It is highly recommended to run the version of the installer you wish to install to generate and configure config files that work with that version.
Once these config files have been created by the installer, you should refer to the up-to-date config examples available in the installation documentation to understand how each config option can be modified.
When you first run the installer binary, it will create a directory in your home folder, ~/.element-enterprise-server. This is where you'll find everything the installer uses / generates as part of the installation including your configuration, the installer itself and logs.
As you run through the GUI, it will output config files within ~/.element-enterprise-server/config that will be used when you deploy. This is the best way to get started, before any automation effort, you should run through the installer and get a working config that suits your requirements.
This will generate the config files, which can then be modified as needed, for your automation efforts, then in order to understand how deployments could be automated, you should understand what config is stored where.
The cluster.yml Config File
The Cluster YAML configuration file is populated with information used by all aspects of the installer. To start you'll find apiVersion:, kind: and metadata which are used by the installer itself to identify the version of your configuration file. In cases where you switch to a new version of the installer, it will then upgrade this config in-line with the latest versions requirements.
Config Example
apiVersion: ess.element.io/v1alpha1
kind: InstallerSettings
metadata:
  annotations:
    k8s.element.io/version: 2023-07.09-gui
  name: first-element-cluster
The configuration information is then stored in the spec: section, for instance you'll see; your Postgres in cluster information; DNS Resolvers; EMS Token; etc. See the example below:
spec:
  connectivity:
    dockerhub: {}
  install:
    certManager:
      adminEmail: admin@example.com
    emsImageStore:
      password: examplesubscriptionpassword
      username: examplesubscriptionusername
    microk8s:
      dnsResolvers:
      - 8.8.8.8
      - 8.8.4.4
      postgresInCluster:
        hostPath: /data/postgres
        passwordsSeed: examplepasswordsseed
The deployment.yml Config File
The Deployment YAML configuration file is populated with the bulk of the configuration for you're deployment. As above, you'll find apiVersion:, kind: and metadata which are used by the installer itself to identify the version of your configuration file. In cases where you switch to a new version of the installer, it will then upgrade this config in-line with the latest versions requirements.
Config Example
apiVersion: matrix.element.io/v1alpha1
kind: ElementDeployment
metadata:
  name: first-element-deployment
  namespace: element-onprem
The configuration is again found within the spec: section of this file, which itself has two main sections:
-
components:which contains the set configuration for each individual component i.e. Element Web or Synapse -
global:which contains configuration required by all components i.e. the root FQDN and Certificate Authority information
components:
First each component has a named section, such as elementWeb, integrator, synapseAdmin, or in this example synapse:
synapse:
Within each component, there are two sections to organise the configuration:
-
config:which is configuration of the component itself i.e. whether Synapse registration is Open / ClosedConfig Example
config: acceptInvites: manual adminPasswordSecretKey: adminPassword externalAppservices: configMaps: [] files: {} federation: certificateAutoritiesSecretKeys: [] clientMinimumTlsVersion: '1.2' trustedKeyServers: [] log: rootLevel: Info macaroonSecretKey: macaroon maxMauUsers: 250 media: maxUploadSize: 100M volume: size: 50Gi postgresql: passwordSecretKey: postgresPassword port: 5432 sslMode: require registration: closed registrationSharedSecretSecretKey: registrationSharedSecret security: defaultRoomEncryption: not_set signingKeySecretKey: signingKey telemetry: enabled: true passwordSecretKey: telemetryPassword room: '#element-telemetry' urlPreview: config: acceptLanguage: - en workers: [] -
k8s:which is configuration of the pod itself in k8s i.e. CPU and Memory resource limits or FQDNConfig Example
      k8s:
        common:
          annotations: {}
        haproxy:
          workloads:
            annotations: {}
            resources:
              limits:
                memory: 200Mi
              requests:
                cpu: 1
                memory: 100Mi
            securityContext:
              fsGroup: 10001
              runAsUser: 10001
        ingress:
          annotations: {}
          fqdn: synapse.example.com
          services: {}
          tls:
            certmanager:
              issuer: letsencrypt
            mode: certmanager
        redis:
          workloads:
            annotations: {}
            resources:
              limits:
                memory: 50Mi
              requests:
                cpu: 200m
                memory: 50Mi
            securityContext:
              fsGroup: 10002
              runAsUser: 10002
        synapse:
          common:
            annotations: {}
          monitoring:
            serviceMonitor:
              deploy: auto
          storage: {}
          workloads:
            annotations: {}
            resources:
              limits:
                memory: 4Gi
              requests:
                cpu: 1
                memory: 2Gi
            securityContext:
              fsGroup: 10991
              runAsUser: 10991
      secretName: synapse
global:
The global: section works just like component: above, split into two sections config: and k8s:. It will set the default settings for all new components, you can see an example below:
Config Example
  global:
    config:
      adminAllowIps:
      - 0.0.0.0/0
      - ::/0
      certificateAuthoritySecretKey: ca.pem
      domainName: example.com
      genericSharedSecretSecretKey: genericSharedSecret
      supportDnsFederationDelegation: false
      verifyTls: true
    k8s:
      common:
        annotations: {}
      ingresses:
        annotations: {}
        services:
          type: ClusterIP
        tls:
          certmanager:
            issuer: letsencrypt
          mode: certmanager
      monitoring:
        serviceMonitor:
          deploy: auto
      workloads:
        annotations: {}
        hostAliases: []
        replicas: 2
        securityContext:
          forceUidGid: auto
          setSecComp: auto
    secretName: global
The secrets.yml Config File
The Secrets YAML configuration file is populated, as expected, the secrets used for your configuration. It consists of multiple entries, separated by lines of --- each following the below format:
Config Example
apiVersion: v1
data:
  genericSharedSecret: Q1BoVmNIaEIzWUR6VVZjZXpkMXhuQnNubHhLVVlM
kind: Secret
metadata:
  name: global
  namespace: element-onprem
The main section of interest for automation purposes, is the data: section, here you will find a dictionary of secrets, in the above you can see a genericSharedSecret and it's value opposite.
The legacy Directory
The legacy directory stores configuration for specific components not yet updated to the new format within the component: section of the deployment.yml. Work is steadily progressing on updating these legacy components to the new format, however in the meantime, you will find a folder for each legacy component here.
As integrations are upgraded to the new format this example (IRC) may become outdated, however the process remains identical for any integrations still using the legacy format. Make sure to check via the installer if the integration you are looking for is configured in this way.
Within each components folder, you will see a .yml file, which is where the configuration of that component is stored. For instance, if you setup the IRC Bridge, it will create ~/.element-enterprise-server/config/legacy/ircbridge with bridge.yml inside. You can use the Integrations and Add-Ons chapter of our documentation for guidance on how these files are configured. Using the IRC Bridge example, you would have a bridge.yml like so:
Config Example
key_file: passkey.pem
bridged_irc_servers:
- postgres_fqdn: ircbridge-postgres
  postgres_user: ircbridge
  postgres_db: ircbridge
  postgres_password: postgres_password
  admins:
  - "@user:example.com"
  logging_level: debug
  enable_presence: true
  drop_matrix_messages_after_seconds: 0
  bot_username: "ircbridgebot"
  provisioning_room_limit: 50
  rmau_limit: 100
  users_prefix: "irc_"
  alias_prefix: "irc_"
  address: irc.example.com
  parameters:
    name: "Example IRC"
    port: 6697
    ssl: true
    botConfig:
      enabled: true
      nick: "MatrixBot"
      username: "matrixbot"
      password: "some_password"
    dynamicChannels:
      enabled: true
    mappings:
      "#welcome":
        roomIds: ["!MLdeIFVsWCgrPkcYkL:example.com"]
    ircClients:
      allowNickChanges: true
There is also another important folder in legacy. The certs directory, here you will need to add any CA.pem file and certificates for the FQDN of any legacy components. As part of any automation, you will need to ensure these files are correct per setup and named correctly, the certificates in this directory should be named using the fully qualified domain name (.key and .crt).
Automating your deployment
Once you have a set of working configuration, you should make a backup of your ~/.element-enterprise-server/config directory. Through whatever form of automation you choose, automate the modification of your cluster.yml, deployment.yml, secrets.yml and any legacy *.ymls to adjust set values as needed.
For instance, perhaps you need 6 identical homeservers each with their own domain name, you would need to edit the fqdn of each component and the domainName in deployment.yml. You'd then have 6 config directories, each differing in domain, ready to be used by an installer binary.
On each of the 6 hosts, create the ~/.element-enterprise-server directory and copy that hosts specific config to ~/.element-enterprise-server/config. Copy the installer binary to the host, ensuring it's executable.
Running the installer unattended
Once host system is setup, you can add unattended when running the binary to run the installer unattended. It will pickup the configuration and start the deployment installation without needing to use the GUI to get it started.
./element-enterprise-graphical-installer-YYYY-MM.VERSION-gui.bin unattended
Using the Admin Console
AKA the Installer GUI, a quick overview of the Configure and Admin tabs and the sections within.
Opening the Admin Console
First, let’s get started by logging into the admin console. To do this, make sure that the installer is still running or bring it up by running the installer binary like this (Please specify the correct version and don’t just copy this line!):
./element-enterprise-graphical-installer-2023-06.01-gui.bin
You will then see output similar to:
To start configuration open:
        https://admin.element.demo:8443/a/XWDPB7NQ
The Configure Tab
On clicking the link, you will be automatically logged in as an administrator and see the console.
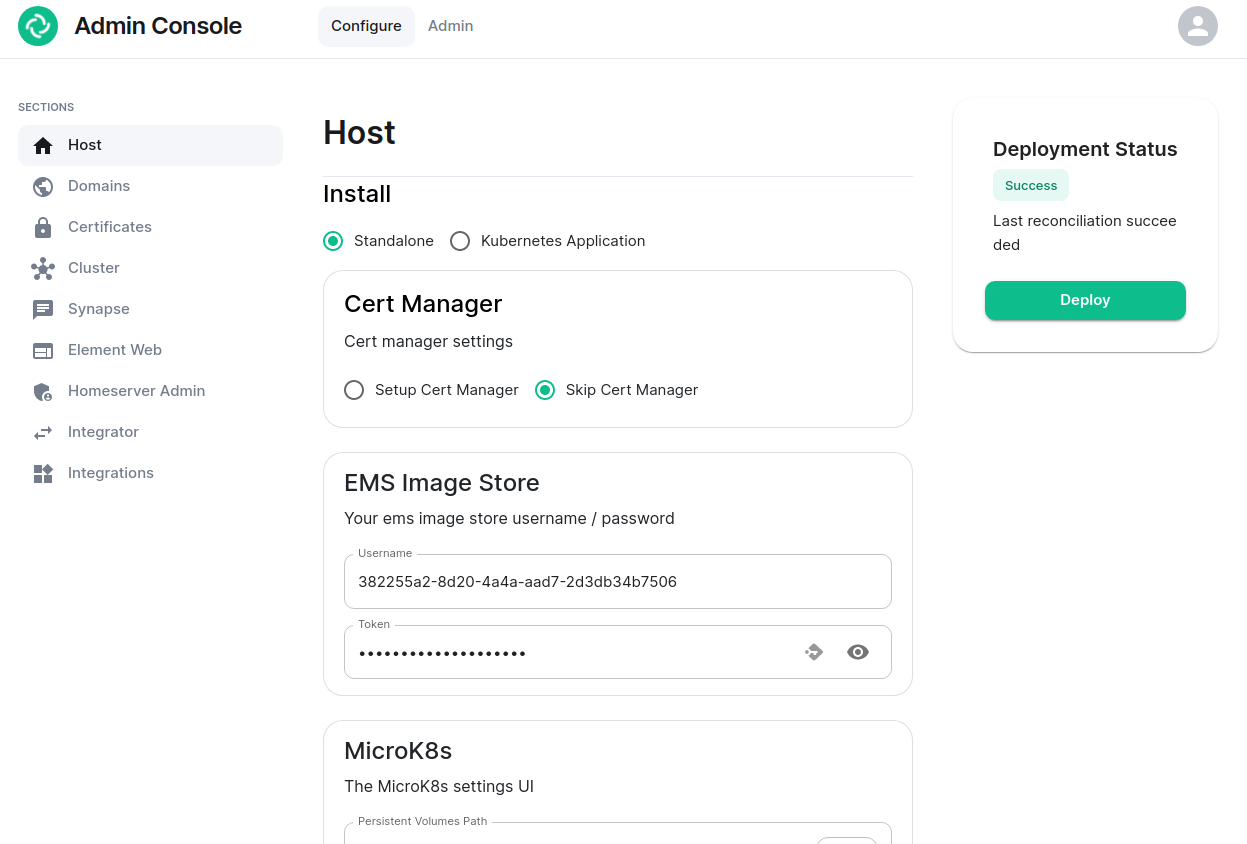
You’ll notice that the first page is the “Configure” tab on the top and the sections in the left hand menu mirror those in the installer:
- Host. is for setting details specific to the deployment host itself.
- Domains. is for setting the specific domain names and subdomains that are used by the installation.
- Certificates. is for making specific certificate choices and uploading certificates if using custom certificates.
- Cluster. is for setting any kubernetes specific parameters required for your installation.
- Synapse. is for setting any homeserver settings or variables. You may also set any custom configuration that can be done through homeserver.yaml.
- Element Web. is for making any specific changes to the Element Web deployment and also for setting any custom configuration that would be specified in a config.json.
- Homeserver Admin. is for making changes related to this admin console.
- Integrator. is for making any changes related to the integration manager.
- Integrations. is for installing, configuring, or removing any of the add-ons that we ship as part of Element Server Suite.
Note that all settings under the “Configure” tab presently require you to re-deploy your installation by using the conveniently located “Deploy” button. Please make all changes across any of these pages that you wish to deploy prior to hitting the “Deploy” button.
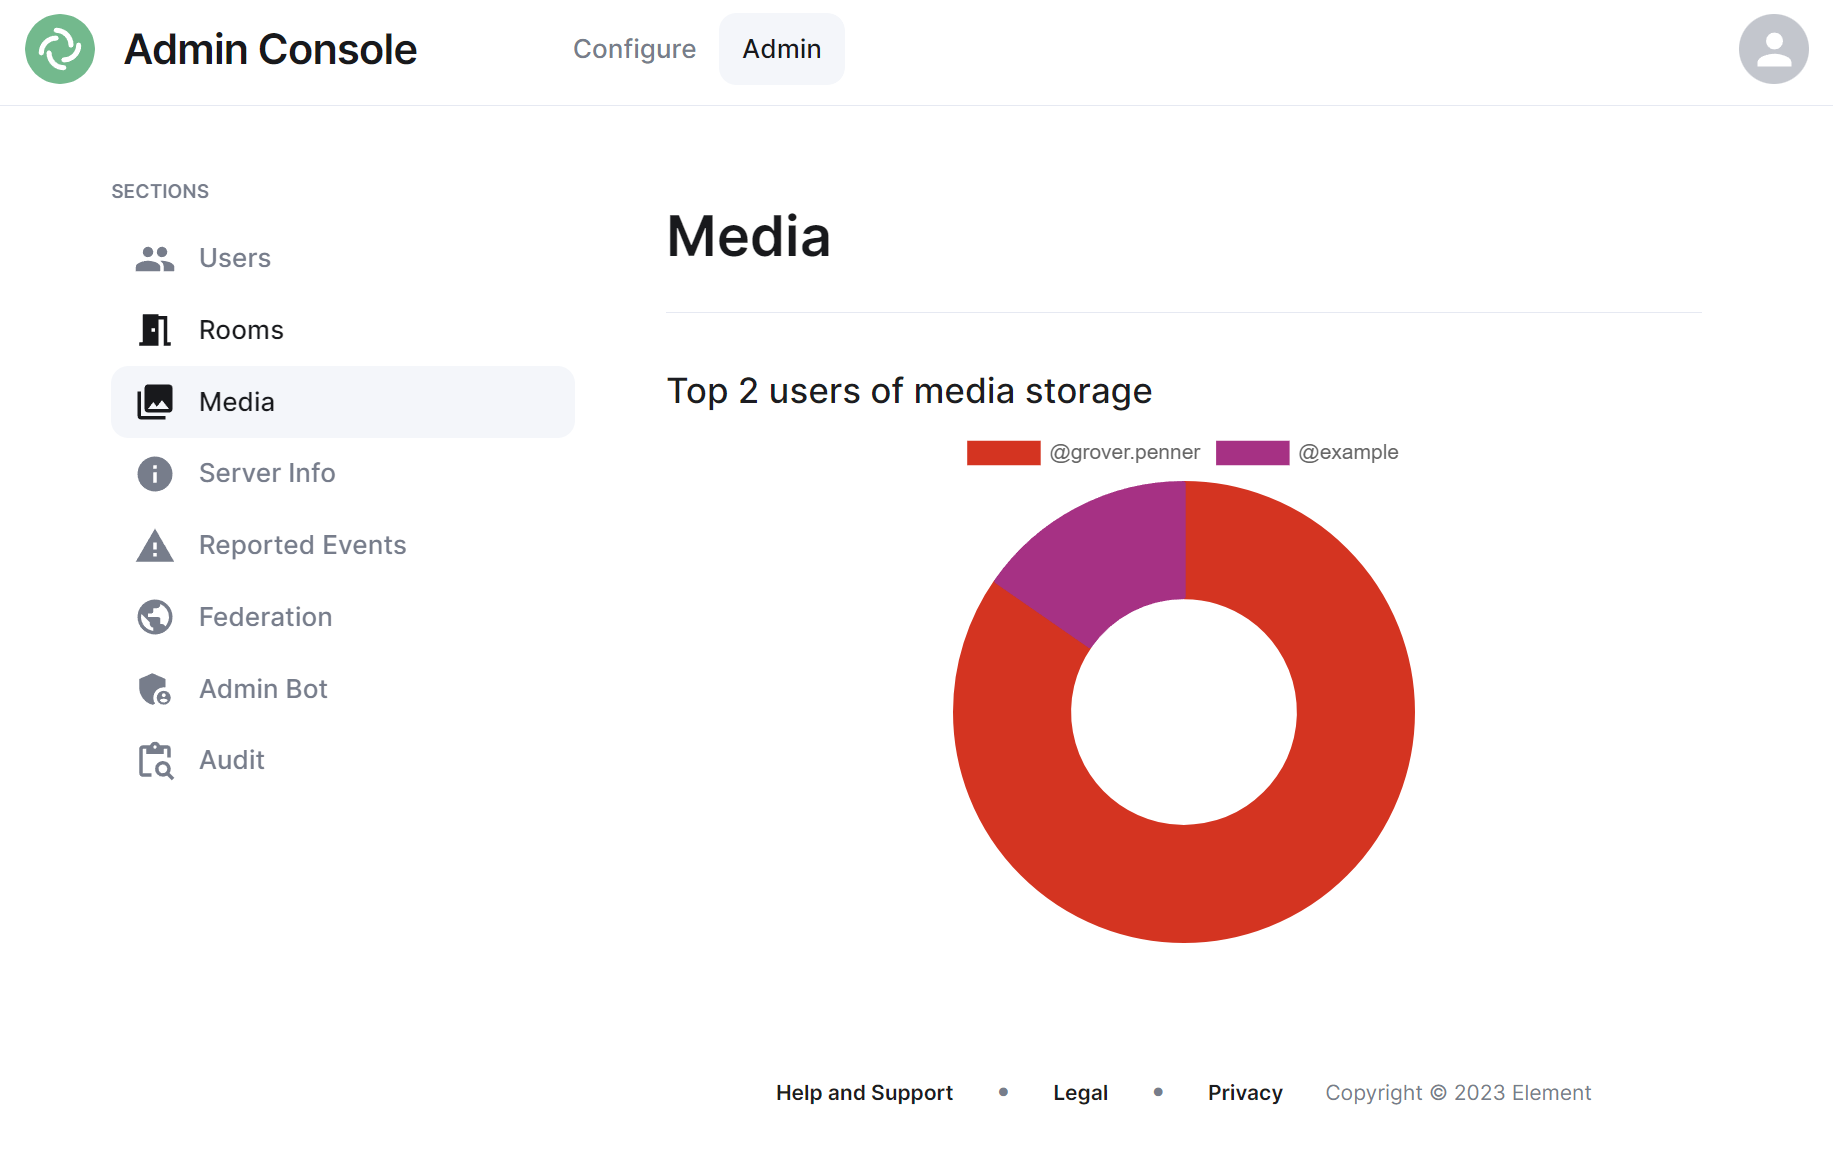
The Admin Tab
If you click on the “Admin” tab, you will see the following screen:
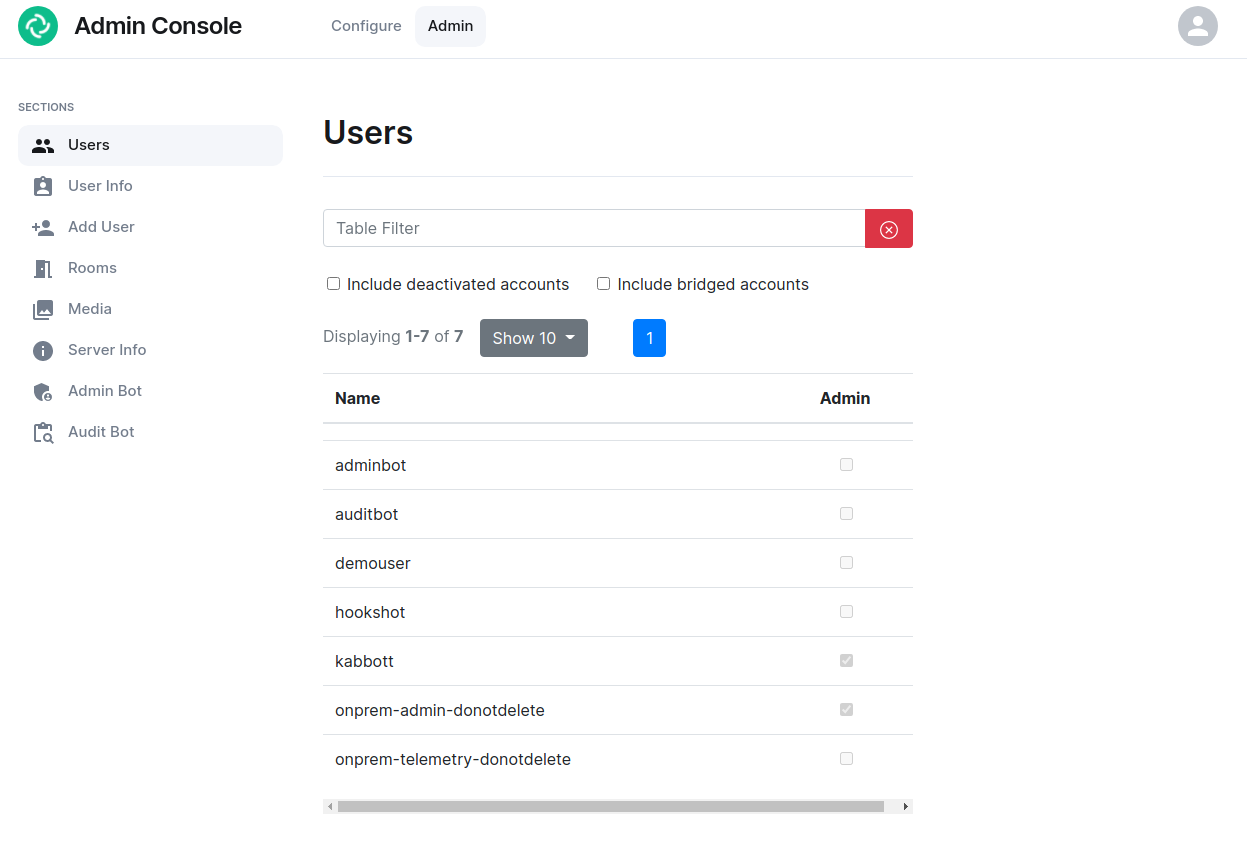
See the section by section guide on Using the Admin Tab for a more detailed look at using it, otherwise see the below overview:
In the left hand menu, we have the following options:
- Users. tab. On this tab, we can display a list of users, see who has admin rights, and click on a username to get more information on a local user.
- User Info. tab. On this tab, we can specify a username and get more information about a user.
- Add User. tab. We can use this tab to add a local user to the database. This will not work if you are using delegated authentication.
- Rooms. tab. On this tab, we can view a list of rooms on the homeserver. This will have information on the room id, the room name, the number of users in a room, and the version of the room. From here, we can also delete rooms from the server.
- Server Info. tab. On this tab, we can see some basic server information such as the version of synapse installed and the version of python available to the homeserver.
- Admin Bot. tab. This tab includes a button to log in as the admin bot user along with the key backup credentials to decrypt the messages once you are logged in as the admin bot.
- Audit Bot. tab. This tab includes a button to log in as the audit bot user along with the key backup credentials to decrypt the messages once you are logged in as the audit bot.
Using the Admin Tab
Users Section
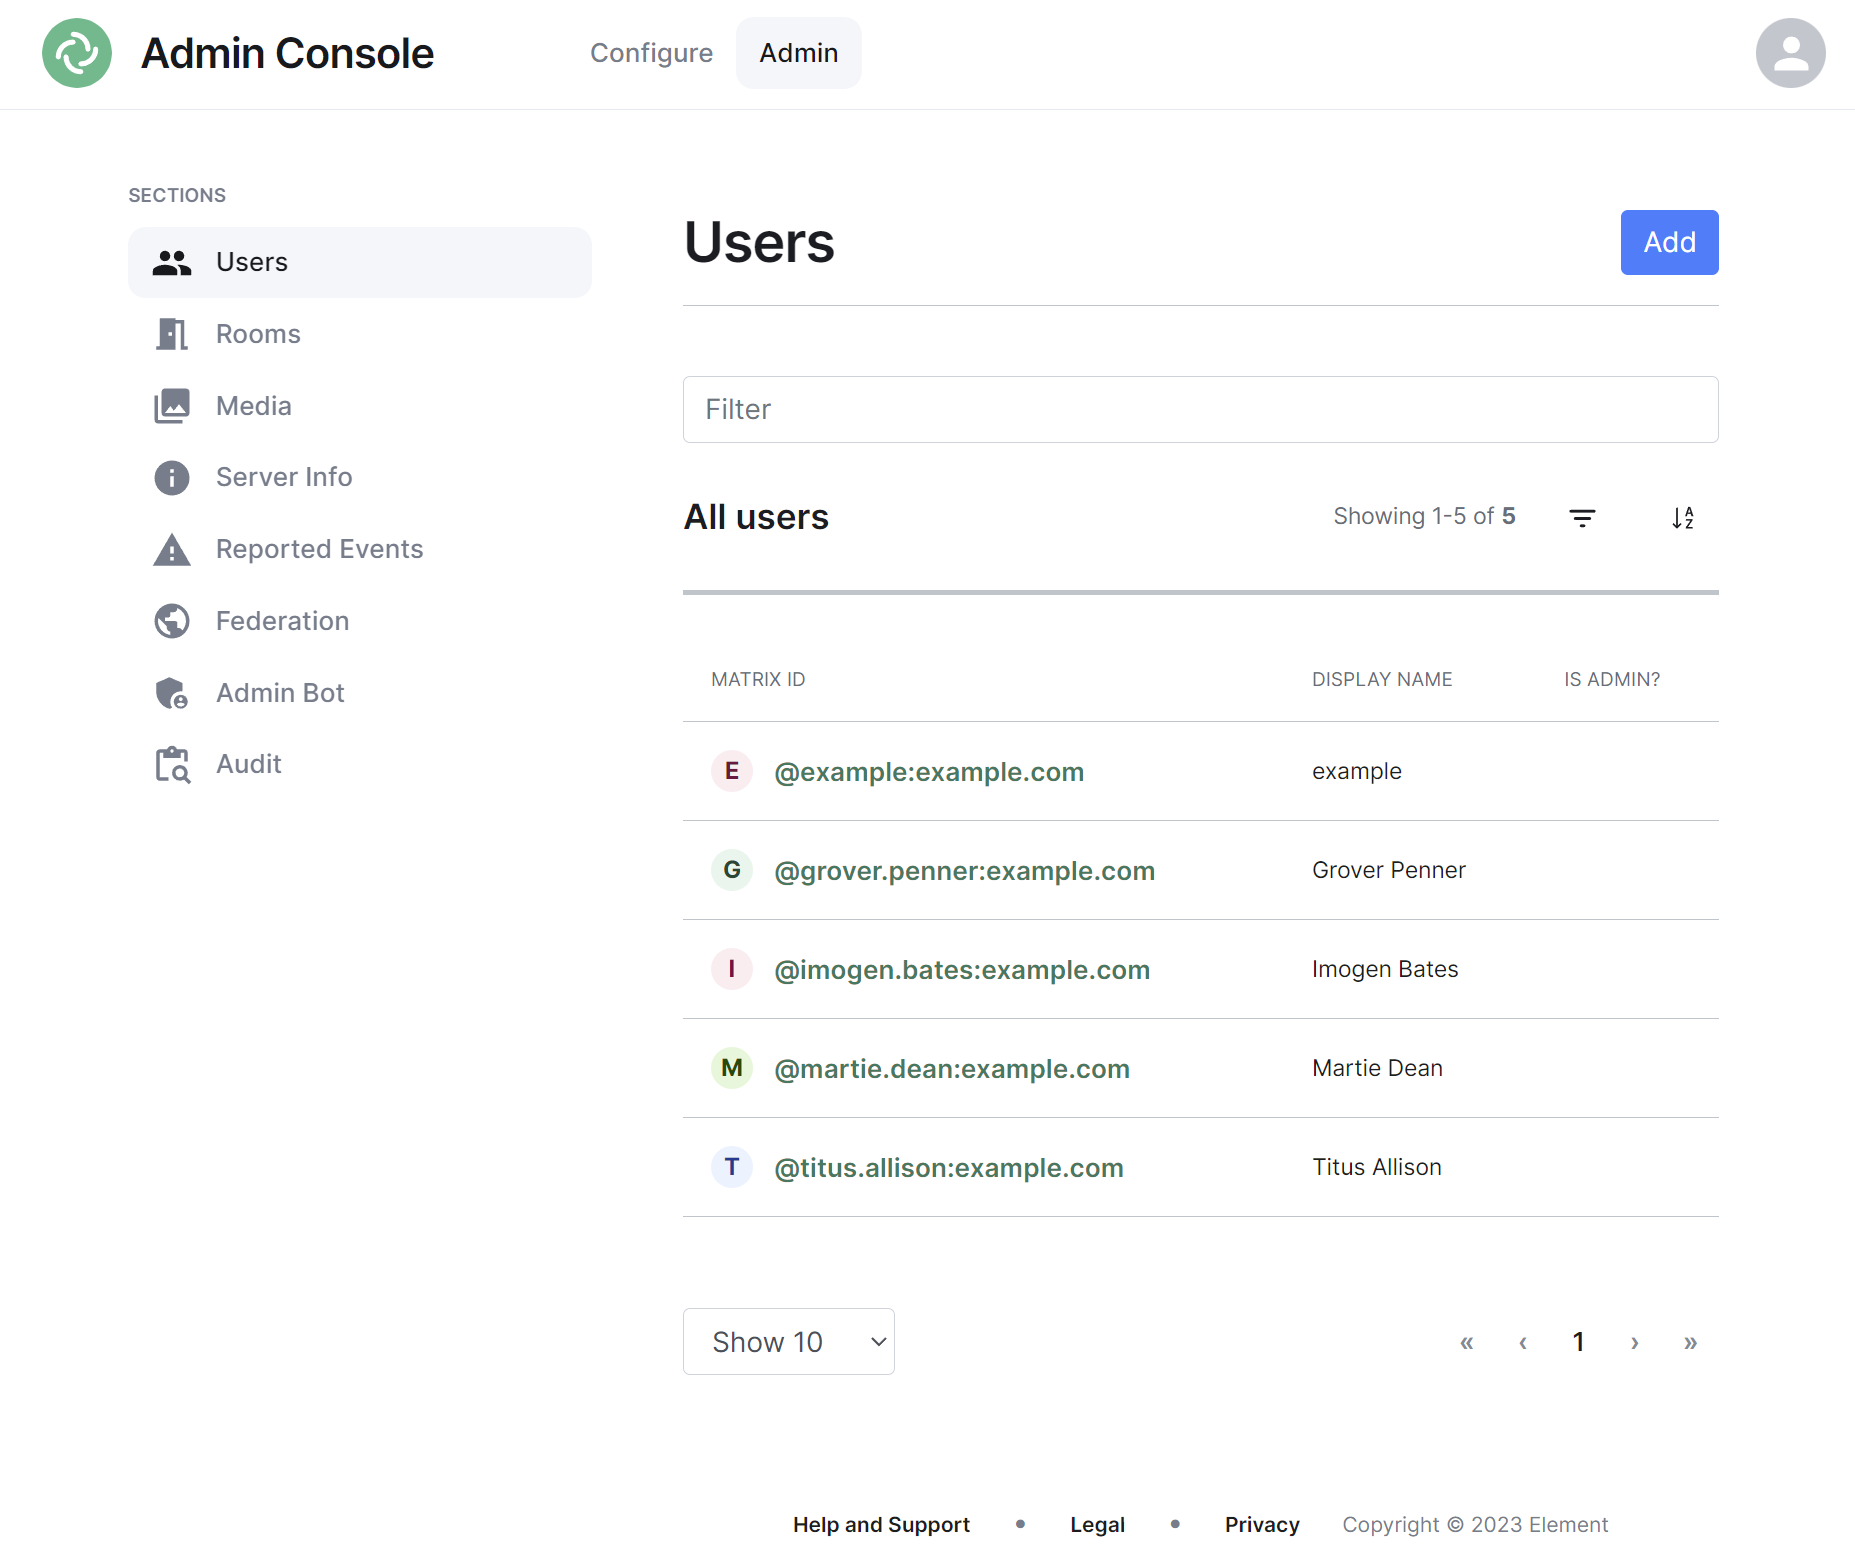
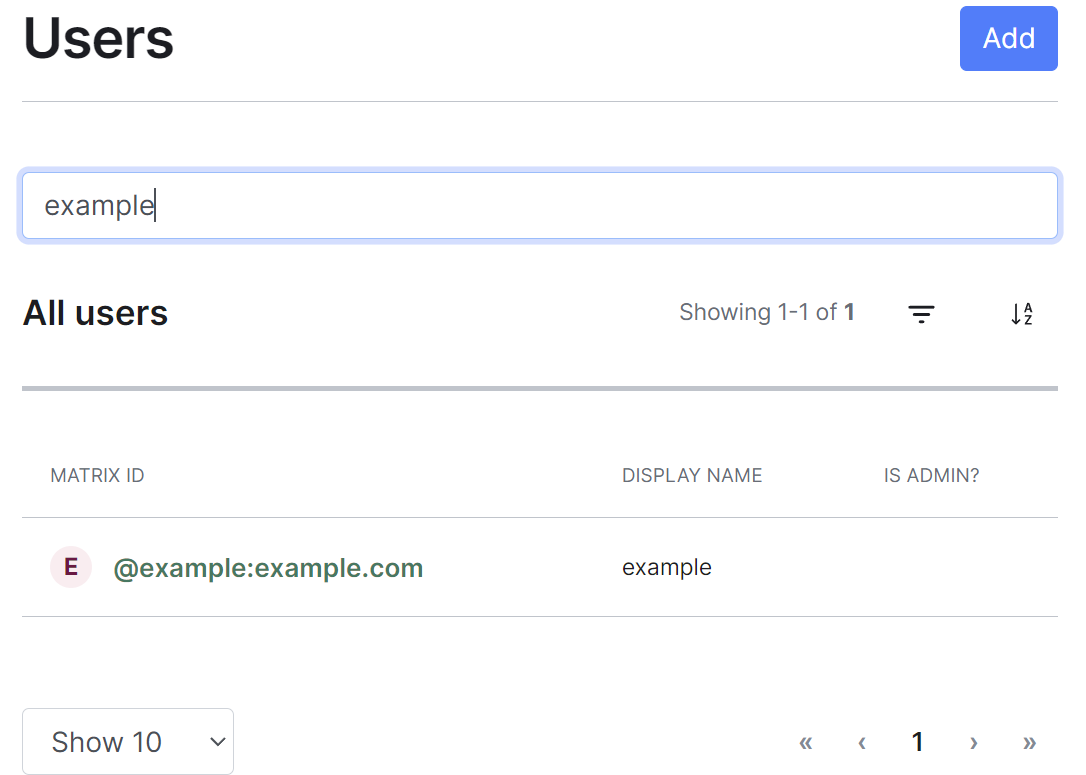
By default the users section will display all active user accounts present on your homeserver, listing their Matrix ID followed by their Display Name and whether the user is a Synapse Admin.
Navigating
Users will be displayed in a list, defaulting to a maximum of 10 users per page, you can show more users per page using the drop found at the bottom left of the list.

Sorting and Filtering
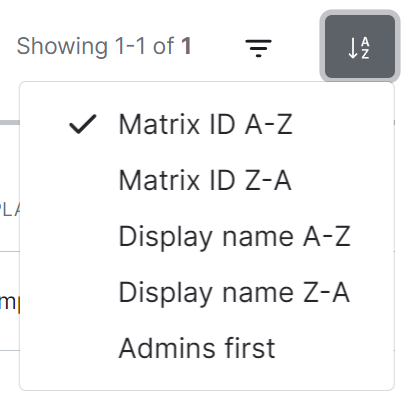
The default view of users can be adjusted using the available sorting and filtering options.
To sort, select the sort button and select how users should be organised, options include by Matrix ID (A-Z or Z-A), by Display Name (A-Z or Z-A) and displaying Admins first.
To search for users specifically, you can use the filter search box found above the list of users. Simply enter your search term and the list will be filtered for matches.
By default a number of account types are excluded from the list of users, these are deactivated accounts, guest accounts, support accounts and bot accounts. You can include these accounts by selecting the filter button then choosing the appropriate option.
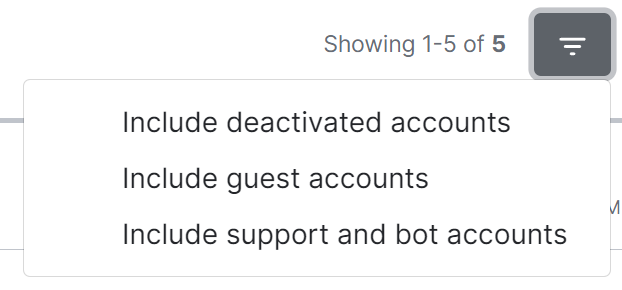
To remove these includes, you can click the 'x' icon next to the filter added just above the list view.

Adding Users
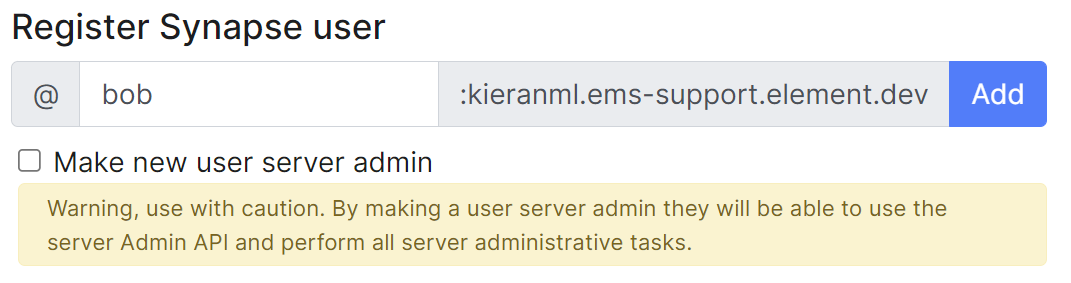
You can add user accounts manually by clicking the Add button found at the top right of the admin interface. This will take you to a page where you can register a new Synapse user.

Note, if your homeserver has a Terms of Service, users added in this way will need to accept those terms after logging in. This differs from the usual flow of users who create their account themselves, accepting the terms during the sign up process.
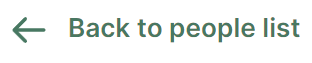
Once any additional user/s have been added, simply click the 'Back to people list' button to return to the user list.
Adding a single user
Provide the required username of the new user, if the user should be made a Synapse admin you should check the 'Make new user server admin' checkbox, then press the Add button. A new user will be added and their password will appear on screen.
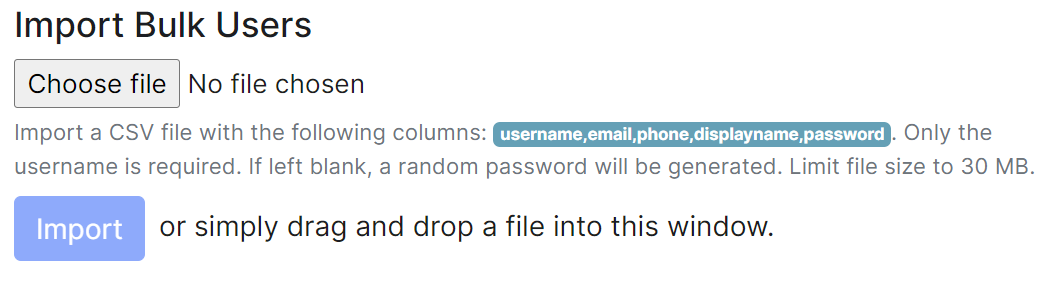
Adding multiple users at once
You are also able to import bulk users at once, either click the username,email,phone,displayname,password button, or manually create a csv file with those headings. Only the username is required and if the password is left blank, a random one will be generated. The CSV should be limited to no more than 30MB, you can see an example below:
username,email,phone,displayname,password
grover.penner,,,Grover Penner,grover
titus.allison,,,Titus Allison,titus
martie.dean,,,Martie Dean,martie
rachyl.dpears,,,Rachyl Spears,rachyl
imogen.bates,,,Imogen Bates,imogen
Either drag the CSV file into the window, or using the 'Choose file' button and press 'Import' to create the users. You will receive confirmation the users have been created.
Managing Users
You can manage an existing user by clicking on their account from the user list. You will then be presented with a view where you can manage the account.
Note, you can quickly copy the accounts Matrix ID by clicking on it, you will see a tooltip confirm the ID has been copied.

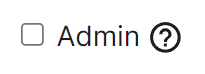
You can make a user a Synapse admin by checking the 'Admin' checkbox found to the right of the Matrix ID. Clicking this checkbox will cause a confirmation prompt to appear to confirm the action.
 |
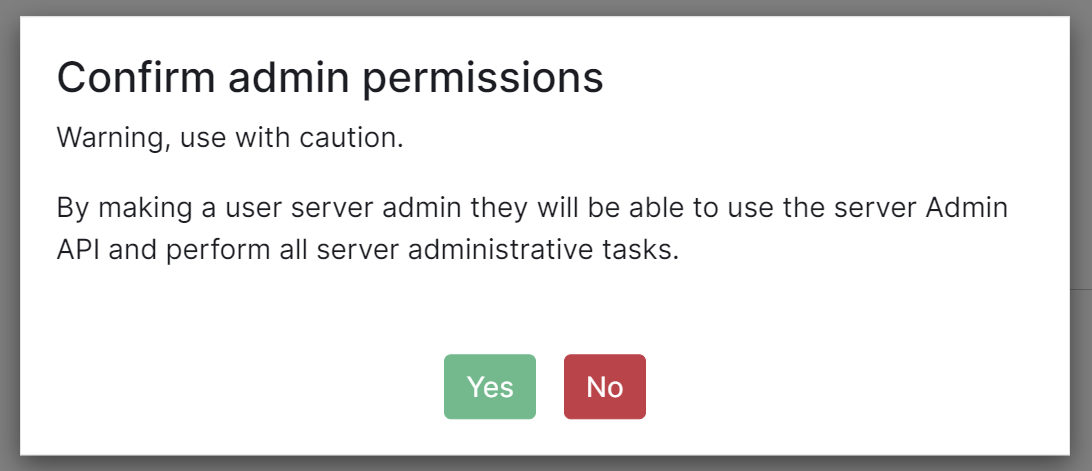 |
Note, this does not currently give any additional permissions in Element clients. It grants permission to use the Synapse Admin API
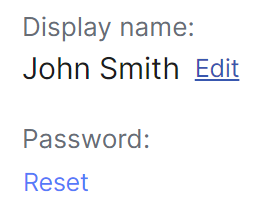
You can edit the users' existing Display Name by clicking the 'edit' button found following their existing Display Name, and you can reset the users' password by clicking the 'Reset' button.
 |
 |
 |
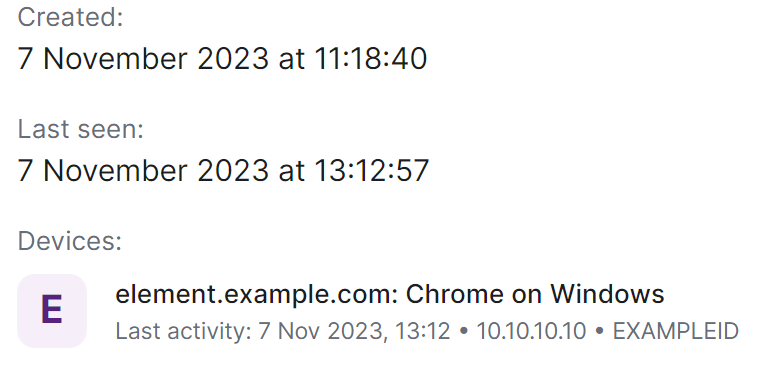
From this view you can also see when a user was last logged in and a list of their currently active devices (i.e. sessions).
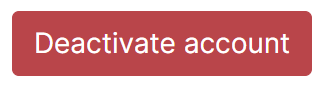
Finally you are also able to manually deactivate the account by clicking the 'Deactivate account' button, this will cause a confirmation prompt to appear to confirm the action.
 |
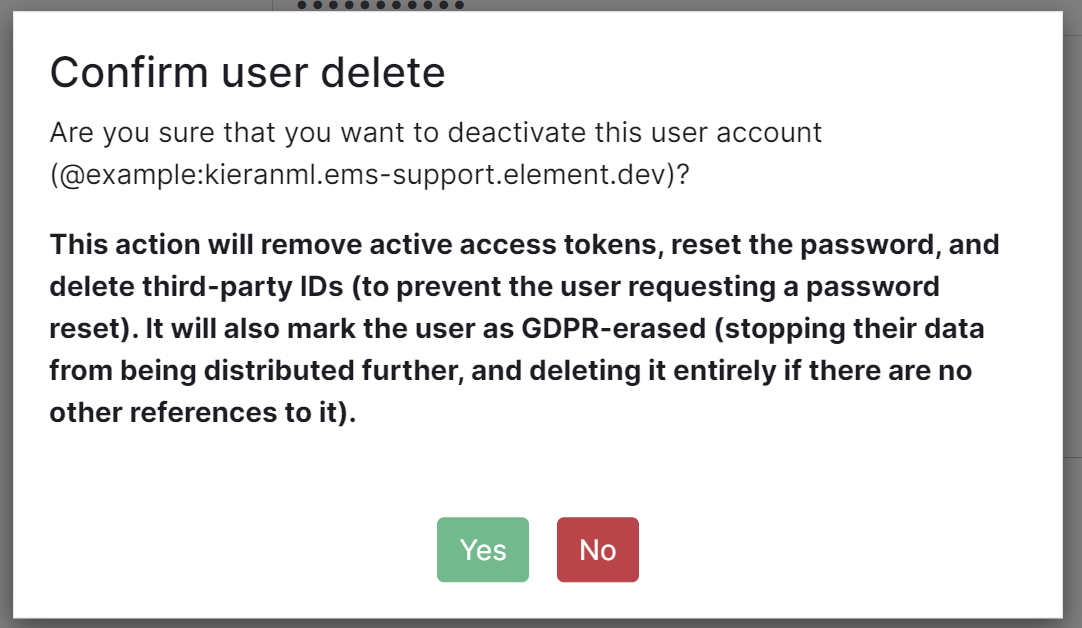 |
Note, this action will remove active access tokens, reset the password, and delete third-party IDs (to prevent the user requesting a password reset). It will also mark the user as GDPR-erased (stopping their data from being distributed further, and deleting it entirely if there are no other references to it).
Rooms Section
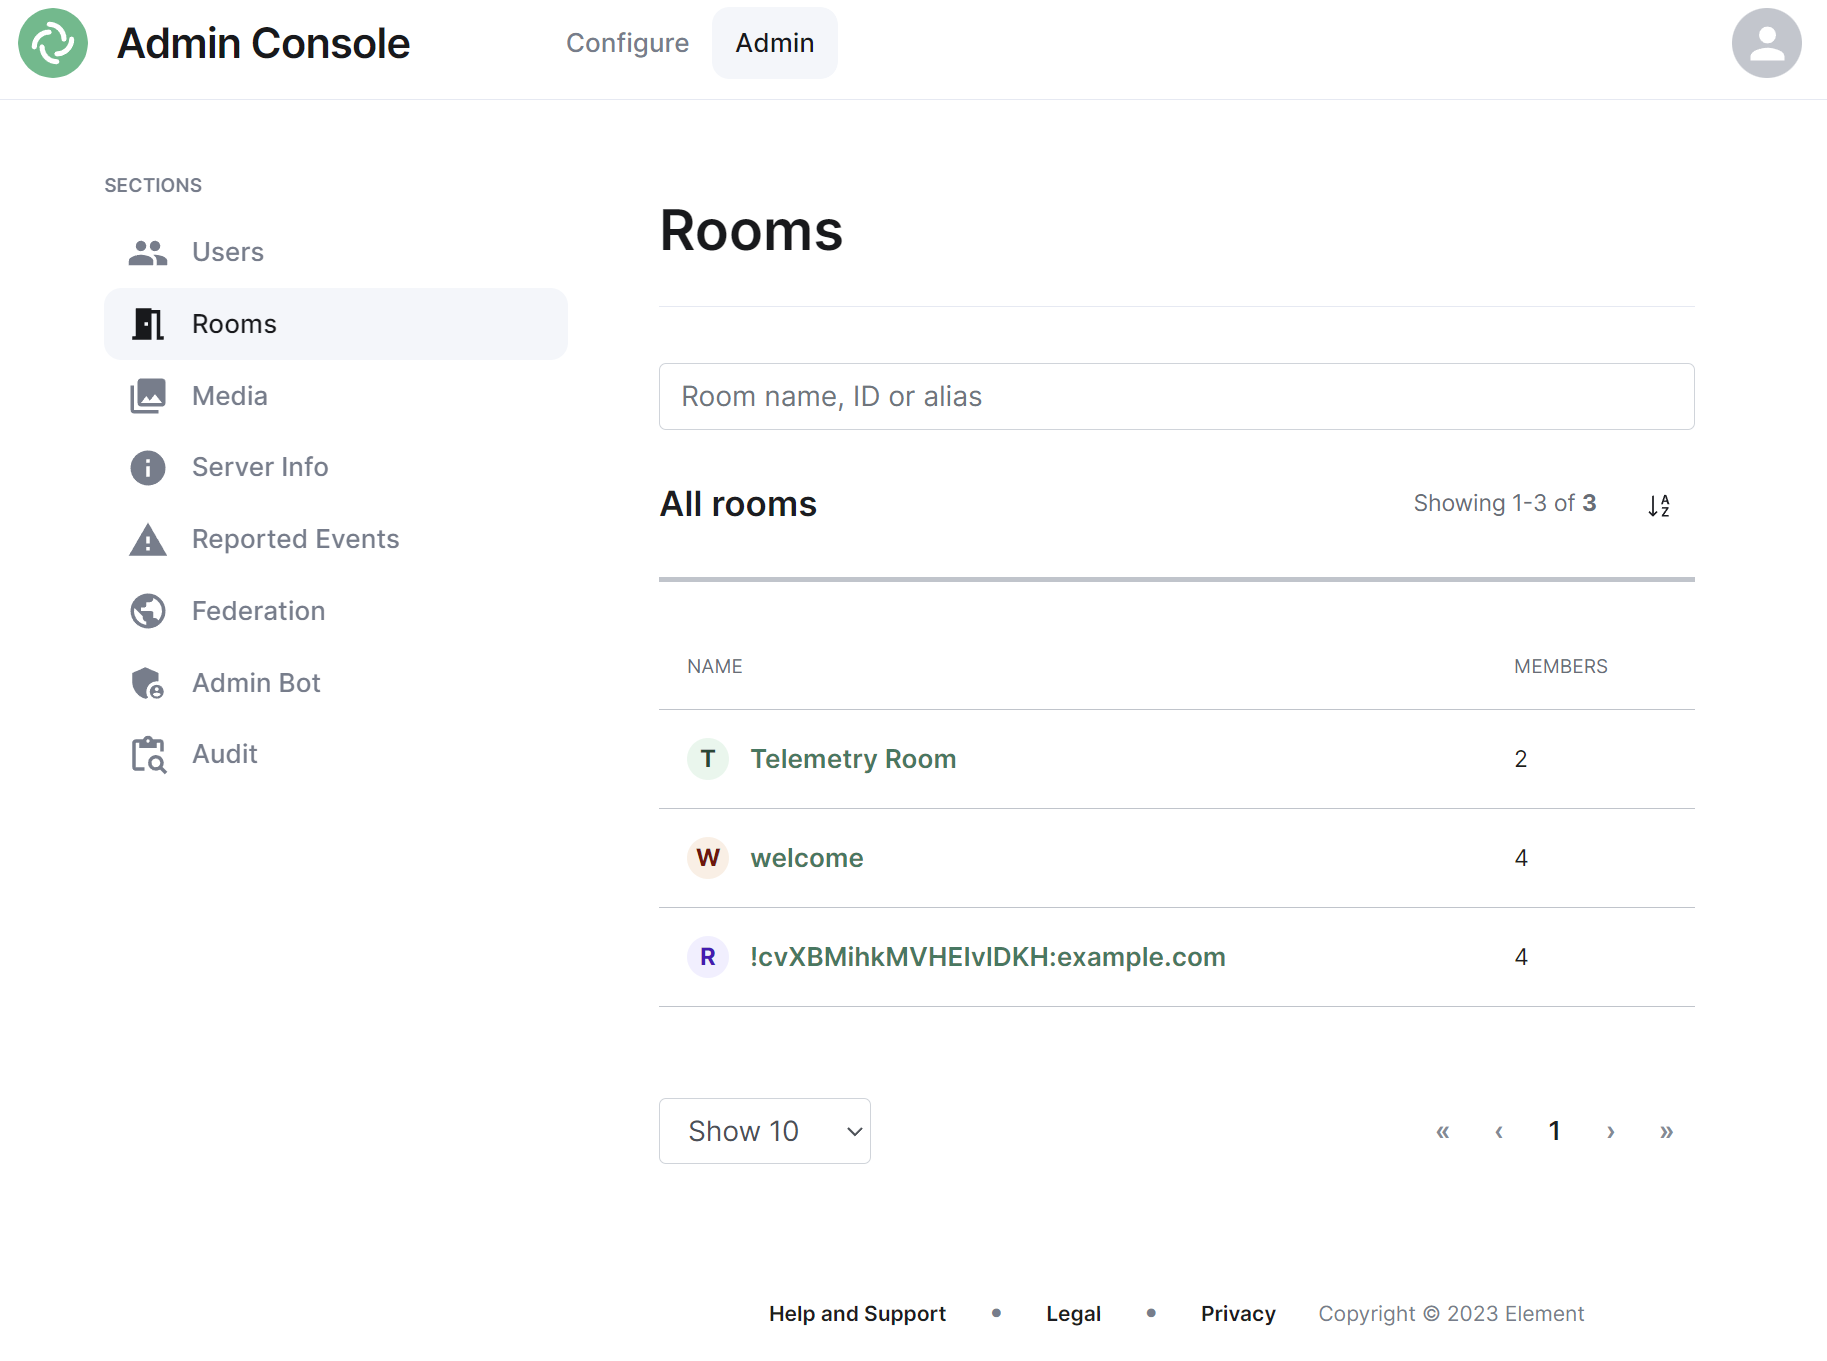
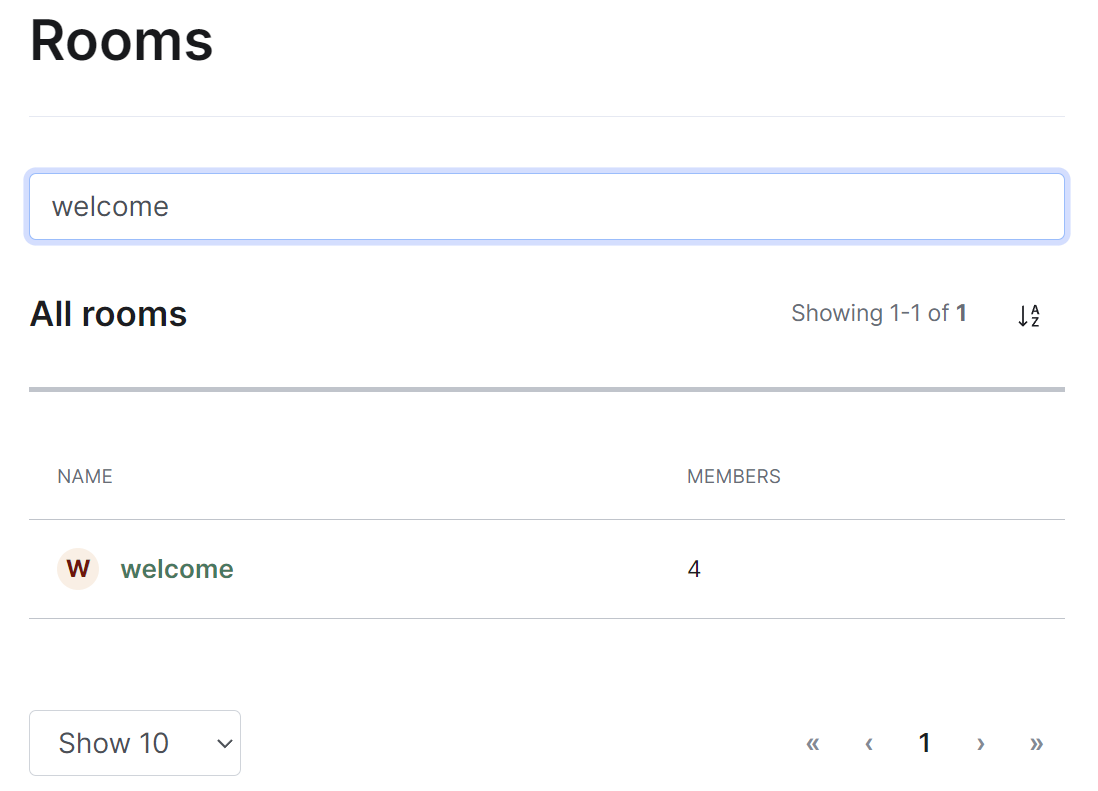
By default the rooms section will display all rooms present on your homeserver, listing their room name, or ID if not applicable, followed by the member count.
Navigating
Rooms will be displayed in a list, defaulting to a maximum of 10 rooms per page, you can show more rooms per page using the drop found at the bottom left of the list.
Sorting and Filtering
The default view of rooms can be adjusted using the available sorting and filtering options.
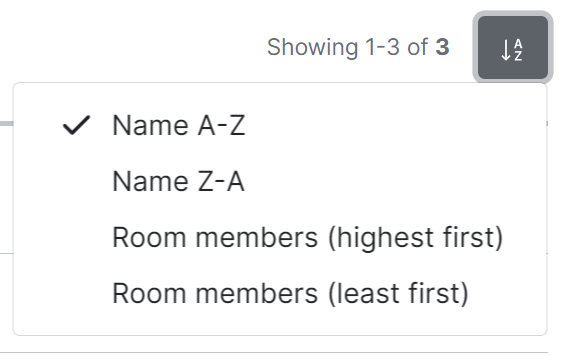
To sort, select the sort button and select how rooms should be organised, options include by Name (A-Z or Z-A) and Room Members (highest first, least first).
To search for rooms specifically, you can use the filter search box found above the list of rooms. Simply enter your search term and the list will be filtered for matches.
Managing Rooms
You can manage an existing room by clicking on its name from the room list. You will then be presented with a view where you can manage the room.
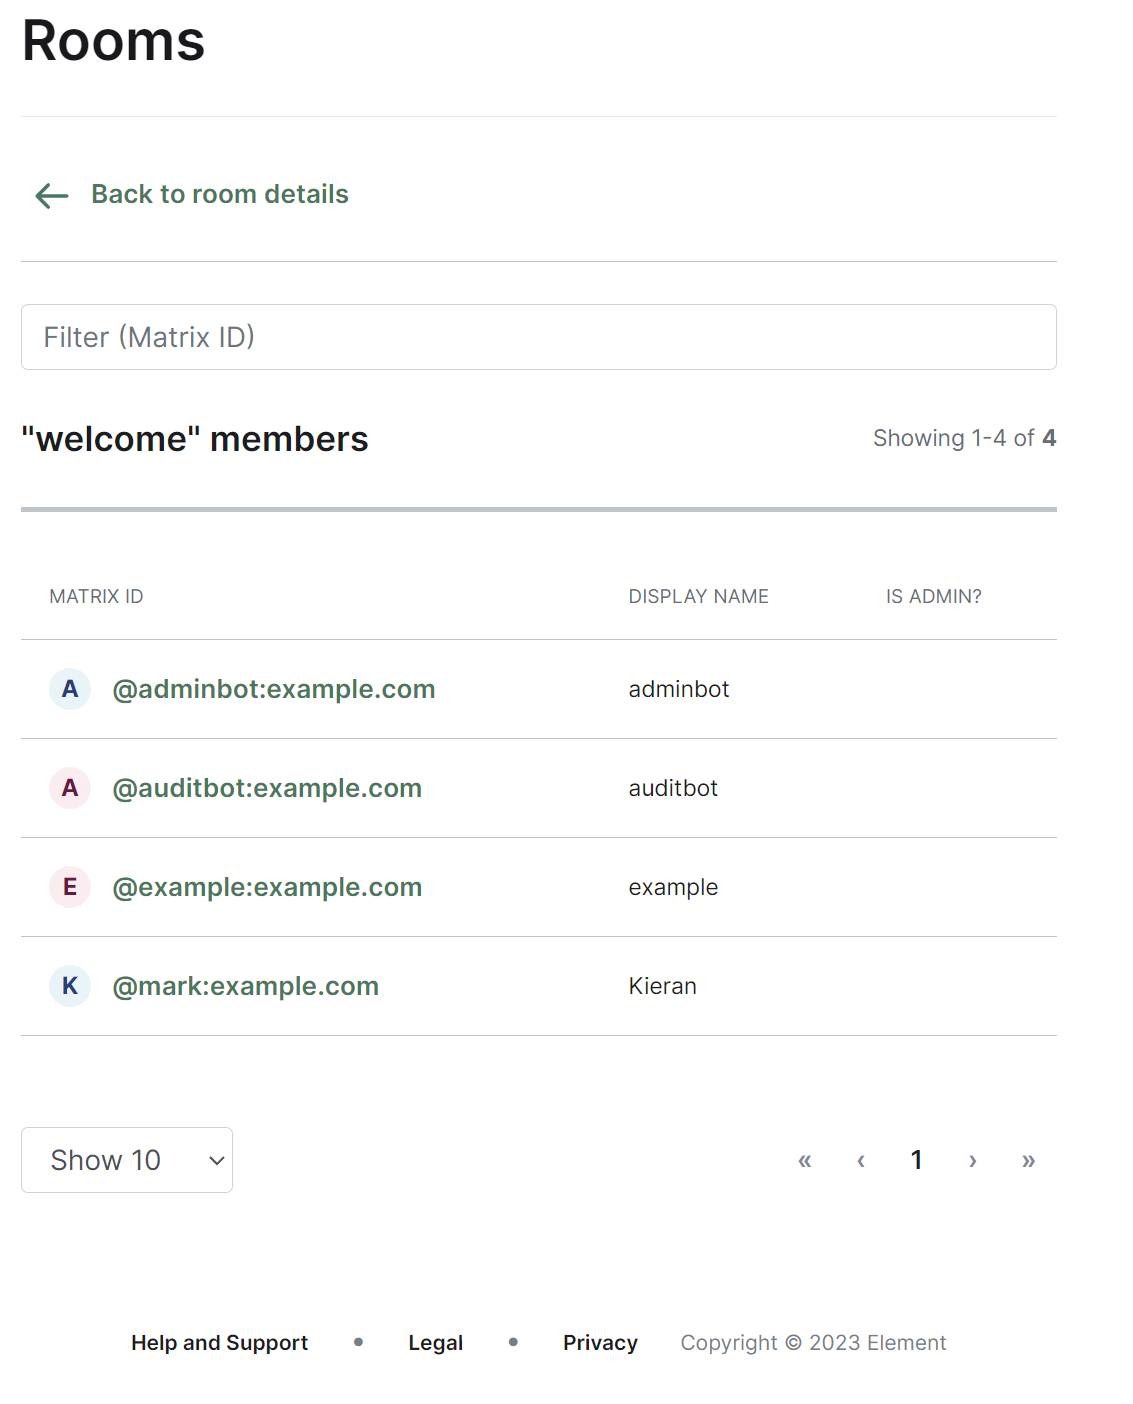
From this view you can view information about the room, including the room name and topic, room ID, members and alias etc. To view the members of the room, you can click the 'View list' link next to the member count to be taken to a view of all accounts within the room.
You can control whether the room is visible in the public directory by toggling the 'Show room in directory' checkbox.

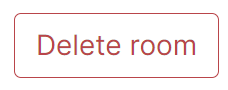
You are also able to delete the room by clicking the 'Delete room' button at the bottom of the page, doing so will cause a confirmation prompt to appear to confirm the action.
 |
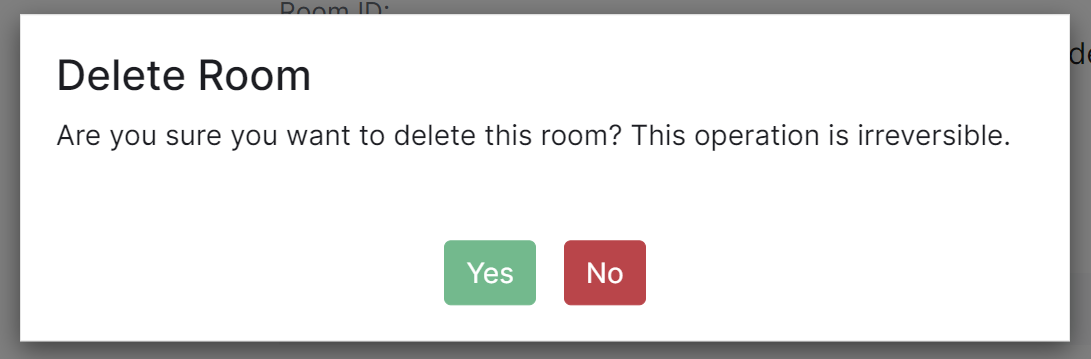 |
Note, this operation is irreversible.
Media Section
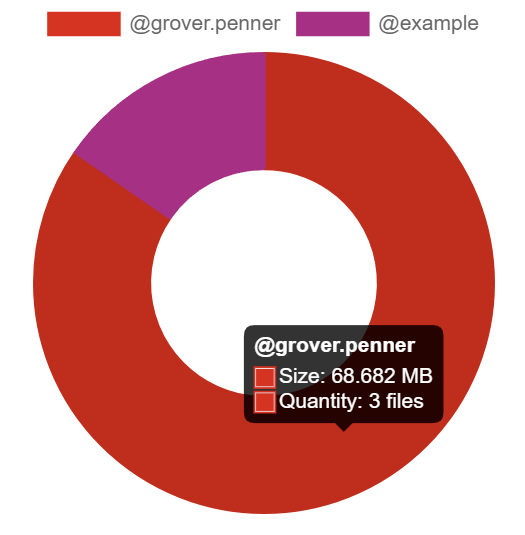
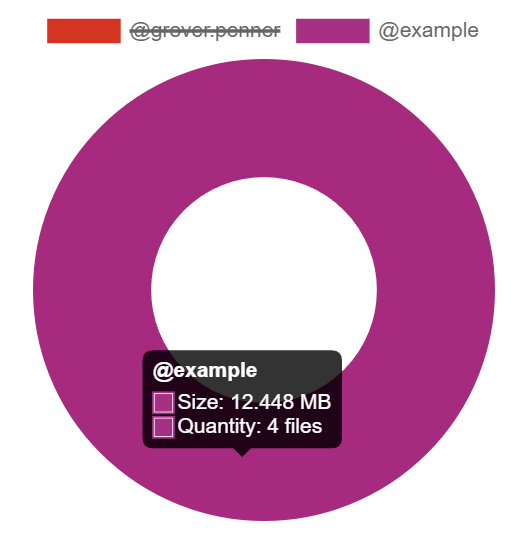
The Media section shows your a pie chart visualisation of the top users of media storage on your homeserver, you can click the individual Matrix IDs from the key to include / exclude those users from the visualisation. You can also hover over the pie chart segments to see a tooltip highlighting the size of storage used by the specific user as well as the quantity of items.
 |
 |
Server Info Section
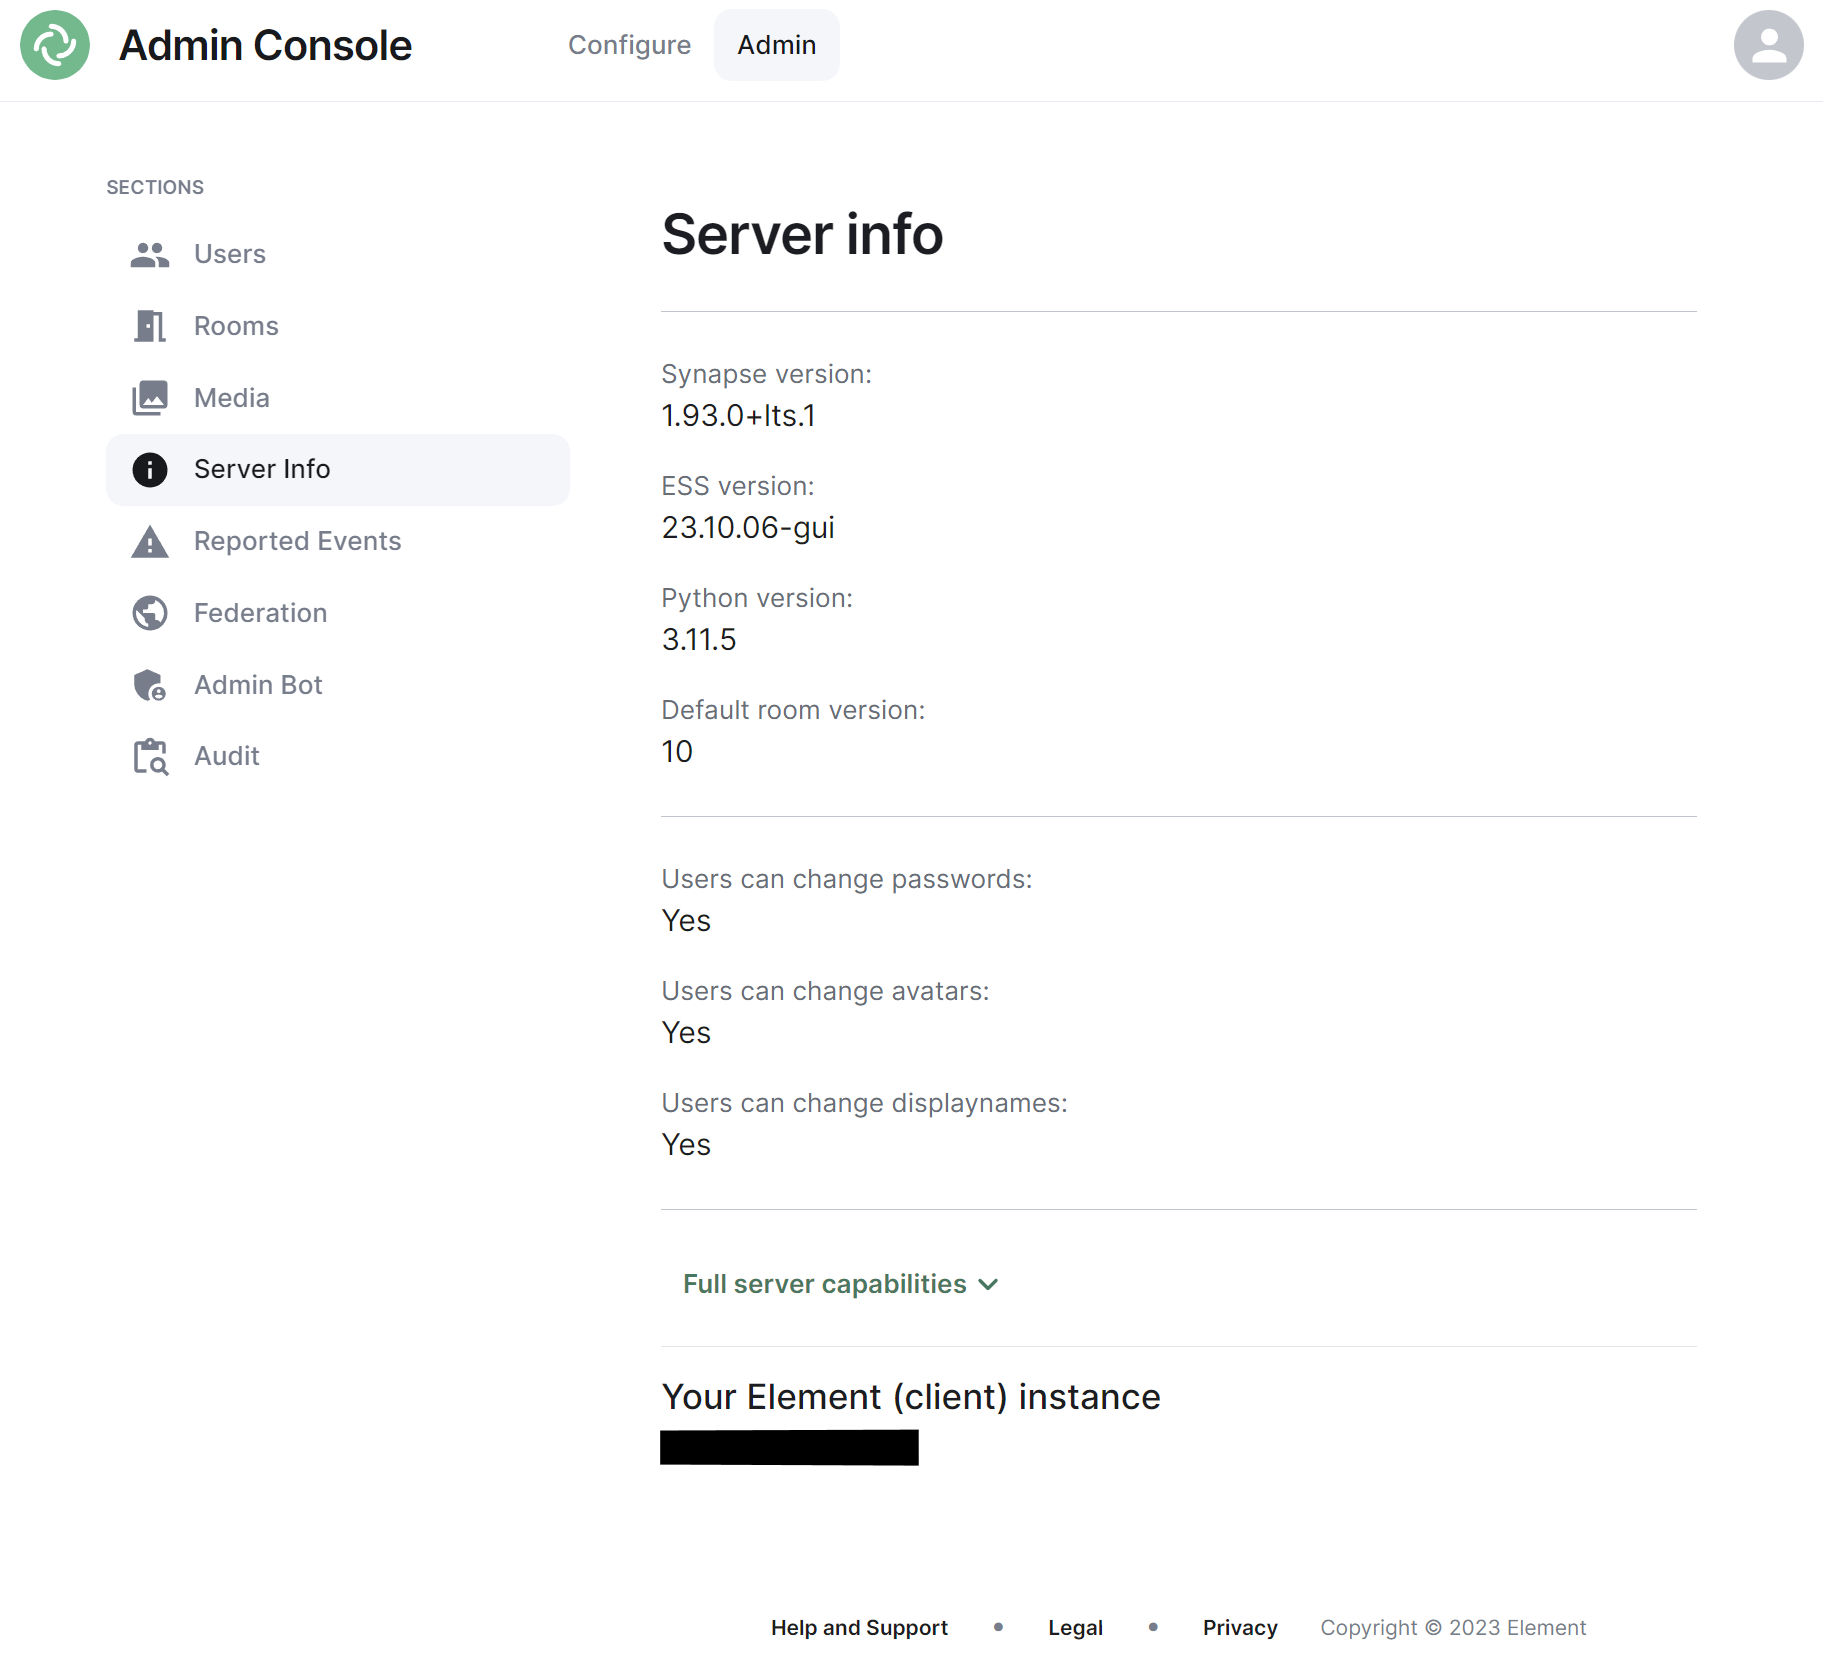
This section allows you to see version specific information about your homeserver, including Synapse version, ESS version, Python version and the default room version.
The view also highlight user access rights to change passwords, avatars and display names as well as a JSON output of the full server capabilities.
Finally it will identify the version of your hosted element client instance.
Reported Events Section
Federation Section
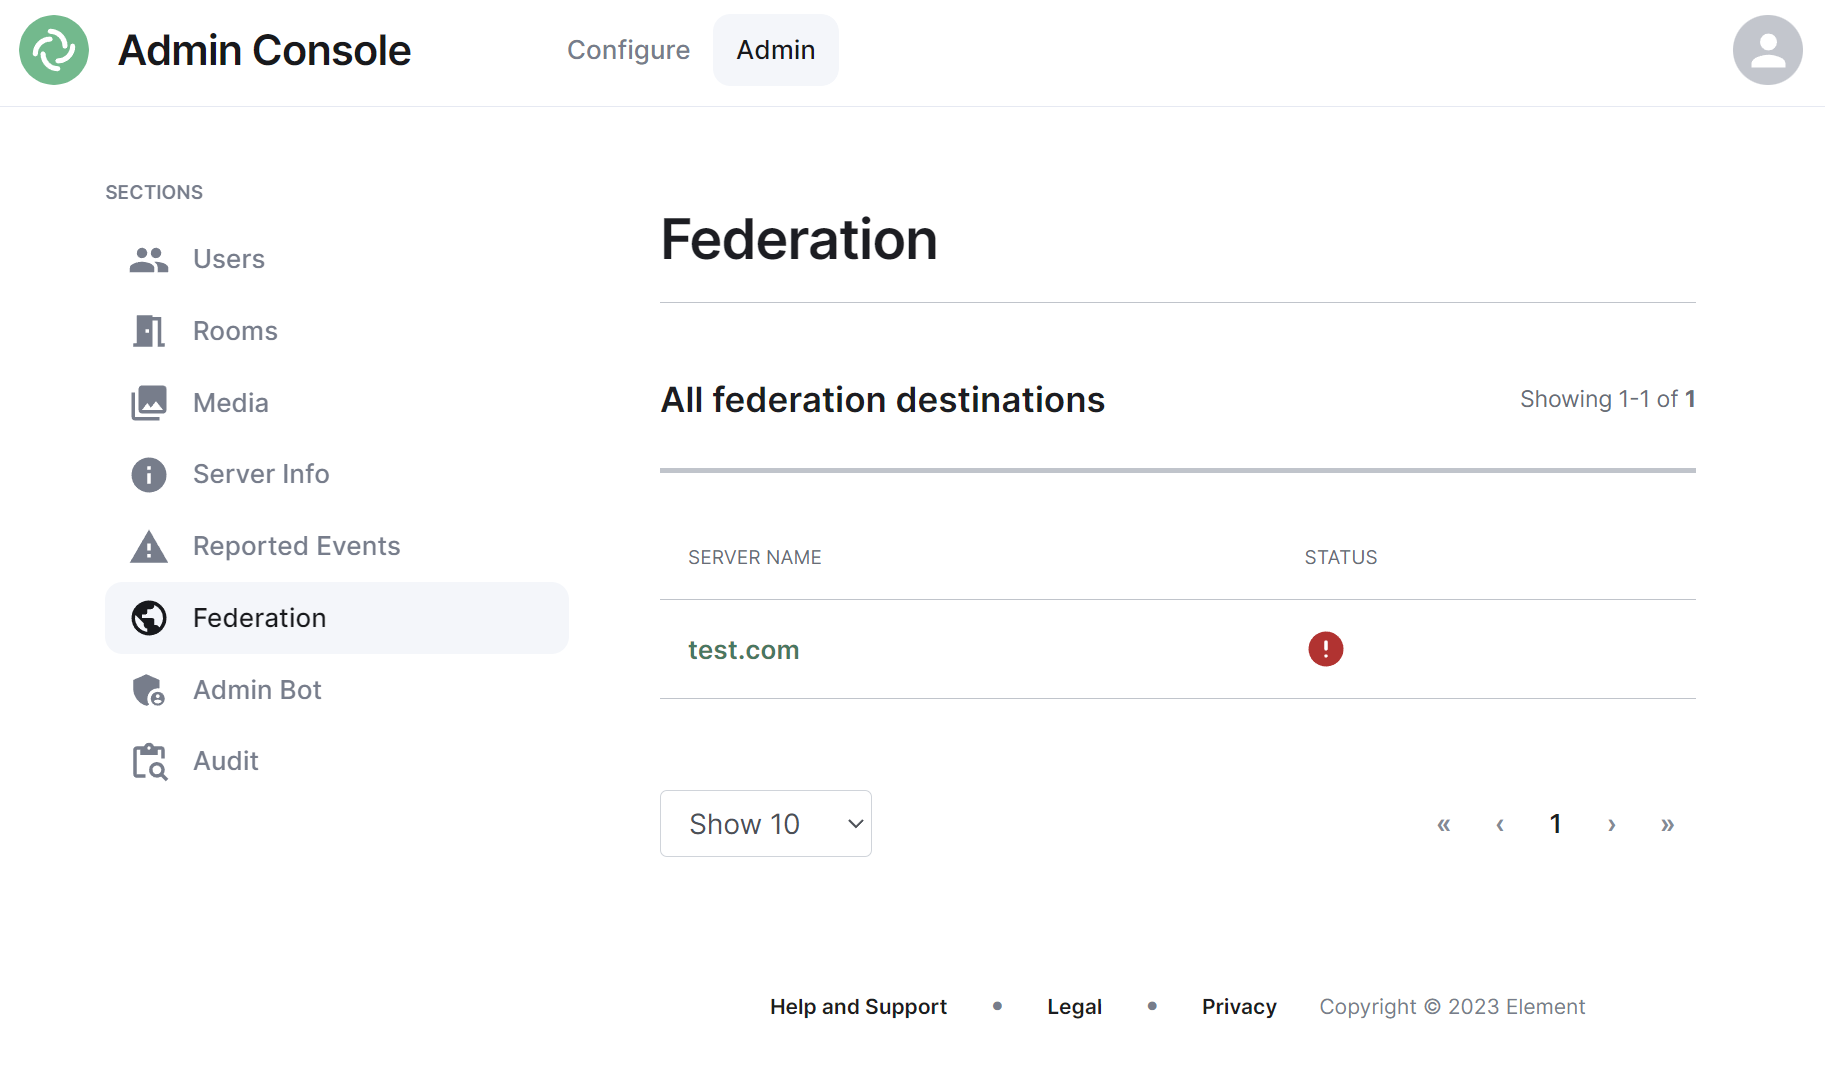
The Federation section shows all homeservers your homeserver is federating with, i.e. which homeservers users from your homeserver share a room with followed by it's current status.
Navigating
Homeservers will be displayed in a list, defaulting to a maximum of 10 homeservers per page, you can show more homeservers per page using the drop found at the bottom left of the list.
Managing Individual Homeserver Federation
You can manage an existing federation destination (homeserver) by clicking on its name from the room list. You will then be presented with a view where you can view the latest status of the federation as well as a list of the federated rooms.
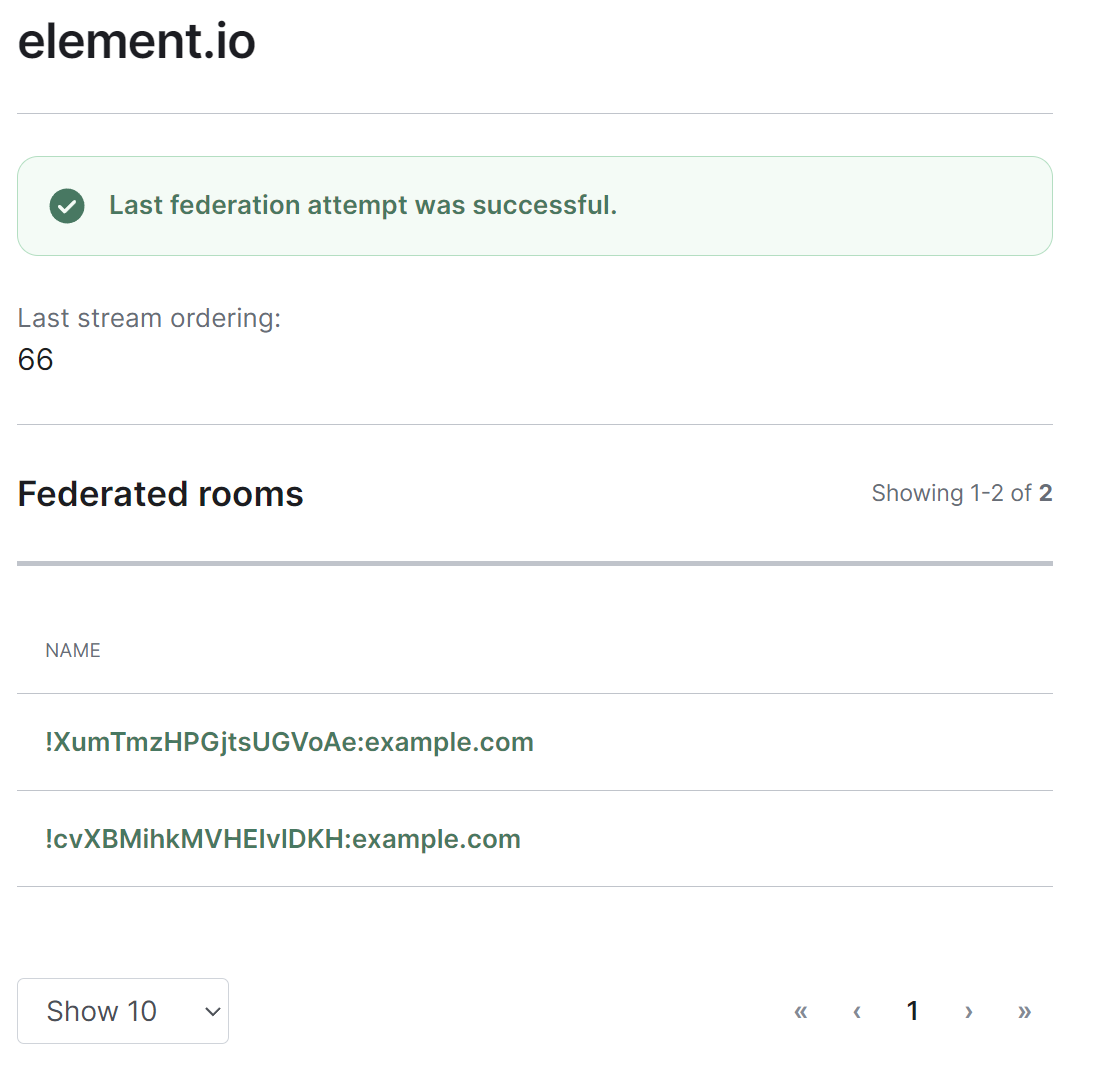
Clicking on any of the rooms from the list, will allow you to manage the specific room via the Rooms section.
Admin Bot Section
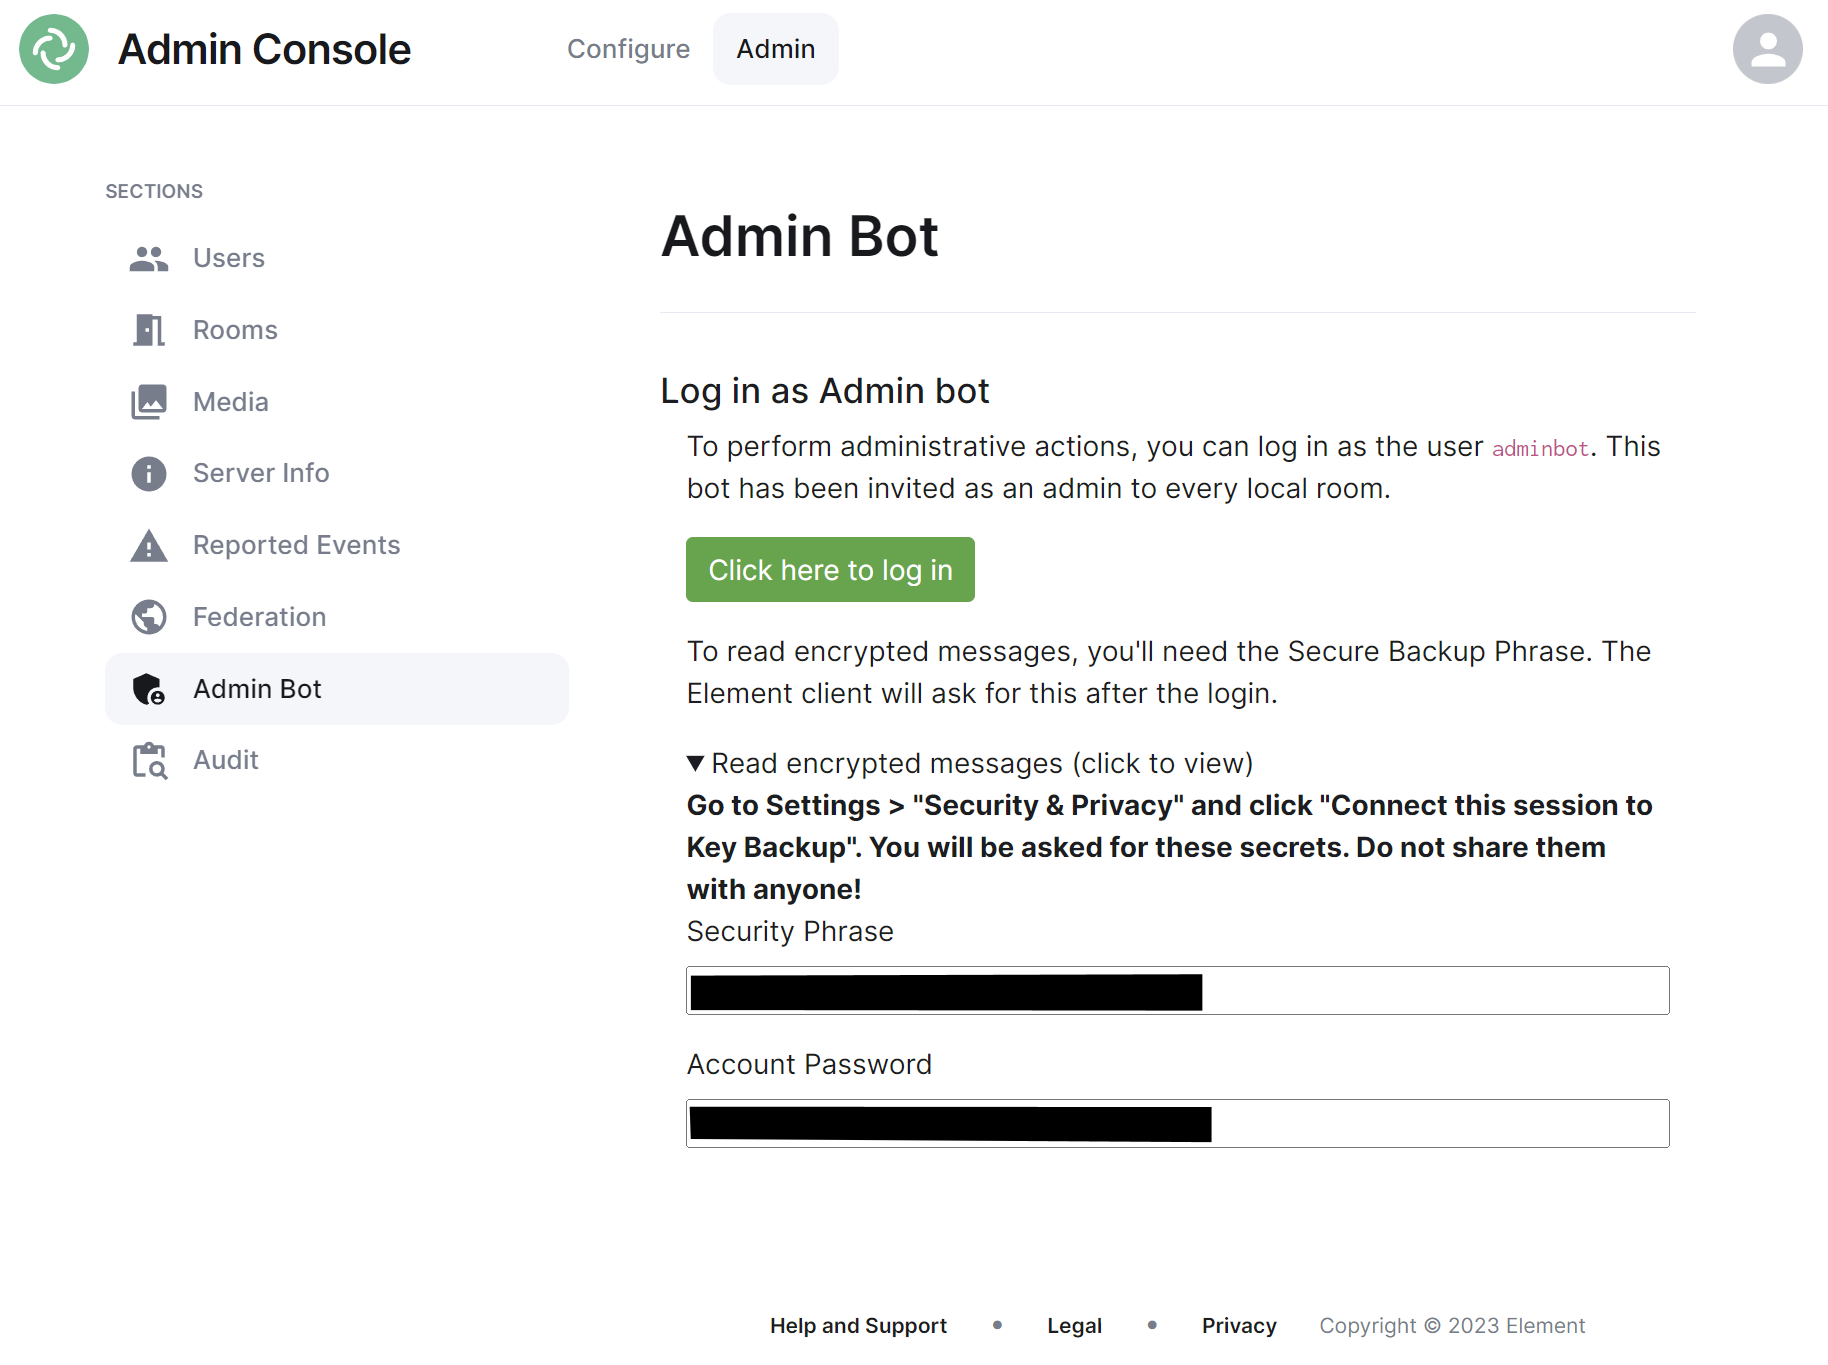
If you make use of Admin Bot you will be able to use this section to log in as the configured Admin Bot user. Click the 'Click here to log in' button to log in and following the instructions provided to read encrypted messages (if required).
Do not make changes to widgets in rooms while logged in as the Adminbot. The dedicated Element Web for Adminbot does not have the custom configuration your main Element Web client has, as such you can cause problems when working with widgets.
Audit Section
If you make use of Audit Bot you will be able to use this section to perform audit tasks on your homeserver.