Initial configuration options specific to the installer, including how ESS should be deployed.
The first section of the ESS installer GUI is the Host section, here you will configure essential details of how ESS will be installed including; deployment type; subscription credentials; PostgreSQL to use; and whether or not your setup is airgapped.
Settings configured via the UI in this section will mainly be saved to your `cluster.yml`. If performing a Kubernetes deployment, you will also be able to config Host Admin settings which will save configuration into both `internal.yml` and `deployment.yml`.
Depending on your environment you will need to select either `Standalone` or `Kubernetes Application`. `Standalone` will install `microk8s` locally on your machine, and deploy to it so all pods are running locally on the host machine. `Kubernetes Application` will deploy to your Kubernetes infrastructure in a context you will need to have already setup via your kube config.
### Deployment (Standalone)
#### Install
[](https://ems-docs.element.io/uploads/images/gallery/2024-02/image-1708075153739.png)
Config Example
```yml
spec:
connectivity:
dockerhub:
password: example
username: example
install:
emsImageStore:
password: example
username: example
webhooks:
caPassphrase: example
# Options unique to selecting Standalone
certManager:
adminEmail: example@Dexample.com
microk8s:
dnsResolvers:
- 8.8.8.8
- 8.8.4.4
postgresInCluster:
hostPath: /data/postgres
passwordsSeed: example
operatorUpdaterDebugLogs: false
useLegacyAuth: false
```
An example of the cluster.yml config generated when selecting Standalone, note that no specific flag is used within the config to specify selecting between Standalone or Kubernetes. If you choose to manually configure ESS bypassing the GUI, ensure only config options specific to how you wish to deploy are provided.
Select your deployment type here, if you've jumped ahead you should first read our [Introduction to Element Server Suite](https://ems-docs.element.io/books/element-server-suite-classic-documentation-lts-2410/page/introduction-to-element-server-suite) and then see our [Requirements and Recommendations](https://ems-docs.element.io/books/element-server-suite-classic-documentation-lts-2410/page/requirements-and-recommendations) which details the environment specifics needed for each deployment type.
##### Debug Logging
[](https://ems-docs.element.io/uploads/images/gallery/2024-11/image-1731068925323.png)
Config Example
```yml
spec:
install:
operatorUpdaterDebugLogs: false
```
Enabling this option will run the operator and updator with debug logging. You should leave this disabled by default unless you are experiencing issues.
##### Legacy Auth
[](https://ems-docs.element.io/uploads/images/gallery/2024-11/image-1731068941645.png)
Config Example
```yml
spec:
install:
useLegacyAuth: false
```
Disabled by default, unless upgrading from a previous LTS version lacking MAS support. Migrating to MAS from legacy authenication is not currently supported.
New to LTS 24.10, authentication by defualt uses the [Matrix Authentication Service](https://github.com/element-hq/matrix-authentication-service). This configurable option allows you to disable the use of MAS and revert back to the legacy authentication offered in previous versions of ESS.
Once you have deployed for the first time, you cannot enable / disable Legacy Auth. Ensure if you require SAML delegated authentication, or wish to use the GroupSync integration, you enable Legacy Authentication prior to deployment.
#### Cert Manager
[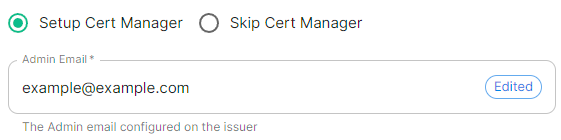](https://ems-docs.element.io/uploads/images/gallery/2024-04/image-1714496045157.png)
Config Example
```yml
spec:
install:
# certManager: {} # When 'Skip Cert Manager' selected
certManager:
adminEmail: example@example.com
```
You should keep this enabled if you will be using Let's Encrypt to verify your domain and generate your certificates, simply provide the username where due to expire certificate notices will be sent.
If you plan to upload your own certificates, or they will be Externally Managed, you should select `Skip Cert Manager`.
#### EMS Image Store
[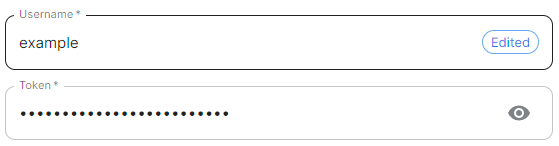](https://ems-docs.element.io/uploads/images/gallery/2024-04/image-1714496065638.png)
Config Example
```yml
spec:
install:
emsImageStore:
password: token
username: test
```
Here you will need to provide your EMS Image Store Username and Token associated with your subscription, which you can find at .
If you forget your token and hit 'Refresh' in the EMS Control Panel, you will need to ensure you redeploy your instance with the new token - otherwise subsequent deployments will fail.
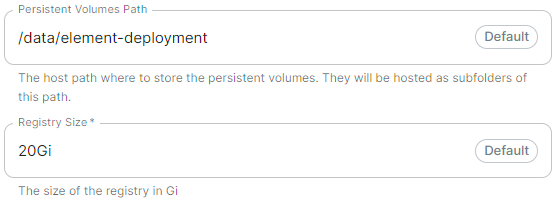
#### MicroK8s
[](https://ems-docs.element.io/uploads/images/gallery/2024-04/image-1714496085591.png)
Config Example
```yml
spec:
install:
microk8s:
persistentVolumesPath: /data/element-deployment
registrySize: 25Gi
```
It is unlikely you should need to adjust these values and it is highly recommended to leave this as their defaults.
If you encounter a requirement to clean up your images cache, see the [Cleaning up images cache](https://ems-docs.element.io/books/element-server-suite-classic-documentation-lts-2410/page/post-installation-essentials#bkmrk-cleaning-up-images-c) section from the [Post-Installation Essentials](https://ems-docs.element.io/books/element-server-suite-classic-documentation-lts-2410/page/post-installation-essentials) page.
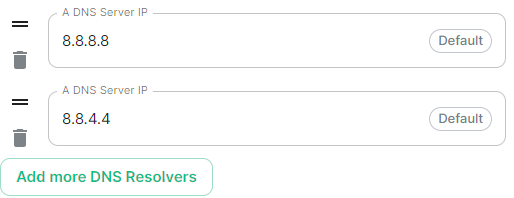
#### DNS Resolvers
[](https://ems-docs.element.io/uploads/images/gallery/2024-04/image-1714496102751.png)
Config Example
```yml
spec:
install:
microk8s:
dnsResolvers:
- 8.8.8.8
- 8.8.4.4
```
Defaulting to `8.8.8.8` and `8.8.4.4`, the DNS server IPs set here will be used by all deployed pods. Click `Add more DNS Resolvers` to add additional entries as required.
#### Nginx Extra Configuration
[](https://ems-docs.element.io/uploads/images/gallery/2024-04/image-1714496120331.png)
Config Example
```yml
spec:
install:
microk8s:
# Not present when disabled
nginxExtraConfiguration:
custom-http-errors: '"404"'
server-snippet: >-
error_page 404 /404.html; location = /404.html { internal; return 200
"
Hello World!
"; }
```
As linked via the ESS installer GUI, see the [Ingress-Nginx Controller ConfigMaps](https://kubernetes.github.io/ingress-nginx/user-guide/nginx-configuration/configmap/#configuration-options) documentation for the options that can be configured.
##### Example
The below example is for demonstration purposes only, you should follow the linked guidance before adding extra configuration.
For example, if you wanted to replace the standard 404 error page, you could do this using both [`custom-http-errors`](https://kubernetes.github.io/ingress-nginx/user-guide/nginx-configuration/configmap/#custom-http-errors) and [`server-snippet`](https://kubernetes.github.io/ingress-nginx/user-guide/nginx-configuration/configmap/#server-snippet). To configure via the installer, simply add the specify `custom-http-errors` as the `Name` and click `Add to Nginx Extra Configuration`, then provide the required value in the newly created field:
[](https://ems-docs.element.io/uploads/images/gallery/2024-02/image-1708078830743.png)
Repeat for `server-snippet`:
[](https://ems-docs.element.io/uploads/images/gallery/2024-02/image-1708078877553.png)
The above example is used to explain how to configure the Nginx Extra Configuration, and so is for demonstration purposes only, it is not recommended to use this example config. Ideally your web server should manage traffic that would otherwise hit a 404 being served by ESS.
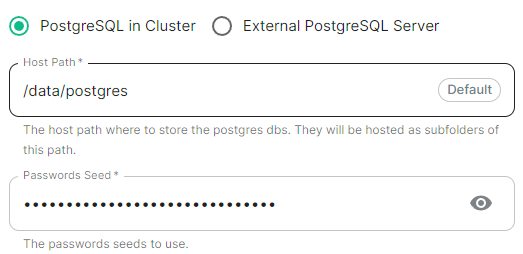
#### PostgreSQL in Cluster
[](https://ems-docs.element.io/uploads/images/gallery/2024-04/image-1714496148674.png)
Config Example
```yml
spec:
install:
microk8s:
# postgresInCluster: {} # If 'External PostgreSQL Server' selected
postgresInCluster:
hostPath: /data/postgres
passwordsSeed: example
```
Only available in Standalone deployments you can have the installer deploy PostgreSQL for you, this will remove the requirement to configure PostgreSQL connection and authentication credentials in later parts of the installer. It is highly recommended to keep the default settings if you opt for this approach.
If you already have an external PostgreSQL server you wish to use, make sure you have followed the [PostgreSQL Standalone Environment Prerequisites](https://ems-docs.element.io/books/element-server-suite-classic-documentation-lts-2410/page/requirements-and-recommendations#bkmrk-postgresql) detailed on the [Requirements and Recommendations](https://ems-docs.element.io/books/element-server-suite-classic-documentation-lts-2410/page/requirements-and-recommendations#bkmrk-postgresql) page. Selecting this option will present an additional `Database` section in the installer process.
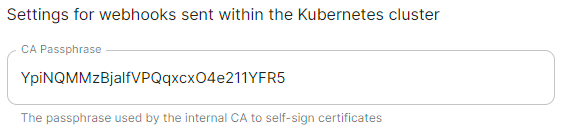
#### Internal Webhooks
[](https://ems-docs.element.io/uploads/images/gallery/2024-05/image-1716365980592.png)
Config Example
```yml
spec:
install:
webhooks:
caPassphrase: YpiNQMMzBjalfVPQqxcxO4e211YFR5
```
You should not need to change this, a unique CA passphrase will b generated on first run of the installer and is used by the interal CA to self-sign certificates.
### Deployment (Kubernetes Application)
#### Install
[](https://ems-docs.element.io/uploads/images/gallery/2024-04/image-1714488149825.png)
Config Example
```yml
spec:
connectivity:
dockerhub:
password: example
username: example
install:
emsImageStore:
password: example
username: example
webhooks:
caPassphrase: example
# Options unique to selecting Standalone
clusterDeployment: true
kubeContextName: example
namespaces: {}
skipElementCrdsSetup: false
skipOperatorSetup: false
skipUpdaterSetup: false
operatorUpdaterDebugLogs: false
useLegacyAuth: false
```
An example of the cluster.yml config generated when selecting Kubernetes, note that no specific flag is used within the config to specify selecting between Standalone or Kubernetes. If you choose to manually configure ESS bypassing the GUI, ensure only config options specific to how you wish to deploy are provided.
Select your deployment type here, if you've jumped ahead you should first read our [Introduction to Element Server Suite](https://ems-docs.element.io/books/element-server-suite-classic-documentation-lts-2410/page/introduction-to-element-server-suite) and then see our [Requirements and Recommendations](https://ems-docs.element.io/books/element-server-suite-classic-documentation-lts-2410/page/requirements-and-recommendations) which details the environment specifics needed for each deployment type.
##### Cluster Deployment
[](https://ems-docs.element.io/uploads/images/gallery/2024-02/image-1708075404378.png)
Config Example
```yml
spec:
install:
clusterDeployment: true
```
Deploy the operator & the updater using Cluster Roles.
##### Kube Context Name
[](https://ems-docs.element.io/uploads/images/gallery/2024-04/image-1714488225063.png)
Config Example
```yml
spec:
install:
kubeContextName: example
```
The name of the Kubernetes context you have already setup that ESS should be deployed into.
{{@684#bkmrk-debug-logging-section}}
{{@684#bkmrk-legacy-auth-section}}
##### Skip Setup Options
[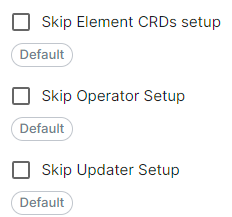](https://ems-docs.element.io/uploads/images/gallery/2024-04/image-1714488379545.png)
Config Example
```yml
spec:
install:
skipElementCrdsSetup: false
skipOperatorSetup: false
skipUpdaterSetup: false
```
Selecting these will allow you to skip the setup of the Element CRDs, Operator and Updater as required.
{{@684#bkmrk-ems-image-store-section}}
#### Namespaces
[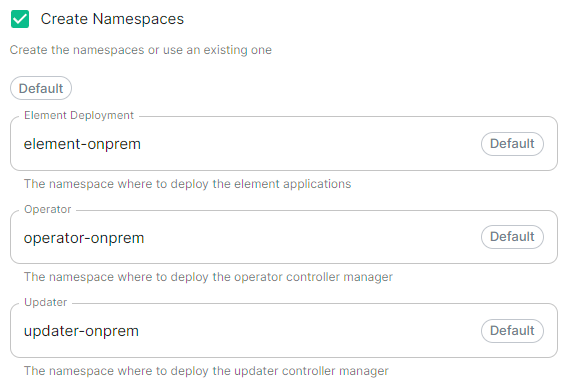](https://ems-docs.element.io/uploads/images/gallery/2024-04/image-1714488532648.png)
Config Example
```yml
spec:
install:
# namespaces: {} # When left as default namespaces
# namespaces: # When `Create Namespaces` is disabled
# createNamespaces: false
namespaces: # When custom namespaces are provided
elementDeployment: element-example # Omit any that should remain as default
operator: operator-example
updater: updater-example
```
Allows you to specify the namespaces you wish to deploy into, with the additional option to create them if they don't exist.
#### Namespace-scoped Deployments
Namespace-scoped deployments in Kubernetes offer a way to organize and manage resources within specific namespaces rather than globally across the entire cluster.
Preparing the Cluster
**Installing the Helm Chart Repositories**
The first step is to start on a machine with helm v3 installed and configured with your kubernetes cluster and pull down the two charts that you will need.
First, let's add the element-updater repository to helm:
```
helm repo add element-updater https://registry.element.io/helm/element-updater --username
ems_image_store_username --password 'ems_image_store_token'
```
Replace `ems_image_store_username` and `ems_image_store_token` with the values provided to you by Element.
Secondly, let's add the element-operator repository to helm:
```
helm repo add element-operator https://registry.element.io/helm/element-operator --username ems_image_store_username --password 'ems_image_store_token'
```
Replace `ems_image_store_username` and `ems_image_store_token` with the values provided to you by Element.
Now that we have the repositories configured, we can verify this by:
```
helm repo list
```
and should see the following in that output:
```
NAME URL
element-operator https://registry.element.io/helm/element-operator
element-updater https://registry.element.io/helm/element-updater
```
**Deploy the CRDs**
Write the following `values.yaml` file:
```
clusterDeployment: true
deployCrds: true
deployCrdRoles: true
deployManager: false
```
To install the CRDs with the helm charts, simply run:
```
helm install element-updater element-updater/element-updater -f values.yaml
helm install element-operator element-operator/element-operator -f values.yaml
```
Now at this point, you should have the following two CRDs available:
```
[user@helm ~]$ kubectl get crds | grep element.io
elementwebs.matrix.element.io 2023-10-11T13:23:14Z
wellknowndelegations.matrix.element.io 2023-10-11T13:23:14Z
elementcalls.matrix.element.io 2023-10-11T13:23:14Z
hydrogens.matrix.element.io 2023-10-11T13:23:14Z
mautrixtelegrams.matrix.element.io 2023-10-11T13:23:14Z
sydents.matrix.element.io 2023-10-11T13:23:14Z
synapseusers.matrix.element.io 2023-10-11T13:23:14Z
bifrosts.matrix.element.io 2023-10-11T13:23:14Z
lowbandwidths.matrix.element.io 2023-10-11T13:23:14Z
synapsemoduleconfigs.matrix.element.io 2023-10-11T13:23:14Z
matrixauthenticationservices.matrix.element.io 2023-10-11T13:23:14Z
ircbridges.matrix.element.io 2023-10-11T13:23:14Z
slidingsyncs.matrix.element.io 2023-10-11T13:23:14Z
securebordergateways.matrix.element.io 2023-10-11T13:23:14Z
hookshots.matrix.element.io 2023-10-11T13:23:14Z
matrixcontentscanners.matrix.element.io 2023-10-11T13:23:14Z
sygnals.matrix.element.io 2023-10-11T13:23:14Z
sipbridges.matrix.element.io 2023-10-11T13:23:14Z
livekits.matrix.element.io 2023-10-11T13:23:14Z
integrators.matrix.element.io 2023-10-11T13:23:14Z
jitsis.matrix.element.io 2023-10-11T13:23:14Z
mautrixwhatsapps.matrix.element.io 2023-11-15T09:03:48Z
synapseadminuis.matrix.element.io 2023-10-11T13:23:14Z
synapses.matrix.element.io 2023-10-11T13:23:14Z
groupsyncs.matrix.element.io 2023-10-11T13:23:14Z
pipes.matrix.element.io 2023-10-11T13:23:14Z
elementdeployments.matrix.element.io 2023-10-11T13:34:25Z
chatterboxes.matrix.element.io 2023-11-21T15:55:59Z
```
**Namespace-scoped role**
In the namespace where the ESS deployment will happen, to give a user permissions to deploy ESS, please create the following role and roles bindings:
- User role:
```
apiVersion: rbac.authorization.k8s.io/v1
kind: Role
metadata:
name: ess-additional
rules:
- apiGroups:
- apiextensions.k8s.io
resources:
- customresourcedefinitions
verbs:
- list
- watch
- get
- apiGroups:
- project.openshift.io
resources:
- projects
verbs:
- get
- list
- watch
```
- User roles bindings:
```
apiVersion: rbac.authorization.k8s.io/v1
kind: RoleBinding
metadata:
name: ess-additional
roleRef:
apiGroup: rbac.authorization.k8s.io
kind: Role
name: ess-additional
subjects:
# role subjects which maps to the user or its groups
```
```
apiVersion: rbac.authorization.k8s.io/v1
kind: RoleBinding
metadata:
name: ess
roleRef:
apiGroup: rbac.authorization.k8s.io
kind: ClusterRole
name: edit
subjects:
# role subjects which maps to the user or its groups
```
Once your cluster is prepared, you can setup your namespace-scoped deployment by configuring these settings:
- **Skip Operator Setup****.** Unchecked
- **Skip Updater Setup****.** Unchecked
- **Skip Element CRDs Setup****.** Checked
- **Cluster Deployment****.** Unchecked
- **Kube Context Name****.** Set to `user_kube_context_name`
- **Namespaces****.**
- **Create Namespaces****.** Unchecked
- **Operator****.** Set to `namespace_to_deploy_ess`
- **Updater****.** Set to same as Operator, `namespace_to_deploy_ess`
- **Element Deployment****.** Set to same as Operator, `namespace_to_deploy_ess`
#### Internal Webhooks
[](https://ems-docs.element.io/uploads/images/gallery/2024-05/image-1716365980592.png)
Config Example
```yml
spec:
install:
webhooks:
caPassphrase: YpiNQMMzBjalfVPQqxcxO4e211YFR5
```
### Connectivity
[](https://ems-docs.element.io/uploads/images/gallery/2024-02/image-1708076541524.png)
Config Example
```yml
spec:
connectivity:
```
#### Connected
[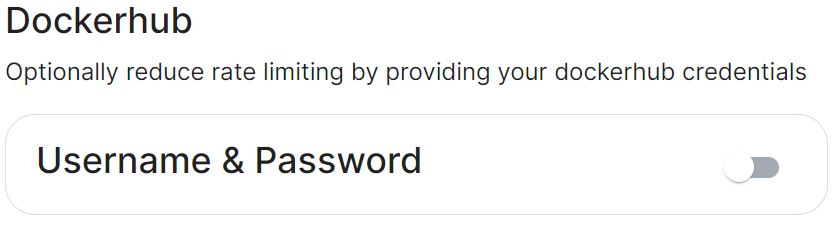](https://ems-docs.element.io/uploads/images/gallery/2024-02/image-1708076586708.png)
Config Example
```yml
spec:
connectivity:
# dockerhub: {} # When Username & Password is disabled per default
dockerhub:
password: password
username: test
```
Connected means the installer will use the previously provided [EMS Image Store](#bkmrk-ems-image-store) credentials to pull the required pod images as part of deployment, optionally, you can specify DockerHub credentials to reduce potential rate limiting.
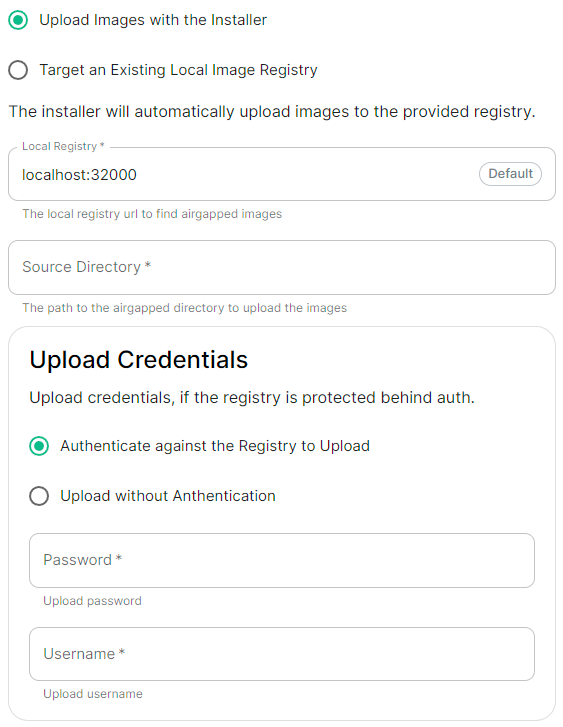
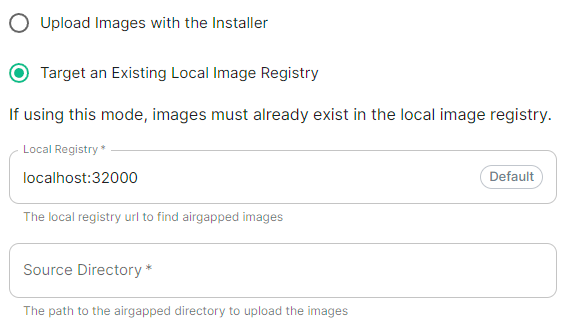
#### Airgapped
Config Example
```yml
spec:
connectivity:
airgapped:
localRegistry: localhost:32000
sourceDirectory: /home/ubuntu/airgapped/
# uploadCredentials not present if `Target an Existing Local Image Registry` selected
# uploadCredentials: {} # If 'Upload without Authentication'
uploadCredentials:
password: example
username: example
```
An airgapped environment is any environment in which the running hosts will not have access to the greater internet. This proposes a situation in which these hosts are unable to get access to various needed bits of software from Element and also are unable to share telemetry data back with Element.
Selecting Airgapped means the installer will rely on images stored in a registry local to your environment, by default the installer will host this registry uploading images found within the specified `Source Directory`, however you can alternatively specify one already present in your environment instead.
##### Getting setup within an Airgapped environment
Alongside each Installer binary available for download, for those customers with airgapped permissions, is an equivalent airgapped package `element-enterprise-installer-airgapped--gui.tar.gz`. Download and copy this archive to the machine running the installer, then use `tar -xzvf element-enterprise-installer-airgapped--gui.tar.gz` to extract out its contents, you should see a folder `airgapped` with the following directories within:
- `pip`
- `galaxy`
- `snaps`
- `containerd`
- `images`
Copy the full path of the root `airgapped` folder, for instance, `/home/ubuntu/airgapped` and paste that into the `Source Directory` field. Should you ever update the ESS installer binary, you will need to ensure you delete and replace this `airgapped` folder, with its updated equivalent.
Your airgapped machine will still require access to airgapped linux repositories depending on your OS. If using Red Hat Enterprise Linux, you will also need access to the EPEL repository in your airgapped environment.
### Host Admin
[](https://ems-docs.element.io/uploads/images/gallery/2024-04/image-1714496264422.png)
Config Example
- `internal.yml`
```yml
spec:
fqdn: admin.example.com
tls:
# When selecting `Self Signed`
# mode: self-signed
# When selecting `Automatic Let's Encrypt`
mode: automatic
automatic:
adminEmail: example@example.com
# When selecting `Certificate File`
# mode: certfile
# certificate:
# certFile: "example" # Base64 encoded string from certificate
# privateKey: "example" # Base64 encoded string from certificate key
# When selecting `Exsiting TLS Certificates in the Cluster`
# mode: existing
# secretName: example
# When selecting `Externally Managed`
# mode: external
```
- `deployment.yml`
```yml
spec:
components:
synapseAdmin:
config:
hostOrigin: >-
https://admin.example.com,https://admin.example.com:8443
```
The Host Admin section allows you to configure the domain name and certificates to use when serving the ESS installer GUI, when running directly on the host - changes here will take affect the next time you run the installer.