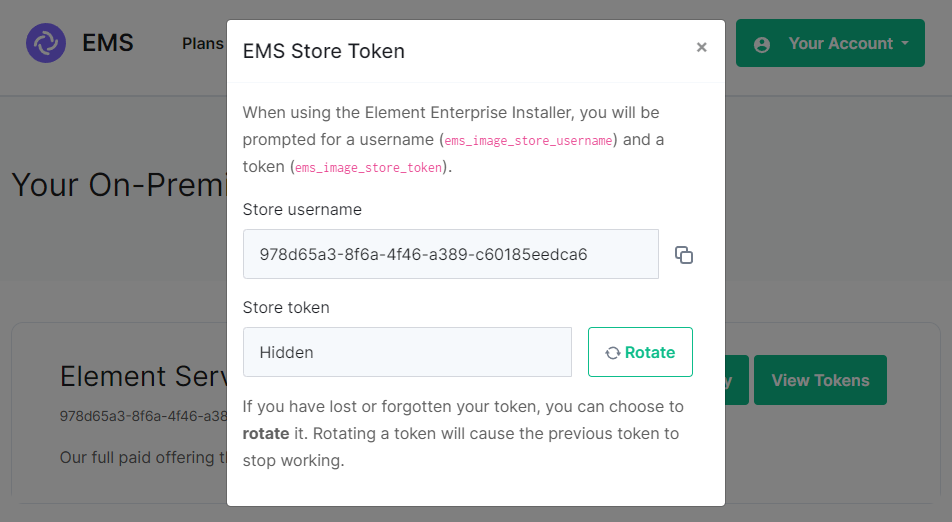
If you forget your token and hit 'Refresh' in the EMS Control Panel, you will need to ensure you redeploy your instance with the new token - otherwise subsequent deployments will fail.
[](https://ems-docs.element.io/uploads/images/gallery/2024-08/image-1722600415206.png) #### MicroK8s [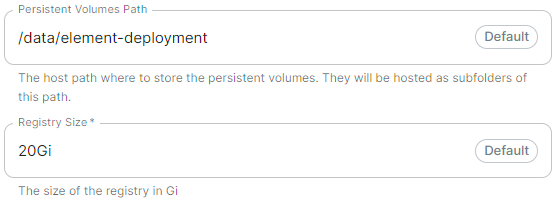](https://ems-docs.element.io/uploads/images/gallery/2024-04/image-1714496085591.png)Config Example
```yml spec: install: microk8s: persistentVolumesPath: /data/element-deployment registrySize: 25Gi ```Config Example
```yml spec: install: microk8s: dnsResolvers: - 8.8.8.8 - 8.8.4.4 ```Config Example
```yml spec: install: microk8s: # Not present when disabled nginxExtraConfiguration: custom-http-errors: '"404"' server-snippet: >- error_page 404 /404.html; location = /404.html { internal; return 200 "Hello World!
"; } ```The below example is for demonstration purposes only, you should follow the linked guidance before adding extra configuration.
For example, if you wanted to replace the standard 404 error page, you could do this using both [`custom-http-errors`](https://kubernetes.github.io/ingress-nginx/user-guide/nginx-configuration/configmap/#custom-http-errors) and [`server-snippet`](https://kubernetes.github.io/ingress-nginx/user-guide/nginx-configuration/configmap/#server-snippet). To configure via the installer, simply add the specify `custom-http-errors` as the `Name` and click `Add to Nginx Extra Configuration`, then provide the required value in the newly created field: [](https://ems-docs.element.io/uploads/images/gallery/2024-02/image-1708078830743.png) Repeat for `server-snippet`: [](https://ems-docs.element.io/uploads/images/gallery/2024-02/image-1708078877553.png)The above example is used to explain how to configure the Nginx Extra Configuration, and so is for demonstration purposes only, it is not recommended to use this example config. Ideally your web server should manage traffic that would otherwise hit a 404 being served by ESS.
#### PostgreSQL in Cluster [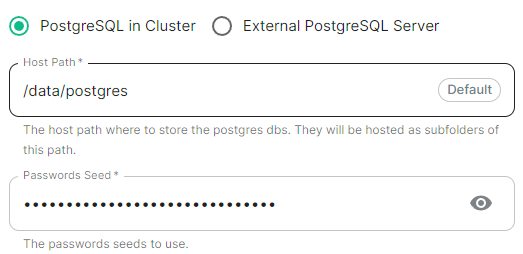](https://ems-docs.element.io/uploads/images/gallery/2024-04/image-1714496148674.png)Config Example
```yml spec: install: microk8s: # postgresInCluster: {} # If 'External PostgreSQL Server' selected postgresInCluster: hostPath: /data/postgres passwordsSeed: example ```Config Example
```yml spec: install: webhooks: caPassphrase: YpiNQMMzBjalfVPQqxcxO4e211YFR5 ```Config Example
```yml spec: connectivity: dockerhub: password: example username: example install: emsImageStore: password: example username: example webhooks: caPassphrase: example # Options unique to selecting Standalone clusterDeployment: true kubeContextName: example namespaces: {} skipElementCrdsSetup: false skipOperatorSetup: false skipUpdaterSetup: false ```An example of the cluster.yml config generated when selecting Kubernetes, note that no specific flag is used within the config to specify selecting between Standalone or Kubernetes. If you choose to manually configure ESS bypassing the GUI, ensure only config options specific to how you wish to deploy are provided.
Config Example
```yml spec: install: clusterDeployment: true ```Config Example
```yml spec: install: kubeContextName: example ```Config Example
```yml spec: install: skipElementCrdsSetup: false skipOperatorSetup: false skipUpdaterSetup: false ```Config Example
```yml spec: install: # namespaces: {} # When left as default namespaces # namespaces: # When `Create Namespaces` is disabled # createNamespaces: false namespaces: # When custom namespaces are provided elementDeployment: element-example # Omit any that should remain as default operator: operator-example updater: updater-example ```Preparing the Cluster
**Installing the Helm Chart Repositories** The first step is to start on a machine with helm v3 installed and configured with your kubernetes cluster and pull down the two charts that you will need. First, let's add the element-updater repository to helm: ``` helm repo add element-updater https://registry.element.io/helm/element-updater --username ems_image_store_username --password 'ems_image_store_token' ``` Replace `ems_image_store_username` and `ems_image_store_token` with the values provided to you by Element. Secondly, let's add the element-operator repository to helm: ``` helm repo add element-operator https://registry.element.io/helm/element-operator --username ems_image_store_username --password 'ems_image_store_token' ``` Replace `ems_image_store_username` and `ems_image_store_token` with the values provided to you by Element. Now that we have the repositories configured, we can verify this by: ``` helm repo list ``` and should see the following in that output: ``` NAME URL element-operator https://registry.element.io/helm/element-operator element-updater https://registry.element.io/helm/element-updater ```**Deploy the CRDs** Write the following `values.yaml` file: ``` clusterDeployment: true deployCrds: true deployCrdRoles: true deployManager: false ``` To install the CRDs with the helm charts, simply run: ``` helm install element-updater element-updater/element-updater -f values.yaml helm install element-operator element-operator/element-operator -f values.yaml ``` Now at this point, you should have the following two CRDs available: ``` [user@helm ~]$ kubectl get crds | grep element.io elementwebs.matrix.element.io 2023-10-11T13:23:14Z wellknowndelegations.matrix.element.io 2023-10-11T13:23:14Z elementcalls.matrix.element.io 2023-10-11T13:23:14Z hydrogens.matrix.element.io 2023-10-11T13:23:14Z mautrixtelegrams.matrix.element.io 2023-10-11T13:23:14Z sydents.matrix.element.io 2023-10-11T13:23:14Z synapseusers.matrix.element.io 2023-10-11T13:23:14Z bifrosts.matrix.element.io 2023-10-11T13:23:14Z lowbandwidths.matrix.element.io 2023-10-11T13:23:14Z synapsemoduleconfigs.matrix.element.io 2023-10-11T13:23:14Z matrixauthenticationservices.matrix.element.io 2023-10-11T13:23:14Z ircbridges.matrix.element.io 2023-10-11T13:23:14Z slidingsyncs.matrix.element.io 2023-10-11T13:23:14Z securebordergateways.matrix.element.io 2023-10-11T13:23:14Z hookshots.matrix.element.io 2023-10-11T13:23:14Z matrixcontentscanners.matrix.element.io 2023-10-11T13:23:14Z sygnals.matrix.element.io 2023-10-11T13:23:14Z sipbridges.matrix.element.io 2023-10-11T13:23:14Z livekits.matrix.element.io 2023-10-11T13:23:14Z integrators.matrix.element.io 2023-10-11T13:23:14Z jitsis.matrix.element.io 2023-10-11T13:23:14Z mautrixwhatsapps.matrix.element.io 2023-11-15T09:03:48Z synapseadminuis.matrix.element.io 2023-10-11T13:23:14Z synapses.matrix.element.io 2023-10-11T13:23:14Z groupsyncs.matrix.element.io 2023-10-11T13:23:14Z pipes.matrix.element.io 2023-10-11T13:23:14Z elementdeployments.matrix.element.io 2023-10-11T13:34:25Z chatterboxes.matrix.element.io 2023-11-21T15:55:59Z ```
**Namespace-scoped role** In the namespace where the ESS deployment will happen, to give a user permissions to deploy ESS, please create the following role and roles bindings: - User role: ``` apiVersion: rbac.authorization.k8s.io/v1 kind: Role metadata: name: ess-additional rules: - apiGroups: - apiextensions.k8s.io resources: - customresourcedefinitions verbs: - list - watch - get - apiGroups: - project.openshift.io resources: - projects verbs: - get - list - watch ``` - User roles bindings: ``` apiVersion: rbac.authorization.k8s.io/v1 kind: RoleBinding metadata: name: ess-additional roleRef: apiGroup: rbac.authorization.k8s.io kind: Role name: ess-additional subjects: # role subjects which maps to the user or its groups ```
``` apiVersion: rbac.authorization.k8s.io/v1 kind: RoleBinding metadata: name: ess roleRef: apiGroup: rbac.authorization.k8s.io kind: ClusterRole name: edit subjects: # role subjects which maps to the user or its groups ```
Unchecked - **Skip Updater Setup****.**
Unchecked - **Skip Element CRDs Setup****.**
Checked - **Cluster Deployment****.**
Unchecked - **Kube Context Name****.**
Set to `user_kube_context_name` - **Namespaces****.** - **Create Namespaces****.**
Unchecked - **Operator****.**
Set to `namespace_to_deploy_ess` - **Updater****.**
Set to same as Operator, `namespace_to_deploy_ess` - **Element Deployment****.**
Set to same as Operator, `namespace_to_deploy_ess` #### Internal Webhooks [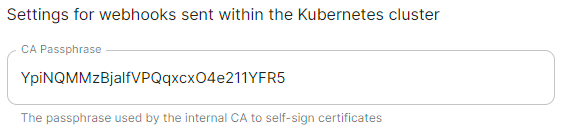](https://ems-docs.element.io/uploads/images/gallery/2024-05/image-1716365980592.png)
Config Example
```yml spec: install: webhooks: caPassphrase: YpiNQMMzBjalfVPQqxcxO4e211YFR5 ```Config Example
```yml spec: connectivity: ```Config Example
```yml spec: connectivity: # dockerhub: {} # When Username & Password is disabled per default dockerhub: password: password username: test ```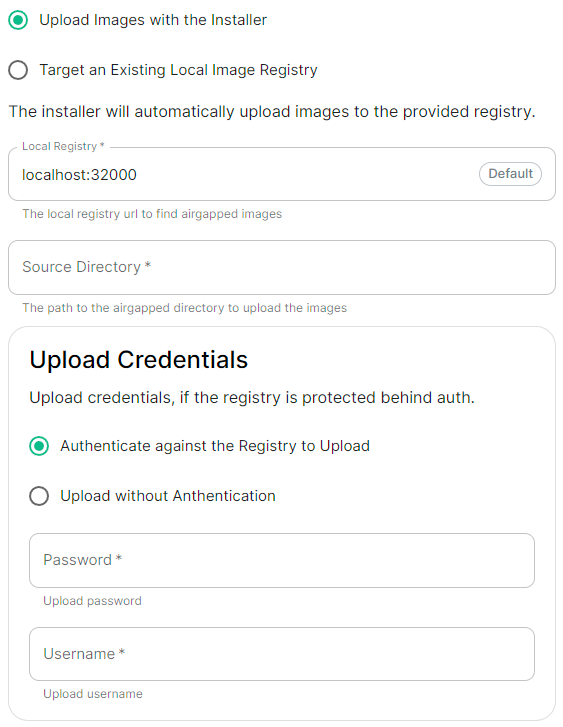 |
 |
Config Example
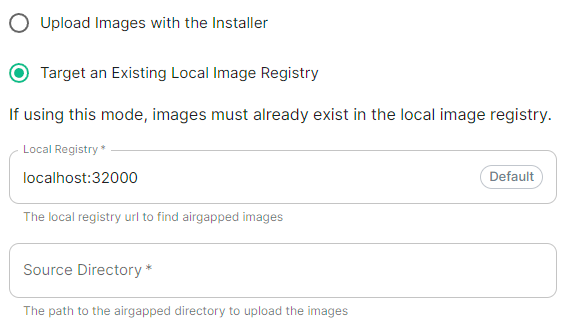
```yml spec: connectivity: airgapped: localRegistry: localhost:32000 sourceDirectory: /home/ubuntu/airgapped/ # uploadCredentials not present if `Target an Existing Local Image Registry` selected # uploadCredentials: {} # If 'Upload without Authentication' uploadCredentials: password: example username: example ```Your airgapped machine will still require access to airgapped linux repositories depending on your OS. If using Red Hat Enterprise Linux, you will also need access to the EPEL repository in your airgapped environment.
### Host Admin [](https://ems-docs.element.io/uploads/images/gallery/2024-04/image-1714496264422.png)Config Example
- `internal.yml` ```yml spec: fqdn: admin.example.com tls: # When selecting `Self Signed` # mode: self-signed # When selecting `Automatic Let's Encrypt` mode: automatic automatic: adminEmail: example@example.com # When selecting `Certificate File` # mode: certfile # certificate: # certFile: "example" # Base64 encoded string from certificate # privateKey: "example" # Base64 encoded string from certificate key # When selecting `Exsiting TLS Certificates in the Cluster` # mode: existing # secretName: example # When selecting `Externally Managed` # mode: external ``` - `deployment.yml` ```yml spec: components: synapseAdmin: config: hostOrigin: >- https://admin.example.com,https://admin.example.com:8443 ```Configure the domains ESS should use for the main components deployed by ESS.
The second section of the ESS installer GUI is the Domains section, here you will configure the fully-qualified domain names for each of the main components that will be deployed by ESS.
The domain names configured via the UI in this section will be saved to your deployment.yml under each of the components' k8s: ingress: configuration.
Config Example
```yml spec: components: elementWeb: k8s: ingress: fqdn: element.example.com integrator: k8s: ingress: fqdn: integrator.example.com synapse: k8s: ingress: fqdn: synapse.example.com synapseAdmin: k8s: ingress: fqdn: admin.example.com global: config: domainName: example.com ```Configure and/or provide the certificates that should be used for each domain served by ESS.
The third section of the ESS installer GUI is the Domains section, here you will configure the certificates to use for each previously specified domain name.
Certificate details configured via the UI in this section will be saved to your deployment.yml under each of the components' k8s: ingress: configuration with the cert contents (if manually uploaded) being saved to a secrets.yml in Base64.
Config Example
- `deployment.yml` ```yml spec: components: elementWeb: k8s: ingress: tls: # Selecting `Certmanager Let's Encrypt` certmanager: issuer: letsencrypt mode: certmanager secretName: element-web integrator: k8s: ingress: tls: # Selecting `Certificate File` certificate: certFileSecretKey: integratorCertificate privateKeySecretKey: integratorPrivateKey mode: certfile secretName: integrator synapse: k8s: ingress: tls: # Selecting `Existing TLS Certificates in the Cluster` mode: existing secretName: example secretName: synapse synapseAdmin: k8s: ingress: tls: # Selecting `Externally Managed` mode: external secretName: synapse-admin wellKnownDelegation: k8s: ingress: tls: mode: external secretName: well-known-delegation ``` - `secrets.yml` ```yml apiVersion: v1 kind: Secret metadata: name: element-web namespace: element-onprem data: elementWebCertificate: >- exampleBase64EncodedString elementWebPrivateKey: >- exampleBase64EncodedString --- apiVersion: v1 kind: Secret metadata: name: integrator namespace: element-onprem data: certificate: >- exampleBase64EncodedString privateKey: >- exampleBase64EncodedString --- apiVersion: v1 kind: Secret metadata: name: synapse namespace: element-onprem data: synapseCertificate: >- exampleBase64EncodedString synapsePrivateKey: >- exampleBase64EncodedString --- apiVersion: v1 kind: Secret metadata: name: synapse-admin namespace: element-onprem data: synapseAdminUICertificate: >- exampleBase64EncodedString synapseAdminUIPrivateKey: >- exampleBase64EncodedString --- apiVersion: v1 kind: Secret metadata: name: well-known-delegation namespace: element-onprem data: wellKnownDelegationCertificate: >- exampleBase64EncodedString wellKnownDelegationPrivateKey: >- exampleBase64EncodedString ```Config Example
```yml spec: components: componentName: # `elementWeb`, `integrator`, `synapse`, `synapseAdmin`, `wellKnownDelegation` k8s: ingress: tls: certmanager: issuer: letsencrypt mode: certmanager secretName: component # Not used with 'Certmanager Let's Encrypt' ```Config Example
- `deployment.yml` ```yml spec: components: componentName: # `elementWeb`, `integrator`, `synapse`, `synapseAdmin`, `wellKnownDelegation` k8s: ingress: tls: mode: certfile certificate: certFileSecretKey: componentCertificate privateKeySecretKey: componentPrivateKey secretName: component ``` - `secrets.yml` ```yml apiVersion: v1 kind: Secret metadata: name: component namespace: element-onprem data: componentCertificate: >- exampleBase64EncodedString componentPrivateKey: >- exampleBase64EncodedString --- ```Config Example
```yml spec: components: componentName: # `elementWeb`, `integrator`, `synapse`, `synapseAdmin`, `wellKnownDelegation` k8s: ingress: tls: mode: existing secretName: example secretName: component # Not used with 'Existing TLS Certificates in the Cluster' ```Config Example
```yml spec: components: componentName: # `elementWeb`, `integrator`, `synapse`, `synapseAdmin`, `wellKnownDelegation` k8s: ingress: tls: mode: external secretName: component # Not used with 'Externally Managed' ```Config Example
```yaml apiVersion: v1 data: client: |- { "m.homeserver": { "base_url": "https://synapse.example.com" } } server: |- { "m.server": "synapse.example.com:443" } kind: ConfigMap metadata: creationTimestamp: "2024-06-13T09:32:52Z" labels: app.kubernetes.io/component: matrix-delegation app.kubernetes.io/instance: first-element-deployment-well-known app.kubernetes.io/managed-by: element-operator app.kubernetes.io/name: well-known app.kubernetes.io/part-of: matrix-stack app.kubernetes.io/version: 1.24-alpine-slim k8s.element.io/crdhash: 9091d9610bf403eada3eb086ed2a64ab70cc90a8 name: first-element-deployment-well-known namespace: element-onprem ownerReferences: - apiVersion: matrix.element.io/v1alpha1 kind: WellKnownDelegation name: first-element-deployment uid: 24659493-cda0-40f0-b4db-bae7e15d8f3f resourceVersion: "3629" uid: 7b0082a9-6773-4a28-a2a9-588a4a7f7602 ```Configuration options for how ESS can communicate with your PostgreSQL database.
This section of the ESS installer GUI will only be present if you are using the Kubernetes deployment option or you have opted to use your own PostgreSQL for a Standalone deployment. If you have not yet set up your PostgreSQL, you should ensure you have done so before proceeding, see the relevant PostgreSQL section from the [Requirements and Recommendations](https://ems-docs.element.io/books/element-server-suite-classic-documentation-lts-2404/page/requirements-and-recommendations) page: - [Standalone Deployment PostgreSQL Prerequisites](https://ems-docs.element.io/books/element-server-suite-classic-documentation-lts-2404/page/requirements-and-recommendations#bkmrk-postgresql) - [Kubernetes Deployment PostgreSQL Prerequisites](https://ems-docs.element.io/books/element-server-suite-classic-documentation-lts-2404/page/requirements-and-recommendations#bkmrk-postgresql-1)
All settings configured via the UI in this section will be saved to your deployment.yml, with the contents of secrets being saved to secrets.yml. You will find specific configuration examples in each section.
Config Example
- `deployment.yml` ```yml spec: components: synapse: config: postgresql: ``` - `secrets.yml` ```yml apiVersion: v1 kind: Secret metadata: name: synapse namespace: element-onprem data: postgresPassword: ```By default, if you do not change any settings on this page, defaults will be added to your configuration file/s (see example below).
Config Example
```yml spec: components: synapse: config: postgresql: database: synapse host: db.example.com passwordSecretKey: postgresPassword user: test-username ```Config Example
```yml spec: components: synapse: config: postgresql: database: synapse ```Config Example
```yml spec: components: synapse: config: postgresql: host: db.example.com ```Config Example
```yml spec: components: synapse: config: postgresql: # port not present when left as default 5432 port: 5432 ```Config Example
```yml spec: components: synapse: config: postgresql: # sslMode not present when left as default `require` sslMode: require # sslMode: disable # sslMode: allow # sslMode: prefer # sslMode: verify-ca # sslMode: verify-full ```Config Example
```yml spec: components: synapse: config: postgresql: user: test-username ```Config Example
- `secrets.yml` ```yml apiVersion: v1 kind: Secret metadata: name: synapse namespace: element-onprem data: postgresPassword: dGVzdC1wYXNzd29yZA== ```Config Example
```yml spec: components: synapse: config: postgresql: # connectionPool not present when left as default connectionPool: maxConnections: 10 minConnections: 5 ```Configuration options relating to how Media uploaded to your homeserver is handled by ESS.
The Media section allows you to customise where media uploaded to your homeserver should be stored and the maximum upload size. By default this is to a Persistent Volume Claim (PVC) however you can also configure options for using S3.
All settings configured via the UI in this section will be saved to your deployment.yml, with the contents of secrets being saved to secrets.yml. You will find specific configuration examples in each section.
Config Example
- `deployment.yml` ```yml metadata: annotations: ui.element.io/layer: | components: synapse: config: media: spec: components: synapse: config: media: ``` - `secrets.yml` ```yml kind: Secret metadata: name: synapse namespace: element-onprem data: ```By default, if you do not change any settings on this page, defaults will be added to your configuration file/s (see example below).
Config Example
- `deployment.yml` ```yml spec: components: synapse: config: media: maxUploadSize: 100M volume: size: 50Gi ```Config Example
```yml spec: components: synapse: config: media: volume: # Present if you select either Persistent Volume Claim option size: 50Gi ```Config Example
```yml spec: components: synapse: config: media: s3: bucket: example_bucket_name prefix: example_prefix storageClass: STANDARD # Not present if left as default ```Config Example
- `secrets.yml` ```yml apiVersion: v1 kind: Secret metadata: name: synapse namespace: element-onprem data: mediaS3StorageAccessKeyId: ZXhhbXBsZWFjY2Vzc2tleWlk mediaS3StorageSecretKey: ZXhhbXBsZXNlY3JldGFjY2Vzc2tleQ== ```Config Example
```yml spec: components: synapse: config: media: s3: region: eu-central-1 # Not present if disabled ```Config Example
```yml spec: components: synapse: config: media: s3: endpointUrl: https://example-endpoint.url # Not present if disabled ```Config Example
```yml spec: components: synapse: config: media: s3: # Not present if disabled # localCleanup: {} # If defaults left as-is localCleanup: frequency: 2h # Only present if changed from default threshold: 2d # Only present if changed from default ```Config Example
```yml spec: components: synapse: config: media: maxUploadSize: 100M ```Settings specific to the environment which you are deploying ESS into such as CA.
In the Cluster section you will find options to configure settings specific to the cluster which Element Deployment will run on top of. Initially only one option is presented, however some additional options are presented under 'Advanced'. By default, it is unlikely you should need to configure anything on this page.
All settings configured via the UI in this section will be saved to your deployment.yml, with the contents of secrets being saved to secrets.yml. You will find specific configuration examples in each section.
Config Example
```yml metadata: annotations: ui.element.io/layer: | global: config: adminAllowIps: _value: defaulted k8s: ingresses: tls: certmanager: _value: defaulted spec: components: synapseAdmin: config: hostOrigin: >- https://admin.example.com,https://admin.example.com:8443 global: config: adminAllowIps: - 0.0.0.0/0 - '::/0' k8s: ingresses: tls: certmanager: issuer: letsencrypt mode: certmanager ```Config Example
- `secrets.yml` ```yml apiVersion: v1 kind: Secret metadata: name: global namespace: element-onprem data: # Added to the `global`, `element-onprem` secret as `ca.pem` under the `data` section. Other values may also be present here. ca.pem: >- base64encodedCAinPEMformatString ```Config Example
- `deployment.yml` ```yml metadata: annotations: ui.element.io/layer: | global: config: imagesDigestsConfigMap: {} # Remove if no longer defined in `spec`, `global`, `config` spec: global: config: imagesDigestsConfigMap: example # Remove if no longer required ```Config Example
- `deployment.yml` ```yml metadata: annotations: ui.element.io/layer: | global: config: supportDnsFederationDelegation: {} # Remove if no longer defined in `spec`, `global`, `config` spec: global: config: # supportDnsFederationDelegation: false # Default value when not defined supportDnsFederationDelegation: true ```It is highly discouraged from enabling support for DNS Federation Delegation, a significant number of features across ESS components are configured via .well-known files deployed by WellKnownDelegation. Enabling this will prevent those features from working so you may have a degraded experience.
Config Example
- `deployment.yml` ```yml metadata: annotations: ui.element.io/layer: | global: config: verifyTls: {} # Remove if no longer defined in `spec`, `global`, `config` spec: global: config: # verifyTls: true # Default value when not defined verifyTls: false ```Config Example
- `secrets.yml` ```yml apiVersion: v1 kind: Secret metadata: name: global namespace: element-onprem data: # Added to the `global`, `element-onprem` secret as `genericSharedSecret` under the `data` section. Other values may also be present here. genericSharedSecret: QmdrWkVzRE5aVFJSOTNKWVJGNXROTG10UTFMVWF2 ```Config Example
- `deployment.yml` ```yml metadata: annotations: ui.element.io/layer: | global: config: adminAllowIps: # _value: defaulted # Default value '0': {} '1': {} spec: global: config: # adminAllowIps: # Default values # - 0.0.0.0/0 # - '::/0' adminAllowIps: - 192.168.0.1/24 - 127.0.0.1/24 ```The Synapse configuration options for your Matrix Homeserver incl. registration & encryption.
Synapse is the Matrix homeserver that powers ESS, in this section you will be customising settings relating to your homeserver, analogous with settings you'd set in the `homeserver.yml` if configuring Synapse manually.
All settings configured via the UI in this section will be saved to your deployment.yml, with the contents of secrets being saved to secrets.yml. You will find specific configuration examples in each section.
Config Example
- `deployment.yml` ```yml metadata: annotations: ui.element.io/layer: | components: synapse: spec: components: synapse: ``` - `secrets.yml` ```yml kind: Secret metadata: name: synapse namespace: element-onprem data: ```By default, if you do not change any settings on this page, defaults will be added to your configuration file/s (see example below).
Config Example
- `deployment.yml` ```yml metadata: annotations: ui.element.io/layer: | components: synapse: config: _value: defaulted k8s: haproxy: _value: defaulted redis: _value: defaulted synapse: _value: defaulted spec: components: synapse: config: maxMauUsers: 250 media: volume: size: 50Gi urlPreview: config: acceptLanguage: - en k8s: haproxy: workloads: resources: limits: memory: 200Mi requests: cpu: 100m memory: 100Mi redis: workloads: resources: limits: memory: 50Mi requests: cpu: 50m memory: 50Mi synapse: workloads: resources: limits: memory: 4Gi requests: cpu: 100m memory: 100Mi ``` - `secrets.yml` ```yml apiVersion: v1 kind: Secret metadata: name: synapse namespace: element-onprem data: adminPassword: exampleAdminPassword macaroon: exampleMacaroon registrationSharedSecret: exampleRegistrationSharedSecret signingKey: >- exampleBase64EncodedSigningKey ```For example, you may wish for your server to be able to handle greater than 500 Monthly Active Users, so you select 2500 users. When you later define the [`Max MAU Users`](https://ems-docs.element.io/link/447#bkmrk-max-mau-users) in the Config section below, you can choose any number you wish.
The same applies with Federation, you can optimise your deployment to suit Open Federation but opt to close it in the dedicated Federation section. #### Monthly Active Users [](https://ems-docs.element.io/uploads/images/gallery/2024-08/image-1724313947283.png)
Config Example
```yml metadata: annotations: ui.element.io/profile: | components: synapse: _subvalues: mau: 500 # mau: 2500 # mau: 10000 ```Config Example
```yml metadata: annotations: ui.element.io/profile: | components: synapse: _subvalues: fed: closed # fed: limited # fed: open ```Config Example
```yml spec: components: synapse: config: acceptInvites: manual # acceptInvites: auto # acceptInvites: auto_dm_only ```Config Example
```yml spec: components: synapse: config: maxMauUsers: 250 ```Config Example
```yml spec: components: synapse: config: registration: open # registration: custom # registration: closed ```Open or Closed registration will not affect the creation of new Matrix Accounts via Delegated Authentication. New users via Delegated Authentication i.e. LDAP, SAML or OIDC, who have yet to login to the homeserver and technically do not yet have a created Matrix ID, will still have one created when they successfully authenticate regardless of if registration is Closed.
#### Admin Password [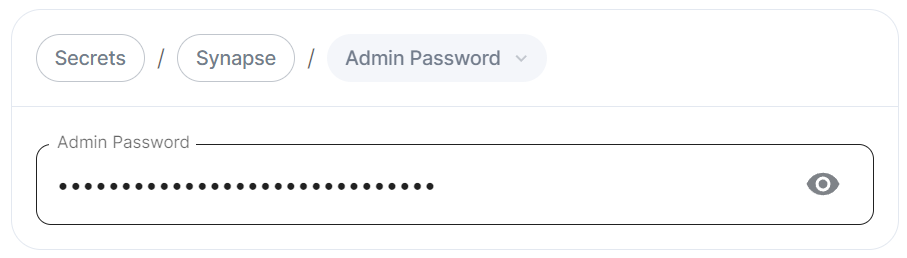](https://ems-docs.element.io/uploads/images/gallery/2024-02/image-1707395849132.png)Config Example
- `deployment.yml` ```yml spec: components: synapse: config: adminPasswordSecretKey: adminPassword ``` - `secrets.yml` ```yml data: adminPassword: ExampleAdminPasswordBase64EncodedString ```If you are experiencing issues with accessing the Admin Console following a wipe and reinstall, ensure you do not have the previous install credentials cached. You can clear them via your browsers' settings, then refresh the page (you will be provided with a new link via the Installer CLI) to resolve.
### Log Unlike with most other sections, logging values set here are analogous to creating a `Config Example
```yml spec: components: synapse: config: log: rootLevel: Info # rootLevel: Debug # rootLevel: Warning # rootLevel: Error # rootLevel: Critical ```It is not advised to leave your Logging Level at anything other than the default, as more verbose logging may expose information that should otherwise not be accessible. When sharing logs, remember to redact any sensitive information you do not wish to share.
#### Sentry DSN [](https://ems-docs.element.io/uploads/images/gallery/2024-02/image-1707396003419.png)Config Example
```yml spec: components: synapse: config: log: sentryDsn: https://publickey:secretkey@sentry.io/projectid ```Config Example
```yml spec: components: synapse: config: log: levelOverrides: synapse.storage.SQL: Info # synapse.storage.SQL: Debug # synapse.storage.SQL: Error # synapse.storage.SQL: Warning # synapse.storage.SQL: Critical ```Config Example
```yml spec: components: synapse: config: security: defaultRoomEncryption: auto_all # defaultRoomEncryption: auto_invite # defaultRoomEncryption: forced_all # defaultRoomEncryption: forced_invite # defaultRoomEncryption: not_set ```This option will only affect rooms created after it is set and will not affect rooms created by other servers.
- `auto_all` - Automatically enables encryption for all rooms created on the local server if all present integrations support it. - `auto_invite` - Automatically enables encryption for private rooms and private messages if all present integrations support it. - `forced_all` - Enforces encryption for all rooms created on the local server, regardless of the integrations supporting encryption. - `forced_invite` - Enforces encryption for private rooms and private messages, regardless of the integrations supporting encryption. - `not_set` - Does not enforce encryption, leaving room encryption configuration choice to room admins. #### Password Policy [`password_config`](https://element-hq.github.io/synapse/latest/usage/configuration/config_documentation.html#password_config) [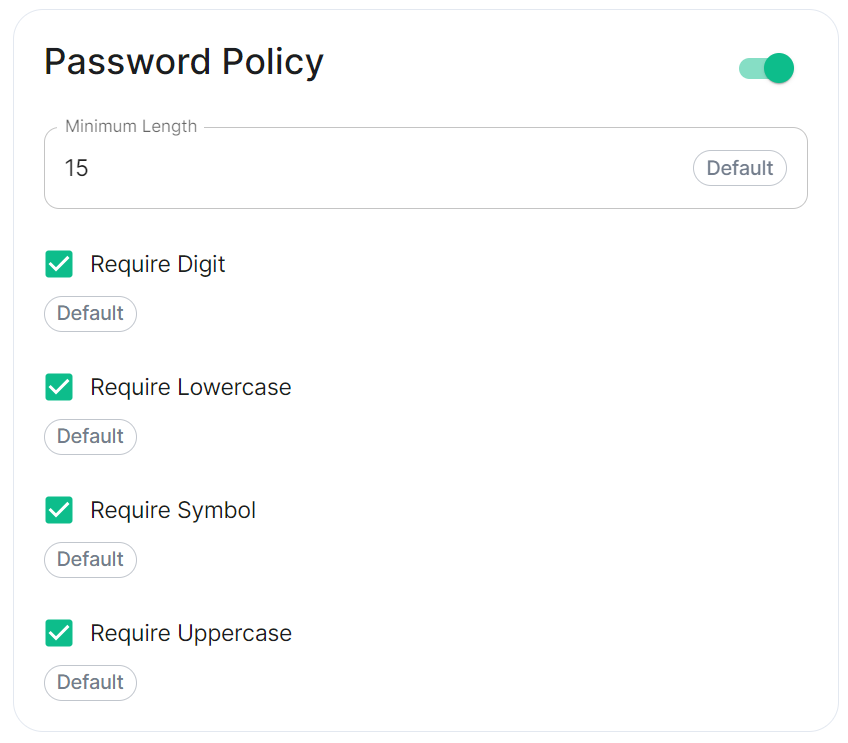](https://ems-docs.element.io/uploads/images/gallery/2024-02/image-1707243135026.png)Config Example
```yml spec: components: synapse: config: security: # Not present when disabled # passwordPolicy: # {} When enabled with default settings passwordPolicy: # Only configured like so when values changed from thier defaults minimumLength: 20 # Default: 15 requireDigit: false # Default: true requireLowercase: false # Default: true requireSymbol: false # Default: true requireUppercase: false # Default: true ```You may notice that despite this not being enabled, users are required when registering to set secure passwords when doing do via the Element Web client. This is because the client itself enforces secure passwords, this setting is required should you wish to ensure all accounts have enforces password requirements, as other Matrix clients may not themselves enforce secure passwords.
### Telemetry [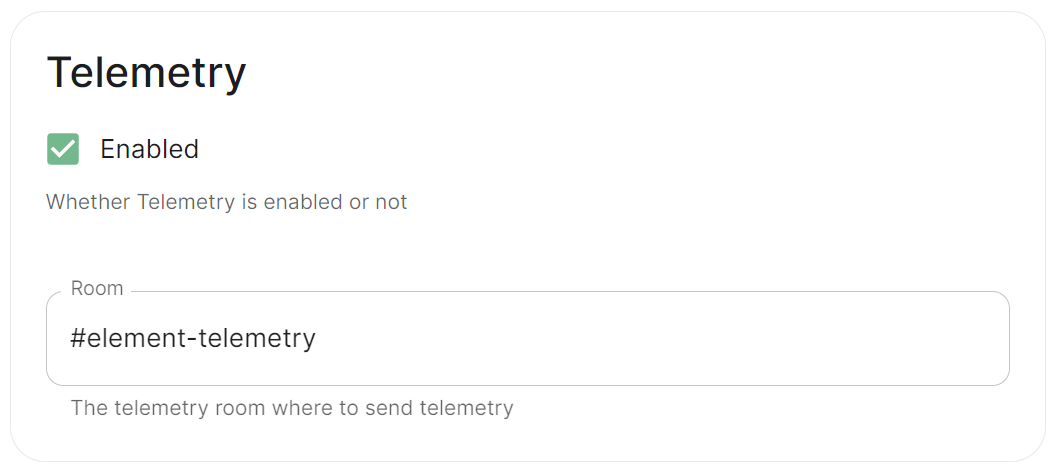](https://ems-docs.element.io/uploads/images/gallery/2024-01/image-1706547000728.png)Config Example
```yml spec: components: synapse: config: telemetry: enabled: true passwordSecretKey: telemetryPassword room: '#element-telemetry' ```Config Example
``` { "_id" : ObjectId("6363bdd7d51c84d1f10a8126"), "onPremiseSubscription" : ObjectId("62f14dd303c67b542efddc4f"), "payload" : { "data" : { "activeUsers" : { "count" : 1, "identifiers" : { "native" : [ "5d3510fc361b95a5d67a464a188dc3686f5eaf14f0e72733591ef6b8da478a18" ] }, "period" : { "end" : 1667481013777, "start" : 1666970260518 } } }, "generationTime" : 1667481013777, "hostname" : "element.demo", "instanceId" : "bd3bbf92-ac8c-472e-abb5-74b659a04eec", "type" : "synapse", "version" : 1 }, "request" : { "clientIp" : "71.70.145.71", "userAgent" : "Synapse/1.65.0" }, "schemaVersion" : 1, "creationTimestamp" : ISODate("2022-11-03T13:10:47.476Z") } ```Config Example
```yml spec: components: synapse: config: telemetry: matrixNetworkStats: endpoint: https://test.endpoint.url ```Config Example
```yml spec: components: synapse: config: urlPreview: {} # {} When disabled, otherwise enabled with config as detailed in sections below. ```Enabling or disabling URL previews can impact the amount of information displayed in the chat interface, and it can also have privacy implications as fetching URL previews involves making requests to external servers to retrieve metadata.
#### Default Blacklist When enabling URL Preview, a default blacklist using [`url_preview_ip_range_blacklist`](https://element-hq.github.io/synapse/latest/usage/configuration/config_documentation.html#url_preview_ip_range_blacklist) is configured for all private networks (see ranged below) to avoid leaking information by asking for preview of links pointing to private paths of the infrastructure. While this blacklist cannot be changed, you can whitelist specific ranges using [IP Range Allowed](#bkmrk-ip-range-allowed).Config Example
```yml url_preview_ip_range_blacklist: - '192.168.0.0/16' - '100.64.0.0/10' - '192.0.0.0/24' - '169.254.0.0/16' - '192.88.99.0/24' - '198.18.0.0/15' - '192.0.2.0/24' - '198.51.100.0/24' - '203.0.113.0/24' - '224.0.0.0/4' - '::1/128' - 'fe80::/10' - 'fc00::/7' - '2001:db8::/32' - 'ff00::/8' - 'fec0::/10' ```Config Example
```yml spec: components: synapse: config: urlPreview: config: acceptLanguage: - en ```Config Example
```yml spec: components: synapse: config: urlPreview: config: ipRangeAllowed: - 10.0.0.0/24 ```Config Example
```yml spec: components: synapse: config: userDirectory: # Not present when left as default, `true` # searchAllUsers: true searchAllUsers: false ```Config Example
- `deployment.yml` ```yml spec: components: synapse: config: # Not present if disabled # stun: {} # If `Internal Coturn Server` selected stun: sharedSecretSecretKey: stunSharedSecret turnUris: - turn:turn.example.com - turns:turns.example.com ``` - `secrets.yml` ```yml data: stunSharedSecret: ExampleSTUNSharedSecretBase64EncodedString ```Config Example
```yml spec: components: synapse: config: # Not present if disabled # identityServer: {} # If enabled but `autoBind` not selected identityServer: autoBind: true ```Config Example
```yml spec: components: synapse: config: httpProxy: httpProxy: http_proxy.example.com httpsProxy: https_proxy.example.com ```Config Example
```yml spec: components: synapse: config: httpProxy: noProxy: - no_proxy.example.com # Hostname example - 192.168.0.123 # IP example - 192.168.1.1/24 # IP range example ```Config Example
```yml spec: components: synapse: config: dataRetention: messageLifetime: 1 ```Config Example
```yml spec: components: synapse: config: dataRetention: mediaLifetime: 1 ```Config Example
```yml spec: components: synapse: config: dataRetention: deleteRoomsAfterInactivity: 1w ```Config Example
- `secrets.yml` ```yml data: macaroon: ExampleMacaroonBase64EncodedString ```Config Example
- `secrets.yml` ```yml data: registrationSharedSecret: ExampleRegistrationSharedSecretBase64EncodedString ```Config Example
- `secrets.yml` ```yml data: signingKey: >- ExampleSigningKeyBase64EncodedString ```We strongly advise against including any config not configurable via the UI as it will most likely interfere with settings automatically computed by the updater. Additional configuration options are not supported so we encourage you to first raise your requirements to Support where we can best advise on them.
An `Additional Config` section, which allows including config not currently configurable via the UI from the [Configuration Manual](https://element-hq.github.io/synapse/latest/usage/configuration/config_documentation.html), is available under the 'Advanced' section of this page. See the dedicated page on additional Synapse configuration, [Synapse Section: Additional Config](https://ems-docs.element.io/books/element-server-suite-classic-documentation-lts-2404/page/synapse-section-additional-config) # Synapse Section: Delegated AuthA detailed look at Delegated Authentication options available and setup examples.
At present, we support delegating the authentication of users to the following provider interfaces: * LDAP * SAML * OIDC When enabling Delegated Auth, you can still allow local users managed by Element to connect to the instance
 |
 |
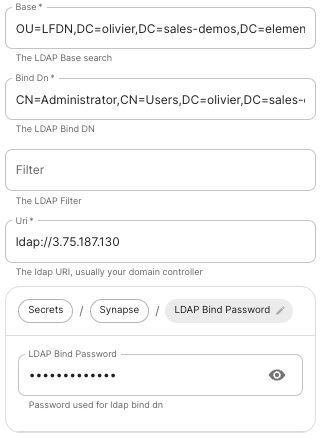
The distinguished name of the root level Org Unit in your LDAP directory. - The distinguished name can be displayed by selecting `View` / `Advanced Features` in the Active Directory console and then, right-clicking on the object, selecting `Properties` / `Attributes Editor`. - **Bind DN****.**
The distinguished name of the LDAP account with read access. - **Filter****.**
A [LDAP filter](https://ldap.com/ldap-filters/) to filter out objects under the LDAP Base DN. - **URI****.**
The URI of your LDAP server `ldap://dc.example.com`. - This is often your Domain Controller, can also pass in `ldaps://` for SSL connectivity. - The following are the typical ports for Windows AD LDAP servers: - `ldap://ServerName:389` - `ldaps://ServerName:636` - **LDAP Bind Password****.**
The password of the AD account with read access. - **LDAP Attributes****.**
- **Mail****.**
`mail` - **Name****.**
`cn` - **UID****.**
`sAMAccountName` ### OpenID on Microsoft Azure Before configuring within the installer, you have to configure Microsoft Azure Active Directory. #### Set up Microsoft Azure Active Directory - You need to create an `App registration`. - You have to select `Redirect URI (optional)` and set it to the following, where `matrix` is the subdomain of Synapse and `example.com` is your base domain as configured on the Domains section: ``` https://matrix.example.com/_synapse/client/oidc/callback ``` [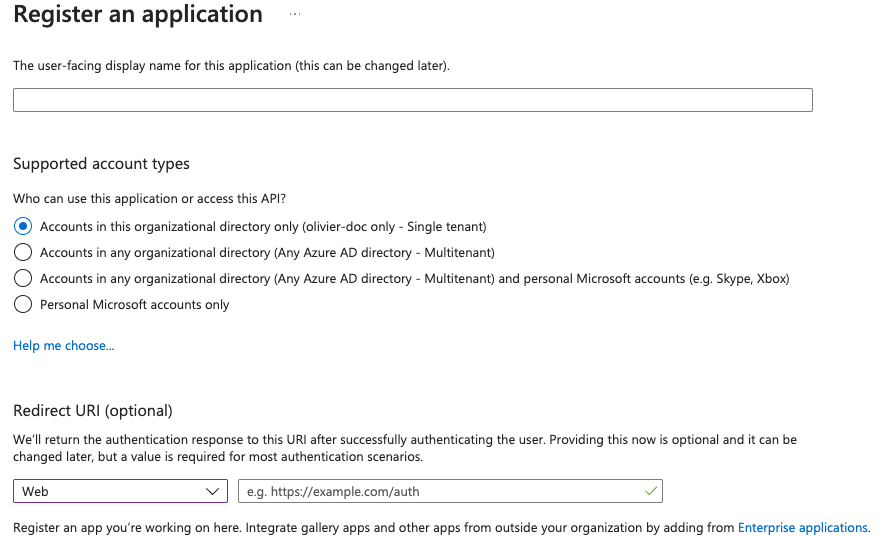](https://ems-docs.element.io/uploads/images/gallery/2023-05/screenshot-2023-05-03-at-16-30-06.png) For the bridge to be able to operate correctly, navigate to API permissions, add Microsoft Graph APIs, choose Delegated Permissions and add: - `openid` - `profile` - `email` Remember to grant the admin consent for those. To setup the installer, you'll need: - The `Application (client) ID` - The `Directory (tenant) ID` - A secret generated from `Certificates & Secrets` on the app. #### Configure the installer
 |
 |
 |
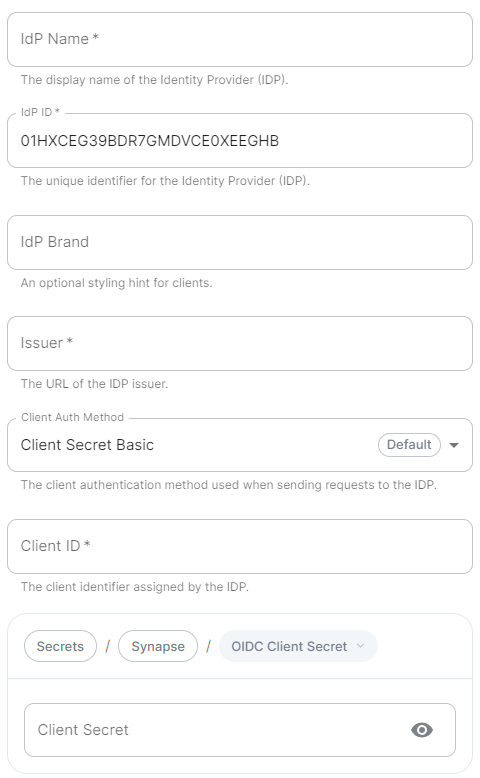
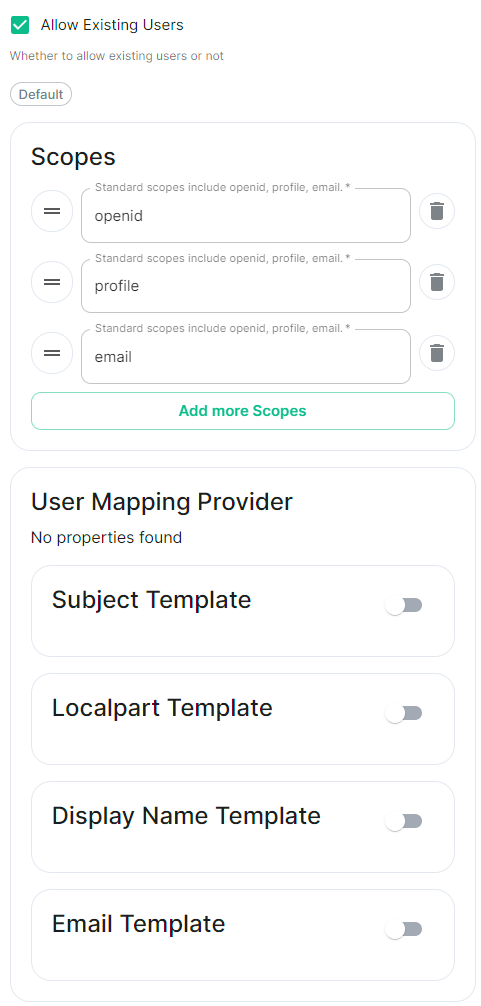
A user-facing name for this identity provider, which is used to offer the user a choice of login mechanisms in the Element UI. - **IdP ID****.**
A string identifying your identity provider in your configuration, this will be auto-generated for you (but can be changed). - **IdP Brand****.**
An optional brand for this identity provider, allowing clients to style the login flow according to the identity provider in question. - **Issuer****.**
The OIDC issuer. Used to validate tokens and (if discovery is enabled) to discover the provider's endpoints. Use `https://login.microsoftonline.com/DIRECTORY_TENNANT_ID/v2.0` replacing `DIRECTORY_TENNANT_ID`. - **Client Auth Method****.**
Auth method to use when exchanging the token. Set it to `Client Secret Post` or any method supported by your IdP. - **Client ID****.**
Set this to your `Application (client) ID`. - **Client Secret****.**
Set this to the secret value defined under "Certificates and secrets". - **Scopes****.**
By default `openid`, `profile` and `email` are added, you shouldn't need to modify these. - **User Mapping Provider****.**
Configuration for how attributes returned from a OIDC provider are mapped onto a matrix user. - **Localpart Template****.**
Jinja2 template for the localpart of the MXID.
Set it to `{{ user.preferred_username.split('@')[0] }}`. - **Display Name Template****.**
Jinja2 template for the display name to set on first login.
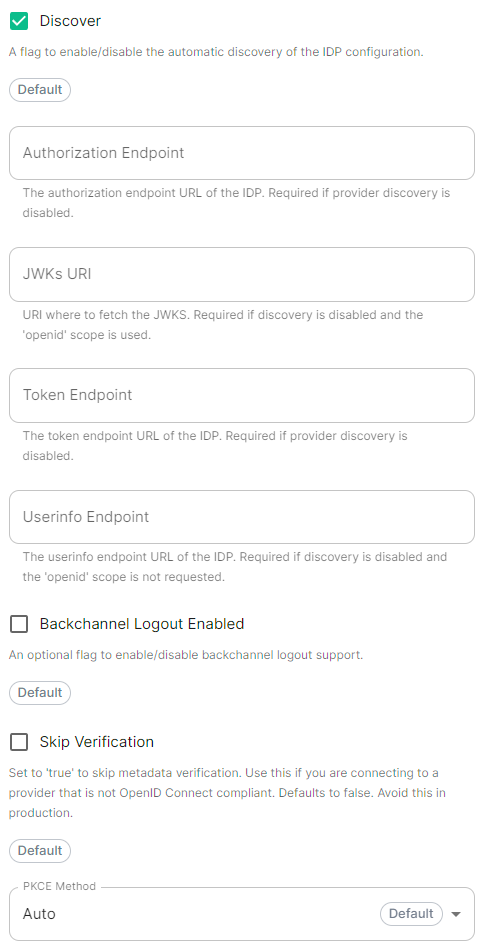
If unset, no display name will be set. Set it to `{{ user.name }}`. - **Discover****.**
Enable / Disable the use of the OIDC discovery mechanism to discover endpoints. - **Backchannel Logout Enabled****.**
Synapse supports receiving OpenID Connect Back-Channel Logout notifications. This lets the OpenID Connect Provider notify Synapse when a user logs out, so that Synapse can end that user session. This property has to bet set to `https://matrix.example.com/_synapse/client/oidc/backchannel_logout`in your identity provider, where `matrix` is the subdomain of Synapse and `example.com` is your base domain as configured on the Domains section. ### OpenID on Microsoft AD FS #### Install Microsoft AD FS Before starting the installation, make sure: - your Windows computer name is correct since you won't be able to change it after having installed AD FS - you configured your server with a static IP address - your server joined a domain and your domain is defined under Server Manager > Local server - you can resolve your server FQDN like computername.my-domain.com
You can find a checklist [here](https://learn.microsoft.com/en-us/windows-server/identity/ad-fs/deployment/checklist--setting-up-a-federation-server).
Steps to follow: - Install AD CS (Certificate Server) to issue valid certificates for AD FS. AD CS provides a platform for issuing and managing public key infrastructure [PKI] certificates. - Install AD FS (Federation Server) ##### Install AD CS You need to install the AD CS Server Role. - Follow this [guide](https://learn.microsoft.com/en-us/windows-server/networking/core-network-guide/cncg/server-certs/install-the-certification-authority).
##### Obtain and Configure an SSL Certificate for AD FS Before installing AD FS, you are required to generate a certificate for your federation service. The SSL certificate is used for securing communications between federation servers and clients. - Follow this [guide](https://learn.microsoft.com/en-us/previous-versions/windows/it-pro/windows-server-2012-R2-and-2012/dn781428(v=ws.11)). - Additionally, this [guide](https://learn.microsoft.com/en-us/windows-server/networking/core-network-guide/cncg/server-certs/configure-the-server-certificate-template) provides more details on how to create a certificate template. ##### Install AD FS You need to install the AD FS Role Service. - Follow this [guide](https://learn.microsoft.com/en-us/windows-server/identity/ad-fs/deployment/install-the-ad-fs-role-service). ##### Configure the federation service AD FS is installed but not configured. - Click on `Configure the federation service on this server` under `Post-deployment configuration` in the `Server Manager`. - Ensure `Create the first federation server in a federation server farm` and is selected [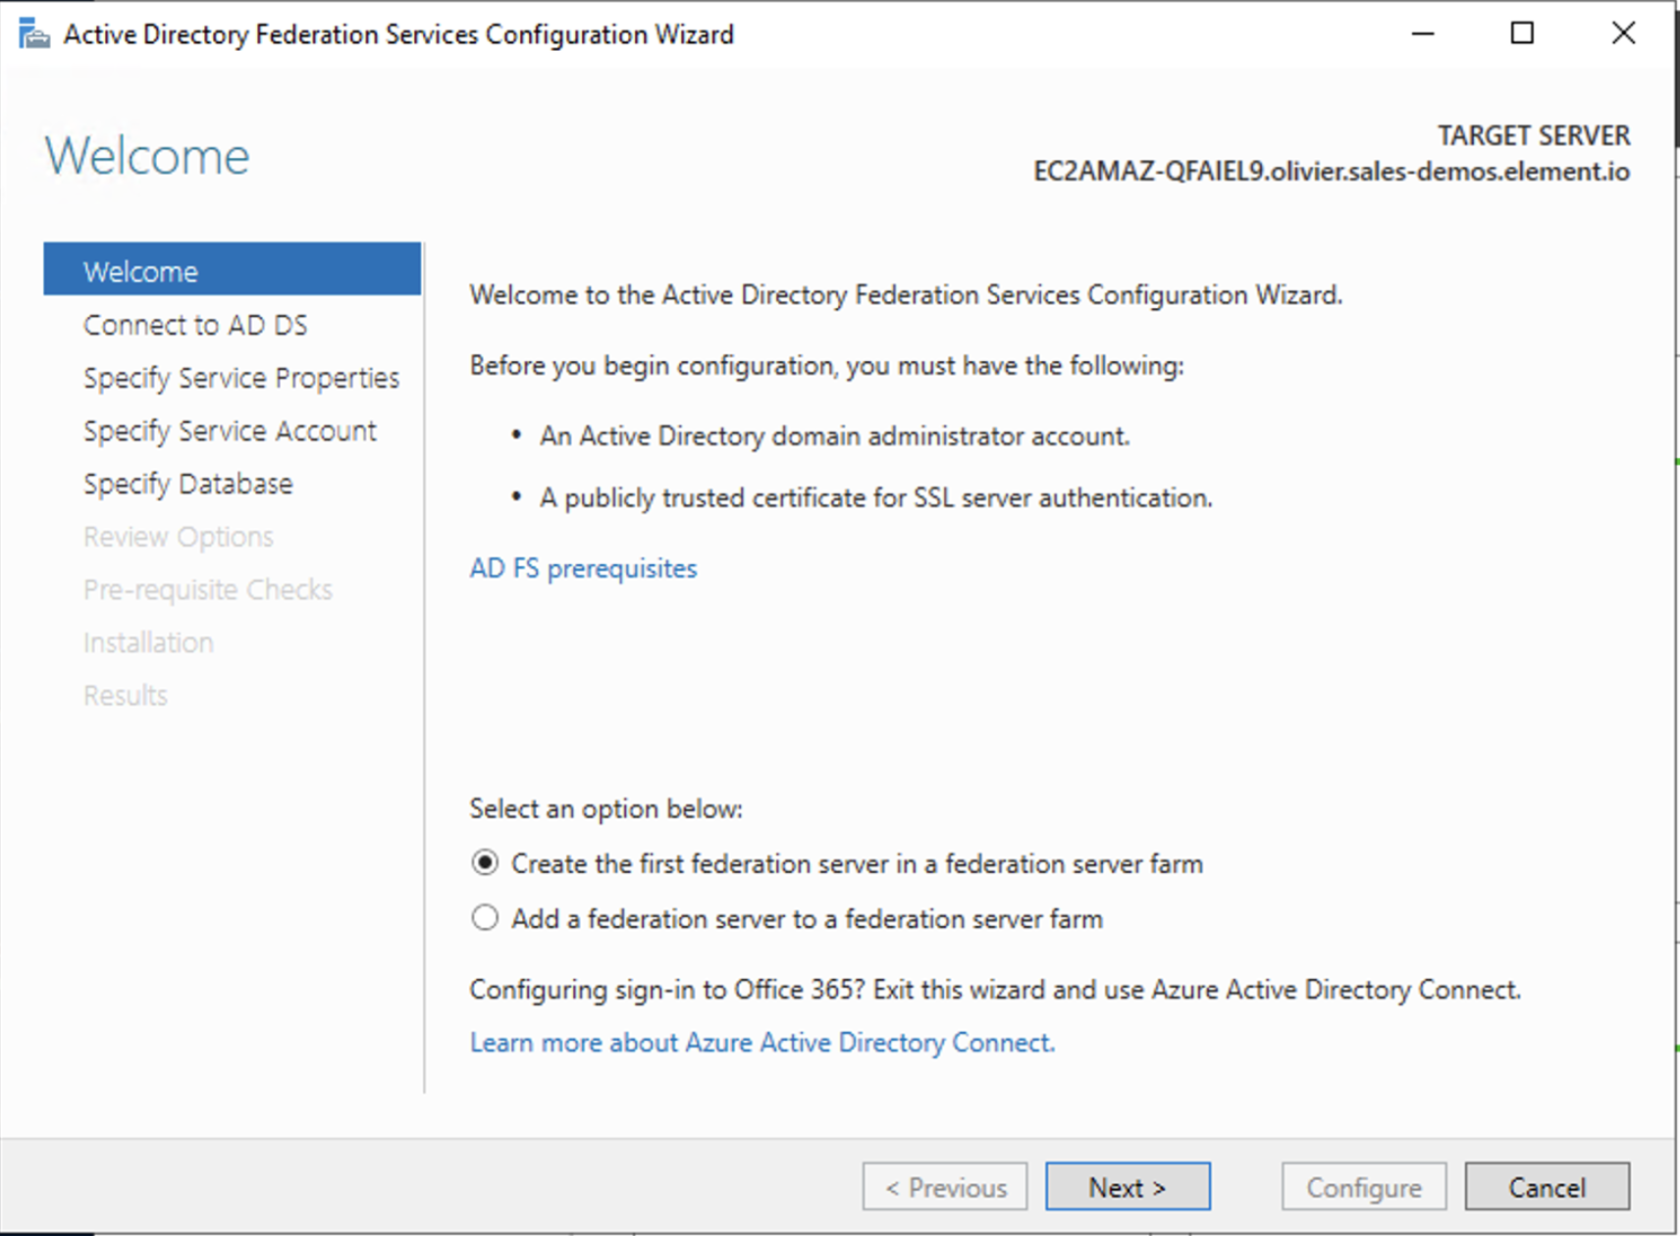](https://ems-docs.element.io/uploads/images/gallery/2023-06/screenshot-2023-06-22-at-15-55-57.png) - Click `Next` [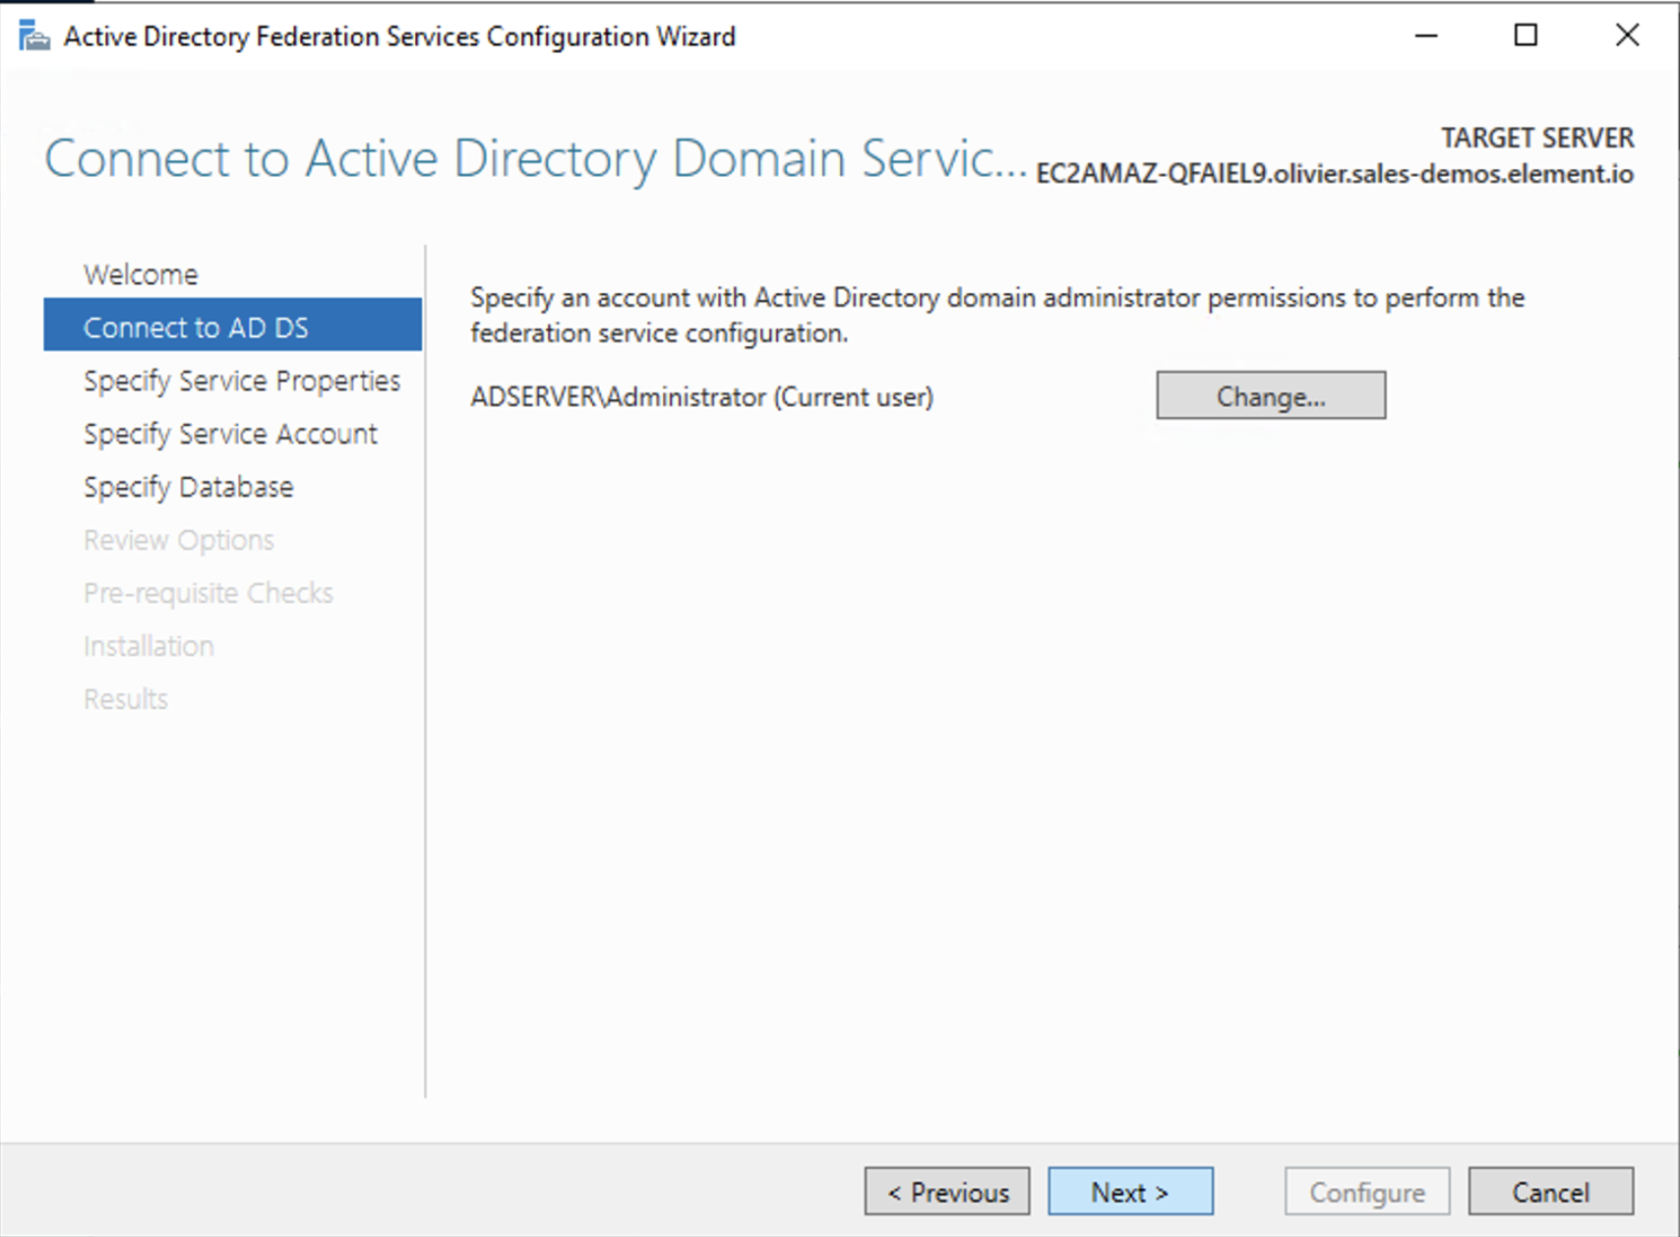](https://ems-docs.element.io/uploads/images/gallery/2023-06/screenshot-2023-06-22-at-15-57-41.png) - Select the SSL Certificate and set a Federation Service Display Name [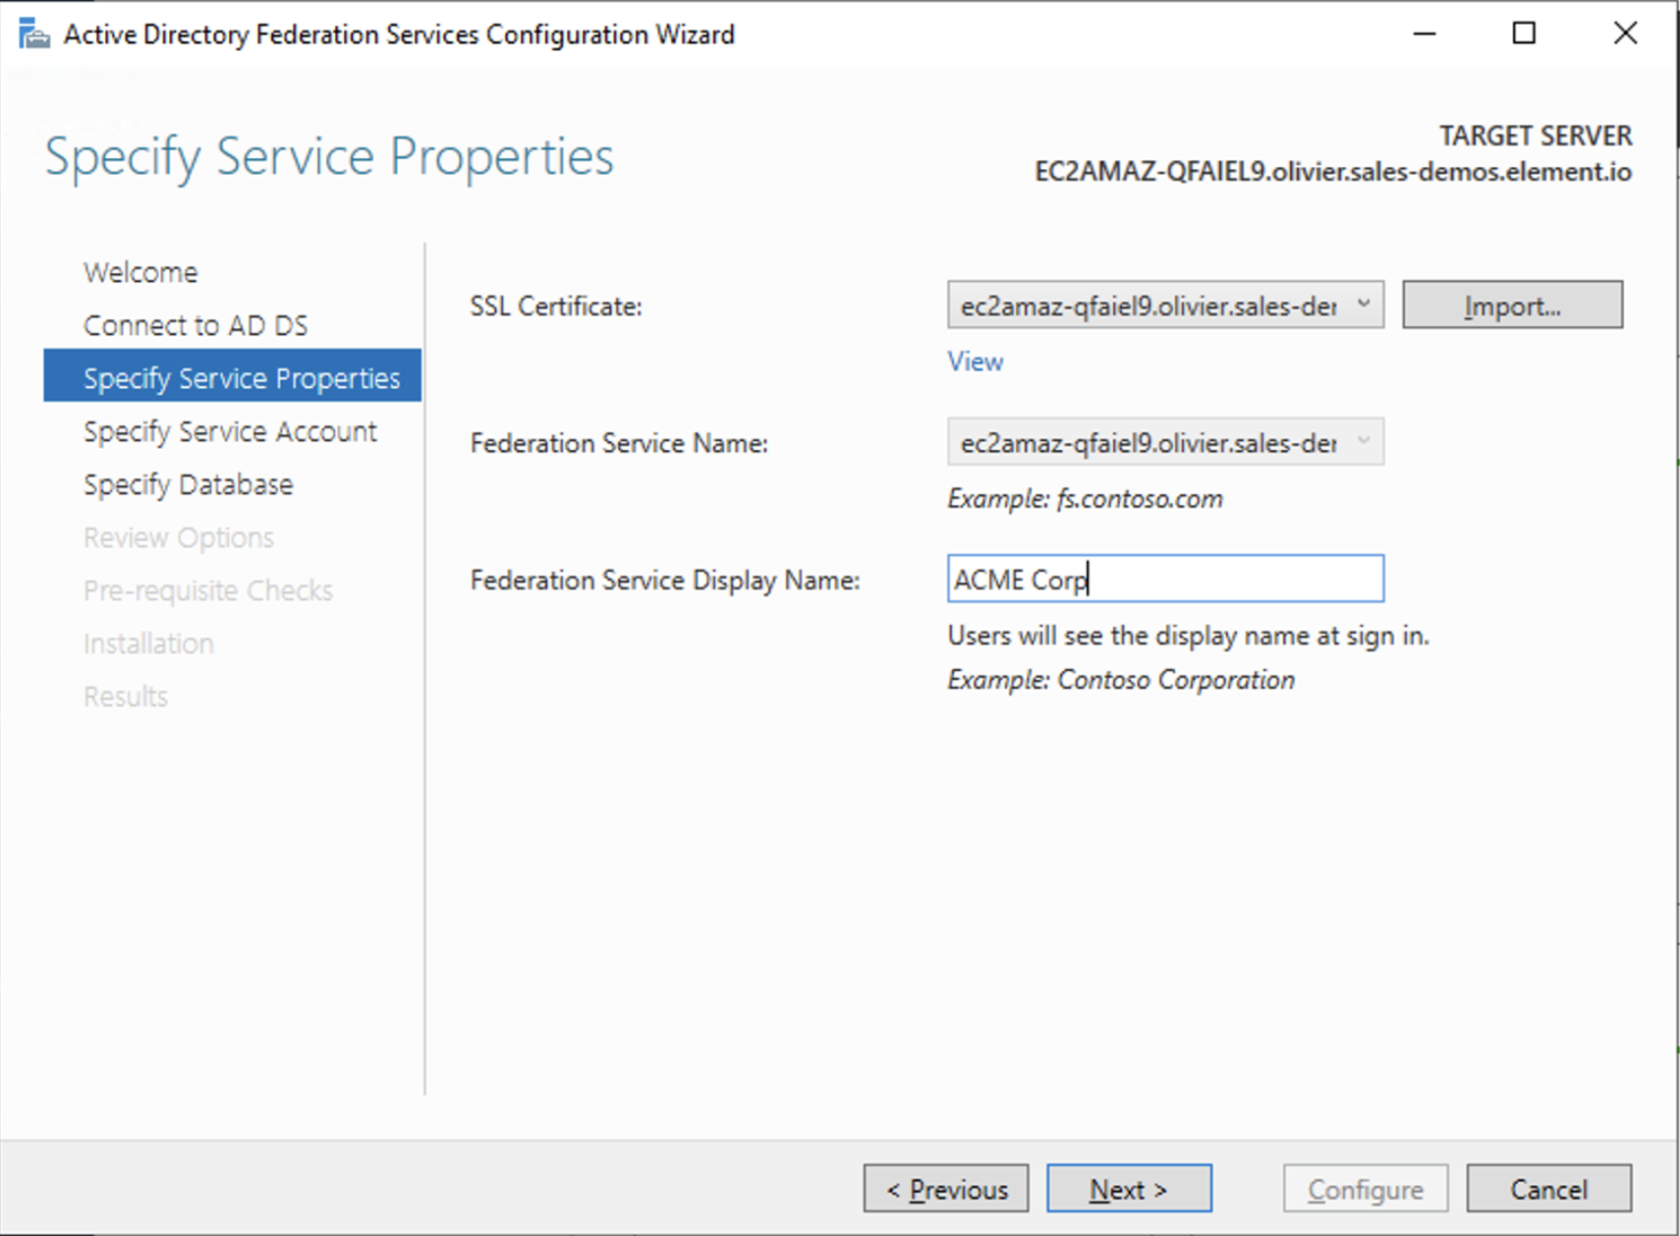](https://ems-docs.element.io/uploads/images/gallery/2023-06/screenshot-2023-06-22-at-15-59-27.png) - On the Specify Service Account page, you can either Create a Group Managed Service Account (gMSA) or Specify an existing Service or gMSA Account [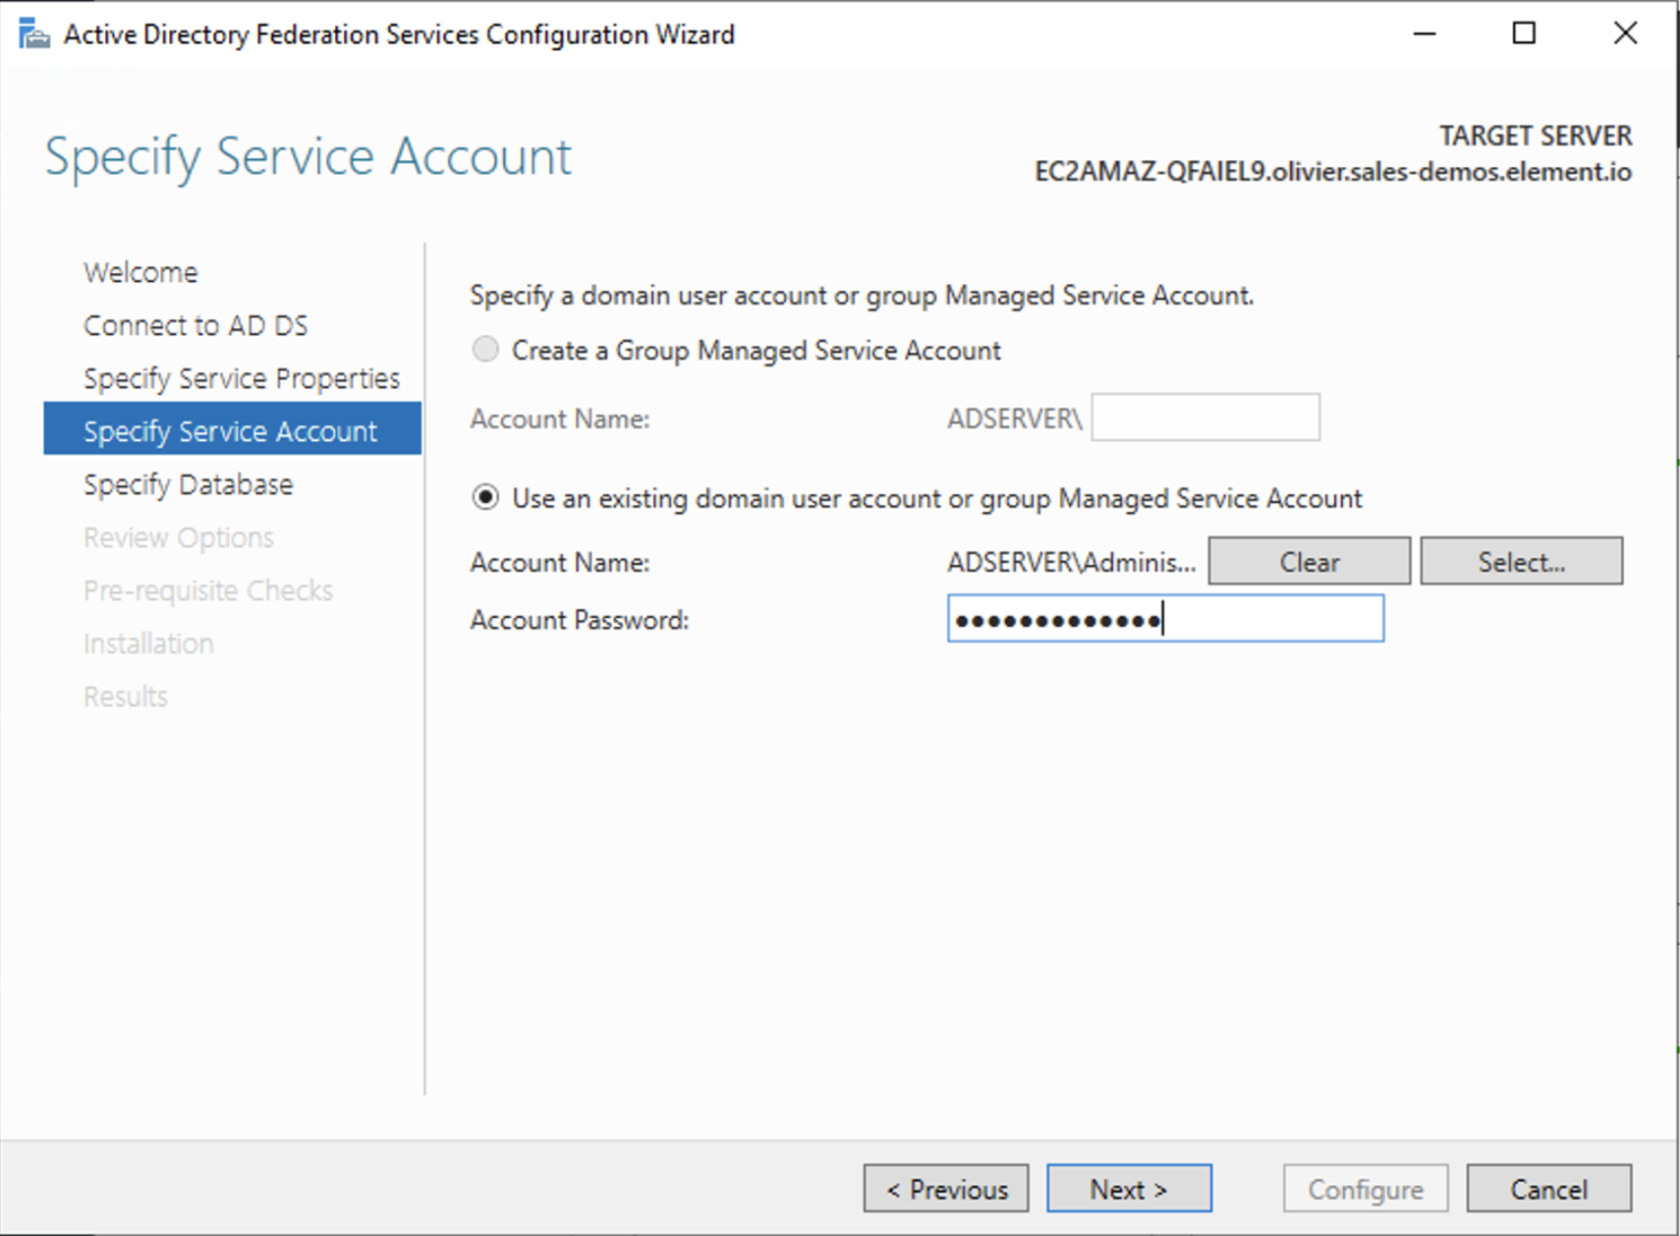](https://ems-docs.element.io/uploads/images/gallery/2023-06/screenshot-2023-06-22-at-16-04-13.png) - Choose your database [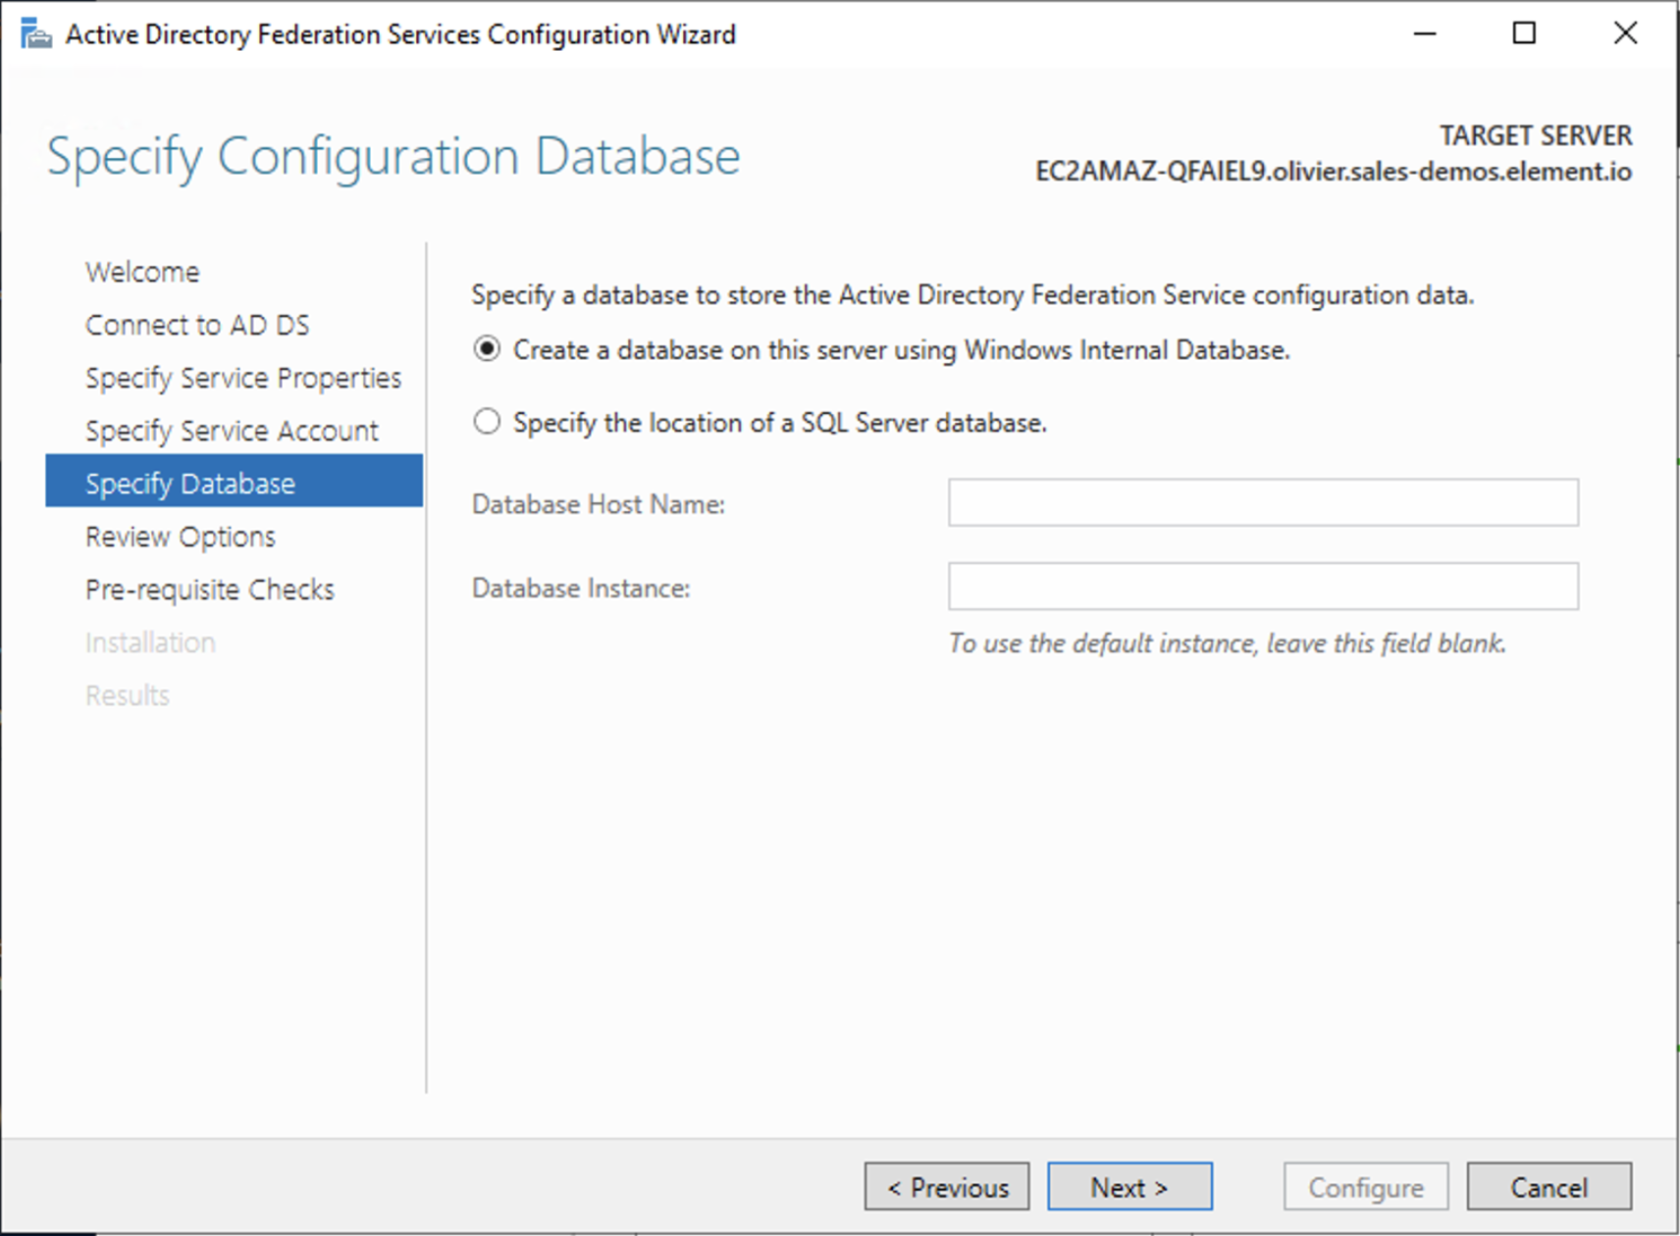](https://ems-docs.element.io/uploads/images/gallery/2023-06/screenshot-2023-06-22-at-16-05-50.png) - Review Options , check prerequisites are completed and click on `Configure` - Restart the server ##### Add AD FS as an OpenID Connect identity provider To enable sign-in for users with an AD FS account, create an Application Group in your AD FS.
To create an Application Group, follow theses steps: - In `Server Manager`, select `Tools`, and then select `AD FS Management` - In AD FS Management, right-click on `Application Groups` and select `Add Application Group` - On the Application Group Wizard `Welcome` screen - Enter the Name of your application - Under `Standalone applications` section, select `Server application` and click `Next` [](https://ems-docs.element.io/uploads/images/gallery/2023-06/screenshot-2023-06-22-at-16-39-52.png) - Enter `https://
https://login.microsoftonline.com/ Detailed information on configuring homeserver Federation including Trusted Key Servers. Previous setups may have used the Synapse Additional config. Configuration of Federation settings via Additional Config, that are in conflict with any set via the UI, will not override the UI set values. As such, we do not advise including them or any related settings within the Additional Config as they are of increased risk to causing issues with your deployment and are not supported. Setting this value higher than "1.2" will prevent federation to most of the public Matrix network: only configure it to "1.3" if you have an entirely private federation setup and you can ensure TLS 1.3 support. Uploaded certificates should be PEM encoded and include the full chain of intermediate CAs and the root CA. You can simply concatenate these files prior to uploading. We recommend also firewalling your federation listener to limit inbound federation traffic as early as possible, rather than relying purely on this application-layer restriction. This does not stop a server from joining rooms that servers not on the whitelist are in. As such, this option is really only useful to establish a "private federation", where a group of servers all whitelist each other and have the same whitelist. Configuration options relating to the deployed Element Web instance provided by ESS. All settings configured via the UI in this section will be saved to your By default, if you do not change any settings on this page, default Element Web pod CPU and Memory requirements will be added to your configuration file/s (see example below). Configuration options relating to the deployed Homeserver Admin instance provided by ESS. All settings configured via the UI in this section will be saved to your By default, if you do not change any settings on this page, default Homeserver Admin pod CPU and Memory requirements will be added to your configuration file/s (see example below). Configuration options relating to the Integrator provided by ESS. All settings configured via the UI in this section will be saved to your By default, if you do not change any settings on this page, defaults will be added to your configuration file/s (see example below). It is not advised to leave your Logging Level at anything other than the default, as more verbose logging may expose information that should otherwise not be accessible. When sharing logs, remember to redact any sensitive information you do not wish to share.
Checked
- **Attribute Map****.**
Select `URN:Oasis:Names:TC:SAML:2.0:Attrname Format:Basic` as the `Identifier`
- **Mapping****.**
Set the following mappings:
- From: `Primary Email` To: `email`
- From: `First Name` To: `firstname`
- From: `Last Name` To: `lastname`
- **Entity****.**
- **Description****.**
- **Entity ID****.** (From Azure)
- **Name****.**
- **User Mapping Provider****.**
Set the following:
- `MXID Mapping`: `Dotreplace`
- `MXID Source Attribute`: `uid`
- **Metadata URL****.**
Add the `App Federation Metadata URL` from Azure.
### Troubleshooting
#### Redirection loop on SSO
Synapse needs to have the `X-Forwarded-For` and `X-Forwarded-Proto` headers set by the reverse proxy doing the TLS termination. If you are using a Kubernetes installation with your own reverse proxy terminating TLS, please make sure that the appropriate headers are set.
# Synapse Section: Federation
Element Web is the web-based client for the Matrix communication protocol. Element Web serves as a user interface for accessing Matrix homeservers, allowing users to send messages, join rooms, share files, and participate in group chats.
deployment.yml, with the contents of secrets being saved to secrets.yml. You will find specific configuration examples in each section.Config Example
```yml
spec:
components:
elementWeb:
```
Config Example
```yml
spec:
components:
elementWeb:
k8s:
workloads:
resources:
limits:
memory: 200Mi
requests:
cpu: 50m
memory: 50Mi
```
Config Example
```yml
spec:
components:
elementWeb:
config:
# Not present if disabled
useOwnUrlForSharingLinks: true
```
Config Example
```yml
spec:
components:
elementWeb:
config:
additionalConfig: |-
"setting_defaults": {
"custom_themes": [
{
"name": "Electric Blue",
"is_dark": false,
"fonts": {
"faces": [
{
"font-family": "Inter",
"src": [{"url": "/fonts/Inter.ttf", "format": "ttf"}]
}
],
"general": "Inter, sans",
"monospace": "'Courier New'"
},
"colors": {
"accent-color": "#3596fc",
"primary-color": "#368bd6",
"warning-color": "#ff4b55",
"sidebar-color": "#27303a",
"roomlist-background-color": "#f3f8fd",
"roomlist-text-color": "#2e2f32",
"roomlist-text-secondary-color": "#61708b",
"roomlist-highlights-color": "#ffffff",
"roomlist-separator-color": "#e3e8f0",
"timeline-background-color": "#ffffff",
"timeline-text-color": "#2e2f32",
"timeline-text-secondary-color": "#61708b",
"timeline-highlights-color": "#f3f8fd",
"username-colors": ["#ff0000", ...]
"avatar-background-colors": ["#cc0000", ...]
}
}
]
}
```
Homeserver Admin is the web-based client for the Synapse Admin API. Homeserver Admin serves as a user interface for administering Synapse homeservers, allowing management of users, rooms, federation and more.
deployment.yml, with the contents of secrets being saved to secrets.yml. You will find specific configuration examples in each section.Config Example
```yml
spec:
components:
synapseAdmin:
```
Config Example
```yml
spec:
components:
synapseAdmin:
k8s:
workloads:
resources:
limits:
memory: 500Mi
requests:
cpu: 50m
memory: 50Mi
```
Config Example
```yml
spec:
components:
synapseAdmin:
# Not present if 'Use Global Setting' selected
config:
# verifyTls: useGlobalSetting
# verifyTls: force
verifyTls: disable
```
In the Integrator section you will find options to configure settings specific to the integrator which is used to send messages to external services. By default, it is unlikely you should need to configure anything on this page, unless you wish to enable the use of Custom Widgets.
deployment.yml, with the contents of secrets being saved to secrets.yml. You will find specific configuration examples in each section.Config Example
```yml
apiVersion: matrix.element.io/v1alpha2
kind: ElementDeployment
metadata:
annotations:
ui.element.io/layer: |
integrator:
spec:
components:
integrator:
```
Config Example
```yml
apiVersion: matrix.element.io/v1alpha2
kind: ElementDeployment
metadata:
annotations:
ui.element.io/layer: |
integrator:
k8s:
workloads:
_value: defaulted
spec:
components:
integrator:
k8s:
workloads:
resources:
appstore:
limits:
memory: 400Mi
requests:
cpu: 50m
memory: 100Mi
integrator:
limits:
memory: 350Mi
requests:
cpu: 100m
memory: 100Mi
modularWidgets:
limits:
memory: 200Mi
requests:
cpu: 50m
memory: 50Mi
scalarWeb:
limits:
memory: 200Mi
requests:
cpu: 50m
memory: 50Mi
```
Config Example
```yml
spec:
components:
integrator:
config:
# Not present if 'false' is selected
# enableCustomWidgets: false
enableCustomWidgets: true
```
Config Example
```yml
spec:
components:
integrator:
# Not present if 'Use Global Setting' selected
config:
# verifyTls: useGlobalSetting
# verifyTls: force
verifyTls: disable
```
Config Example
```yml
spec:
components:
integrator:
config:
log:
# Not present if left at default 'info'
level: info
# level: debug
# level: warning
# level: error
```
Config Example
```yml
spec:
components:
integrator:
config:
log:
# Not present if left at default 'false'
# structured: false
structured: true
```
Config Example
```yml
spec:
components:
integrator:
config:
postgresql:
database: integrator
```
Config Example
```yml
spec:
components:
integrator:
config:
postgresql:
host: db.example.com
```
Config Example
```yml
spec:
components:
integrator:
config:
postgresql:
# port not present when left as default 5432
port: 5432
```
Config Example
```yml
spec:
components:
integrator:
config:
postgresql:
# sslMode not present when left as default `require`
sslMode: require
# sslMode: disable
# sslMode: no-verify
# sslMode: verify-full
```
Config Example
```yml
spec:
components:
integrator:
config:
postgresql:
user: test-username
```
Config Example
- `secrets.yml`
```yml
apiVersion: v1
kind: Secret
metadata:
name: integrator
namespace: element-onprem
data:
postgresPassword: dGVzdC1wYXNzd29yZA==
```
Config Example
```yml
spec:
components:
integrator:
config:
jitsiDomain: https://jitsi.example.com
```